background image

Always follow the proper starting procedure described below.

9.2.1 Starting Cold Engine: 

    1. Fit the Emergency Cease Fire. 
    2. Turn the fuel tap to ON position. 
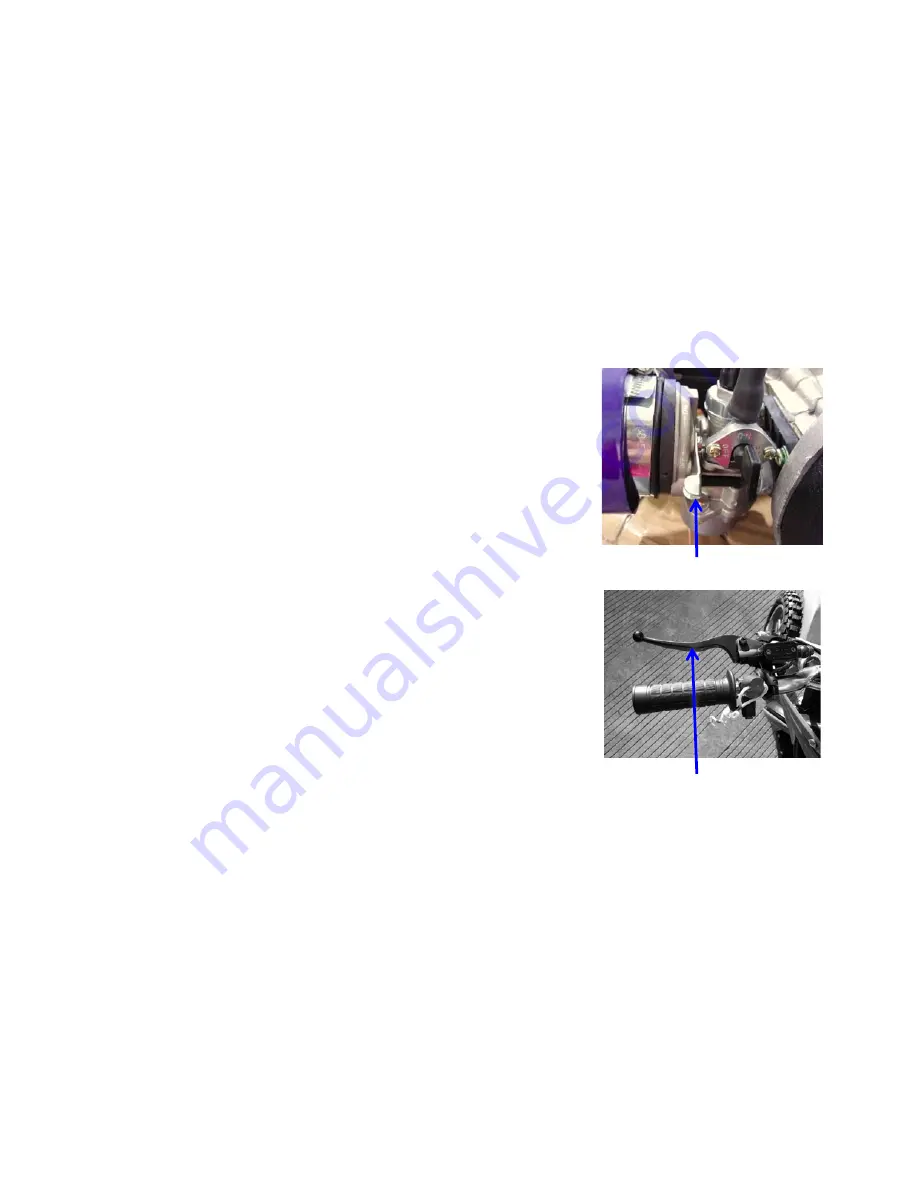
    3. Press choke lever to ON position.
    4. Pull the starter rope lightly until you feel resistance, then pull briskly and
return gently. Repeat about 3 times until engine tries to run.
    5. After the engine starts, slightly operate the throttle grip to ensure that
the engine reaches the stable idling speed. When engine is running turn choke 
to OFF position.
    6. Before riding the bike, make sure the engine is warmed up.

Choke Lever

9.2.2 Starting Warm Engine: 

    1. Fit the Emergency Cease Fire. 
    2. Turn  the fuel tap to ON position.
    3. Press choke lever to OFF position. Pull the starter rope lightly
until you feel resistance, then pull briskly. Starting may require several times of
pulling the starter rope. 

NOTE


Remember to hold the brake lever during the start to avoid sudden 

movement of the bike. 

Left Brake Lever


Slightly opening the throttle may aid starting when cold.

· 9 ·

Содержание Mini Moto-X

Страница 1: ...Imported by SRGS Pty Ltd 751 Gympie Road Lawnton Brisbane QLD 4501 MINI MOTO X BIKE Read this Manual thoroughly before riding Always wearing protetive clothing while riding...

Страница 2: ...g this Mini Moto X Bike This manual includes important safety information It covers the main data basic structure Products are always subject to further improvement which will cause some difference be...

Страница 3: ...eipt Model of product Frame Engine number of product You will be advised where to take the product to receive your service Provided the issue is a warranty one repairs will be free of charge If not yo...

Страница 4: ...will need your receipt or proof of purchase Additional information may be requested of you to process your claim Should you not be able to provide proof of purchase with a receipt or a bank statement...

Страница 5: ...ng System Page 18 8 Tyre Page 7 21 Checking Brake System Page 19 9 Operation Guide Page 8 22 Inspection of Front Suspension Page 19 9 1 Pre ride Inspection Page 8 23 Transmission System Page 20 9 2 St...

Страница 6: ...ds or highways If it is necessary to cross a public road please get off this bike and push it across 5 Do not operate this bike under the influence of alcohol or drugs which can impair judgment and re...

Страница 7: ...servicing and non original parts may cause the bike to fail or to become unsafe or illegal Genuine accessories have been specifically designed and tested on this bike Don t attempt to change them wit...

Страница 8: ...ine Code in the space provided below This can assist in the unfortunate event of the bike being stolen FRAME NUMBER ENGINE CODE FRAME NUMBER ENGINE CODE NOTES The Frame Number is stamped on right side...

Страница 9: ...with Allen key see photo 2 Put the Handlebar on the clamp and put the top cap on then screw the bolts in Handlebar Clamp Bolts 3 Ensure the brake levers face the front of the bike adjust the handlebar...

Страница 10: ...firmly fitted to the riders wrist or belt loop by the rope at ALL TIMES IMPORTANT This device is designed to kill the engine in the event the rider falls off the bike This device should be firmly fitt...

Страница 11: ...under certain conditions Always wear protective equipment when mixing or filling the fuel tank Breathable Hose Refuel in a well ventilated area with the engine stopped Do not smoke or allow flames or...

Страница 12: ...acement of damaged or punctured tyres and or inner tubes WARNING Do not attempt to patch a damaged tyre or inner tube otherwise wheel balance and tyre reliability may be impaired Improper tyre inflati...

Страница 13: ...ontact service agent 3 Tyres check condition and pressure 4 Throttle operation check for smooth opening and full closing in all steering positions check for throttle grip free play 5 Fasteners check t...

Страница 14: ...hat the engine reaches the stable idling speed When engine is running turn choke to OFF position 6 Before riding the bike make sure the engine is warmed up Choke Lever 9 2 2 Starting Warm Engine 1 Fit...

Страница 15: ...ntrol Throttle Grip Right Brake Lever 10 THROTTLE OPERATION 1 Check for smooth rotation of the throttle grip from the fully open to the fully closed position at both full steering positions 2 Measure...

Страница 16: ...NG WARNING Review General Safety before you ride 1 After the engine has been warmed up the bike is ready to ride 2 While sitting on the bike hold the handlebar steady and kick off the kickstand CAUTIO...

Страница 17: ...rcycle Avoid spraying high pressure water at the following areas Wheel Hubs Carburetor Brake Lever Air Cleaner Muffler Outlets Fuel Tank Bottom Drive Chain and Seat Bottom 1 Wash the bike completely w...

Страница 18: ...ained or stored and where the fuel tank is refueled 3 Remove the spark plug and add 15 20ml engine oil into the cylinder pull the pull starter to scatter evenly the oil inside the cylinder and then re...

Страница 19: ...PLUG 17 1 Check and Replace 1 Disconnect the spark plug cap from the spark plug 2 Clean any dirt from around the spark plug base Remove the spark plug using the plug wrench in the tool kit 3 Inspect...

Страница 20: ...the spark plug cap Center electrode Side electrode NOTE Replacement Spark Plug LD BM6A Torch L6C or NGK BM6A 17 2 IMPORTANT NOTES 1 The Spark Plug must be tightened When the engine is running the max...

Страница 21: ...rner 3 Remove the cover of air cleaner and please mind the direction of core 4 Shake air cleaner to remove dirt excessive dust may be removed with low pressure compressed air from inside the air clean...

Страница 22: ...ed one can be used Idle Speed Adjustment Screw 3 Turn the Adjustment Screw clockwise will increase idle speed and decrease it by turning counter clockwise 4 If difficulty is experienced set the screw...

Страница 23: ...isc brake at front and rear Generally adjustment is not necessary The Left brake lever is for rear brake and the Right brake lever is for front brake Left Brake Lever Right Brake Lever Rear Disc Brake...

Страница 24: ...e liquid must not be in good condition 2 If the lever feels soft or spongy there is air inside the brake system In this case air should be discharged from the brake system before riding the bike other...

Страница 25: ...eded refer to Chain Adjustment If washing the chain in solvents soak in oil for 30 minutes before using It is recommended that the chain is lubricated using a chain lube before and after each ride as...

Страница 26: ...unusually dusty or wet conditions bike service should be performed more regularly than specified in the schedule Maintenance work should be performed by properly trained and equipped technicians I IN...

Страница 27: ...heck replace spark plug Return to service Agent for repair Choke is in the on position Check top up fluid level and or brake lines for fracture leaking Air cleaner blocked Clean replace air cleaner Su...

Страница 28: ...l Tank Fuel Tank Cap Throttle Emergency Cease Fire Brake Cylinder Brake Lever Muffler Suspension Fork Rear Brake Caliper Front Wheel Chain Tensioner Rear Wheel Pull Starter Handle Engine Exhaust Pipe...

Страница 29: ...Type Length 1220mm Transmission Chain CDI Height 2 stroke Single Cylinder Air Cooled 845mm Fuel Tank Capacity Compression Ratio Ignition Mode Width 2 4N m Wheelbase 8 0 1 Unit Weight Rear Brake Type...

Страница 30: ...29 ELECTRICAL 25...

Отзывы: