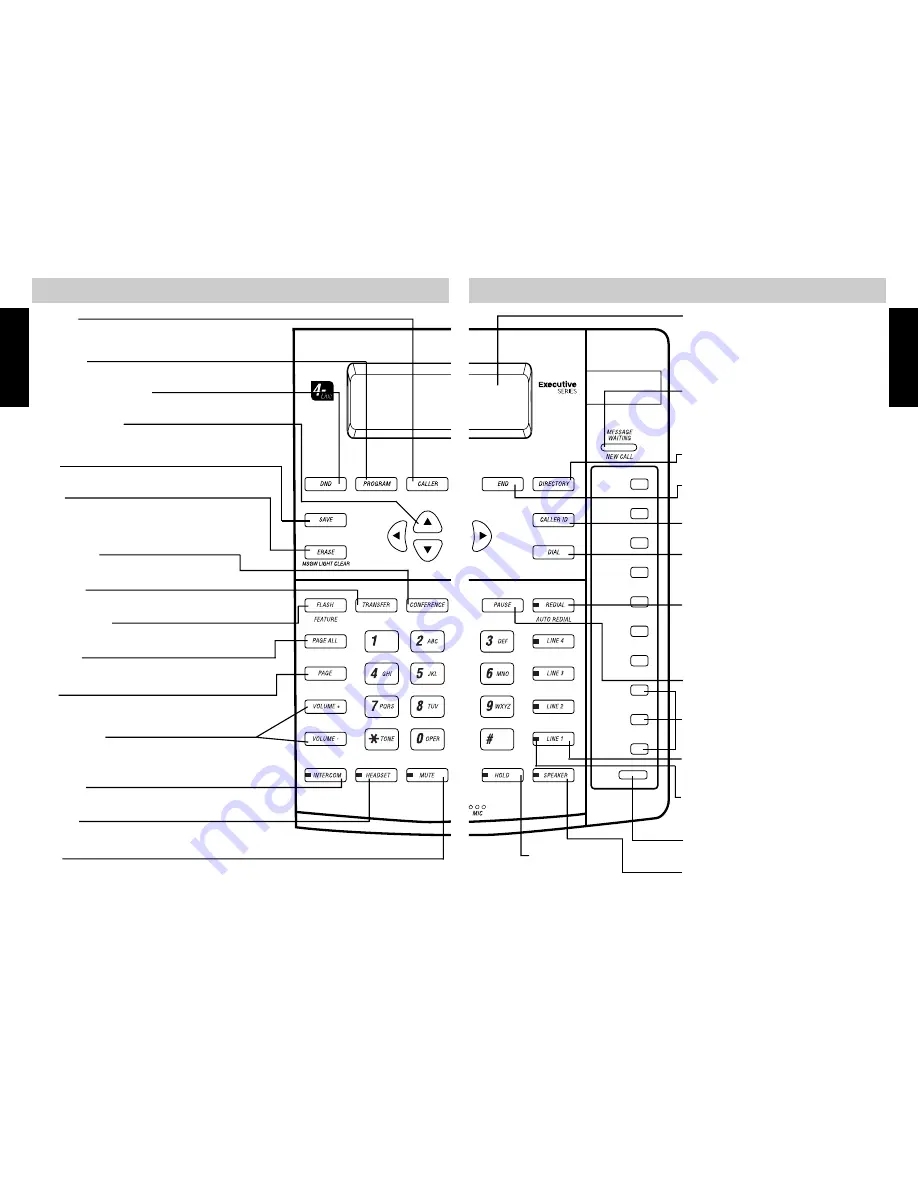
SBC SBC-420 Скачать руководство пользователя страница 4

4

5

420 KEY FEATURES

420 KEY FEATURES

INITIAL SETUP

INITIAL SETUP

VOLUME KEYS

Adjust the handset, headset, speakerphone or ringer
volume levels, page 22.

REDIAL/LAST NUMBER REDIAL

Automatically dials the last number called,
page 25.

AUTO REDIAL

Automatically dials the last number called up
to 10 times at 30 second intervals, page 25.

CALLER

Used to view Caller ID information when more than
one line is ringing.

CALLER ID

Accesses the CALLER ID database, page 31.

CONFERENCE

Initiates 3-Way conference calls, page 26.

NAVIGATION KEYS

Used to navigate CALLER ID records, DIRECTORY
records and Programming options.

DIRECTORY

Accesses the DIRECTORY database, page 32.

DIAL

Used to dial CALLER ID and DIRECTORY
numbers, pages 31-33.

DND - DO NOT DISTURB

Silences the call and intercom ringers, page 26.

END

Used to exit a mode.

ERASE

Used to erase Caller ID or Directory records.

MSGW LIGHT CLEAR

Used to clear MESSAGE WAITING indicator.

FLASH/FEATURE

Used to access telephone company features, page 25.

HEADSET

Answer or make calls without lifting the handset, page 36.

HOLD

Places or releases
a call on hold,
page 24.

INTERCOM

Call other 420 stations without using an outside line.

LCD (BACKLIT)

Large multi-function Liquid Crystal
Display indicates telephone status and
displays CALLER ID and DIRECTORY
records, page 6.

LINE SELECT KEYS

Allows manual selection of lines 1, 2, 3 or 4,
page 23.

2-COLOR LINE STATUS INDICATORS

Shows status of telephone lines at a glance,
page 22.

MUTE

Turns off the 420 microphone. The receiver stays on
and calling party can still be heard, page 25.

NEW CALL/MESSAGE WAITING
INDICATOR

Indicates new Caller ID data or new
telephone company voice mail, page 21.

PAUSE

Allows a pause to be inserted in a dialing
sequence, page 32.

PAGE

Page individual 420 stations, page 28.

PAGE ALL

Page all 420 stations simultaneously, page 27.

PROGRAM

Used to enter the program mode, page 10.

TRANSFER

Calls can be transferred from one 420 extension to another.

SPEAKER(PHONE)

Answer or make calls hands free, page 23.

SAVE

Used to program or change settings.

FEATURE KEYS

Store multi-function autodial numbers, page 35.

SHIFT

Programs and dials Feature Keys, page 35.

Содержание SBC-420

Страница 1: ...5156 2006 Grace DigitalInc All rights Reserved SBC is a trademark of AT T Knowledge Ventures L P Licensed to Grace DigitalInc In case of difficulities visit our service center at www sbctelephones co...

Страница 2: ...Reminder 19 Programming Area Codes 19 Resetting the 420 20 TELEPHONE OPERATION New Call Message Waiting Indicator 21 Voice Mail 21 Turning the Message Waiting Indicator Off 21 Line Status Indicators...

Страница 3: ...s 32 Deleting an Individual Caller ID Record 32 Deleting All Caller ID Records 32 DIRECTORY Directory 32 Creating a New Directory Entry 32 Transferring a Caller ID Record to the Directory 33 Locating...

Страница 4: ...tures page 25 HEADSET Answer or make calls without lifting the handset page 36 HOLD Places or releases a call on hold page 24 INTERCOM Call other 420 stations without using an outside line LCD BACKLIT...

Страница 5: ...7...

Страница 6: ...his process will take about 8 seconds 5 The initial display will appear The default extension ID is 22 CONNECTING THE TELEPHONE cont 01 01 01 01A EXT 22 CID 000 000 NOTE If you are using a single cabl...

Страница 7: ...d advance to AM PM 11 Use the buttons to select AM or PM 12 Press SAVE to accept your settings and advance to DAY OF WEEK 13 Use the buttons to select the correct day 14 Press SAVE to accept your sett...

Страница 8: ...o enter 5 Use the buttons to select the ringer type As you scroll through the types a sample of the actual ringer will be heard L1 RINGER TYPE Type 2 Programmed L1 RINGER TYPE Type 2 select SAVE 6 Pre...

Страница 9: ...e button to enter 5 Use the buttons to turn the line on or off L4 USAGE Off select SAVE 6 Press SAVE to accept the setting 7 The LINE IN USE INDICATOR for the line will stop flashing and will not reli...

Страница 10: ...in the PROGRAM mode press the button until the following screen appears LINE GROUP select enter LINE GROUP L04 select SAVE 2 Press the button to enter 3 Use the buttons to change the LINE GROUP LINE G...

Страница 11: ...6 sec select SAVE 2 Press the button to enter FLASH TIME 0 8 sec select SAVE FLASH TIME 0 8 sec Programmed 3 Use the buttons to change the setting 4 Press SAVE to accept the setting CHANGING HOLD REMI...

Страница 12: ...oice Mail PROGRAMMING TELEPHONE TURNING THE MESSAGE WAITING INDICATOR OFF The light and display indication can be turned OFF manually in the PROGRAM MODE MSGW LIGHT select enter L1 MSGW LIGHT select e...

Страница 13: ...the line is in use the line will not be seized RECEIVING TELEPHONE CALLS If you subscribe to Call Waiting and a call is received on a line in use for another call you will hear a beep to indicate the...

Страница 14: ...A CALL ON HOLD 1 Press HOLD 2 The LINE INDICATOR will flash regular to indicate that the call is on Hold TO RELEASE A CALL ON HOLD 1 Press the flashing LINE button or pick up another phone on the sam...

Страница 15: ...you to bridge a call between any two lines to establish a 3 way conference call 1 Initiate the first call 2 Place the first call on HOLD 3 Initiate the second call 4 Press CONFERENCE You will now be t...

Страница 16: ...ion 1 Press PAGE to answer You can use the speakerphone headset or handset to converse 2 To end simply hang up NOTE Only one extension can answer a system wide page at a time PAGING A SINGLE EXTENSION...

Страница 17: ...420 between the first and second ring NOTE If you answer a call before the second ring the Caller ID information might not be displayed Call Waiting Caller ID records will not be displayed or logged d...

Страница 18: ...RD 1 Press CALLER ID 2 Locate the desired Caller ID record using the buttons 3 Press ERASE 4 The screen will prompt ERASE erase 5 Press ERASE to confirm or END to abort DIRECTORY The 420 will store up...

Страница 19: ...USING THE FEATURE KEYS 1 Go off hook 2 Press the desired FEATURE key To dial the second memory press SHIFT followed by the FEATURE key 6 Enter the telephone number using the numeric keypad 7 Press the...

Страница 20: ...ure the coiled handset cord is plugged into the HANDSET jack not the HEADSET jack See pg 7 Intercom Paging Signal Not Received Make sure you have programmed your extension number correctly Line 1 must...

Страница 21: ...ur phone These devices can interfere with the system s data links Operation During a Power Failure A 9 volt battery must be installed for power failure operation See pg 36 No Call Waiting Caller ID In...

Страница 22: ...Off select SAVE DELAY RING Off Programmed DELAY RING 02 sec select SAVE DELAY RING 02 sec Programmed Maximum Delay Ring 30 sec PROGRAMMING TREE L3 L4 L3 L4 MSGW LIGHT select enter L1 MSGW LIGHT select...

Страница 23: ...r LINE GROUP L04 select SAVE LINE GROUP L04 Programmed LINE GROUP L15 select SAVE LINE GROUP L15 Programmed LINE GROUP PRV select SAVE LINE GROUP PRV Programmed AUTO MUTE select enter AUTO MUTE On sel...

Страница 24: ...problem with this unit the telephone company may ask you to disconnect this equipment from the network until the problem has been corrected or you are sure that the equipment is not malfunctioning 6 R...

Страница 25: ...t Amplification 0dB to 12dB 4 levels The unit is hearing aid compatible Design and specifications are subject to change without notice Feature Specifications UZ635AT Caller ID with Call Waiting Type 2...

Страница 26: ...roduct damage 6 Slots and openings in the cabinet and the back or bottom are provided for ventilation To protect it from overheating these openings must not be blocked or covered by placing the produc...

Отзывы: