background image

12

Enter the desired contrast and press [Start].

100 is maximum contrast and 1 is minimum contrast.

Password Protection

SawGear can be secured by a password to prevent its use by unauthorized persons.

The following steps show how to activate password protection.

Once a password has been set, SawGear cannot be operated without it, so DON'T LOSE IT!

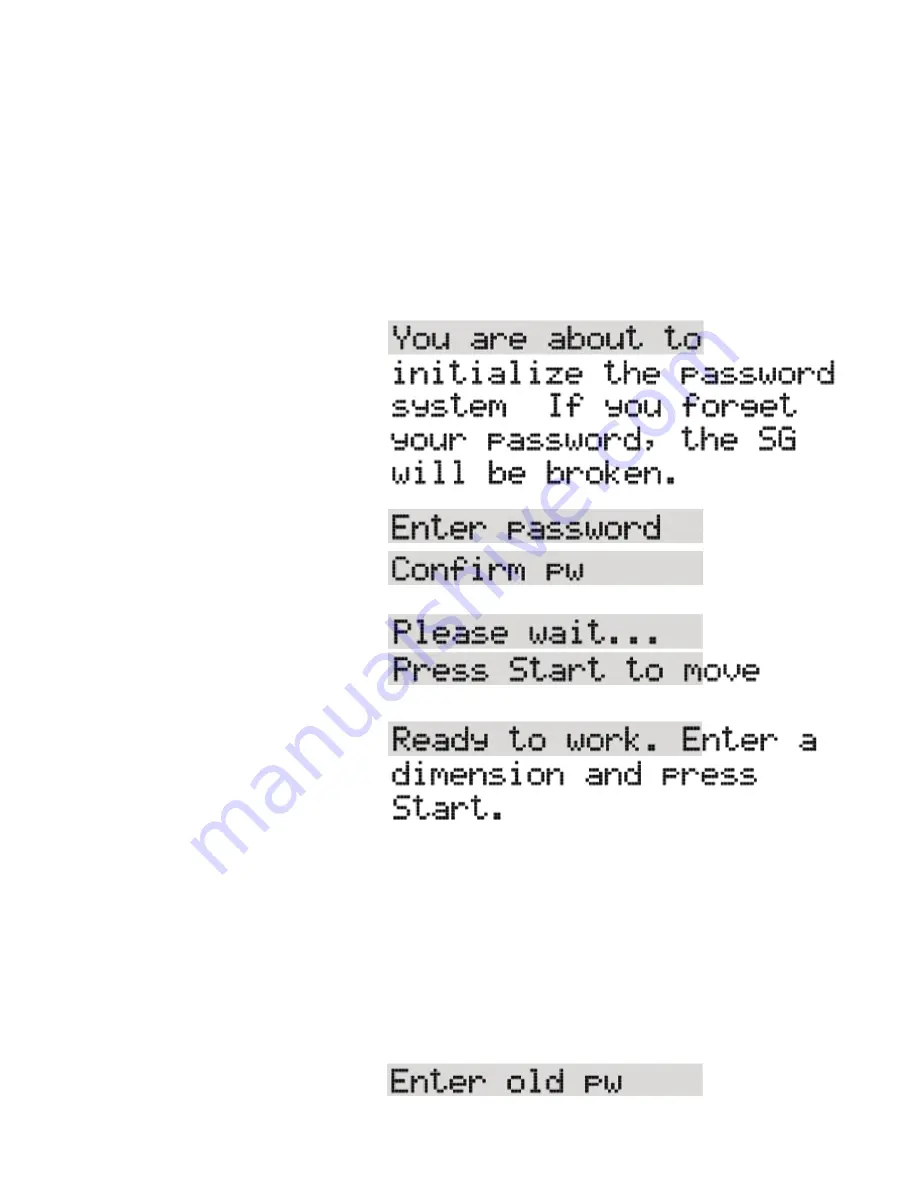
The messages shown below SCROLL across the screen if longer than the LCD's 16     

character width.

1. Unplug SawGear from AC power.

2. While holding down the [/] key, 

plug SawGear into AC power.

3. Press [Start].

4. Enter a password consisting of 4 

to 8 digits, and press [Start].

5. Re-enter password and press 

[Start].

6. Press [Start].

SawGear homes itself and then scrolls:

SawGear is now ready to use!

The password MUST be entered whenever SawGear is powered up

Change the Password

When password protection has been set, the password can be changed.

The following steps show how to change the password.

Once a password has been set, SawGear cannot be operated without it, so DON'T LOSE IT!

The messages shown below SCROLL across the screen if longer than the LCD's 16  

character width.

1. Unplug SawGear from AC power.

16

Содержание SGTAB04

Страница 1: ... 2017 TigerStop LLC MANUAL MANUAL ...

Страница 2: ...T WARNING TigerStop Products must be installed in accordance with all local state and federal regulations Only personnel properly trained in the safe design and installation of automation machinery and related power equipment should install TigerStop Products onto other equipment to ensure a safe and proper work station TigerStop Products should not be operated without proper training both in the ...

Страница 3: ...ootwear safety glasses ear protection and a dust mask Use only 3 wire extension cords that have 3 prong grounding type plugs and 3 pole receptacles that accept the tools plug for 120VAC Use only 5 wire cords and plugs when using 3 phase DO NOT operate this or any machine under the influence of drugs or alcohol Do not open motor compartment or controller keypad DC Voltage with potentially FATAL amp...

Страница 4: ...12 Change the Password 12 Deactivate the Password 13 Setting the Distance Between the Stop and the Blade 14 Calibrate Straight Cut Distance 14 Calibrate Miter Cut X Distance 14 Calibrate Miter Cut Y Distance 15 Calibrate Miter Cut Z Distance 15 Calibrate Increment Distance 15 Straight Cutting 15 Basic Operation 15 45 Miter Cutting 15 Custom Miter Cutting 16 Using Crown Miter Pro 17 Increment 20 Sa...

Страница 5: ...5 ...

Страница 6: ...2 6 ...

Страница 7: ...he desired position relative to the saw 3 When SawGear is facing front there is an angled channel running along the full length of the beam at the bottom Pivot SawGear so the curled front edge of both SawGear bench mount brackets fits into this channel 4 Let SawGear lie flat against the surface of both brackets so the beveled back lip of the Saw Gear beam can be secured by the locking knobs 5 Turn...

Страница 8: ...ill contact you by phone to give you the enable code within the hour during regular business hours 360 448 6102 Mon Fri 6am 4pm PST West Coast or the next business day if faxed after 4 00 P M Enable Your SawGear To use your SawGear you have to enable it Your SawGear warranty begins on the day that your SawGear is enabled 1 Power SawGear ON using the button on the keypad 2 The screen displays SN En...

Страница 9: ...in your saw Check Your Pivot Point This example assumes that SawGear is on the right of the saw and that the observed pivot point is on the right side of the saw blade You can check for accuracy by comparing the straight cut and the left and right miter cuts 1 End trim a sample board so it has a clean square right end 2 Using a tape measure mark 8 from the right end with a pencil and square 3 Line...

Страница 10: ... to adjust the fence to improve pivot point alignment Pivot point too far BACK Pivot point too far FORWARD Using SawGear to Adjust Pivot Point If the back fence of the saw cannot be moved you can adjust the pivot point offset using SawGears pivot point adjustment system 1 Press the D key then press the W key 2 If SawGear calibration is necessary press Stop and calibrate as usual 3 If calibration i...

Страница 11: ...e end against the SawGear Press Start key 7 Swing your miter saw right to 45 degrees Cut the piece and then measure the piece from the back edge Enter this dimension and press Start key SawGear will return to the main screen Pivot Point is now set 11 ...

Страница 12: ...r subtracts from current position by a given amount List List stores dimensions for later use D Calibrate sets the distance from the saw blade Also used to set or kill sleep mode STOP Stop halts movement immediately Start Start accepts an entered dimension and causes movement Clr Clear backs up and erases one digit at a time to correct a data entry error Also used to clear a cut length Decimal is ...

Страница 13: ... blink back and forth Switch between Inches and Metric Press then press 1st Power Up The following routine is followed only the first time SawGear is used or whenever the interface language measuring system saw side or working length must be changed The messages shown below SCROLL across the screen if longer than the LCD s 16 char acter width 1 Plug into AC power Press Soft Start 2 Select language...

Страница 14: ...r is now ready to use Repeat a 1st Power Up If you need to change the interface language the measurement system or the saw location or if you are moving the SawGear power head to a different measuring bar you must perform a 1st power up Unplug the machine and plug it in again while HOLDING DOWN the STOP key While still HOLDING DOWN the STOP key press the soft start key until the active screen disp...

Страница 15: ...ver SawGear has to be powered on Set Sleep Mode SawGear will automatically power OFF after ten minutes of inactivity This puts it in sleep mode Start it up again using the soft start key Sleep mode can be turned off or the length of time before going into sleep mode can be changed 1 Press and then 2 Press 0 to turn sleep mode OFF and Start to save the setting Your SawGear will never automatically ...

Страница 16: ...ower 2 While holding down the key plug SawGear into AC power 3 Press Start 4 Enter a password consisting of 4 to 8 digits and press Start 5 Re enter password and press Start 6 Press Start SawGear homes itself and then scrolls SawGear is now ready to use The password MUST be entered whenever SawGear is powered up Change the Password When password protection has been set the password can be changed ...

Страница 17: ...rd When password protection has been set it can also be turned off The following steps show how to deactivate password protection The messages shown below SCROLL across the screen if longer than the LCD s 16 character width 1 Unplug SawGear from AC power 2 While holding down the key plug SawGear into AC power 3 Enter the old password and press Start 4 Press Start Start 5 Press Start Start again Th...

Страница 18: ...3 Between stop and saw blade at 45 angle miter Y distance 4 Between stop and saw blade at 45 angle miter Z distance 5 Between stop and saw blade stored increment Calibrate Straight Cut Distance 1 Cut a sample board at least 12 inches long 2 Measure the cut board and press D The LCD screen scrolls 3 Enter the actual length of the sample piece and press Start to return to the ready screen Calibrate ...

Страница 19: ...nd press D Z 3 Enter the actual Z length of the sample piece and press Start to return to the ready screen Calibrate Increment Distance 1 Press D 2 Enter the length of the desired increment and press Start to return to the ready screen Straight Cutting SawGear has been set up on a chop saw or miter saw and has been homed and is now ready to run SawGear can be used in Foot Mode or in Metric Mode Ba...

Страница 20: ... press Start SawGear moves to a length accounting for the 45 angle of the two miter cut ends 7 Move your piece to the stop swing the saw to the left set it at 45 make the cut and remove the piece 8 Swing the saw to the right set it at 45 and trim off the residual miter from the previous cut 9 Press Z to set the length of the right stile enter the interior dimension of the casing and press Start Sa...

Страница 21: ...vious cut 6 Press Y to set the length of the header enter the interior dimension of the casing and press Start SawGear moves to a length accounting for the 45 angle of the two miter cut ends 7 Move your piece to the stop swing the saw to the left set it at 45 make the cut and remove the piece 8 Swing the saw to the right set it at 45 and trim off the residual miter from the previous cut 9 Press Z ...

Страница 22: ...ro Once we have a list compiled we can start using the system W Key The W key is used to set the width of the molding X Key In Crown Miter Pro mode the X key acts as the first angle of your part Press the X key and the following screen will display A is the angle S is the saw angle you will need to set Enter the first angle of the piece you want to cut then use the increm key to select if this is ...

Страница 23: ...ee for Left or for Right This will tell you which direction to set the saw angle Once the saw is set press Start and SawGear will move to the proper length for the cut Example of work flow 1 Press X Enter the first angle and use the increm key to select inside or outside corner From table 1 above we can see its 45 and its an outside corner Once the angle is entered SawGear will display the angle a...

Страница 24: ... SawGear lets you save dimensions you are working with by storing up to 9 lengths in each of 10 cut lists The messages shown below SCROLL across the screen if longer than the LCD s 16 character width SawGear is in Foot mode for these examples 1 Press List 2 Enter 5 Or any number from 0 to 9 The screen displays List followed by the number you entered If this is NOT the list number you want exit by ...

Страница 25: ...the dimensions will be saved 7 Press Start to advance to the next line in the cut list Enter as many as 9 different dimensions into a list 8 Press STOP to exit a list Entering Feet Inches and Fractions The following examples show how to enter dimensions into SawGear and how it interprets the data SawGear is in Foot mode for these examples 1 Enter 6 2 Press Start SawGear moves to position at 6 inch...

Страница 26: ...tion at 6 feet RULE Any number in whole feet with neither inches nor fractions must be followed by Ft oth erwise the number will be interpreted as Inches DISPLAY If a dimension is entered in feet and no inches 0in will ALWAYS display at the end of the number when at position Largest Number Display The LCD display has 16 characters available which limits the maximum number SawGear is in Foot mode f...

Страница 27: ...at the end of the number when at position 7 Enter 6 Ft 8 Press Start SawGear moves to position at 6 feet RULE Any number in whole feet with no inches must be followed by Ft otherwise the number will be interpreted as Inches DISPLAY If a dimension is entered in feet and no inches 0 0in will ALWAYS display at the end of the number when at position Largest Number Display The LCD display has 16 charac...

Страница 28: ...In and keys are disabled 1 Enter 1 1 1 8 2 Press Start SawGear moves to position at 111 8 millimeters RULE When in Metric mode SawGear assumes every dimension is in millimeters Largest Number Display The LCD display has 16 characters available which limits the maximum number SawGear is in Metric mode for this example The number of millimeters is related to SawGear working length Entering Negative ...

Страница 29: ...mum limit SawGear is in Foot mode for this example 1 Enter 2 4 4 and press Start SawGear assumes inches and displays an error message Then it quickly returns to the ready screen and displays the actual position waiting for your valid input 2 Enter any dimension that is not MORE than SawGear s maximum limit and press Start to move Too Small Error You cannot enter a dimension at the SawGear control ...

Страница 30: ...y 0 03 Or vice versa Start through the other options these include throttles and scale throttles are 300 inches and 8000 inches speed is 25 ips scale defaults to 3 047 inches but you musst allow it to float as you change the working length Now it moves to the back and says ready to work Calibrate short Cut long Repeat if necessary 30 Scaling Instructions Calibration adjusts the screen position to ...

Страница 31: ... for incredible stability in only a matter of minutes of set up time Each leg snaps into place and is height adjustable using the small handle located at the center of the leg SawGear table legs are simple to use and functional The legs are constructed out of thick gauge steel for durability and longevity in any industrial or jobsite environment ...

Страница 32: ...12909 NE 95th Street Vancouver WA 98682 2426 1 360 254 0661 sales tigerstop com TigerStop B V Holland 31 546 575 171 info tigerstop nl www tigerstop com FIND US ONLINE AT 9 20 2017 ...

Отзывы: