background image

nova250 Touch Panel

Start screen

7001064003  T1

Sauter Systems

9

2

2 Start screen

2.1

Main menu

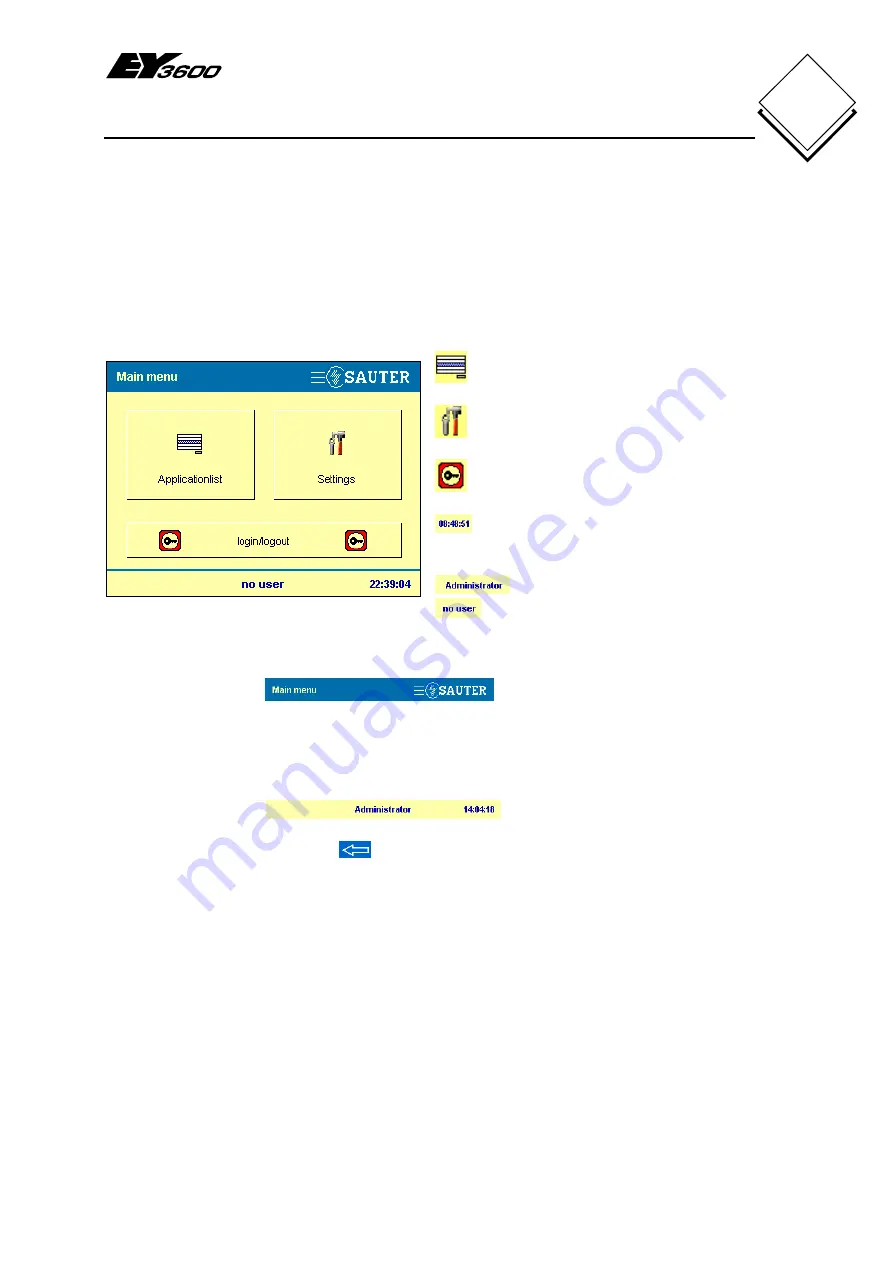
After you have successfully connected and started the touch-panel, the 

main menu

start screen is called up automatically. This contains the top level of menu items.

Fig. 2-1: Main Menu

 Application list

 Settings

 Login/logout (with password)

 Time (in the status bar)

User (in the status bar):

 Default administrator

 Logged out, no user

The touch screen is divided into three sections:- 
 

1.

Title bar
Menu header with company logo

2. The central area is used to display the various functions and buttons as depicted 

in Fig. 2-1. 
 

3.

Status bar
Displays the logged-in user with the current time. Also, the status bar often 
contains the bacarrow 

, which is used to go back to the previous window.

Touch one of the three buttons to select the function of your choice:- 

Application list (section 3) 

-

Selection of the automation station (AS) or plant that you want

Settings (section 5) 

-

Calibration: calibration of the touch-panel screen

-

Reboot: restart the touch-panel software

-

System info: view the current system settings and versions

Other settings:-

-

Display parameters: setting the screen contrast

-

Clock: set the time

-

Profiles: create users

-

Filters: view, enable and disable filters

Содержание nova250

Страница 1: ...0 Touch Panel 7001064003 T1 Sauter Systems 1 nova250 Touch Panel User s Manual 7001064003 T1 This description relates to version 1 3 5 of the program Changes may be made at any time without prior notification ...

Страница 2: ...nova250 Touch Panel 2 7001064003 T1 Sauter Systems ...

Страница 3: ... value from data point list 16 4 2 Alarms 18 4 2 1 Visualise alarm list 18 4 3 Time programs and calendar 19 4 3 1 Data points for time programs 19 4 3 2 Time program for days of the week 19 4 3 3 Time program entry 21 4 3 4 Time program for special days 22 4 3 5 Send time programs 23 4 3 6 Calendar 23 4 4 Historical data 25 5 Settings 29 5 1 Calibration 30 5 2 Reboot 31 5 3 System information 31 ...

Страница 4: ...nova250 Touch Panel Table of Contents 4 7001064003 T1 Sauter Systems 0 ...

Страница 5: ... a motor control centre or onto a top hat rail These Operating Instructions aim to explain the basic functions of the touch panel and to aid operation of the automatically created application In the rest of this section you will find information on installing the touch panel If the device is already installed and capable of functioning please refer to sections 2 to 4 for the main instructions on c...

Страница 6: ...s permanently installed and is not in the low voltage range the installation must be carried out by a trained specialist technician electrician or installer The other connections such as the RJ 45 connection for Ethernet and the DB 9 interface RS232 are used only for any application downloads and firmware updates that may be needed Note You must select the correct cable for the novaNet connection ...

Страница 7: ...ch panel can be used directly without configuration with the Sauter EY3600 system When you do this the configuration of the automation stations is read automatically and the touch panel application is created Sections 3 and 4 describe the standard functions and section 5 explains the touch panel settings Note If you do not wish to use this application individual applications and dynamised pictures...

Страница 8: ...nova250 Touch Panel Overview 8 7001064003 T1 Sauter Systems 1 ...

Страница 9: ...ntral area is used to display the various functions and buttons as depicted in Fig 2 1 3 Status bar Displays the logged in user with the current time Also the status bar often contains the back arrow which is used to go back to the previous window Touch one of the three buttons to select the function of your choice Application list section 3 Selection of the automation station AS or plant that you...

Страница 10: ...ouch the Login logout button on the start screen to view a dialogue for user login logout Fig 2 2 You can also go to the same login logout dialogue by touching the name of the user who is not yet logged in or the name of the logged in user e g in the status bar The list of user names shows all users who have been defined by the administrator in the Profiles menu See section 5 7 In the original sta...

Страница 11: ... in first select the user name from the list box and touch the password box Fig 2 2 Fig 2 3 Enter Password You see a numerical keypad with a request to enter the password You can now enter the password Press to confirm the password the user is logged in and you are returned to the screen shown in Fig 2 4 If you press you are also taken back so you can cancel the login Fig 2 4 Successful Log in A r...

Страница 12: ... as a user In this case you will see the button which you have to press in order to change the password Fig 2 6 Entries to Change a Password Make the following entries in sequence Enter the old password Enter the new password Confirm the new password Press the button to save and return If you press the button you return to the previous screen without making any changes Fig 2 5 ...

Страница 13: ...responded Depending on the definition in CASE FBD this column shows the house address or if no definition is available the default name device with AS address e g device 220 is shown The AS address column shows the group address of the AS If an application is distributed over several AS an is shown Press on the Application column header or AS address to sort the lines in ascending or descending al...

Страница 14: ...ate data points The data point list is taken from the application in the touch panel memory and is not updated In this case only the values statuses and alarms are read afresh As long as data are being polled scanned the message in Fig 3 2 is shown Fig 3 2 Please Wait After the application has been updated or activated either the data point list or the start screen for the application will appear ...

Страница 15: ...ta point description address text Value column current value Unit column shows the physical variable Press the column header house address description value or unit physical variable to sort the lines in ascending or descending alphanumeric order The house address and description buttons allow you to show or hide the house address and address text columns only the house address only the address te...

Страница 16: ...ging of all data points that accept remote commands or value changes Select the relevant line with the data point you must press the button in order to make the entry These windows are shown for binary values Automatic mode Manual mode Fig 4 2 Binary Output Automatic Fig 4 3 Binary Output Switching Command Automatic mode can be selected with To select a manual status for the command the button has...

Страница 17: ...select a manual value for the analogue output the button has to be deselected and the analogue setpoint value as 23 0 for example can be entered Numerical buttons are available to enter the numbers Fig 4 6 Numerical entries Backspace deletes the previous character Clear deletes the whole entry decimal point change prefixed sign Press the button to apply the value and the window will be closed Pres...

Страница 18: ...ription column data point description address text Value column current value Unit column shows the physical variable Press the column header house address description value or unit to sort the lines in ascending or descending alphanumeric order The house address and description buttons allow you to show or hide the house address and address text columns only the house address only the address tex...

Страница 19: ...owing you to return to the data point list To visualise or change the time program or to create a new one the data point must be selected and activated by pressing The current time program for the data point is then read from the AS Note To change time programs you must be logged in as a user from the administrator or user group See section 5 7 4 3 2 Time program for days of the week Once the data...

Страница 20: ...a point to the time on the activated weekday and the activated special day with the analogue value or switching command value An example Fig 4 11 Example of Time Program If the selected data point has a time program the time program is shown graphically in different colours and in list form Fig 4 11 In the example the valve Valve2 is opened at 8 o clock on Monday to Friday OPEN and is closed again...

Страница 21: ...or disable the desired weekdays for the switching command or the value change Special days to up to 8 special day time programs can be assigned to this data point with the help of the calendar function also see section 4 3 6 Time You can set and change the switching time with the slider or the forwards backwards buttons 1 minute steps 30 minute steps Value Touch this box to open the window where y...

Страница 22: ...r all 8 special days is in the upper section of the window and the graphic view is in the lower section Buttons or switch over between the special day time program and the weekday time program for the relevant data point also see section 4 3 2 Press in the time program to prepare for writing the time program to the AS Before the time program is sent you see a confirmation window see section 4 3 5 ...

Страница 23: ...station without defined calendar function Fig 4 15 Calendar The Start date and End date columns define the period for the calendar entry The Calendar column shows the definition of the calendar entry either with special day 1 to 8 or an assigned weekday allows you to change the selected existing calendar entry allows you to create a new calendar entry allows you to delete the selected calendar ent...

Страница 24: ...riod from start to end date for the calendar entry can be set with the slider or with special day period The slider resolution changes depending on the date box that is activated DD MM YYYY day month year If the calendar entry is defined only on one specific day the start and end dates must be identical special day Press in the calendar Fig 4 15 to prepare for writing the 2 year calendar to the AS...

Страница 25: ...n analogue value the Y scale window opens Fig 4 19 The Y scale is not active for binary values definition of the value range in the Y scale definition of the time axis read and show historical data The buttons allow you to adapt the defined minimum and maximum Y scale values for the relevant data points that were added Fig 4 19 Value Range Y scale In this window you can define the Y scale for the ...

Страница 26: ...w with scroll function Bottom list of HDB entries for the active data point with date time and value or up to to activate the HDB entries for the data point visualises the selected entry with lines in the graphic view The date and time according to the start and end of the time range are shown above the graphic view left and right The house address is at the top in the middle In the centre you see...

Страница 27: ...three data points have been added and by pressing they could be shown as a graphic as depicted in Fig 4 23 In this case the house address was deactivated in the list view so only the description of the data points in the list is shown Fig 4 23 HDB View Example The first data point is activated with The HDB entry with value 62 71 is selected and is pressed to highlight it with dotted lines The colo...

Страница 28: ...nova250 Touch Panel Standard application 28 7001064003 T1 Sauter Systems 4 ...

Страница 29: ...ers from the Guest user group can only call up the calibration the system info and the reboot settings A user in the user group can also access the display parameters accessible under more settings Fig 5 1 Settings Calibration If a button cannot be correctly assigned to the action a calibration must be carried out all Reboot reboots the touch panel all System info Important system information can ...

Страница 30: ...lose the window being displayed Fig 5 3 Calibration Points For a new calibration you must press briefly in the centre of the circle at the top right and then in the circle at the bottom left Note You are recommended to use a pen or pencil for this setting If this operation has been performed correctly you are taken back to Fig 5 2 Fig 5 4 Calibration Error If the calibration has not been successfu...

Страница 31: ...n window as shown in Fig 5 6 Fig 5 6 Reboot Press to trigger the reboot of the touch panel If you press the reboot action is not performed and the window closes 5 3 System information Press the System info button to display the most important system information Fig 5 7 System Info The upper section contains the information about the installed versions and active configurations such as the PC addre...

Страница 32: ...her settings The Other settings button takes you to Fig 5 8 and for a user from the administrator or user group shows further setting options for the touch panel These other settings are briefly described in the following sections Fig 5 8 Other Settings Display settings parameters Use this button to adjust the contrast setting for the background illumination administrator and user Clock sets time ...

Страница 33: ...tomatically after one minute if no operations are performed Touch the screen to reactivate the background illumination 5 6 Clock If you detect a discrepancy between the time shown in the touch panel and the real time you can set the time and date on the touch panel Touch the clock button or the time shown at the bottom right to display Fig 5 10 Fig 5 10 Clock Setting The information appears in the...

Страница 34: ...and is only used internally for a user who has logged out no user who also has viewing rights only To make changes in the Profile settings you must be logged in as an administrator Press the Profile button to see Fig 5 11 Fig 5 11 Profile The user list shows all defined users Use these three buttons and to create new user profiles and edit or delete existing profiles The password time out section ...

Страница 35: ...wise an error message as shown in Fig 5 13 may appear Fig 5 13 Error Message for Access Rights If you cannot log in again with the same access rights you can simply press to return to the main menu and log in again If password time out is activated it is advisable to leave the touch panel in a condition where all users from all user groups can log in again 5 7 2 Create new user profile Press in Fi...

Страница 36: ...e new password A minimum of 1 and a maximum of 16 characters are allowed Confirm with the button and you are returned to Fig 5 14 with the relevant password for the new user Press the button to return without a user password See also Fig 4 6 Fig 5 17 User Group Finally one of the three user groups must also be assigned confirms the entries for the new user cancel entries for the new user Once entr...

Страница 37: ...user group and confirm with You will also see a request to enter the password for the logged in administrator If this is successful the user profile is changed Notes a Editing a user profile can be useful if a user has forgotten his password b A user name cannot be changed To change the user name the profile has to be deleted and a new one must be created from scratch 5 8 Filters Filter definition...

Страница 38: ...er Application an application filter named novaTherm 200 is defined and activated Click on to disable the filter Calendar a calendar filter with the application name is also defined and activated Any calendar that is sent see section 4 3 6 will go only to this application If a filter is activated or deactivated and if the Filter window is closed by pressing a dialogue box Fig 5 21 will appear aski...

Страница 39: ...es can also be found in the Sauter Seminar Programme 6 2 Additional literature A varied range of product information and manuals is available to users technicians and programmers in connection with the nova250 touch panel This list contains the main items 1 EYT250 Configurator Operating Instructions CASE TPC 7001020 2 EY3600 System Description 7000937 The internet www sauter controls com and the i...

Отзывы: