Sauder 423731 Скачать руководство пользователя страница 6

Step 2

Page 6

www.sauder.com

423731

 å

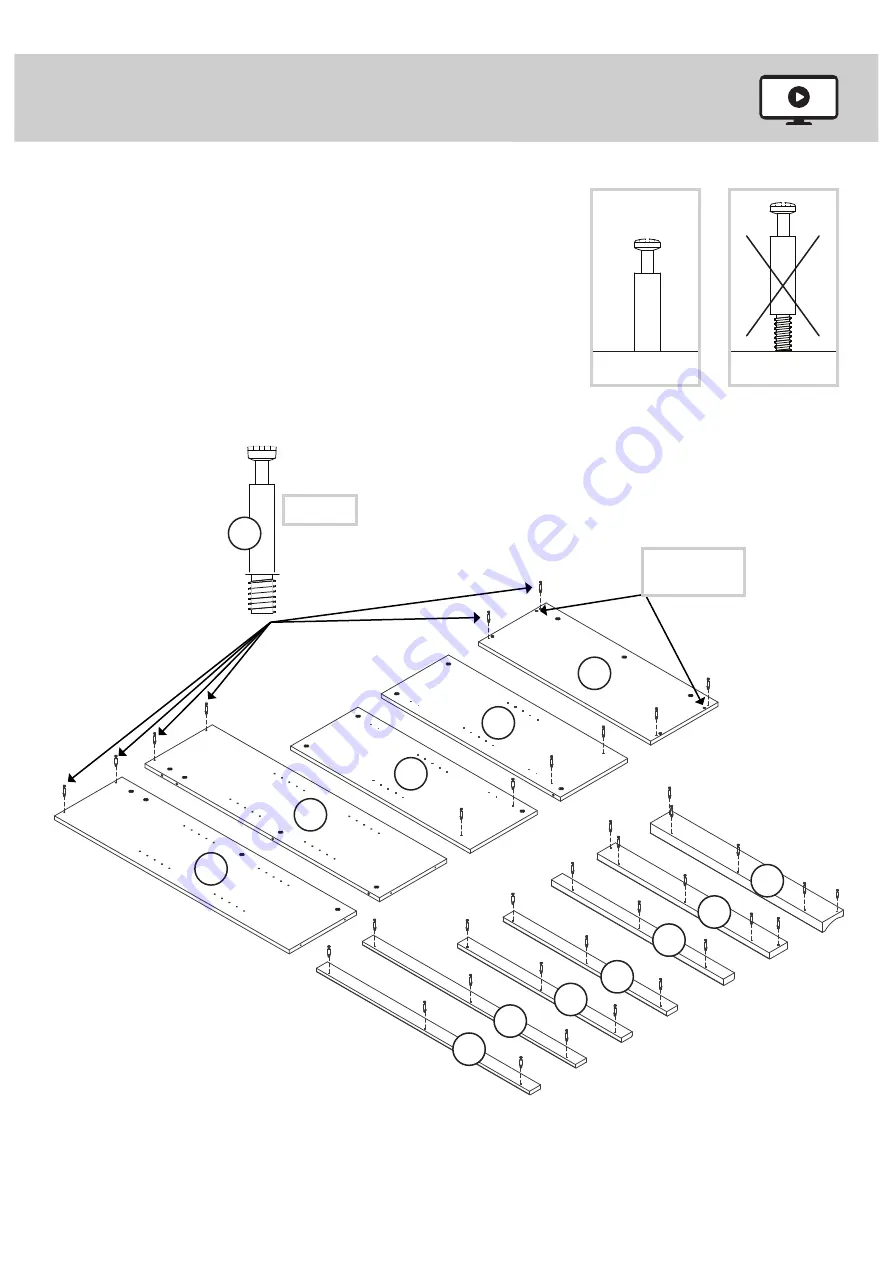
Turn thirty-seven CAM SCREWS (2) into the exact holes 
shown in the ENDS (A, B, C, and D), SHELF (G), SHELF 
MOLDINGS (J and L), VALANCE (K), BASE (M), and UPPER 
END MOLDINGS (N).

2

B

A

D

C

G

K

L

M

N

J

J

N

(37 used)

Do not use the 
through holes.

Содержание 423731

Страница 1: ...chased __________________ sauder com CONTACT US FIRST BEFORE MAKING ANY RETURNS TO THE STORE Share your journey sauder com CONTACT US FIRST BEFORE MAKING ANY RETURNS TO THE STORE Visit sauder com serviceto order replacement parts view video assembly tips or chat with a live rep Prefer the phone Give us a ring at 1 800 445 1527 Customer Service is available Monday Friday 9 a m to 5 30 p m EST excep...

Страница 2: ...Cs Part Identification å While not all parts are labeled some of the parts will have a label or an inked letter on the edge to help distinguish similar parts from each other Use this part identification to help identify similar parts A UPPER RIGHT END 1 B UPPER LEFT END 1 C LOWER RIGHT END 1 D LOWER LEFT END 1 E TOP 1 F BOTTOM 1 G SHELF 1 H ADJUSTABLE SHELF 2 I DOOR 2 J ADJUSTABLE SHELF MOLDING 2 K ...

Страница 3: ...Part Identification Page 3 www sauder com 423731 E F B A D C G H K L M N P Q J H J N O I I ...

Страница 4: ...r unit Page 4 www sauder com 423731 FURNITURE TIPPING RESTRAINT KIT 1 99 HIDDEN CAM 37 1 7 TACK GLIDE 4 SILVER 1 1 2 FLAT HEAD SCREW 4 10 CAM SCREW 37 2 METAL PIN 12 3 HINGE 4 4 8 BUMPER CARD 1 PULL 2 5 SILVER 11 16 MACHINE SCREW 4 11 NAIL 46 6 APPLIQUE CARD 4 9 SILVER 1 2 PAN HEAD SCREW 16 12 ...

Страница 5: ...n to avoid scratching your unit or the floor å Push thirty seven HIDDEN CAMS 1 into the ENDS A B C and D TOP E BOTTOM F SHELF G and ADJUSTABLE SHELVES H Page 5 www sauder com 423731 Some assembly and snacks required E F B A D C G H H Arrow The arrow in the HIDDEN CAM must point toward the hole in the edge of the board Hole Arrow 1 1 Arrow 1 Arrow Arrow 1 37 used ...

Страница 6: ...m 423731 å Turn thirty seven CAM SCREWS 2 into the exact holes shown in the ENDS A B C and D SHELF G SHELF MOLDINGS J and L VALANCE K BASE M and UPPER END MOLDINGS N 2 B A D C G K L M N J J N 37 used Do not use the through holes ...

Страница 7: ...to the TOP E Tighten four HIDDEN CAMS 1 2 E B A Surface with HIDDEN CAMS Surface with HIDDEN CAMS Surface without HIDDEN CAMS Edge with HIDDEN CAMS Edge with HIDDEN CAMS Do not stand the unit upright without the BACK fastened The unit may collapse Caution Finished edge ...

Страница 8: ...der com 423731 å Fasten the SHELF G to the UPPER ENDS A and B Use four SILVER 1 1 2 FLAT HEAD SCREWS 10 SILVER 1 1 2 FLAT HEAD SCREW 4 used in this step 10 B A G Edge with HIDDEN CAMS Surface with HIDDEN CAMS Finished edge ...

Страница 9: ... sauder com 423731 å Fasten the LOWER ENDS C and D to the BOTTOM F Tighten four HIDDEN CAMS F D C Surface with HIDDEN CAMS Surface with HIDDEN CAMS Surface without HIDDEN CAMS Edge with HIDDEN CAMS Edge with HIDDEN CAM ...

Страница 10: ...Step 6 Page 10 www sauder com 423731 å Fasten the LOWER ENDS C and D to the SHELF G Tighten four HIDDEN CAMS D C G Just think The sooner you do this the sooner you do something else ...

Страница 11: ...AILS 6 å NOTE Do not fasten the upper edge of the SMALL BACK at this time å Repeat this step for the LARGE BACK P å NOTE The LARGE BACK P will overlap the SMALL BACK Q Do not stand the unit upright without the BACK fastened The unit may collapse Caution U n fi n i s h e d s u r f a c e P Q U n fi n i s h e d s u r f a c e Do not fasten NAILS along this edge until the LARGE BACK P is overlapping the ...

Страница 12: ... B Tighten five HIDDEN CAMS å Fasten the UPPER END MOLDINGS N to the UPPER ENDS A and B Tighten six HIDDEN CAMS å Fasten the SHELF MOLDING L to the SHELF G Tighten three HIDDEN CAMS å Fasten the BASE M to the LOWER ENDS C and D and BOTTOM F Tighten five HIDDEN CAMS E B A K N N These surfaces should be even Curved edge Curved edge D C F M L G ...

Страница 13: ...Step 9 Page 13 www sauder com 423731 å With your hammer gently tap the TACK GLIDES 7 into the bottom edges of the LOWER ENDS C and D and BASE M 7 D C M ...

Страница 14: ...the ADJUSTABLE SHELVES H Tighten three HIDDEN CAMS å Repeat this step for the remaining ADJUSTABLE SHELF H and ADJUSTABLE SHELF MOLDING J Step 10 Page 14 www sauder com 423731 J H These surfaces should be even S u r f a c e w i t h H I D D E N C A M S ...

Страница 15: ...DS A B C and D Set the ADJUSTABLE SHELVES H and O onto the METAL PINS in the ENDS A B C and D å Peel the BUMPERS from the BUMPER CARD 8 and stick them onto the center of the DOOR ADJUSTABLE SHELF O Step 11 Page 15 www sauder com 423731 B A D C H H O 12 used 3 8 Pro Tip Lift with your legs And you know your arms ...

Страница 16: ...å Fasten the HINGES 4 to the DOORS I Use eight SILVER 1 2 PAN HEAD SCREWS 12 Step 12 Page 16 www sauder com 423731 I I 4 SILVER 1 2 PAN HEAD SCREW 8 used in this step 12 ...

Страница 17: ...t SILVER 1 2 PAN HEAD SCREWS 12 å Fasten the PULLS 5 to the DOORS I Use four SILVER 11 16 MACHINE SCREWS 11 Step 13 Page 17 www sauder com 423731 I I 5 5 C D SILVER 11 16 MACHINE SCREW 4 used in this step 11 SILVER 1 2 PAN HEAD SCREW 8 used in this step 12 ...

Страница 18: ...the wall å Peel APPLIQUES from the APPLIQUE CARDS 9 and stick them onto each visible HIDDEN CAM å NOTE Please read the back pages of the instruction booklet for important safety information å This completes assembly Clean with a damp cloth Wipe dry Step 14 Page 18 www sauder com 423731 99 Use the 5 8 screw through the small hole in a bracket and into the back edge of the TOP E Small hole To cover ...

Страница 19: ...ATION du manuel en anglais pour vous familiariser avec les pièces avant l assemblage REMARQUE CE MANUEL D INSTRUCTIONS CONTIENT D IMPORTANTES INFORMATIONS RELATIVES À LA SÉCURITÉ À LIRE ET CONSERVER POUR TOUTE RÉFÉRENCE FUTURE Noter la date d achat de cet élément et conserver le livret pour future référence Pour contacter Sauder en ce qui concerne cet élément faire référence au numéro de lot et nu...

Страница 20: ...TIT ARRIÈRE à ce point Répéter cette étape pour le GRAND ARRIÈRE P REMARQUE Le GRAND ARRIÈRE P va chevaucher le PETIT ARRIÈRE Q ÉTAPE 4 Fixer la TABLETTE G aux EXTRÉMITÉS SUPÉRIEURES A et B Utiliser quatre VIS TÊTE PLATE 38 mm ARGENTÉES 10 ÉTAPE 3 Attention Ne pas relever l élément dans sa position verticale avant d avoir fixé l ARRIÈRE L élément risque de s effondrer Fixer les EXTRÉMITÉS SUPÉRIEUR...

Страница 21: ...urité figurant sur les pages arrière du manuel d instructions Ceci complète l assemblage Nettoyer avec un tissu humide Essuyer ÉTAPE 12 Fixer les CHARNIÈRES 4 aux PORTES I Utiliser huit VIS TÊTE GOUTTE DE SUIF 13 mm ARGENTÉES 12 ÉTAPE 11 Relever avec précaution l élément dans sa position verticale Insérer les GOUPILLES EN MÉTAL 3 dans les trous choisis dans les EXTRÉMITÉS A B C et D Poser les TABLE...

Страница 22: ...NFORMACIÓN IMPORTANTE SOBRE LA SEGURIDAD POR FAVOR LEA Y GUÁRDELO PARA REFERENCIA EN EL FUTURO LISTA DE PARTES ITEM DESCRIPCIÓN CANTIDAD Anote la fecha de comprar esta unidad y guarde el folleto para su referencia futura Si necesita ponerse en contacto con Sauder en cuanto a esta unidad refiérase al número de lote y al número de modelo cuando llame a nuestro número gratis No lote ____________ Fecha...

Страница 23: ...paso para el DORSO GRANDE P NOTA El DORSO GRANDE P se solapará con el DORSO PEQUEÑO Q PASO 4 Fije el ESTANTE G a los EXTREMOS SUPERIORES A y B Utilice cuatro TORNILLOS PLATEADOS DE CABEZA PERDIDA de 38 mm 10 PASO 3 Precaución No coloque la unidad en posición vertical hasta que se fije el DORSO La unidad podría caerse Fije los EXTREMOS SUPERIORES A y B al PANEL SUPERIOR E Apriete cuatro EXCÉNTRICOS ...

Страница 24: ...ciones en cuanto a importante información de seguridad Esto completa el ensamblaje Limpiar con un trapo húmedo Seque con un paño PASO 12 Fije las BISAGRAS 4 a las PUERTAS I Utilice ocho TORNILLOS PLATEADOS DE CABEZA REDONDA de 13 mm 12 PASO 11 Cuidadosamente ponga la unidad en posición vertical Inserte las ESPIGAS DE METAL 3 en los agujeros al nivel preferido de los EXTREMOS A B C y D Coloque los ...

Страница 25: ...u peut endommager le mobilier et les articles ménagers Lire attentivement le tableau suivant À surveiller Danger éventuel Solution Tablettes surchargées En cas de chargement inadéquat l élément peut être lourd du haut Risque de blessure Du mobilier mal équilibré risque de se renverser Des tablettes surchargées risquerait de casser Ne jamais excéder les limites de poids indiquées dans les instructi...

Страница 26: ...biliario puede ser muy pesado Descargue los estantes desde arriba hacia abajo antes de mover el mobiliario No empuje la unidad especialmente sobre un piso alfombrado Pide la ayuda de otra persona para levantar la unidad y colocarla en lugar Esta unidad debe ser colocada contra una pared Un niño subiendo al mobiliario puede causar la inestabilidad y como resultado la caída de la unidad Riesgo de le...

Страница 27: ...es de rechange seront garanties uniquement pendant la période restante de la garantie originale SAUDER NE SERA EN AUCUN CAS RESPONSABLE de TOUT DOMMAGE ACCESSOIRE OU CONSÉCUTIF DE TOUTE SORTE et lesdits dommages sont EXCLUS DE LA PRÉSENTE GARANTIE à savoir perte d utilisation démontage transport main d œuvre ou dommages matériels sur ou à proximité du produit Certains États ou provinces ne permett...

Страница 28: ...____________ So how did it go Set a world record for speed Feeling good about yourself Nice Get social with it on any of these quality share sites And don t forget to rate and review your piece at Walmart com in the product detail page If you need assistance please contact customer service at 800 445 1527 Monday Friday 9 a m to 5 30 p m EST except holidays or at sauder com service Register your ne...

Отзывы: