5
Replacement
74
S84-ex/S86-ex Service Manual
6
Remove seven
screws
attaching the
main (CONT) PCB
to the rear housing
cover.
7
Remove the
interface panel plate
from the
main (CONT) PCB
.
8
Replace the defective
main (CONT)
PCB
with a new
main (CONT) PCB
.
9
Perform the assembly with the reverse
procedure.
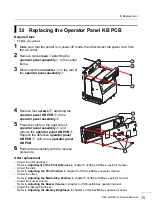
After replacement
• Set the SW1 (DIP switch) on the Main (CONT) PCB.
Section 4.1 Functional Structure of Main (CONT) PCB
for details.
• Adjust the media sensor.
Refer to
Adjusting the Media Sensors
in chapter 5 of S84-ex/S86-ex operator manual.
• Adjust the print darkness.
Refer to
Adjustment of the Print Darkness
in chapter 5 of S84-ex/S86-ex operator manual.
• Adjust the pitch.
Refer to
Adjusting the Print Position
in chapter 5 of S84-ex/S86-ex operator manual.
• Adjust the offset.
Refer to
Adjusting the Media Stop Position
in chapter 5 of S84-ex/S86-ex operator manual.
2
5
Содержание S84 ex
Страница 1: ...Service Manual For printer model ...
Страница 6: ...Table of Contents 4 S84 ex S86 ex Service Manual This page is intentionally left blank ...
Страница 32: ...2 Operation and Configuration 30 S84 ex S86 ex Service Manual This page is intentionally left blank ...
Страница 104: ...5 Replacement 102 S84 ex S86 ex Service Manual This page is intentionally left blank ...
Страница 123: ...7 Appendix 121 S84 ex S86 ex Service Manual This page is intentionally left blank ...
Страница 124: ...Extensive contact information for worldwide SATO operations can be found on the Internet at www satoworldwide com ...


