


- 3 -
(1)
Press day(s) to set program schedule
(2)
“
Hold Until
” indicates the time when a temporary hold period will end
(3)
Press to select system type
(4)
Press to select fan operation
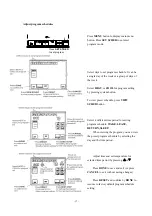
(5)
Press “
MENU
” to display first function menu of button (6) (7) (8) (9) (10)
Press “
DOWN
” to confirm current setting
(6)
Press “
SET TIME
” to set current time clock
Press “
INFO
” to check outside temperature or inquiry for count back time for changing filter or
inquiry for UV light duration hours.
(7) Press “
RUN SCHED
” to resume program operation
Press “
RESET
” to current program setting or current configuration setting to factory default value
Press “
CONFIG
” to set configuration menu item
(8)
Press “
HOLD
” to permanent hold current set point
Press “
CLEAN DISPLAY
” for entering 30 second count back time for cleaning the display
Press “
PREVIOUS STEP”
for going back to last configuration menu item
(9)
Press “
SET SCHED
” for setting schedule for each days of the week
Press “
NEXT STEP
” for going forward to next configuration menu item or next day of week when
setting schedule.
(10)
Press “
OTHER
” for entering the second function menu of (5) (7) (8) (10)
Press “
CANCEL
” to disregard current setting and go back to last operation
(11)
Press “
WAKE
” “
LEAVE
” “
RETURN
” “
SLEEP
” to choose the 4 setting period of each day when
setting program schedule
(12)
Press UP and DOWN for modifying set point
(13)
“
Days
”
displays during steps in setting vacation duration days or count back days of vacation duration
days
“
Am
” indicate current time clock is in the morning. “
Pm
” indicates current time clock is in the
afternoon
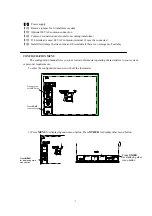
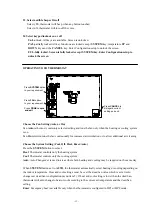
(1)
(2)
(14)
(13)
(15)
(16)
(17)
(18)
(19)
(20)
(24) (23) (22)
(21)
(5)
(6)
(7)
(8)
(9)
(10)
(11)
(3)
(4)
(12)
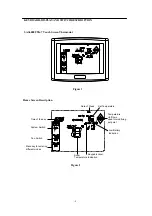
Figure 3
Содержание SAS6000UTK-7
Страница 20: ...20...


