background image

This camera offers a built-in motion sensor function that detects movements by intruders and so on and outputs 
an alarm signal. 

SIZE: Sets the detection area size. 
MASKING: Sets masks. 
SENSITIVITY: Sets the detection sensitivity. 
DURATION: Sets the alarm disable duration. 

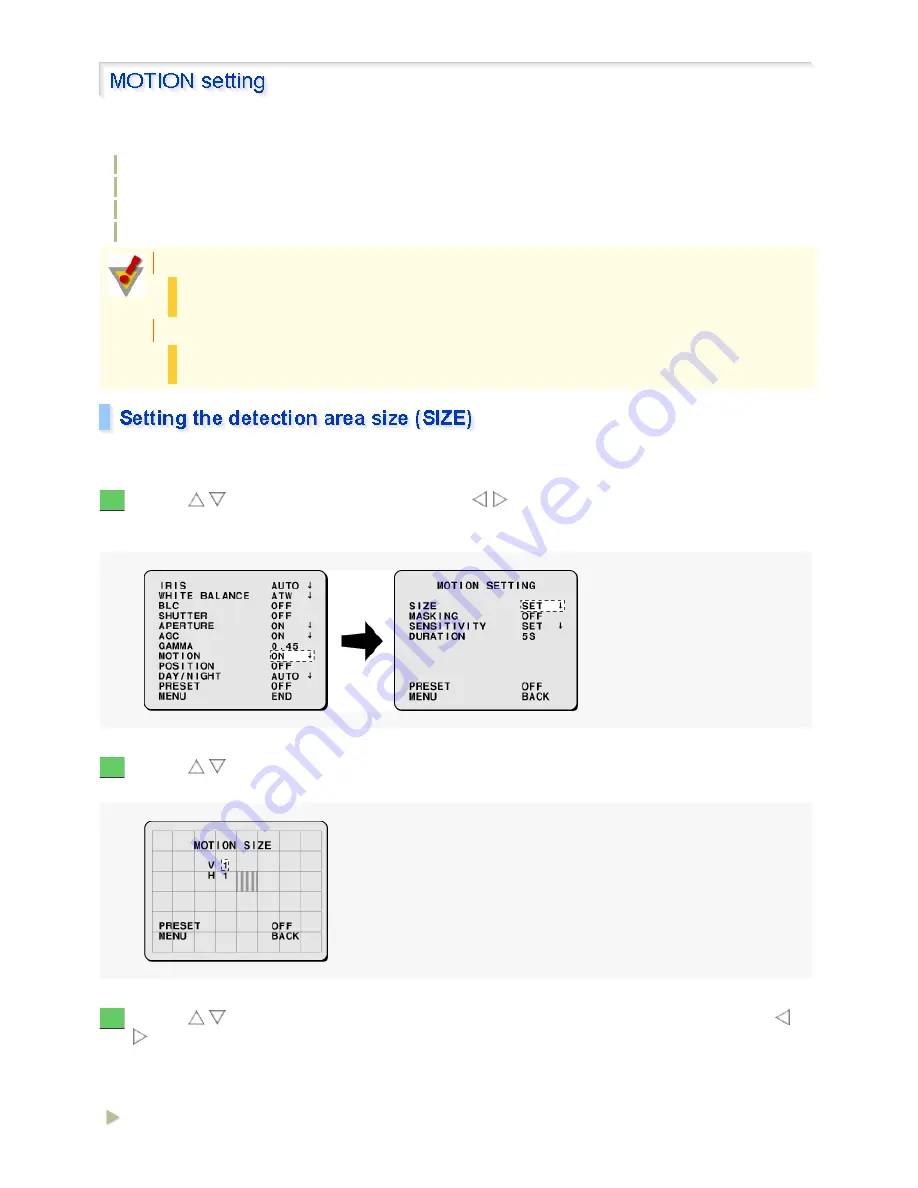
Set the size of the detection area on the screen, where movements will be detected. 

Use the 

/

 button to select [MOTION], use the 

/

 button to choose “ON”, and press the 

SET button. 

The MOTION SETTING screen appears. 

Use the 

/

 button to select [SIZE] and press the SET button. 

The MOTION SIZE screen appears, showing the detection pattern in the center area. 

Use the 

/

 button to select [V] (for vertical sizing) or [H] (for horizontal sizing) and use the 

/

 button to set the size value. 

The size of the detection pattern shown on the screen changes based on the [V] and [H] settings. 
An alarm signal will be output if motion is detected in all areas of the set detection pattern. 
Available settings: 

If [MOTION] cannot be set: 

[SENSE UP] (electronic sensitivity boosting) is set, or [SHUTTER] is set to “LONG” (a slow shutter 
speed). 

Setting [MOTION] causes the following: 

[SENSE UP] (electronic sensitivity boosting) cannot be set, and [SHUTTER] cannot be set to 
“LONG” (a slow shutter speed). 

1

2

3

V: Vertical sizing (1 to 6)

33 / 100

Содержание VCC-XZ600P

Страница 1: ...camera cover fixing screws Camera stand Arm Camera mount Camera mounting bracket Operation buttons on right side face Camera cover Camera cover fixing screws 4 Lens Safety chain Cable label Connection cables You can identify each connection cable by its shape and color 1 2 3 4 5 6 7 8 9 10 11 1 100 ...

Страница 2: ...sor or other external devices To automatically switch between the color and black white modes select DAY NIGHT choose the COLOR mode and then set the EXT ALARM to an appropriate input level BLACK ALARM IN 2 BLUE ALARM OUT Used to connect a buzzer lamp video recorder or other peripheral device To control the alarm output externally from a remote location on the ALARM OUT screen select OUTPUT and ch...

Страница 3: ...locked Make sure that the cable is locked firmly in place 1 2 3 To prevent short circuiting make sure that the stripped wire portion is not exposed out of the connector This connector is a separable type Separating the connector by pressing the connector lever facilitates your work especially when changing the connection with the power supply and system components A 3 100 ...

Страница 4: ...es to the power terminals of the one touch connector Use a power cable with an AWG wire 20 21 or 22 Although power wires have no polarity in this case the earth wire must be connected to the earth COMMON terminal 1 Cable type RG 59U 3C 2V 250 m maximum Cable type RG 6U 5C 2V 500 m maximum Cable type RG 11U 7C 2V 600 m maximum Using lower grade cables will cause the attenuation of the video and syn...

Страница 5: ...red For detailed information on these connections refer to the separate installation manual ALARM IN cables GRAY BLACK BLACK Used to connect alarm switch infrared sensor or other external devices ALARM OUT cable BLUE Used to connect a buzzer lamp digital video recorder or other peripheral device FOCUS ZOOM cable YELLOW ORANGE Used to remote control the camera UTP cables SKYBLUE PINK Use these twis...

Страница 6: ...ance systems the use of a DVR is recommended DVRs ensure a long hour recording without video degradation Provides not only the remote control of the camera and connected devices but also the centralized control of a surveillance system consisting of multiple components This is a simplified camera controller It enables you to set the camera s menu options from a remote location Be sure to disconnec...

Страница 7: ...ically move the cursor to select a menu item buttons Used to make adjustments in horizontal direction or choose a setting value SET button Use the SET button to set the value you adjusted or chose for the selected item or switch to the sub menu When the password lock is enabled the user will be prompted for the entry of the password if he she attempts to access the setting on the menu screen Using...

Страница 8: ...auto focus adjustment Use the SET button to focus the camera automatically by one push operation Connecting the optional camera control unit enables you to remotely set the camera s operating conditions on the menu screen For details refer to the instruction manual supplied with the camera control unit 1 2 3 Be sure to disconnect the camera control unit after you complete setting up the camera Avo...

Страница 9: ...epending on the luminance of the target 3 LENS FOCUS Sets the focusing mode ZOOM Sets the optical zooming speed and electronic zooming option 4 ALARM ALARM IN Provides alarm input settings ALARM OUT Provides alarm output settings ALARM DISPLAY Sets the alarm display function 5 PRIVACY MASK MASK 1 to 4 Masks anywhere you want to hide on the screen for the purpose of privacy protection 6 PASSWORD PA...

Страница 10: ...n to select the menu item If the down arrow symbol is shown to the right of the selected menu item press the SET button The next level sub menu or the details setting screen appears To choose a setting show the desired value or option using the button To return to the previous screen use the button to select MENU and with the setting of BACK shown press the SET button 1 2 3 4 10 100 ...

Страница 11: ...ton to change the setting from BACK to END and press the SET button The main menu disappears and live video images appear on the screen To display the main menu again press the SET button located on the side face of the camera for approximately three seconds 5 11 100 ...

Страница 12: ...e settings for the following items PRIVACY MASK on main menu PASSWORD on the main menu DISPLAY TITLE and SYSTEM on the OPTION menu Zoom or focus setting in POSITION on the CAMERA menu Note that the value of the item POSITION is reset from ON to the default OFF When the POSITION setting is switched to OFF the zoom and focus settings stored in the camera will be overwritten by those settings of the ...

Страница 13: ...zation Performs synchronization according to the camera s internal signal L L Line Lock Power source synchronization Performs synchronization according to the frequency of the commercial power source With this method you can manually adjust the vertical synchronization phase 13 100 ...

Страница 14: ...ct SYNC use the button to choose L L and press the SET button The L L SETTING screen appears Use the button to adjust the vertical synchronization phase Select MENU and choose BACK or END to complete adjustment 1 2 3 14 100 ...

Страница 15: ... automatically detects moving targets POSITION setting Stores the zoom focus settings of the current position by camera setting number 1 or 2 DAY NIGHT setting Sets the Day Night function that automatically switches between color and black white video modes depending on the luminance of the target Setting example for using the operating conditions for the daytime use and nighttime use Select CAMER...

Страница 16: ...ou want to set operating conditions and press the SET button The CAMERA setting screen for the chosen camera setting number appears 1 You can use the system controller to change the camera setting number in CAMERA To do so select AUX ON for CAMERA 1 or AUX OFF for CAMERA 2 and select 7 on the number entry screen 16 100 ...

Страница 17: ...ark to 100 bright Select MENU and choose BACK or END to complete adjustment The auto iris function is not available when the electronic iris EI is set Set the lens iris manually using the following procedure Use the button to select IRIS use the button to choose MANU and press the SET 1 2 If the electronic sensitivity boosting power cannot be set MOTION is set to ON or AGC is set to OFF Setting th...

Страница 18: ...f the video signal level Available settings 0 dark to 100 bright Select MENU and choose BACK or END to complete adjustment 2 Setting the electronic iris EI causes the following The SHUTTER electronic shutter setting SHORT or LONG will be cancelled and the SENSE UP electronic sensitivity boosting will not work Under extremely bright lighting the electronic iris cannot adjust the light entering thro...

Страница 19: ...on to choose ATW and press the SET button The ATW SETTING screen appears Select MENU and choose BACK or END to complete the setting To mask a specific light source or to set the SMART ATW function do the following If the target objects include an extremely bright light source set a mask as follows to correct the white balance Use the button to select MASKING use the button to choose ON and press t...

Страница 20: ... balance may not produce desirable results if a single color occupies the majority of the images In such a case use the smart function Use the button to select SMART ATW and use the button to choose ON This sets the smart function To delete a mask move the mask pattern over it and press the SET button 3 4 Do not use the smart function in environments where the color temperature varies In an outdoo...

Страница 21: ...tting changes from to highlighted in two seconds which indicates that the white balance adjustment has been completed Select MENU and choose BACK or END to complete adjustment You can set the color temperature to a fixed value Use the button to select WHITE BALANCE and use the button to choose the desired fixed white balance option Available settings 2 1 2 If the white balance adjustment does not ...

Страница 22: ...B SETTING screen appears Use the button to select R or B and use the button to choose the gain value of the red or blue signal Available settings Select MENU and choose BACK or END to complete adjustment 3200 For indoors Fixes the color temperature to 3200 K 5600 For outdoors Fixes the color temperature to 5600 K FLUO For fluorescent lighting Fixes the color temperature to 4200 K 2 1 2 R red 0 lig...

Страница 23: ...d use the button to adjust the backlight compensation weight sensitivity Available settings 0 low sensitivity to 15 high sensitivity Use the button to select BRIGHT and use the button to adjust the compensation level for the brightness of the backlighting Available settings 0 minimum brightness compensation to 15 maximum brightness compensation Select MENU and choose BACK or END to complete adjust...

Страница 24: ...he SET button The BLC WINDOW WEIGHTING screen appears Use the button to select each spot to be weighted and use the button to set the weighting value Spot evaluative metering will occur in five spots TOP BOTTOM LEFT RIGHT and CENTER The weighting value of CENTER FIX is fixed to 7 Available settings 0 minimum to 7 maximum 2 3 Use the button to change the vertical size Use the button to change the h...

Страница 25: ...t BLC use the button to choose MASK and press the SET button The BLC MASKING screen appears with a blinking mask pattern shown at the top left Use the buttons to move the mask pattern over the light source you want to mask and press the SET button This sets a mask at the position where you moved the mask pattern A new mask pattern starts blinking Repeat this step to set masks as many as you want 5...

Страница 26: ...bottom area of the screen and press and hold the button for approximately three seconds The PRESET and MENU items appear on the screen Select MENU and choose BACK or END to complete the setting To delete a mask move the mask pattern over it and press the SET button 3 4 26 100 ...

Страница 27: ...creasing the exposure time will improve the sensitivity ensuring clear images even if the target objects are dark Use the button to select SHUTTER use the button to choose LONG and press the SET button The ES SETTING screen appears If fast shutter speeds SHORT cannot be set SENSE UP electronic sensitivity boosting or EI electronic iris is set 1 2 PAL 50 120 250 500 1000 2000 4000 10000 NTSC 60 100...

Страница 28: ...ttings Select MENU and choose BACK or END to complete the setting 2 1 2 4 8 16 32 The faster shutter speeds the longer the resulting exposure time Setting an excessively long exposure time may result in ghosts blurs and white spots in moving target objects 3 28 100 ...

Страница 29: ...Use the button to select APERTURE use the button to choose ON and press the SET button The APERTURE SETTING screen appears Use the button to select the direction of aperture compensation H or V and use the button to set the compensation value Available settings Select MENU and choose BACK or END to complete the setting 1 2 H Horizontal aperture compensation 1 to 15 V Vertical aperture compensation...

Страница 30: ...se Reduction will reduce the noise at low luminance levels Select MENU and choose BACK or END to complete the setting Use the button to select AGC use the button to choose OFF and press the SET 1 2 LOW For bright target object NORMAL Normal setting MIDDLE For slightly dark target objects HIGH For dark target objects The maximum gain value varies depending on the Day Night function mode Setting a h...

Страница 31: ...e button to set the AGC s gain value Available settings 0 to 30 dB Select MENU and choose BACK or END to complete the setting If AGC cannot be set to OFF DAY NIGHT is set to AUTO or SENSE UP electronic sensitivity boosting is set to ON 2 3 31 100 ...

Страница 32: ...rection level Available settings Select MENU and choose BACK or END to complete the setting 1 0 45 Sets the gamma correction level to 0 45 1 Sets the gamma correction level to 1 MODE1 Increases the contrast in dark areas MODE2 Increases the contrast in dark areas further Choosing MODE1 or MODE2 may result in excessively bright images depending on the target objects 2 32 100 ...

Страница 33: ...T button The MOTION SIZE screen appears showing the detection pattern in the center area Use the button to select V for vertical sizing or H for horizontal sizing and use the button to set the size value The size of the detection pattern shown on the screen changes based on the V and H settings An alarm signal will be output if motion is detected in all areas of the set detection pattern Available...

Страница 34: ... at the top left H Horizontal sizing 1 to 8 The maximum size of the detection pattern V x H is 9 If setting a vertical or horizontal size causes this maximum size to be exceeded the other size will be automatically adjusted The detection pattern can be set in 19 sizes as shown below Any motion in the target that is larger than the area of the set detection pattern causes the motion sensor to respo...

Страница 35: ...tems and use the button to adjust the detection level For all items the sensitivity decreases as you increase the value MOVE Motion sensitivity 1 to 10 Set a larger value to prevent the detection of subtle movements such as those caused by a breeze Y LEVEL Brightness level 1 to 10 Set a larger value to prevent unwanted detection due to noise in a dark image Y DIFFER Brightness difference 1 to 10 S...

Страница 36: ...alarm signal from detecting subsequent alarm motions for that period Use the button to select DURATION and use the button to choose the alarm disable duration Available settings 5S 10S 15S 20S 30S 45S 1M 2M 3M 4M 5M S seconds M minutes Select MENU and choose BACK or END to complete the setting 1 2 36 100 ...

Страница 37: ...ot store zoom and focus settings set POSITION to OFF Use the button to adjust the zoom and use the button to adjust the focus and press the SET button This stores the zoom and focus settings and brings you back to the CAMERA setting screen 1 2 The button can be used to adjust the focus even when the auto focus is set FOCUS is set to AUTO When POSITION is set to OFF the zoom and focus settings stor...

Страница 38: ... AUX ON and select one of the mode numbers on the number entry screen 3 AUTO mode 2 B W mode 1 COLOR mode You may hear switching noise or see distorted images when the camera mode is switched This is not a malfunction however In AUTO mode turning OFF the camera with black white image displayed and then turning it back on again switches to color image The retrieved focused position may differ betwe...

Страница 39: ...etting to retain the difference Use the button to select BURST and use the button to turn ON OFF the burst signal If connected to a peripheral device like a frame switcher the camera may produce distorted images or burst when switching between the color and black white video modes This phenomenon can be corrected by inserting a color burst signal Normally set BURST to OFF Available settings Use th...

Страница 40: ...ings On the ALARM screen use the button to set ALARM IN to 1 or 2 alarm input channel set on the D N SETTING COLOR screen and use the button to select POLARITY For details see Setting the Alarm Input ALARM IN POLARITY NO Open color mode Closed black white mode POLARITY NC Open black white mode Closed color mode Select MENU and choose BACK or END to complete the setting 1 2 1 2 OFF Disables detecti...

Страница 41: ...F Available settings Use the button to select FOCUS and use the button to choose the focus compensation mode Normally set the focus compensation mode to 1 However if the target gets out of focus set this to 2 Available settings Select MENU and choose BACK or END to complete the setting 1 2 ON Inserts a burst signal OFF Does not insert a burst signal 3 1 Use this mode if the camera is used under ne...

Страница 42: ...cify the options for focusing and zooming operations Focusing operation settings FOCUS Sets the focusing mode to either auto or manual Zooming operation settings ZOOM Sets the optical zooming speed and electronic zooming option 42 100 ...

Страница 43: ...ct LIMIT NEAR and use the button to choose the nearest focusing distance to the object Available settings 10cm 30cm 50cm 1m 3m 5m Use the button to select SENSITIVITY and use the button to select sensitivity in focusing Available settings 1 2 3 When the distance to the object is less than or equal to 1m focusing may become difficult 4 HIGH High sensitivity focusing LOW Low sensitivity focusing Whe...

Страница 44: ... Available settings Select MENU and choose BACK or END to complete the setting Use the button to select FOCUS use the button to choose MANU and press the SET button The FOCUS SETTING screen appears 5 6 1 entire screen 2 center of screen larger area 3 center of screen smaller area 7 8 AUTO Returns the focusing mode automatically to the auto focus mode when a zooming operation is performed after the...

Страница 45: ...ble settings 10cm 30cm 50cm 1m 3m 5m Use the button to select SPEED and use the button to select the focusing speed Available settings 1 2 3 and 4 maximum Select MENU and choose BACK or END to complete the setting 2 When the distance to the object is less than or equal to 1m focusing may become difficult 3 4 45 100 ...

Страница 46: ...s Available settings Use the button to select V RESO UP and use the button to enable disable the vertical resolution increase Available settings Select MENU and choose BACK or END to complete the setting 1 2 3 OFF Optical zoom only x 2 Approx 60x magnification x 4 Approx 120x magnification x 8 Approx 240x magnification x 16 Approx 480x magnification When the electronic zoom is applied the quality ...

Страница 47: ...o perform the alarm input settings input conditions alarm action etc for each alarm input number ALARM OUT Allows you to perform the alarm output settings ALARM DISPLAY When an alarm is detected the camera title displayed in the screen blinks indicating that an alarm is detected 47 100 ...

Страница 48: ...isplay duration ZOOM TIME To use this setting select whether or not to return to the previous operating conditions upon completion of an alarm action in RETURN under the item ACTION 1 2 When the alarm input is used as the external control input of the DAY NIGHT function D N appears in the top right of the screen In this case settings other than POLARITY cannot be made When EXT ALARM for DAY NIGHT ...

Страница 49: ... to set the duration for which the zoomed image is displayed Available settings 5S 10S 15S 20S 30S 45S 1M 2M 3M 4M 5M S seconds M minutes 1 2 Use the button to choose MANU and press the SET button The RATIO SETTING screen appears On this screen the and buttons are used for zooming operation and the and buttons for focusing operation Use the button to adjust the zoom and use the button to adjust th...

Страница 50: ...an alarm input source 1 CAM1 Uses the operating conditions you configured for Camera 1 in CAMERA to monitor surveillance points CAM2 Uses the operating conditions you configured for Camera 2 in CAMERA to monitor surveillance points 2 OFF Retains the operating conditions used after the receipt of the alarm input ON Returns to the operating conditions before the receipt of the alarm input Setting RE...

Страница 51: ...and choose BACK or END to complete the setting AND Outputs an alarm signal if an external alarm input is received when the motion sensor has detected an alarm condition OR Outputs an alarm signal if the motion sensor detects an alarm condition or an external alarm input is received 5 OFF Does not output the alarm signal ON Outputs the alarm signal 6 OFF Does not output the alarm signal ON Outputs ...

Страница 52: ...52 100 ...

Страница 53: ... Does not output the alarm signal REMOTE Outputs the alarm signal by remote operation When selecting REMOTE MANU is available for ALARM TIME enabling remote operation of the alarm output using an external device Selecting AUX6 ON enables remote operation and selecting AUX6 OFF disables remote operation You can also turn on or off the alarm output using the system controller Press the AUX ON button...

Страница 54: ...settings 5S 10S 15S 20S 30S 45S 1M 2M 3M 4M 5M S seconds M minutes Select MENU and choose BACK or END to complete the setting 1 OFF The alarm information does not blink ON When an alarm is detected the camera title displayed in the screen blinks indicating that the alarm is detected While ALARM DISPLAY is set to ON the camera title will flash even when TITLE in DISPLAY is set to OFF If the camera ...

Страница 55: ...rtain part of the surveillance image The privacy mask may be used to protect privacy Up to 4 privacy masks can be set Setting the Privacy Mask over Areas You Want to Hide Turning Configured Privacy Masks On Off and Reconfiguration Masks 55 100 ...

Страница 56: ... be covered and press the SET button The MASK 1 SET SIZE screen appears Use the buttons to adjust the vertical and horizontal sizes of the mask pattern and press the SET button This completes the privacy mask settings The MASK NO SELECT screen appears again and the setting for MASK 1 has been changed to ON Repeat the same procedures above to set MASK 2 to MASK 4 as necessary 1 2 3 4 5 If any other...

Страница 57: ...Select MENU and choose BACK or END to complete the setting numbers which appear in masking order from left to right 6 57 100 ...

Страница 58: ...re SET the mask Available settings You can display up to 4 privacy masks simultaneously on the screen if you turn on all the privacy masks MASK 1 to 4 ON Displays the privacy mask for the mask number you selected OFF Does not display the privacy mask for the mask number you selected SET Resets the privacy mask setting 58 100 ...

Страница 59: ... by password entry PASSWORD CHANGE Changes the password The factory setting value of the password is 1234 For security reasons change your password periodically When the password lock is set entering the password is prompted before performing any menu operation While this option is set to ON only the password administrator can change the menu settings 59 100 ...

Страница 60: ...this procedure until the whole password value ex 1234 is entered and press the SET button When a valid password is entered OK appears Press the SET button again This completes the password lock setting and the PASSWORD screen appears again While the password lock is enabled ON is displayed for PASSWORD LOCK Select MENU and choose BACK or END to complete the setting 1 2 3 When a wrong password is e...

Страница 61: ...61 100 ...

Страница 62: ...procedure until the whole password value is entered and press the SET button When the valid password is entered OK appears When a wrong password is entered NG appears Press the SET button again This disables the password lock function and the PASSWORD screen appears again When the password lock is disabled OFF is displayed for PASSWORD LOCK Select MENU and choose BACK or END to complete the settin...

Страница 63: ...lue ex 1234 is entered and press the SET button When the valid password is entered the PASSWORD NEW PASSWORD screen appears Use the button to select the digit and use the button to select a number for the digit Repeat this procedure until the new password value ex 4321 is entered and press the SET button OK appears under the NEW PASSWORD field and the new password is set Select MENU and choose BAC...

Страница 64: ...button The LANGUAGE screen appears Use the button to select the language used for menu display and press the SET button All the menu displays are changed to the selected language Available settings Select MENU and choose BACK or END to complete the setting 1 2 PAL system region English French German NTSC system region English French Spanish 3 64 100 ...

Страница 65: ...sition in the monitor MIRROR Sets a mirroring mode according to your installation condition of the camera This setting is useful for example when the camera is installed upside down or when performing surveillance through a mirror STABILIZER Corrects images from a shaking camera installed on the roadside or a similar place SYSTEM Sets the preferences when the external system device is connected to...

Страница 66: ... want the camera title and the zoom magnification power to be displayed on the monitor Use the button to select TITLE use the button to choose ON and press the SET button The camera title setting screen appears Use the buttons to select a character for the title from the character selection panel and press the SET button The selected character C in the example below appears in the first digit of t...

Страница 67: ...tting Use the button to select ZOOM RATIO use the button to choose ON and press the SET button The current zoom magnification power appears in the right bottom corner of the screen The camera title can use up to 16 characters indication for the unused digits will not be displayed in the monitor 2 in the character selection panel represents the carriage return character When the character is entere...

Страница 68: ...n power to be displayed and press the SET button The DISPLAY screen appears again Select MENU and choose BACK or END to complete the setting 2 If the display positions of the camera title and the zoom magnification power overlap the camera title precedes in display 3 68 100 ...

Страница 69: ...he SET button For example an image will be rotated vertically and horizontally when HV is selected Available settings Select MENU and choose BACK or END to complete the setting 1 OFF Normal image HV Rotated vertically and horizontally H Rotated horizontally V Rotated vertically 2 69 100 ...

Страница 70: ...nd choose BACK or END to complete the setting 1 2 The higher the correction level the lower the image resolution during correction The angle of view will also be slightly narrower The correction function will not work in the following condition During switching images between color and black white modes when using the Day Night function When the menu screen is displayed Immediately after powering ...

Страница 71: ...ADDRESS setting screen appears Use the button to select the digit and use the button to enter the number and press button Repeat the procedure until the entire address is entered The SYSTEM screen appears again 1 2 COAX coaxial superimposed communication Supports Sanyo s coaxial SSP fast SSP and PELCO C auto recognition 485 RS 485 communication Supports Sanyo s SSP fast SSP auto recognition and PE...

Страница 72: ...epeat the procedure until the entire address is entered The SYSTEM screen appears again Valid address range Use the button to select BAUD RATE and use the button to select the baud rate used for the connection Available settings 19200 9600 4800 2400 Use the button to select TERMINATE and use the button to select the termination setting When you connect multiple devices set the termination setting ...

Страница 73: ...73 100 ...

Страница 74: ...e object is too bright When the object is dark When the object is hard to see in the backlight condition CAMERA BLC When proper white balance adjustment cannot be made CAMERA WHITE BALANCE Recording fast moving object CAMERA SHUTTER SHORT Emphasizing the profile of the object CAMERA APERTURE Adjusting the brightness or contrast level of the entire image CAMERA GAMMA When the camera reacts to sligh...

Страница 75: ...75 100 ...

Страница 76: ...r screen The live image can be displayed reversely by setting a mirroring mode according to your installation condition of the camera This mode is useful for example when the camera is installed upside down or when performing surveillance through a mirror You can display the camera s name on the monitor by setting a specific title to the camera 76 100 ...

Страница 77: ...ge the zooming speed for optical zoom function the SPEED option While zooming operation is achieved by the optical lens mechanism you can zoom in the object further by setting the electronic zooming function 77 100 ...

Страница 78: ...to zoom in the object automatically when the alarm is detected There are 15 available options for the magnification power in zooming You can configure the camera title to blink on the screen when the alarm is detected You can adjust the detection sensitivity to movement or brightness of the object 78 100 ...

Страница 79: ...perture opening value CAMERA IRIS Select MIDDLE or HIGH for the MAX GAIN setting under the AGC option CAMERA AGC Set the electronic shutter setting to slow shutter speed LONG CAMERA SHUTTER Increase the level of electronic sensitivity SENSE UP CAMERA IRIS Adjust the iris level or the aperture opening value CAMERA IRIS When noise occurs in the image because the object is dark enable the digital noi...

Страница 80: ... auto white balance function by setting SMART ATW to ON Although the camera is set to the auto trace white balance ATW mode by default you may choose to set other adjustment modes Set the electronic shutter to the fast mode SHORT Enable the profile compensation function Adjust the gamma correction level Set the sensitivity in focusing LOW in SENSITIVITY Compensate the black white video signal by i...

Страница 81: ...81 100 ...

Страница 82: ...the CONTROL option OPTION SYSTEM Set addresses to individual cameras OPTION SYSTEM When you want to output the alarm signal from the camera to the system controller set the LINE OUT option to ON ALARM ALARM IN Perform the input setting for the control terminal ALARM IN Perform the output setting for the control terminal ALARM OUT 82 100 ...

Страница 83: ...ming of switching or fix the viewing mode to either the color or black white video modes change the option for the DAY NIGHT setting You can save two monitoring condition settings and select the setting according to the installation environment of the camera Use the password lock function While the password lock function is enabled the menu operations cannot be made unless the valid password is en...

Страница 84: ...Performing a certain setting may limit another setting Refer to the following troubleshooting topics when in trouble for setting 84 100 ...

Страница 85: ...option MOTION is set to ON The fast shutter speed SHORT can be set 1 The SENSE UP setting cannot be made while AUTO is selected for IRIS In the following conditions the SENSE UP option is fixed to OFF and the level of electronic sensitivity cannot be configured 1 2 2 The SHORT and LONG options cannot be selected for the SHUTTER setting In the following conditions the SHUTTER option is fixed to OFF...

Страница 86: ...hen the Day Night function DAY NIGHT is set to AUTO 3 The auto gain control AGC cannot be set to OFF In the following conditions the AGC option is fixed to ON and the auto gain control cannot be disabled 1 2 4 The motion sensor option MOTION cannot be set to ON 86 100 ...

Страница 87: ...TTER is set to LONG When ON is selected for AGC and the digital noise reduction DNR is set to ON In the following conditions the MOTION option is fixed to OFF and the motion sensor functions cannot be configured 1 2 5 The V RESO UP option in the ZOOM SETTING screen cannot be set to ON In the following conditions the V RESO UP option is fixed to OFF and the vertical resolution increase cannot be co...

Страница 88: ...to OFF 6 The settings in the ALARM IN screen cannot be made When the DAY NIGHT option is set to COLOR and the EXIT ALARM option is set to other than OFF 1 or 2 D N is displayed in the top right corner of the ALARM IN screen and the menu settings other than the POLARITY option cannot be made 7 The setting you made has been forced to be changed When you made the following setting other relevant sett...

Страница 89: ...MANU is selected for IRIS and the electronic iris EI option is set to ON When SHORT or LONG is selected for the SHUTTER setting the option is changed to OFF When the Day Night function DAY NIGHT is set to AUTO When the AGC option is set to OFF the option is changed to ON When ON is selected for AGC and the digital noise reduction DNR is set to ON 89 100 ...

Страница 90: ...When the V RESO UP option in the ZOOM SETTING screen is set to ON the option is changed to OFF 90 100 ...

Страница 91: ...ion ON Horizontal and Vertical compensation settings adjustable and OFF Gamma correction 0 45 1 MODE1 Increases contrast and MODE2 Increases contrast further Electronic shutter Fast shutter speeds SHORT NTSC 1 60 1 100 1 250 1 500 1 1000 1 2000 1 4000 and 1 10000 PAL 1 50 1 120 1 250 1 500 1 1000 1 2000 1 4000 and 1 10000 Slow shutter speeds LONG x1 x2 x4 x8 x16 and x32 Camera titles ON OFF max 16...

Страница 92: ...Weight Without sunshade Approx 1 8 kg With sunshade Approx 2 0 g 92 100 ...

Страница 93: ...Burst Signal BURST Aperture APERTURE Coaxial Superimposed Communication COAX RS 485 Communication 485 Address ADDRESS Protocol PROTOCOL Baud Rate BAUD RATE Terminator TERMINATE SSP Security Serial Protocol IP Address IP ADDRESS Port Number PORT DHCP Dynamic Host Configuration Protocol Subnet Mask SUBNET MASK Gateway GATEWAY IP66 93 100 ...

Страница 94: ...ral as possible The luminosity of the monitor screen changes according to the strength of signal input from the camera The numerical value showing the level change of luminosity according to the strength change of signal input is called gamma value The level of luminosity does not change in proportion to the strength of input signal The changes of the level and strength are expressed with a curve ...

Страница 95: ... the compensation level of the camera to LOW MIDDLE or HIGH according to the blurring level of the camera When a compensation level is set for the camera the electronic zoom will expand the image i e the angle of view will change With the level set to HIGH the angle of view will become the narrowest when the level of compensation is the greatest and the sway of the image will be suppressed most ef...

Страница 96: ...HIGH about 1 2x MIDDLE about 1 1x 96 100 ...

Страница 97: ...s The DNR is a function that discriminates and removes only the noise from the brightness and color signals of the image thus reproducing a beautiful high quality image A color sync signal required for color reproduction Usually the monochrome signal is not superimposed with any burst signal If there is any image disorder when the image is switched from color to black and white with a peripheral d...

Страница 98: ...ange data The item SANYO which supports SANYO s SSP fast SSP protocol or PELCO which supports the PELCO D protocol can be selected when this model is in RS 485 communication A unit of modulation rate per second The higher the rate is the larger the amount of data transmitted in a definite period will be The baud rate can be set to 2400 4800 9600 or 19200 The speed of transmission is expressed by b...

Страница 99: ...ansmission occurs based on the combination of the IP address and the port number The port number is represented as a 16 bit number and specified in the range of 0 to 65535 DHCP is a protocol used by a network server to automatically allocate IP address and other network information to clients on the network The subnet mask refers to the value used to obtain the network address of a subnet segment ...

Страница 100: ... IEC International Electrotechnical Commission and JIS Japanese Industrial Standards This camera meets the requirements of IP66 which means it provides excellent protection against water and dust for outdoor use However the camera cannot be immersed in water or used under high water pressure 100 100 ...

Отзывы: