background image

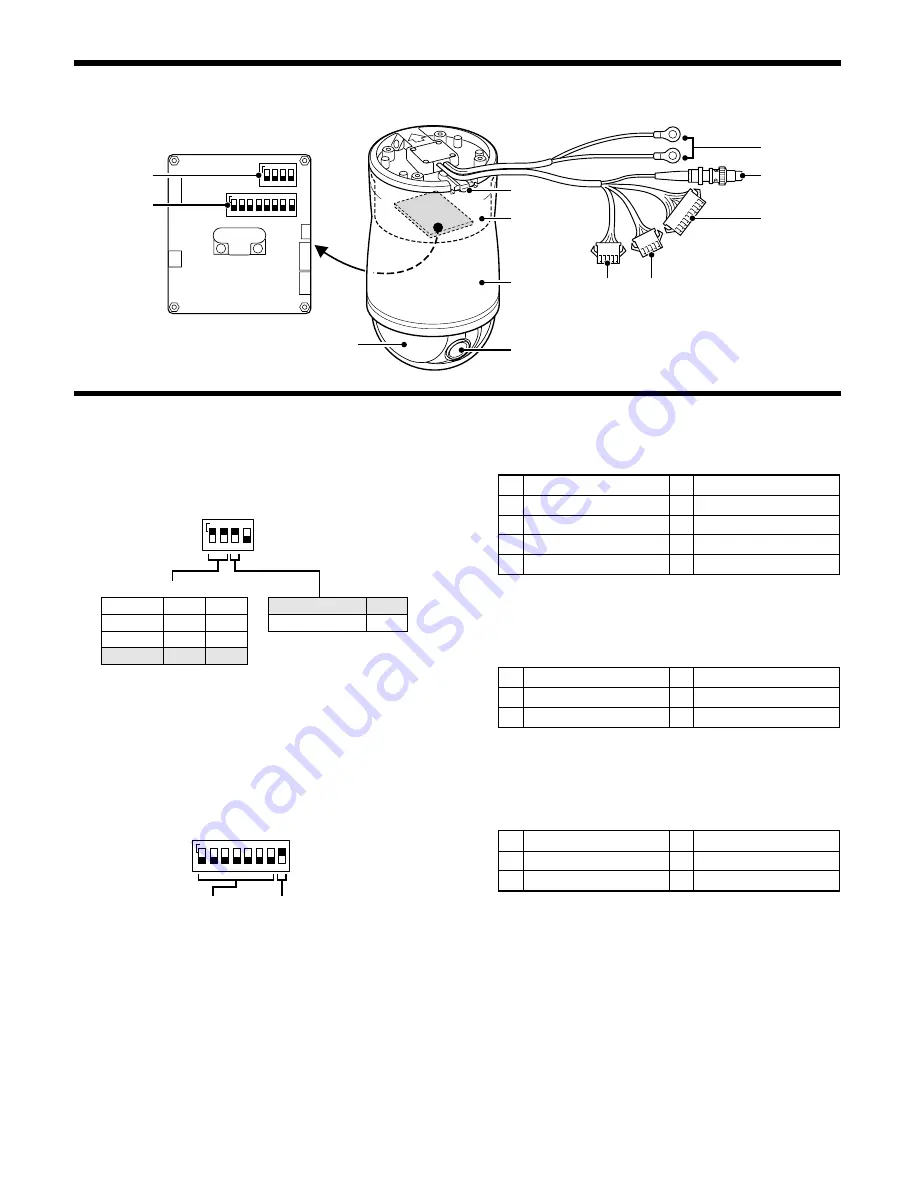
PART NAMES

1

2

3

4

5

6

7

8

ON

1

2

3

4

ON

1

2

3

4

5

6

7

8

9

F

H

G

1

System control setting switches (See p4)

Sets baud rate and sets RS485 or coaxial control.

Baud rate setting

Initial setting is 19200bps.

RS485 or coaxial control setting

Initial setting is coaxial control.

2

Address setting switches (See p4)

The address of the camera set here is needed for operating the
camera through a system controller. In addition, when the
camera is connected to the system, be sure to set the terminate
setting to ON when the camera is in the last connected position.

Address setting (See p45)

Address values can be between 0 and 127.

Initial setting is for all switches OFF.

Terminate setting

Initial setting is ON.

3

Power supply unit removal lever

This lever is be used to remove the power supply from the
camera unit when switch settings need to be made.
(See p4)

4

Power supply unit

5

Camera unit

6

Lens

7

Dome cover

8

Power supply cable (AC 24 V, 60 Hz)

9

Video output connector (BNC)

F

Alarm input connector (10 pin)

Use for functions such as intruder detection. Connect the
supplied alarm input expansion connector to this connector and
install the alarm detection switch on the cable side.

1

Alarm input 1

6

Alarm input 5

2

Alarm input 2

7

Alarm input 6

3

Alarm input 3

8

Alarm input 7

4

Alarm input 4

9

Alarm input 8

5

GND

10 GND

G

Alarm output connector (5 pin, white)

Use for controlling peripheral equipment or supplying power to
sensors and other devices. Connect the supplied alarm output
expansion connector to this connector and use to establish
output to the cable side of the connection.

1

Alarm output 1

4

N. C

2

Alarm output 2

5

GND

3

GND

* Open collector output, drive capacity up to 18 V, 50 mA.

H

Camera control connector (5 pin, black)

Connect this line when controlling the camera by RS485.
Connect the supplied camera control expansion connector to
this connector and connect peripheral equipment such as a
system controller to the cable.

1

A  (+)

4

B  (–)

2

B  (–)

5

GND

3

A  (+)

1

2

3

4

ON

Baud rate (bps)

2400

4800

9600

19200

OFF

OFF

ON

ON

OFF

ON

OFF

ON

Coaxial control

RS485

ON

OFF

1

2

3

4

5

6

7

8

ON

Address setting

Terminate setting

English

– 3 –

Содержание VCC-9300

Страница 1: ...ler et d utiliser cet appareil veuillez lire ce manuel attentivement Assurez vous de le garder à portée de la main pour référence ultérieure Acerca de este manual Antes de instalar y usar este aparato lea detenidamente este manual Asegúrese de guardarlo a mano para futuras referencias Dome type camera English GB Caméra de type dôme Français F Cámara tipo domo Español E L53F4 US VCC 9300 GB 2002 6 ...

Страница 2: ...l where the temperature range will stay between 10 C and 50 C no condensation Cleaning Dirt can be removed from the cabinet by wiping it with a soft cloth To remove stains wipe with a soft cloth moistened with a soft detergent solution and wrung dry then wipe dry with dry soft cloth Do not use benzine thinner or other chemical product on the cabinet as that may cause deformation and paint peeling ...

Страница 3: ...talled and used in accordance with the instructions may cause harmful interference to radio communications However there is no guarantee that interference will not occur in a particular installation If this equipment does cause harmful interference to radio or television reception which can be determined by turning the equipment off and on the user is encouraged to try to correct the interference ...

Страница 4: ...ctor BNC F Alarm input connector 10 pin Use for functions such as intruder detection Connect the supplied alarm input expansion connector to this connector and install the alarm detection switch on the cable side 1 Alarm input 1 6 Alarm input 5 2 Alarm input 2 7 Alarm input 6 3 Alarm input 3 8 Alarm input 7 4 Alarm input 4 9 Alarm input 8 5 GND 10 GND G Alarm output connector 5 pin white Use for c...

Страница 5: ...slot G then turn the camera unit in the direction of the arrow A clicking sound will be heard when the power supply unit removal lever drops into place indicating that the camera unit is properly set Note The camera unit is not properly set if a clicking sound is not heard Check that the unit is firmly set Do not continue to turn the camera unit after it has been properly set Doing so could damage...

Страница 6: ...trol expansion connector 5 pin Alarm output expansion connector 5 pin Alarm input expansion connector 10 pin Alarm output connector 5 pin Alarm input connector 10 pin Digital video recorder sold separately Connect an external switch to an ALARM IN connector Pin 1 is shown by the arrow Connecting external alarm sensors To enable external alarm sensors connect the supplied alarm input expansion conn...

Страница 7: ... 14 5 1 9 13 7 3 11 15 8 4 12 16 TV monitor sold separately System controller sold separately RS 485 connector Ground C Ground C ALARM IN connector Switch output connector Time lapse VCR sold separately or Digital video recorder sold separately CONTROL SIGNAL SEPA MIX GND A B RS485 System controller sold separately COAX SSP converter sold separately 24V AC GND TV monitor sold separately Video outp...

Страница 8: ... ADDRESS position 1 3 of the ADDRESS TERMINATE dip switches on the back panel 3 Install the power supply unit and turn on power to all equipment When the power is turned on the camera will perform its startup movements The camera s address will flash on the monitor screen 4 Operation of the camera with the system controller Operation methods are described below For detailed information about opera...

Страница 9: ...ons Sets 1 of 9 possible VIEW SETTING patterns for the camera AUTO MODE settings See p35 Sets ordering method for sequential automatic display by numeric order or random selection Sequential pan Selects image tracking memory 30 seconds or 60 seconds Tour mode Sets Auto pan movements between start point and end point Auto pan mode 6 ALARM settings See p40 Alarm input 8 related items Sets alarm inpu...

Страница 10: ... MENU screen will reappear Information in the MAIN MENU screen will appear in the selected language 4 Canceling a settings screen Use the joystick lever l to select FIN for MENU then press the ENTER button The normal screen will reappear MAIN MENU LANGUAGE SET PRESET POSITION SET CAMERA SET AUTO MODE PAN AUTO FLIP OFF ALARM OFF FREEZE OFF REFRESH OFF STARTING POINT OFF MENU END ENTER LANGUE LANGUA...

Страница 11: ... to delete stored information for this preset number PRESET NO 1 represents the home position and cannot be deleted so the DELETE command is not shown for number 1 C TITLE This item sets the camera ID and title for the preset number When a title is set it will be superimposed on the screen for that position D CAMERA VIEW This enables adding of camera setting patterns made in the VIEW SETTING menu ...

Страница 12: ... item can be used to display information distinguishing which camera is in use Refer to Camera ID setting for further information See p12 B Deleting preset positions DELETE Example Deleting preset position 3 1 In the PRESET NO SELECT screen select preset number 3 and press the ENTER button The PRESET SETTING screen will appear 2 Use the joystick lever j or l to move the cursor to SET for DELETE an...

Страница 13: ...AM1 ID TITLE CAM1 ID TITLE CAM1 FLOOR 1 Camera ID and TITLE screen 1 The letter selection palette By moving the cursor to letters or numbers in this palette you can select characters Selected characters will appear in the corresponding field under ID or TITLE 2 ID TITLE ID The ID for this camera is set by preset position 1 It cannot be set by other preset position numbers The ID entry field shows ...

Страница 14: ...viewing patterns select the number of the most suitable pattern for each of the preset surveillance locations Use the joystick lever j or l to move the cursor to CAMERA VIEW then use the joystick lever d or c to select the value to a pattern number Available settings 0 8 E PAUSE TIME settings Sets the duration time of image pausing when using sequential automatic display Sequential pan Use the joy...

Страница 15: ... ZOOM SET PRESET OFF MENU BACK VIEW SETTING 1 IRIS AUTO WHITE BALANCE ATW SHUTTER OFF MOTION OFF APERTURE ON AGC ON GAMMA ON PRESET OFF MENU BACK VIEW SETTING 0 IRIS AUTO WHITE BALANCE ATW SHUTTER OFF MOTION APERTURE ON AGC ON GAMMA ON PRESET OFF MENU BACK About creating image setting files in VIEW SETTING You can set 9 different patterns with view files Use the joystick lever d or c to change the...

Страница 16: ...The CAMERA SETTING screen will appear 2 Use the joystick lever j or l to select SET for PRIVACY MASK then press the ENTER button The PRIVACY MASK SETTING screen will appear 3 Use the joystick lever j or l to move the cursor to SET for MASK SET and press the ENTER button The MASK NO SELECT screen will appear Note When PASSWORD LOCK is ON moving the cursor to MASK SET and press the ENTER button to b...

Страница 17: ...ee the example below for an illustration of the use of 8 gray masks The area under a mask can be seen when the camera is changing preset positions To compensate for this make the masks a little larger when necessary 8 Use the joystick lever d or c to move the gray mask then press the ENTER button The SIZE screen will appear and the mask that was positioned in the POSITION screen will be displayed ...

Страница 18: ... the same steps to enter 2 3 and 4 then press the ENTER button OK will appear and BACK for MENU will be blinking Press the ENTER button again The PRIVACY MASK SETTING screen will reappear and ON will be blinking for PASSWORD LOCK PASSWORD changes You can change the password with PASSWORD LOCK in either the ON or OFF setting 1 Use the joystick lever j or l to move the cursor to SET for PASSWORD CHA...

Страница 19: ... Ex 3 Available settings 1 2 3 4 Quickest speed 6 Canceling a settings screen Use the joystick lever l to select BACK for MENU then press the ENTER button The LENS screen will reappear To return to the normal screen use the joystick lever l c to select END for MENU then press the ENTER button Setting the autofocus AUTO Sets a limit for near distance focusing and sets focusing sensitivity and focus...

Страница 20: ...oystick lever j or l to move the cursor to SET for AREA and press the ENTER button The AREA SETTING screen for AREA 2 initial setting will appear to allow setting of focus target area 6 Use the joystick lever d or c to select the focus target area Ex 3 The focus target area will become narrow Available settings 1 full screen 2 center of screen 3 smaller center 4 Canceling a settings screen Use the...

Страница 21: ...ilable settings OFF x2 x4 x8 x16 16 power V RESO UP Vertical resolution setting 6 Use the joystick lever j or l to move the cursor to V RESO UP then use the joystick lever d or c to select the vertical resolution Ex ON Note When V RESO UP is set to ON vertical resolution sensitivity for still pictures in the electronic zoom field will be improved but afterimages of moving objects will be more cons...

Страница 22: ...tes an alarm when a suspicious figure is detected Each of the settings will enable certain kinds of detection based on the natural image swaying trees flickers of light etc It is also possible to enable zooming in on target objects and intruders that have unusual brightness levels moving bright or are fast moving E Profile compensation setting APERTURE See p33 This setting emphasizes the target ob...

Страница 23: ... center and corrects according to the best image obtained See p23 MASK 48 multi spot metering Covers bright areas such as persons with mask patterns and treats light measurement output as irrelevant See p24 2 Use the joystick lever d or c to select the value of BLC WEIGHT Sets backlight and brightness level Available settings 0 15 Note The larger the number the more backlighting works 3 Use the jo...

Страница 24: ...P Weighting is at top 2 BOTTOM Weighting is at bottom 3 LEFT Weighting is at left 4 RIGHT Weighting is at right 5 CENT FIX Center weighting is fixed by the number 7 Example of setting the mask in the center weighting position 7 Canceling a settings screen Use the joystick lever l to select BACK for MENU then press the ENTER button The IRIS SETTING screen will reappear To return to the normal scree...

Страница 25: ...ailable settings OFF x2 x4 x8 x16 x32 Note Electronic sensitivity boosting SENSE UP automatically lengthens the CCD exposure time in dark situations Accordingly do not use for light target objects Because exposure time is lengthened while in operation moving target objects may cause conspicuous afterimages and blurs It is not possible to set SENSE UP ON or SHUTTER LONG when MOTION is set to ON Whe...

Страница 26: ...ettings 0 100 Level of opening Note The smaller the value the more the video level drops becoming darker The LEVEL setting controls both AGC circuit gain and shutter speed changing the amount of exposure 7 Canceling a settings screen Use the joystick lever l to select BACK for MENU then press the ENTER button The VIEW SETTING screen will reappear To return to the normal screen use the joystick lev...

Страница 27: ...ithfully in the ATW method See p28 MWB Manual white balance Fine adjustments for preferred colors can be done manually This method is preferable when suitable colors cannot be obtained with the ATW method White balance additional settings 1 MWB setting 1 Use the joystick lever j or l to move the cursor to WHITE BALANCE then use the joystick lever d or c to select a white balance type Ex MWB Then p...

Страница 28: ...s the ENTER button again 4 Use the joystick lever j or l to move a mask pattern to the bottom area of the screen and continue holding the joystick lever straight down for 3 seconds The PRESET and MENU items will appear on the screen Use the joystick lever j or l to select BACK then press the ENTER button The ATW SETTING screen will reappear SMART ATW setting If saturation is high or a scene is bri...

Страница 29: ... lever j or l to move the cursor to SET for GO TO MWB and press the ENTER button The MWB SETTING screen will appear and the R value will be blinking 4 Use the joystick lever d or c to adjust the value for R red Available settings 0 255 Note The larger the number the stronger red becomes 5 Use the joystick lever j or l to move the cursor to B then use the joystick lever d or c to adjust the Blue va...

Страница 30: ...en use the joystick lever d or c to select the speed mode for the electronic shutter Ex LONG Then press the ENTER button The ES SETTING screen will appear and x1 1 60 sec will be blinking This setting is suitable for dark target objects Note When a shutter speed is set it can also be adjusted with the ELS button on the system controller 2 Use the joystick lever d or c to select a electronic shutte...

Страница 31: ...rn will expand downward Repeating this motion will expand the pattern in the up and down direction Tilting the joystick lever to the left will reduce the pattern size 2 Determine the horizontal size Use the joystick lever l to move the cursor to the 1 for H then tilt the joystick lever to the right c The H value horizontal pattern will change to 2 and the detection pattern will expand to the left ...

Страница 32: ...tivity can be set so that natural motions on the screen such as wind and light changes will not be detected When this is necessary activate the following setting 1 In the MOTION SETTING select SET for SENSITIVITY and press the ENTER button The SENSITIVITY screen will appear When necessary adjust the following settings Motion sensitivity MOVE setting Use the joystick lever j or l to move the cursor...

Страница 33: ... is set in the MOTION SETTING screen Use the joystick lever j or l to move the cursor to ZOOM then use the joystick lever d or c to select the zoom magnification power Ex x2 Available settings OFF x1 4 x2 x2 8 x4 x6 Note When a suspicious motion is detected the camera zooms in according to the set magnification power The zoom takes effect for 5 seconds and then returns to the previous magnificatio...

Страница 34: ...the MAIN MENU select SET for CAMERA and press the ENTER button The CAMERA SETTING screen will appear 2 Use the joystick lever j or l to move the cursor to VIEW SETTING then press the ENTER button Ex 1 The VIEW SETTING 1 screen will appear 3 Use the joystick lever j or l to move the cursor to AGC and then use the joystick lever d or c to select the compensation level Available settings ON DNR digit...

Страница 35: ...ING then press the ENTER button Ex 1 The VIEW SETTING 1 screen will appear 3 Use the joystick lever j or l to move the cursor to ON for GAMMA then use the joystick lever d or c to select the gamma correction Available settings OFF No gamma correction ON Gamma correction γ 0 45 SMART 1 Correction 1 SMART 2 Correction 2 improves contrast for dark locations Note When using SMART 1 or SMART 2 the targ...

Страница 36: ...acks can be recorded TOUR 1 and TOUR 2 In addition TOUR 1 and TOUR 2 can be combined to create a separate 60 second image track When a W track is created stored data for TOUR 1 and TOUR 2 is cleared To do this set TOUR to W The image track can be activated by pressing the TOUR and buttons on the CAMERA keypad of the system controller TOUR Tour mode setting See p36 C The PAN function stores a start...

Страница 37: ...ever l c to select END for MENU then press the ENTER button B Tour mode setting Before recording in TOUR mode move the camera in the normal viewing mode to the location from which to start the TOUR mode This will make effective use of the tour time Example A 30 second image track of camera pan tilt and zoom operations will be recorded for TOUR 2 1 In the MAIN MENU select TOUR for AUTO MODE and pre...

Страница 38: ...N ON indicates tour replay availability When TOUR MODE is in use VIEW SETTING will be set to 0 6 Canceling a settings screen Use the joystick lever l to select BACK for MENU then press the ENTER button The MAIN MENU screen will reappear To return to the normal screen use the joystick lever l c to select END for MENU then press the ENTER button C Auto pan setting Example A start point and end point...

Страница 39: ...ailable settings LEFT Camera pans left from start point to end point RIGHT Camera pans right from start point to end point 8 Use the joystick lever j or l to move the cursor to PAN SPEED then use the joystick lever d or c to adjust the speed for the auto pan Ex 8 Available settings 1 slow 15 fast 9 Canceling a settings screen Use the joystick lever l to select BACK for MENU then press the ENTER bu...

Страница 40: ...FLIP Use the joystick lever d or c to change OFF to ON Note The screen image will be flipped 180 degrees when a tilt operation exceeds the straight down position The timing for this flip will be at the end of the tilt operation or at the tilt limit 2 Use the joystick lever j or l to move the cursor to END then press the ENTER button To return to the normal screen ENTER MAIN MENU LANGUAGE SET PRESE...

Страница 41: ...l equipment ALARM OUT For example when ALARM OUT is set to 1 in the ALARM IN 1 setting screen and ALARM OUT is set to 1 in the selection screen the alarm output image becomes the camera image taken after moving to preset position 1 If set to ALARM IN 3 image is from preset position 3 By connecting the camera s alarm output connector 1 or 2 to the input terminal of a time lapse video recorder or di...

Страница 42: ...move to a PRESET POSITION Motion sensor input setting MOTION Matches information from the camera s motion sensor and the external alarm and outputs it Use the joystick lever j or l to move the cursor to MOTION then use the joystick lever d or c to select the input Available settings OFF Does not output a motion sensor alarm AND Outputs an alarm when an external alarm input and motion sensor alarm ...

Страница 43: ...anceling a settings screen Use the joystick lever l to select BACK for MENU then press the ENTER button The ALARM screen will reappear To return to the normal screen use the joystick lever l c to select END for MENU then press the ENTER button B Alarm output setting 1 In the MAIN MENU select ON for ALARM and press the ENTER button The ALARM screen will appear 2 Use the joystick lever j or l to mov...

Страница 44: ...eriods of time the PRESET POSITIONS can also slip from their original positions To avoid these kinds of situations the REFRESH function performs a cleaning of the contact area In the MAIN MENU move the cursor to REFRESH then use the joystick lever d or c to select SET then press the ENTER button The message NOW REFRESH appears on screen and cleaning of the horizontal contacts begins The normal vie...

Страница 45: ...sition marked by FRONT is 0 degrees ON A special position that has been set is 0 degrees SET Sets the designated surveillance position as 0 degrees Note Calibration of degrees is in clockwise direction East is 90 degrees when north is 0 degrees The camera s angle information is taken and sent through the communications line for status purposes Sent through the RS 232C line on the system controller...

Страница 46: ... m 55 m m m m m 56 m m m 57 m m m m 58 m m m m 59 m m m m m 60 m m m m 61 m m m m m 62 m m m m m 63 m m m m m m 64 65 m 66 m 67 m m 68 m 69 m m 70 m m 71 m m m 72 m 73 m m 74 m m 75 m m m 76 m m 77 m m m 78 m m m 79 m m m m 80 m 81 m m 82 m m 83 m m m 84 m m 85 m m m Address Camera No Switch numbers 86 m m m 87 m m m m 88 m m 89 m m m 90 m m m 91 m m m m 92 m m m 93 m m m m 94 m m m m 95 m m m m m...

Страница 47: ... sensitivity boosting AUTO OFF works with auto iris Up to x32 max setting possible White balance ATW AWC MWB AGC gain ON OFF MANUAL Motion detector ON OFF individual settings possible Aperture H V setting possible Privacy masking ON OFF max of 8 masked locations Wide view screen 1 screen max 4 masks Password lock possible Alarm input output External input 8 External output 2 NO Normal open NC Norm...

Страница 48: ...d masking patterns can be placed over defined areas to protect privacy PRIVACY MASK One push automatic white balance is available to adjust the image in surveillance locations where faithful color reproduction is difficult Backlight compensation can be set to one of three different methods multi spot evaluative metering 5 spot centerweighted average metering or 48 multi spot metering The monitor s...

Страница 49: ... to repairs or replacements necessitated by any cause beyond the control of SFC including but not limited to any malfunction defect or failure caused by or resulting from the use of any products operated outside of the operating temperature ranges stated in our product specification i e between 41 and 104 degrees Farenheit or between 5 and 40 degrees Celsius unauthorized service or parts improper ...

Страница 50: ...Printed on recycled paper Imprimé sur du papier recyclé Impreso en papel reciclado SANYO Electric Co Ltd 1AC6P1P2559 L54F4 US 0602KP CZ Printed in Japan L54F4 US VCC 9300 GB 2002 6 3 ...

Отзывы: