background image

14

English

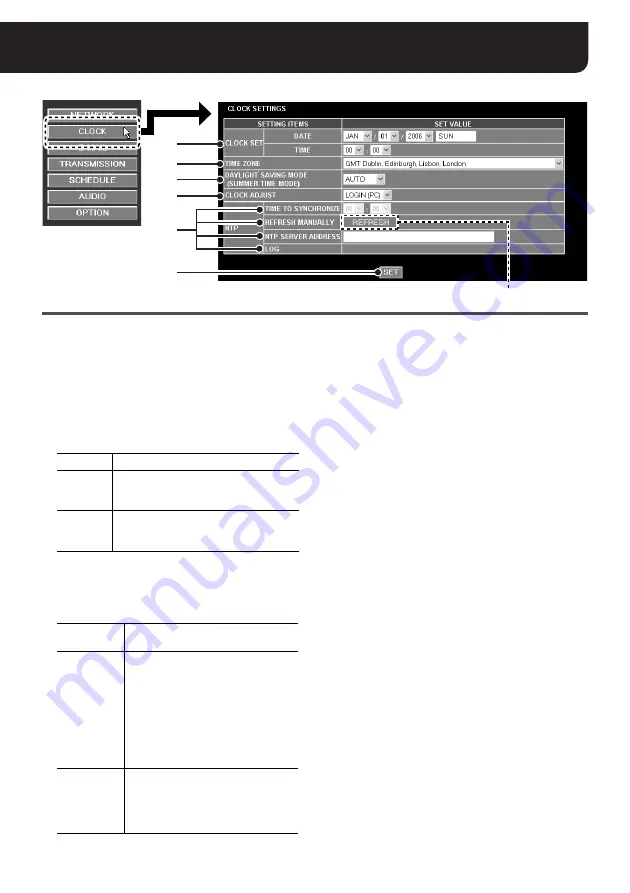
CLOCK SETTINGS

 (“admin” only)

1

CLOCK SET

Set the date and time for the clock built into the 
camera.

2

TIME ZONE

Selects the time zone where the camera is used.

3

DAYLIGHT SAVING MODE
(SUMMER TIME MODE)

Sets the summer time switching mode.

When “MANUAL” is selected, the summer time 
manual setting screen is displayed.

4

CLOCK ADJUST

Can be used to adjust date and time automatically.

5

NTP settings

The following configurations can be made only when 
the [CLOCK ADJUST] preference is set to “

ON 

(NTP)

”.

• TIME TO SYNCHRONIZE

Specify the time for performing the 
automatic clock adjustment.

• REFRESH MANUALLY

When you adjust date and time manually, 
click the [REFRESH] button to make 
adjustment.

• NTP SERVER ADDRESS

Enter the domain name or IP address of 
the NTP server used for retrieving the 
date and time information.

• LOG

Displays the date and time for the 
automatic clock adjustment last 
performed.

6

[SET] button

After completing the settings, click this button to 
confirm the settings.
If you change the setting on the [TIME ZONE] or 
[DAYLIGHT SAVING MODE (SUMMER TIME 
MODE)] preference, the connection will be 
automatically disconnected, and after about 
20 seconds it will be established again.

1
2
3
4

5

6

[REFRESH] button

NO USE

Do not set summer time.

AUTO

Automatically switches between 
standard time and summer time 
according to the [TIME ZONE] setting.

MANUAL

Used when manually setting the start 
and finish dates and times of summer 
time.

OFF

Automatic clock adjustment is not 
used.

ON (NTP)

Adjusts the clock automatically by 
retrieving the date and time 
information from the NTP server. 
Adjustment will be made at the 
following timing:

• When you turn the camera on
• The time you specified in the 

[TIME TO SYNCHRONIZE] 
preference (

5

)


(Daily)

LOGIN (PC)

Performs the automatic clock 
adjustment during login process by 
retrieving the date and time 
information from the PC used for 
accessing the camera.

Содержание VA-80LAN

Страница 1: ...INSTRUCTION MANUAL VA 80LAN Option Board Network ...

Страница 2: ...itoring Live Video In The Main Screen 8 Using The Main Screen 9 How To Use the Control Panel 9 Other operations 10 Establishing Voice Communication 11 Selecting the Operating Conditions 12 NETWORK SETTINGS 13 CLOCK SETTINGS 14 E MAIL SETTINGS 15 IMAGE TRANSFER SETTINGS 17 For HTTP connection 17 For FTP connection 18 SCHEDULE SETTINGS 21 SCHEDULE 21 AUTO MODE SCHEDULE 22 HOLIDAY SETTINGS 23 AUDIO S...

Страница 3: ...ed and or audio interrupted depending on the environment of use Copyright notice This instruction manual is copyrighted by SANYO Electric Co Ltd No materials contained in this manual may be reproduced in any format without the prior permission of the copyright holder Microsoft Windows and Internet Explorer are registered trademarks or trademarks of Microsoft Corporation in the United States and ot...

Страница 4: ...lower as the number of connected users increases 1 Installing the option board on the camera Refer to the supplied INSTALLATION MANUAL for how to install the option board on the camera and make connection using LAN cables Refer to 2 Configuring the TCP IP settings on PC Page 4 3 Accessing the camera Enter your user name and password to access the camera using the Web browser Page 6 4 Monitoring li...

Страница 5: ...en appears The LAN interface Ethernet adapter configurations appear in the LAN or High Speed Internet section 3 Right click on the LAN interface Ethernet adapter configuration used for accessing the camera and click Properties in the context menu General tab appears in the Local Area Connection 2 Properties dialog box 4 In the This connection uses the following items list box select the Internet P...

Страница 6: ... s settings by clicking Tool and then Internet Options When accessing the camera using SSL encryption for video signal 1 Click the Advanced tab 2 Make sure that the Use SSL 2 0 and Use SSL 3 0 options under the Security section are enabled If disabled select the options When the video update is unstable 1 Click the General tab 2 Under the Temporary Internet Files section click the Settings button ...

Страница 7: ...e used for display and click the SET button Available languages English French German Spanish Japanese After selecting the display language the main screen appears and the live video from the camera is displayed in the video display area From the second time onwards if the language selection screen is left for longer than 10 seconds the last display language is automatically selected and the main ...

Страница 8: ...the UPnP connection In the OPTION SETTINGS screen set the UPnP option to ON see page 25 The factory setting value is ON How to access the camera 1 Open the My Network Places window The icon for the camera detected on the network appears in the window 2 Double click the icon This establishes the connection to the camera and the authentication dialog appears Display name in the My Network Places win...

Страница 9: ...LARM are displayed in red or orange 3 Video display area The live video from the camera is displayed 4 DATE See page 14 The date and time specified in the CLOCK SETTINGS screen is displayed 5 Capture button See page 10 Displays the still image in a separate window 6 Voice control buttons See page 11 Allows you to enable or disable the voice input output send receive ON OFF respectively as well as ...

Страница 10: ...cts movements in the object according to changes in brightness and automatically switches from frame to field mode When the field mode is switched to vertical resolution deteriorates to some degree however there is less jaggedness of moving object s edge If the change in brightness is too small DFFC may not function Changes the camera orientation toward the direction indicated by arrow mark The ca...

Страница 11: ...ure button displays the still image at the moment of clicking the button in a separate window While displaying the still image the live video in the main screen continues to be shown as a moving picture To save the still image right click on the still image to be saved to display context menu and select Save As To close the window displaying the still image click Close 2 Using the alarm output Ala...

Страница 12: ...Control Panel 2 Select the Voice tab and click the Volume button under Voice playback 3 In the Volume Control window select Properties from the Options menu Select the Mic Volume check box under Show the following volume controls and click OK 4 Click the Advanced button under Mic Volume if no Advanced button is shown select Advanced Controls from the Options menu 5 In the Advanced Controls for Mic...

Страница 13: ...n be attached to the e mail 4 TRANSMISSION See pages 17 20 Used for configuring the recording preferences when recording the live video using the recorder software You can select the image transfer mode either from HTTP or FTP 5 SCHEDULE See pages 21 23 Used for configuring the scheduling preferences including alarm notification alarm image transfer in the FTP mode alarm image transfer using the t...

Страница 14: ...cified in the SSL setting above You can assign a value between 1 and 65535 to the SSL port number Note Set the port number in the range of 1 65535 but make sure that it doesn t overlap with the AUDIO PORT NUMBER on the AUDIO SETTINGS screen F PASSWORD Specify the login password according to each user name guest admin MEMO When you enter a blank guest password no password is specified the authentic...

Страница 15: ...me for the automatic clock adjustment last performed 6 SET button After completing the settings click this button to confirm the settings If you change the setting on the TIME ZONE or DAYLIGHT SAVING MODE SUMMER TIME MODE preference the connection will be automatically disconnected and after about 20 seconds it will be established again 1 2 3 4 5 6 REFRESH button NO USE Do not set summer time AUTO...

Страница 16: ...pecifies the sender s e mail address 4 RECIPIENT MAIL ADDRESS Specifies the recipient s e mail address to which the e mail is sent You can specify up to five e mail addresses 1 Type the recipient s e mail address and check the check box to the left of the e mail address field 2 When you want to attach the image file to the e mail check the check box for the recipient under the ATTACH IMAGE title 5...

Страница 17: ...ication e mail The camera title date and time of e mail transmission and the IP address of the camera are automatically inserted into the notification e mail as default information SUBJECT Specifies the e mail subject up to 32 characters displayed at the top of the e mail message TEXT Specifies your additional comment up to 64 characters appended after the default information 3 TX RATE Specifies t...

Страница 18: ...ove 2 Select the BUFFER SIZE option for specifying the buffering capacity for recording each alarm image According to the value you select perform the following settings One alarm image set containing both the pre and post alarm images is stored in the camera and then the alarm image set is transferred one by one to the VA SW3050 software Note If PRE POST is set at other than 0 100 the LIVE NORMAL...

Страница 19: ... following FTP information is specified in these setting items PORT NUMBER Please set the same number as the control port number configured on the server side Normally 21 is set Note Do not set 3000 5000 10000 10001 and 38214 SERVER ADDRESS Note When you specify the domain name also specify the DNS of your network USER ID PASSWORD FTP PASSIVE 1 2 3 5 4 1 2 3 ...

Страница 20: ...server Note Depending on the shooting conditions the number of images that are transferred will differ When the alarm is detected only the post alarm images will be transferred to the FTP server at the interval you specified in the TX RATE setting Transfer may not end within the set time because communication speed may differ depending on the network or FTP server environment OFF Disables the alar...

Страница 21: ...nfigures the image transmission interval 5 SET button After completing the settings click this button to confirm the settings MEMO When SCHEDULE is selected for the ALARM or TIMER option specify the duration for the alarm image to be transferred and set the ALARM FTP TIMER FTP to ON on the SCHEDULE SETTINGS screen see page 21 The file names of alarm images are composed as follows File name Camera ...

Страница 22: ...e specified schedule can be applied to the following five functions TIMER SMTP Enable disables the e mail transmission using the timer TIMER FTP Enables disables the image transmission using the timer in the FTP mode ALARM SMTP Enables disables transmission of the alarm notification e mail ALARM FTP Enables disables alarm image transmission in the FTP mode REMOTE ALARM ACTIVE Enables disables Alar...

Страница 23: ...COPY button MEMO When the auto mode operation completes the camera returns to the original monitoring position However when the auto return function is enabled on the camera the specified operation mode is activated after the auto mode operation When you perform any camera operation pan tilt zoom menu operation during the auto mode operation the camera does not return to the original monitoring po...

Страница 24: ... is SUN 2 MONTH DAY Specifies the dates you want to treat as holidays For the date specified here regardless of the actual day of the week the same operation schedule as the day of the week specified in HOLIDAY will be applied You can specify up to 20 dates as holiday 3 SET button When all the settings in the SCHEDULE SETTINGS screen are completed click the SET button to save the settings 1 3 2 ...

Страница 25: ...nnected to the camera Set to ON when outputting voice from the PC microphone to the speakers on the camera side OUTPUT LEVEL Output volume from the speakers connected to the camera can be selected out of four levels MUTE When set to ON voice output from the PC speakers is muted during PAN TILT or ZOOM operation 3 AUDIO PORT NUMBER Set the number of the port for voice communications Note Do not set...

Страница 26: ...button to locate the firmware update file and click the EXECUTE button This starts the firmware update process Note Neither make any operations on the screen nor turn power off while the LOADING FIRMWARE FILE message is displayed You cannot update the firmware while recording a video Trying to update the firmware during recording causes the operation confirmation dialog to appear When the firmware...

Страница 27: ...ith y mark have a submenu for detailed settings Move the cursor to your desired menu and click to open the submenu To return to the previous screen Click to move the cursor to MENU at the bottom of the submenu set the value to BACK and click To exit from the menu Click to move the cursor to MENU at the bottom of the menu make sure that the value is set to END or change to END if BACK is displayed ...

Страница 28: ...rs IP ADDRESS FIX 192 168 0 2 DHCP SUBNET MASK 255 255 255 0 GATEWAY 192 168 0 1 DNS FIX DHCP DNS SERVER ADDRESS 0 0 0 0 SSL OFF ON PORT NUMBER SSL OFF 80 SSL ON 443 PASSWORD User name guest guest 4 to 8 alphanumeric characters User name admin admin 4 to 8 alphanumeric characters NETWORK SPEED NO LIMIT 128K 256K 512K 1M 2M 3M 4M bps CLOCK SETTINGS CLOCK SET Month day year hour minute TIME ZONE 75 ...

Страница 29: ...640 x 480DFFC 720 x 572DFFC QUALITY BASIC NORMAL ENHANCED FINE SUPER FINE AUDIO OFF ON ALARM RESOLUTION NTSC 180 x 120 360 x 240 720 x 240 640 x 480 720 x 480 640 x 480DFFC 720 x 480DFFC PAL 180 x 143 360 x 286 720 x 286 640 x 480 720 x 572 640 x 480DFFC 720 x 572DFFC QUALITY BASIC NORMAL ENHANCED FINE SUPER FINE AUDIO OFF ON BUFFER SIZE OFF 0 5MB 1MB 2MB 4MB 6MB 8MB PRE POST 0 100 10 90 20 80 30 ...

Страница 30: ...L 1FPS 2FPS 3FPS 5FPS 8FPS 12 5FPS 25FPS DURATION 5SEC 10SEC 20SEC 40SEC 1MIN 2MIN 3MIN 4MIN 5MIN 10MIN 15MIN TX RATE 1SEC 2SEC 3SEC 5SEC 10SEC 20SEC 40SEC 1MIN 2MIN 3MIN 4MIN 5MIN 10MIN 15MIN TIMER TIMER OFF ON SCHEDULE CAMERA ID up to 20 characters OVERWRITE OFF ON TX RATE 1MIN 2MIN 3MIN 4MIN 5MIN 10MIN 15MIN 30MIN 1HOUR 2HOUR 3HOUR 4HOUR 5HOUR 6HOUR 7HOUR 8HOUR 12HOUR 24HOUR SCHEDULE SETTINGS S...

Страница 31: ...SETTINGS setting in the OPTION SETTINGS screen see page 25 Screen Setting menu Options MAIN SETTINGS screens AUDIO SETTINGS AUDIO INPUT OFF ON MIC SENSITIVITY 3 2 1 0 1 2 3 4 FILTER 500Hz OFF ON 3dB ON 6dB AUDIO OUTPUT OFF ON OUTPUT LEVEL 1 0 1 2 MUTE PAN TILT OFF ON ZOOM OFF ON AUDIO PORT NUMBER 34341 OPTION SETTINGS UPnP ON OFF ...

Страница 32: ...it and OpenSSL Project must not be used to endorse or promote products derived from this software without prior written permission For written permission please contact openssl core openssl org 5 Products derived from this software may not be called OpenSSL nor may OpenSSL appear in their names without prior written permission of the OpenSSL Project 6 Redistributions of any form whatsoever must re...

Страница 33: ...ions and the following disclaimer in the documentation and or other materials provided with the distribution 3 All advertising materials mentioning features or use of this software must display the following acknowledgement This product includes cryptographic software written by Eric Young eay cryptsoft com The word cryptographic can be left out if the rouines from the library being used are not c...

Страница 34: ...86 Voice compression method G 711 192 Kbps full duplex Microphone input 62 to 32 dB monaural microphone 3 5 φ mini jack Voice output LINE OUT monaural voice output Maximum 8 dBs 3 5 φ mini jack Voice encryption system PCM 16 bit Bandwidth 128 256 512 Kbps 1 2 3 4 Mbps no limitation Alarm buffer Up to 8 MB configurable Interface 10BASE T 100BASE TX RJ45 connector Protocol TCP UDP HTTP HTTPS SMTP NT...

Отзывы: