background image

Positioning the appliance

1. Do not place your appliance on an unstable cart, stand, shelf or table.

Serious injury to an individual, and damage to the appliance, may result
if it should fall. Your salesperson can recommend approved
carts and stands or shelf and wall mounting instructions. An
appliance and cart combination should be moved with care.
Quick stops, excessive force, and uneven surfaces may cause
the appliance and cart combination to overturn.

2. Slots and openings in the cabinet and in the back or bottom are 

provided for ventilation. To ensure reliable operation of the appliance and
to protect it from overheating, these openings must not be blocked or
covered. The openings should never be covered with a cloth or other
material, and the bottom openings should not be blocked by placing the
unit on a bed, sofa, rug, or other similar surface. This appliance should
never be placed near or over a radiator or heat register. This appliance
should not be placed in a built-in installation such as a bookcase unless
proper ventilation is provided.

3. Do not expose the appliance to rain or use near water . . . for example,

near a bathtub, swimming pool, kitchen sink, in a wet basement, etc.

Hooking Up Outdoor Antenna

LIGHTNING PROTECTION FOR YOUR ANTENNA AND SET AS PER NATIONAL
ELECTRICAL CODE INSTRUCTIONS.

4. If an outside antenna is connected to the receiver, be sure the antenna

system is grounded so as to provide some protection against voltage
surges and built up static charges. Article 810 of the National Electrical
Code, ANSI/NFPA 70, provides information with respect to proper
grounding of the mast and supporting structure, grounding of the lead in
wire to an antenna discharge unit, size of grounding conductors, 
location of antenna discharge unit, connection to grounding electrodes,
and requirements for the grounding electrode.
An outside antenna system should not be located in the vicinity of over-
head power lines or other electric light or power circuits, or where it can
fall into such power lines or circuits. When installing an outside antenna
system extreme care should be taken to keep from touching such power
lines or circuits as contact with them might be fatal.

Plug in the power cord

5. This product should be operated only from the type of power source indi-

cated on the marking label. If you are not sure of the type of power
supply to your home, consult your product dealer or local power
company. This product is equipped with a polarized alternating current
line plug (a plug having one blade wider than the other). This plug will fit
into the power outlet only one way. This is a safety feature.  If you are
unable to insert the plug fully into the outlet, try reversing the plug. If the
plug should still fail to fit, contact your electrician to replace your 
obsolete outlet. Do not defeat the safety purpose of this polarized plug.
Do not overload wall outlets, extension cords, or integral convenience
receptacles as this can result in a risk of fire or electric shock.

6. Power-supply cords should be routed so that they are not likely to be

walked on or pinched by items placed upon or against them, paying 
particular attention to cords at plugs, convenience receptacles, and the
point where they exit from the product.

Cleaning

7. Before cleaning, unplug the unit from the wall outlet. Do not apply liquid clean-

ers or aerosol cleaners directly to the unit. Use a dry cloth for cleaning.

Service & Repair

8. Unplug the appliance from the wall outlet and refer servicing to 

qualified service personnel under the following conditions:

A. If the power cord or plug is damaged or frayed.
B. If liquid has been spilled into the appliance.
C. If the appliance has been exposed to rain or water.
D. If the appliance has been dropped or the cabinet has been damaged.
E. If the appliance exhibits a distinct change in performance.
F. If the appliance does not operate normally by following the operating

instructions, adjust only those controls that are covered in the 
operating instructions. Improper adjustment of other controls may
result in damage and will often require extensive work by a qualified
technician to restore the appliance to normal operation.

9. Upon completion of any service or repair, request the service technician’s

assurance that only Factory Authorized Replacement Parts that have the
same characteristics as the original parts were used, and that routine
safety checks have been performed to determine that the 
appliance is in safe operating condition. Unauthorized substitutions may
result in fire, electrical shock, or other hazards.

10. Never add accessories that have not been specifically designed for use

with this appliance as they may cause hazards.

11. For added protection during a lightning storm, or when the set is left

unattended and unused for long periods of time, unplug it from the wall
outlet and disconnect the antenna. This will prevent damage to the set
due to lightning or power line surges.

12. Never push objects of any kind into this product through openings as

they may touch dangerous voltage points or short-out parts that could
result in a fire or electric shock. Never spill liquid of any kind on the
product.

EXAMPLE OF ANTENNA GROUNDING ACCORDING TO NATIONAL 
ELECTRICAL CODE, ANSI/NFPA 70

CAUTION

RISK OF ELECTRIC SHOCK DO NOT OPEN

CAUTION: TO REDUCE THE RISK OF ELECTRIC SHOCK, DO NOT REMOVE COVER (OR
BACK). NO USER-SERVICEABLE PARTS INSIDE. REFER SERVICING TO QUALIFIED
SERVICE PERSONNEL.

THIS SYMBOL INDICATES THAT DANGEROUS VOLTAGE CONSTITUTING A
RISK OF ELECTRIC SHOCK IS PRESENT WITHIN THIS UNIT.

THIS SYMBOL INDICATES THAT THERE ARE IMPORTANT OPERATING
AND MAINTENANCE INSTRUCTIONS IN THE LITERATURE ACCOMPANY-
ING THIS UNIT.

WARNING: TO REDUCE THE RISK OF FIRE OR ELECTRIC SHOCK, DO NOT EXPOSE THIS 
APPLIANCE TO RAIN OR MOISTURE.

IMPORTANT SAFETY INSTRUCTIONS

CAUTION: PLEASE ADHERE TO ALL WARNINGS ON THE PRODUCT AND IN THE OPERATING INSTRUCTIONS. BEFORE
OPERATING THE PRODUCT, PLEASE READ ALL OF THE SAFETY AND OPERATING INSTRUCTIONS. RETAIN THIS 
LITERATURE FOR REFERENCE. 

Follow all instructions...

“Note to CATV system installer:
This reminder is provided to call the CATV system installer’s attention to Article 820-40
of the NEC that provides guidelines for proper grounding and, in particular, specifies that
the cable ground shall be connected to the grounding system of the building, as close to
the point of cable entry as practical.”

NEC

 - NATIONAL ELECTRICAL CODE

ANTENNA
LEAD IN
WIRE

GROUNDING CONDUCTORS
(NEC SECTION 810-21)

GROUND CLAMPS

ANTENNA
DISCHARGE UNIT
(NEC SECTION 810-20)

GROUND
CLAMP

ELECTRIC
SERVICE
EQUIPMENT

POWER SERVICE GROUNDING
ELECTRODE SYSTEM
(NEC ART 250, PART H)

2

Содержание DS27224

Страница 1: ...the Front Audio Video Input Jacks 5 Connecting a Video Game 5 Using the Audio Output Jacks 5 Connecting Stereo Amplifier 5 Using the Rear Audio Video Input Jacks 6 Connecting a VCR or DVD Player 6 Using the Multimedia Remote Control 7 10 Programming the Remote 8 9 VCR Cable Box DVD Codes 9 Key Functions Chart 10 TV Adjustment and Setup How to operate the On Screen Menu 11 Adjusting the Picture Sou...

Страница 2: ...y exit from the product Cleaning 7 Before cleaning unplug the unit from the wall outlet Do not apply liquid clean ers or aerosol cleaners directly to the unit Use a dry cloth for cleaning Service Repair 8 Unplug the appliance from the wall outlet and refer servicing to qualified service personnel under the following conditions A If the power cord or plug is damaged or frayed B If liquid has been s...

Страница 3: ...ly 27 inches PICTURE RESOLUTION 260 Lines Video Input 500 Lines ANTENNA INPUT UHF VHF CATV 75Ω POWER REQUIREMENT 120VAC 60Hz POWER 86 watts HORIZONTAL DIM Width 26 1 in 664mm VERTICAL DIM Height 23 2 in 589mm DEPTH DIM Thickness 20 5 in 522mm WEIGHT Approx 66 7 lbs 30 3 Kg SOUND 2 Speakers Size 8 cm AMPLIFIER Built in with 1W ch AUDIO VIDEO INPUT JACKS Front Rear Video Input Audio Input R L S Vide...

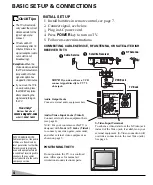
Страница 4: ...CATV IN OUT TO TV S VIDEO CH3 CH4 L R AUDIO VIDEO L R AUDIO VIDEO FROM ANT OUT TO TV IN OUT CONNECTING CABLE SERVICE RF ANTENNA OR SATELLITE DISH RECEIVER TO TV Cable Service RF Antenna Satellite Receiver TV Back POSITIONING THE TV Do not position the TV in a confined area Allow space for normal air circulation around electronic parts Audio Video Input Jacks Video2 Connect external video equipment...

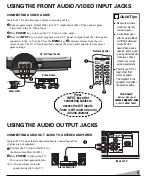
Страница 5: ... from the video game connected to the A V jacks Press the MENU key and select Game from the on screen menu The TV will automatically change the screen and sound to factory preset game settings POWER AS VIDEO IN L AUDIO R MTS MTS POWER MENU MENU VOL VOL VOL VOL CH CH CH CH MENU MENU VIDEO IN L AUDIO R Video Game Camcorder TV A V Input Jacks AUDIO VIDEO INPUT R L UHF VHF CATV 75Ω R L VIDEO MONO S VI...

Страница 6: ...Ω R L VIDEO MONO S VIDEO AUDIO OUTPUT IN OUT A V JACKS L R AUDIO VIDEO L R AUDIO VIDEO S VIDEO OUT R L OUTPUT AUDIO OUT VIDEO OUT CAPTION SLEEP RESET INPUT POWER VCR TV AUX 1 2 3 4 5 6 7 8 9 0 Back View of VCR Remote Control TV A V Input Rear Jacks DVD USINGTHE REAR AUDIO VIDEO INPUT JACKS QuickTips Always match cables according to the colors RED for right audio WHITE for left audio and YELLOW for...

Страница 7: ...m the remote control see pages 8 10 INSTALL BATTERIES AS SHOWN 2 AA not included Notes Do not mix old batteries with new ones or mix different types of batteries together Remove the batteries if the remote control will not be used for a month or more Weak batteries may leak and cause damage Normal battery life is roughly six months IMPORTANT NOTE Spent or discharged batteries must be recycled or d...

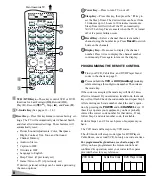
Страница 8: ...hannel number continuously Press again to remove the display 8 RECALL DISPLAY MUTE PLAY PAUSE V GUIDE REC STOP MENU CAPTION SLEEP RESET INPUT CH VOL VOL POWER VCR TV AUX 1 2 3 4 5 6 7 8 9 0 1 2 3 4 5 6 7 8 9 0 12 13 14 11 Point towardsTV 11 12 13 14 PROGRAMMING THE REMOTE CONTROL VCR Code Cable Box Code DVD Player Code Find your VCR Cable Box and DVD Player brand codes in the charts on page 9 Pres...

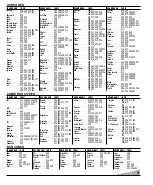
Страница 9: ...tachi 228 230 246 226 221 222 209 217 Hughes 221 230 JBL 237 Jensen 209 JVC 220 225 238 226 201 203 209 221 230 KEC 240 205 Kenwood 220 225 226 238 201 203 209 Kodak 232 Lloyd s 228 Logik 235 219 LXI 232 221 228 230 201 202 203 206 211 217 Magnasonic 223 235 240 205 219 Magnavox 204 232 235 228 211 216 217 219 220 225 Marta 206 Matsushita 232 216 MEI 232 Memorex 227 232 239 243 245 223 224 228 229...

Страница 10: ...ls Used to Select Channels No Function INPUT Selects TV Video Selects TV VCR No Function No Function RECALL Selects previous channel Selects previous channel Selects previous channel Select Repeat function MENU Displays Setup Menu Displays Setup Menu Displays Setup Menu Displays Setup Menu CHANNEL UP Channel Cursor Up Channel Cursor Up Channel Cursor Up Next Cursor Up CHANNEL DOWN Channel Cursor D...

Страница 11: ...e such as moving to another city or having a cable service installed 1 Choose Start from the Ch Search menu options QuickTips The menu will display on the screen for approximately 20 seconds Press MENU again to redisplay Use the CHANNEL keys and the VOLUME keys to navigate through the menus and to make selections from the menus Under weak stereo signal conditions you may receive better quality sou...

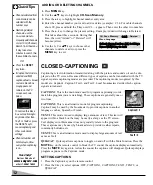
Страница 12: ...34 4 4 4 Deleted CAPTION1 This is the main mode used for program captioning words match the program you are watching These captions are generally one or two lines CAPTION2 This is an alternative mode for program captioning Caption2 may be used by the broadcaster to provide captions in another language such as Spanish or French TEXT1 This mode is used to display large amounts of text This text will...

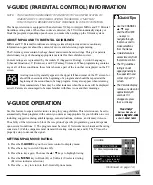
Страница 13: ...y or block the program depending upon choices you make when setting up the V Guide system QuickTips Use the CHANNEL keys and the VOLUME keys to navigate through the menus and to make selections from the menus V Guide feature is accessible only from the remote control The TV guidelines rating icon will appear generally in the upper left hand corner of your TV screen The V Guide display remains on s...

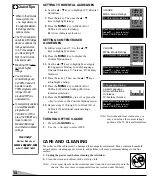
Страница 14: ...ENU key to Block B or Unblock U selected rating Arrow indicates selection 14 Press the V GUIDE key to exit or press the key to return to the Content Options menu 15 Repeat steps 11 through 13 to Block B or Unblock U additional content ratings if desired TURNING OFF THE V GUIDE 1 Press the V GUIDE key 2 Use the keys to select OFF Note Networks and local stations may or may not include the content r...

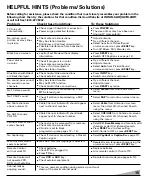
Страница 15: ...ns off automatically No picture poor picture or wavy lines in picture Black box on screen Poor color or no color Blue Screen withVideo1 or Video2 displayed No sound poor sound No sound on some channels NoTV stereo sound NoTV SAP sound No Cable channels above number 13 No UHF channels VHF OK Cannot select or scan some channels No Captioning Menu System words seem misspelled Remote Control will not ...

Страница 16: ...ILL COVER ITS TOTALITY OF PIECES COMPONENTS AND SERVICE REPAIR OF PRODUCT AND THE RESPECTIVE COST OF TRANSPORTATION THIS GUARANTEE WILL BE NULL AND VOID IN THE FOLLOWING CIRCUMSTANCES WHEN PRODUCT HAS BEEN USED IN A DIFFERENT CONDITION THAN ITS NORMAL USE WHEN PRODUCT HASN T BEEN OPERATING CORRECTLY ACCORDING TO THE INSTRUCTIONS IN THIS MANUAL WHEN PRODUCT HAS BEEN CHANGED OR REPAIRED BY PERSONS N...

Страница 17: ... WARRANTY IS EXCLUSIVE AND IN LIEU OF ALL OTHER WARRANTIES OF MERCHANTABILITY OR FITNESS FOR A PARTICULAR PURPOSE OBLIGATIONS For one year from the date of purchase Sanyo Manufacturing Corporation warrants this product to be free from defects in material and workmanship under normal use and conditions Should replacement be necessary under this warranty for any reason due to manufacturing defect or...

Страница 18: ...en Sonido 28 Agregando o Borrando Canales 29 Transmisión Captada 29 Informacíon de Guía V 30 Operación de Guía V Control Paternal 30 31 Cuidado y Limpieza 31 Sugerencias Útiles problemas soluciones 32 Garantía México 33 Garantía Estados Unidos y Canadá 34 Bienvenido al mundo SANYO Gracías por comprar un Televisor a Color Sanyo Usted hizo una excelente selección por Funcionamiento Estilo Confiabili...

Страница 19: ...o eléctrico Este producto esta equipado con cordón de potencia polarizado una de las navajas de la clavija es más ancha que la otra Esta clavija debe de ajustar en el toma corriente de una manera solamente Esta característica es una medida de seguridad Si usted no puede insertar la clavija totalmente en el toma corriente trate invirtiendo la clavija Si la clavija continua floja en el toma corrient...

Страница 20: ...uridad 0 9 Selección de Canales Numerados Búsqueda de Canales Volume Mute Power Recall Display Sleep Caption Reset Menu V Guide Input VCR DVD teclas TAMAÑO DEL TUBO DE IMAGEN Medido Diagonalmente 27 pulgadas RESOLUCIÓN DE IMAGEN 260 Líneas Entrada de Video 500 Líneas ENTRADA UHF VHF CATV 75Ω FRECUENCIA DE OPERACION 60Hz TENSION DE ALIMENTACION 120 V CONSUMO DE CORRIENTE 86 watts DIMENSIÓN HORIZONT...

Страница 21: ...OM ANT OUT TO TV IN OUT Receptor CONECTANDO EL SERVICO DE CABLE ANTENA RF O RECEPTOR DE SATÉLITE A UNA TV Posterior de la TV Antena RF COLOCANDO LA TV No coloque la TV en una área confinada Deje espacio suficiente para tener una buena circulación de aire en los compo nentes electrónicos Conectores de Salidas de Audio Fijo Conecte aquí el equipo de audio externo vea página 22 Entradas de Audio y Vi...

Страница 22: ... sido detectada en el conector de Video Coloque su televisor al menos a 60 cm de las bocinas de un sistema estéreo Los magnetos en dichas bocinas pueden afectar la calidad de pureza de la imagen Necesita ayuda Visite nuestro sitio en internet www sanyoctv com o Llame 1 800 877 5032 POWER AS VIDEO IN L AUDIO R MTS MTS POWER MENU MENU VOL VOL VOL VOL CH CH CH CH MENU MENU VIDEO IN L AUDIO R Video Ju...

Страница 23: ...deo invalida el conector de entrada de Video Presione POWER para encender la TV Además Encienda el equipo externo Presione INPUT para seleccionar de VÍDEO2 Nota Sólo un artefacto puede ser conectado a la veza estos gatos AUDIO VIDEO INPUT R L UHF VHF CATV 75Ω R L VIDEO MONO S VIDEO AUDIO OUTPUT IN OUT A V JACKS L R AUDIO VIDEO L R AUDIO VIDEO S VIDEO OUT R L OUTPUT AUDIO OUT VIDEO OUT CAPTION SLEE...

Страница 24: ...ideo que ha sido conectado a las entradas de A V Teclas Numeradas Dos teclas deben de ser presionadas para seleccionar un canal Ejemplo Presione 0 y después 6 para seleccionar el canal 6 Para canales de cable del 100 hasta el 125 presione y mantenga así la tecla del número 1 hasta que el C1 aparezca Tecla de CAPTION Vea página 29 Tecla de MENU Use esta tecla junto con las teclas de navegación use ...

Страница 25: ...ezca nuevamente Presione nuevamente para eliminarlo 11 12 13 14 25 RECALL DISPLAY MUTE PLAY PAUSE V GUIDE REC STOP MENU CAPTION SLEEP RESET INPUT CH VOL VOL POWER VCR TV AUX 1 2 3 4 5 6 7 8 9 0 1 2 3 4 5 6 7 8 9 0 12 13 14 11 Apunte hacía elTV PROGRAMANDO EL CONTROL REMOTO Código de VCR Código de Decodificador de Cable Código de Reproductor de DVD Encuentre el código de la marca de la video casete...

Страница 26: ...Hughes 221 230 JBL 237 Jensen 209 JVC 220 225 238 226 201 203 209 221 230 KEC 240 205 Kenwood 220 225 226 238 201 203 209 Kodak 232 Lloyd s 228 Logik 235 219 LXI 232 221 228 230 201 202 203 206 211 217 Magnasonic 223 235 240 205 219 Magnavox 204 232 235 228 211 216 217 219 220 225 Marta 206 Matsushita 232 216 MEI 232 Memorex 227 232 239 243 245 223 224 228 229 230 221 200 201 202 203 206 215 Minol...

Страница 27: ...onar TV modo Seleccionar TV VCR mode No Funciona No Funciona de Vídeo RECALL Canal seleccionado Canal seleccionado Canal seleccionado Se repite la selección previamente previamente previamente MENU Despliega el Menú de Despliega el Menú de Despliega el Menú de Despliega el Menú de Ajuste Ajuste Ajuste Ajuste CANAL Canal Cursor Arriba Canal Cursor Arriba Canal Cursor Arriba Siguiente Cursor Arriba ...

Страница 28: ...cione Auto la opción de Imagen Sonido Para personalizar manualmente la Imagen Sonido 1 Seleccione Manual de las opciones de Imagen Sonido 2 Presione MENU para activar los submenús controles 3 Use las teclas de para resaltar el control que se quiere ajustar 4 Use las teclas de para hacer los ajustes Para selección automática de Juego 1 Seleccione Juego del menú de opciones de Imagen Sonido La image...

Страница 29: ...s coinciden con el programa que Ud esta viendo La mayoría de las transmisoras usarán Caption1 para transmitir programas subtítulados Estos subtítulos son generalmente una o dos lineas y aparecen el la parte inferior de la pantalla o cerca de la persona que esta hablando Caption2 Es un modo alterno para programar subtítulos Caption2 puede ser usado por las estaciones transmisoras para proveer subtí...

Страница 30: ...ar estos íconos Los padres estan alentados a familiarizarse con estos íconos y sus significados Consejos Rápidos Use las teclas de CANALES y las teclas de VOLUMEN para navegar a través del menú y para hacer las selecciones de los menus La función de V Guide es accesible solamente por el control remoto Un icono con indica ciones de clasifi caciones aparecerá generalmente la esquina superior izquier...

Страница 31: ...ontenido Sexual V Violencia FV Fantasía Violenta 12 Presione la tecla de Entonces use las teclas de hasta iluminar una clasificación 13 Presione la tecla de MENU para Bloqueado B o No Bloqueado U la clasificación seleccionada Flecha indica el artículo seleccionado 14 Presione la tecla de V GUIDE para salirse o presione la tecla de para retornar al menú de Content Options 15 Repita los pasos del nú...

Страница 32: ...dicador de Cable C no deberá de aparecer junto al número del canal El canal puede estar eliminado en la memoria Cheque la conexión de antena V Guide esta programado para bloquear la programación vea páginas 30 31 Cheque que la difusora transmita la señal deTransmisión Captada Posiblemente una lenguaje extranjero este seleccionado Cheque las pilas Cheque que laTV este conectada Presione la tecla de...

Страница 33: ...AMPARA LA TOTALIDAD DE LAS PIEZAS Y COMPONENTER DEL PRODUCTO Y MANO DE OBRA DE LA REPARACIÓN ASÍ COMO GASTOS DE TRANSPORTACIÓN RESPECTIVOS ESTA GARANTIA SERA NULA EN LOS SIGUIENTES CASOS CUANDO EL PRODUCTO SE HUBIESE UTILIZADO EN CONDICIONES DISTINTAS A LAS NORMALES CUANDO EL PRODUCTO NO HUBIESE SIDO OPERADO DE ACUERDO CON EL INSTRUCTIVO DE USO QUE SE LE ACOMPAÑA CUANDO EL PRODUCTO HUBIESE SIDO AL...

Страница 34: ...ÍA ES EXCLUSIVA Y EN LUGAR DE OTRAS GARANTÍAS DE MERCANCÍA O CONVENIENTE PARA UN PROPÓSITO PARTICULAR OBLIGACIONES Por un año a partir de la fecha de compra Sanyo Manufacturing Corporation garantiza que este producto esta libre de defectos en materiales y mano de obra bajo condiciones normales de uso El reemplazo solo será necesario bajo esta garantía por cualquier razón debido a defecto de manufa...

Страница 35: ...tes correspondre la lame large de la fiche à la fente large de la prise puis enfichez à fond Ceci est une mesure de sécurité conçue pour ne brancher la fiche que d une seule façon sur une prise électrique Lorsque vous utilisez le télécouleur avec des jeux vidéo ne saturez pas la luminosité ni le contraste Avec le temps ceci pourrait causer l impression permanente de l image du champ de jeu sur l é...

Страница 36: ...DVD DIMENSION DU TUBE IMAGE en diagonale Écran 27 pouces RÉSOLUTION D IMAGE 260 lignes Video 500 lignes ENTRÉE ANTENNE 75 ohms UHF VHF télé par câble ALIMENTATION 120 V CA 60 Hz CONSOMMATION 86 watts DIMENSION HORIZONTALE LARGEUR 26 1 po 664 mm DIMENSION VERTICALE HAUTEUR 23 2 po 589 mm PROFONDEUR 20 5 po 522 mm POIDS APPROX KG LB 66 7 lbs 30 3 Kg SON 2 haut parleurs 8 cm AMPLIFICATEUR Intégré ave...

Страница 37: ...que Antenne RF Câble POSITION DU TÉLÉVISEUR Ne placez pas le téléviseur dans un endroit trop exigu Laissez assez d espace pour une circulation d air normale autour des éléments électroniques Prises de sortie audio fixes Branchez ici l équipement audio extérieur voir page 38 Prises d entrée audio vidéo Video2 Branchez ici l équipement vidéo extérieur voir page 39 Remarque Pour votre commodité ce té...

Страница 38: ...t choisissez Jeu au menu à l écran POWER AS VIDEO IN L AUDIO R MTS MTS POWER MENU MENU VOL VOL VOL VOL CH CH CH CH MENU MENU VIDEO IN L AUDIO R Jeux vidéo Prises d entrée audio vidéo avant du téléviseur Conseils Assurez vous que tous les connecteurs de câble sont bien engagés dans les prises Branchez toujours les câbles compte tenu des couleurs ROUGE pour audio droite BLANC pour audio gauche et JA...

Страница 39: ... ou d un autre appareil dans la prise d entrée vidéo S du télécouleur Appuyez sur POWER pour mettre le téléviseur en marche Mettez aussi l équipement extérieur en marche Appuyez sur la touche de INPUT pour choisir la source de VIDEO2 Remarque Un seul appareil à la fois peut être branché sur ces prises AUDIO VIDEO INPUT R L UHF VHF CATV 75Ω R L VIDEO MONO S VIDEO AUDIO OUTPUT IN OUT A V JACKS L R A...

Страница 40: ...isse Appuyez ensuite sur les deux autres chiffres Touche de sous titres Voir page 45 Touche de menu S utilise avec les touches et pour naviguer dans le système de menus à l écran et régler les fonctions voir pages 44 45 Touches de canal CH et de volume VOL Appuyez sur ces touches pour explorer les canaux en mémoire ou pour régler le volume Touche de silencieux Appuyez une fois sur cette touche pou...

Страница 41: ...TE PLAY PAUSE V GUIDE REC STOP MENU CAPTION SLEEP RESET INPUT CH VOL VOL POWER VCR TV AUX 1 2 3 4 5 6 7 8 9 0 1 2 3 4 5 6 7 8 9 0 12 13 14 11 13 14 PROGRAMMATION DE LATÉLÉCOMMANDE Code magnétoscope Code boîte de télé par câble Code lecteur de vidéodisque Orientez en direction du téléviseur Cherchez les codes de marque de votre magnétoscope de votre convertisseur de télé par câble et de votre lecte...

Страница 42: ...21 230 JBL 237 Jensen 209 JVC 220 225 238 226 201 203 209 221 230 KEC 240 205 Kenwood 220 225 226 238 201 203 209 Kodak 232 Lloyd s 228 Logik 235 219 LXI 232 221 228 230 201 202 203 206 211 217 Magnasonic 223 235 240 205 219 Magnavox 204 232 235 228 211 216 217 219 220 225 Marta 206 Matsushita 232 216 MEI 232 Memorex 227 232 239 243 245 223 224 228 229 230 221 200 201 202 203 206 215 Minolta 221 2...

Страница 43: ... Affichage du menu installé Affichage du menu installé Affichage du menu installé Affichage du menu installé CHANNEL CROISSANT Canal Curseur supérieur Canal Curseur supérieur Canal Curseur supérieur Suivant Curseur supérieur CHANNEL DÉCROISSANT Canal Curseur inférieur Canal Curseur inférieur Canal Curseur inférieur Précédant Curseur inférieur VOLUME Baisse du volume audio Baisse du volume audio Ba...

Страница 44: ...ns les options d image son Pour ajuster manuellement l image son 1 Choisissez Manuel dans les options d image son 2 Appuyez sur la touche MENU pour accéder au sous menu des commandes 3 Mettez en évidence la commande que vous désirez régler à l aide des touches 4 Faites les réglages à l aide des touches Pour le réglage automatique des jeux 1 Choisissez Jeu dans les options du menu image son L écran...

Страница 45: ...u programme que vous suivez La majorité des télédiffuseurs utilisent Sous titre1 pour transmettre les sous titres des programmes Ces sous titres sont généralement donnés en une ou deux lignes Sous titres2 Autre mode de sous titrage des programmes Le télédiffuseur peut utiliser Sous titre2 pour transmettre des sous titres dans une autre langue par exemple en français ou en espagnol Texte1 Mode util...

Страница 46: ... 2 affiché Pas de son son médiocre Pas de son sur certains canaux Pas de son stéréo du téléviseur Pas de programme secondaire du téléviseur Pas de canaux de télé par câble au dessus de 13 Pas de canaux UHF réception VHF correcte Impossible de choisir ou d explorer certains canaux Pas de sous titrage Fautes d orthographe dans le système du menu La télécommande ne fonctionne pas La télécommande ne c...

Страница 47: ... est utilisé normalement dans des conditions appropriées Si pour quelque raison que ce soit un remplacement s avère nécessaire dans le cadre de la présente garantie à cause d un défaut de fabrication ou de mauvais fonctionnement pendant la première année à partir de la date de l achat initial Sanyo Manufacturing Corporation fournira un télécouleur neuf à titre d échange pour le détaillant Pour l a...

Страница 48: ... safety and educate customers and their families about television safety Tune Into Safety 1 One size does NOT fit all Use the appropriate furniture that is large enough to support the weight of your television and other electronic components 2 Use appropriate angle braces straps and anchors to secure your furniture to the wall but never screw anything directly into the TV 3 Carefully read and unde...

Отзывы: