background image

8

INSTALLATION

Controls and Menus

q

w

å

The LCD display has a Standby light to show there is power.

Switching into/from standby mode

The Standby mode is used for switching the LCD monitor off for short 
periods of time. In standby mode the monitor is switched off but is still 
receiving mains power.

L

To turn the monitor into standby mode, press the 

button

.

The blue power indicator illuminates more brightly.

L

To turn the monitor ON from standby mode, press the 

button

again.

,I\RX¿QGWKHSRZHULQGLFDWRUÀDVKLQJGLVFRQQHFW

power cord from the power outlet and contact our 

6HUYLFHGHVN

7KLVZDUQLQJLVDVLJQWROHW\RXNQRZWKDWWKH

power protection function of this TV set is now 
operating.

ç

Control buttons (bottom corner of back cover)

Menu button:

 Used to display or cancel main menu.

Input/

4

 button:

Switch between AV1, RGB, AV2, AV3, PC , DVI 

RU1HWZRUNPRGH,WLVDOVRXVHGWRSURYLGHVXE

menu selection from the Main Menu.

 or 

buttons:

 provide up and down adjustments.

button:

To switch to standby mode (to switch off completely 
disconnect the monitor from the power supply).

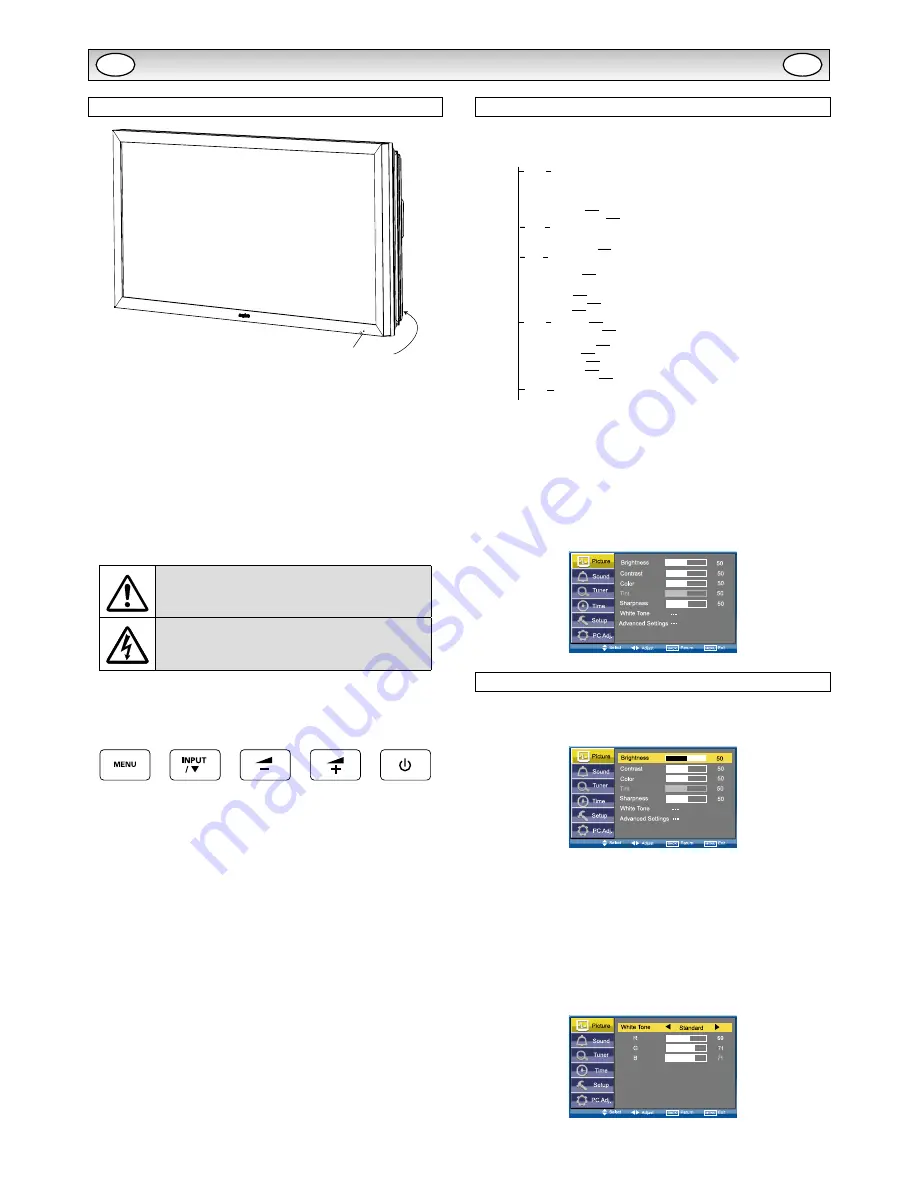
Menu Operation

Many of your monitors functions are controlled through the menu 
function, using the remote control.

MENU

Picture

Brightness
Contrast
Color
Tint (only if NTSC equipment is detected)
Sharpness
White Tone

White Tone / R / G / B

Advanced Setting

DCDi / ACC/ACM / CCS / DNR / MPEG NR / Film Mode

Sound

Treble
Bass
Balance

Bass Expander

On / Off

Time

Setup

PC Adj.

Current Time
Schedule
Weekday

On Program

AV1 /  RGB / AV2 / AV3 / PC / DVI / Network 

Menu Setup
PIP / POP Setup
Initial Settings
Text Language
Tile Mode
AV2 Setting

Western / Eastern / Russian / Arabic / Farsi

Tile Mode Active / H/V_Sets / H/V Location / Bezel H/V Adjustment

RGBHV / YPbPr

Auto Adjust
H-Position
V-Position
Clock

Phase

Language / H/V-Position / Duration / Transparence

PIP/POP Mode / Main/Sub Source / PIP Position

Time
Action

Active

Power On / Power Off

On / Off

1 - 20

Current Weekday

XGA Mode

PC Power save

XGA / WXGA 1366x768

On / Off

During menu operation the bottom of the on screen display will show 
which controls can be used for menu navigation.
Press the 

MENU button

 to 

enter

 the main menu. Whenever main 

menu is accessed initially, 

PICTURE

 will be the default selection.

A sub menu is selected using the 

 or 

button

 and pressing 

the 

 or 

button

 when the required sub menu is highlighted.

:KHQ\RXKDYH¿QLVKHG\RXFDQSUHVVWKH

BACK button

 to return to 

the previous menu, press the 

MENU button

 to exit the menu operation.

Picture menu

1.

Press the 

MENU button

.

 PICTURE

 will be the default selection.

Press the 

 or 

button

 to enter.

Set the picture settings for your “

personal

” preference.

2.

Use the 

 or 

button

 to select eg. Brightness and the 

 or 

button

 to adjust levels.

N

 White Tone

May be used to adjust the color tone of the picture. Use the 

 or 

button

 to select 

White Tone

 and press the 

 or 

button

to enter the sub menu. You can select 

Personal

,

Cool

,

Standard

 or 

Warm

 settings by using the 

 or 

button

. To adjust the color 

tone of the picture by using the 

 or 

button

 to select 

Red(R)

,

Green(G)

 or 

Blue(B)

 and the 

 or 

button

 to adjust levels.

These settings will be stored in personal mode automatically.

GB

GB

Содержание CE42LH2DPB

Страница 1: ...INSTRUCTION MANUAL CE42LH2R CE42LH2DPB CE42LH2WP LCD Monitor Please read this Instruction book before using your LCD monitor We wish you many hours of pleasure from your new LCD monitor ...

Страница 2: ...ects against mischief in the public display applications and less maintenance when used in a dusty or oily environment Weather proof monitor CE42LH2WP Weather resistant and water proof in accordance with the IP66 standard L ANTI REFLECTION TAMPER GLASS This monitor set has a tough anti refection tampered glass This offers the protection for the panel surface in the public display circum stance L A...

Страница 3: ... away from the monitor The external surface of the FDELQHW QQHG DUHD PXVW QRW EH FRYHUHG RU WKH DLUÀRZ UHVWULFWHG LQ anyway by enclosing the LCD monitor CE42LH2WP model only The operating temperature range of this monitor is guaranteed 0 C 40 C 32 F 104 F It is not recommended to install the screen in direct sunlight without adequate shading as this will cause the WHPSHUDWXUH RI WKH SDQHO WR ULVH ...

Страница 4: ...digital device pursuant to Part 15 of FCC Rules These limits are designed to provide reasonable protection against harmful interference when the equipment is operated in a commercial environment This equipment generates uses and can radiate radio frequency energy and if not installed and used in accordance with the instruction manual PD FDXVH KDUPIXO LQWHUIHUHQFH WR UDGLR FRPPXQLFDWLRQV 2SHUDWLRQ ...

Страница 5: ...in the Software to you The Software provided hereunder may contain or be derived from portions of materials provided to SANYO under license by a third party supplier 5 Except as expressly permitted by statute you may not L use the Software in conjunction with any other computer hardware other than the product L copy all or part of the Software L incorporate all or any of the Software into other pr...

Страница 6: ...AV2 Setting in Set up menu see page 10 You can connect your DVD player to the Y Pb Pr terminals instead of using a scart lead This can VXSSRUW KLJK GH QLWLRQ LQ DQDORJXH FRPSRQHQW IRUP 5 9 FDQ be used as a PC input via the BNC terminals Both options support a large range of resolutions page 17 AV2 OUT can be used to output the incoming AV2 signal to the other monitor 4 AV3 Composite CVBS signal in...

Страница 7: ...ormal viewing mode Dynamic Suitable for brightly lit rooms Soft Low contrast setting Eco Suitable for dimly lit rooms and gives a cin HPD OLNH HIIHFW UHH H To switch picture still on or off Green Press this button for more than 5 seconds installa tion mode will appear Remote control Remote control battery installation QVWDOO WZR YROW EDWWHULHV VR WKDW WKH DQG PDUNV RQ WKH EDWWHULHV PDWFK WKH DQG P...

Страница 8: ...le Weekday On Program AV1 RGB AV2 AV3 PC DVI Network Menu Setup PIP POP Setup Initial Settings Text Language Tile Mode AV2 Setting Western Eastern Russian Arabic Farsi Tile Mode Active H V_Sets H V Location Bezel H V Adjustment RGBHV YPbPr Auto Adjust H Position V Position Clock Phase Language H V Position Duration Transparence PIP POP Mode Main Sub Source PIP Position Time Action Active Power On ...

Страница 9: ...r Press the BACK but ton to return to the previous menu Press the MENU button to exit menu operation N Current Weekday 8VH WR VHW FXUUHQW ZHHNGD XVLQJ WKH or button N Current Time Use to set the current time using the Numeric buttons Other items in Time Menu should not be selected until Current Time has been set N Schedule Use to set up to 20 separate time schedules for Power On or Power Off selec...

Страница 10: ...divide the vertical picture into more than one part and the most is also 5 parts 5 monitors Using the or but ton to set H Location is used to select one part of the horizonal picture to dis play on the current LCD Monitor using the or button V Location is used to select one part of the vertical picture to display on the current LCD Monitor using the or button H HO GMXVWPHQW is used to align the im...

Страница 11: ...WRQV DUH SUHVVHG ZKHQ FKLOG ORFN LV 2Q 6WDQGE RSHUDWHV QRUPDOO ZKHQ FKLOGORFN LV VHW 2Q N Address Set the address for the LCD monitor 0 999 L Setting the monitor address in RS232 mode DFK PRQLWRU FDQ KDYH D VSHFL F GGUHVV ZKLFK KHOSV FRPPDQG that monitor individually and will not effect to other monitors con nected to a controlling PC Address format command The addressing format command is used fo...

Страница 12: ...ssed even more to allow subtitles to be seen As Zoom 16 9 but bottom is compressed even more to allow subtitles to be seen As Zoom 16 9 but bottom is compressed even more to allow subtitles to be seen As Zoom 16 9 but bottom is compressed even more to allow subtitles to be seen 4 3 14 9 16 9 Letterbox Video The correct picture width is maintained but the top and bot tom are cropped Zooms in slight...

Страница 13: ...POP mode press the Main Sub Picture Swap but ton will switch the location for main and sub picture Only the sound on the main picture is heard from the monitor VSHDNHU 7KH VRXQG RQ WKH VXE SLFWXUH FDQQRW EH KHDUG The details for PIP POP operation eg location for sub picture or input source for any picture etc please refer to page 10 N PIP1 mode N OFF mode N PIP2 mode N POP mode The left picture is...

Страница 14: ...c ture appears on the screen Press this button once again or press TXT TV button CANCEL mode will be cancelled In CANCEL mode CAN is always displayed on the upper left of the screen Text Hold Press Text Hold button to stop page request and updating HOLD ON The Hold symbol will appear instead of the page number Update of TELETEXT is forbidden It holds on the current TEXT screen display now HOLD OFF...

Страница 15: ...L Adjust BRIGHTNESS CONTRAST levels too low N 12 2 285 3 785 2 L Adjust COLOUR control L KHFN OHDG FRQQHFWLRQV L Does the signal input have colour N REMOTE CONTROL DOES NOT WORK L KHFN EDWWHULHV DUH LQVHUWHG FRUUHFWO L KHFN FRQGLWLRQ RI EDWWHULHV L KHFN WR VHH LI UHPRWH FRQWURO LQKLELW LV VHW 21 N 3 785 2 12 6281 L KHFN H WHUQDO VSHDNHUV DUH FRQQHFWHG FRUUHFWO L KHFN OHDG FRQQHFWLRQV WR H WHUQDO H...

Страница 16: ... 8 126 0 50 8 17 6 953 0 402 9 417 9 292 0 300 6 178 5 43 7 930 25 925 4 WALL MOUNT SCREW 10 x M6 1 0 PITCH x 12MM ø4 2 RC RECEIVER VIEWING AREA H 620 0 546 0 523 0 VIEWING AREA V Control buttons ø4 2 LED INDICATOR Handles x 2 Cables exit terminal cover Unit mm N CE42LH2WP GB GB ...

Страница 17: ... 47 70 09 DOS VGA 640 x 480 31 43 59 88 VGA VESA 60Hz 640 x 480 37 50 75 00 VGA VESA 75Hz 640 x 480 37 86 72 81 VGA VESA 72Hz 640 x 480 43 27 85 00 VGA VESA 85Hz 640 x 480 35 00 66 67 Mac 13 640 x 480 34 97 66 60 Mac LC 13 800 x 600 35 16 56 25 SVGA VESA 56Hz 800 x 600 37 88 60 32 SVGA VESA 60Hz 800 x 600 46 875 75 00 SVGA VESA 75Hz 800 x 600 34 50 55 38 SVGA 800 x 600 38 00 60 51 SVGA 800 x 600 5...

Страница 18: ...rast CR COLOR Status of Color CR TINT Status of Tint CR SHARP Sharpness CR WBAL Status of White Balance Mode informa tion CR WBAL R Status of White Balance Red CR WBAL G Status of White Balance Green CR WBAL B Status of White Balance Blue CR NZRED Status of Noise reduction setting CR FILM Status of Film mode setting CR IMAGE Status of Image selection The same as PICTURE mode CR DCDI Status of DCDi...

Страница 19: ... execution Wait and transmit command again 101 The errors not including above N Sound control Read Command Table Status read command Item CR VOLUME Status of volume value CR MUTE Status of MUTE N Other Read Command Table Status read command Item CR STATUS Status of the operation of the monitor CR SIGNAL Status of with or without signal CR FREEZE Status of Freeze setting CR FANLOCK 6WDWXVHV RI IDQ ...

Страница 20: ...N7RAK N7RBK N7RPK 6 1 2 OHFWULF R WG ...

Страница 21: ... VOR DEM AUSPACKEN UND DER INSTALLATION BELANGRIJK LEES DEZE HANDLEIDING VOOR HET UITPAKKEN EN INSTALLEREN IMPORTANTE LEGGERE ATTENTAMENTE LE SEGUENTI ISTRUZIONI PRIMA DI DISIMBALLARE E INSTALLARE IL PRODOTTO INSTALLATION GUIDELINES CONSIGNES D INSTALLATION INSTRUCCIONES DE INSTALACIÓN INSTALLATIONSRICHTLINIEN INSTALLATIEHANDLEIDING ISTRUZIONI DI INSTALLAZIONE CE42LH2WP CE42LM6WP CE42SR2 CE52LH2WP...

Страница 22: ...n result in damage to the sets integrity and appearance Please ensure carton top is facing upwards before removing monitor HIRUH UHPRYLQJ PRQLWRU IURP FDUWRQ ZH UHFRPPHQG WKDW WKH PRXQWLQJ EUDFNHW LV DWWDFKHG ÀUVW WR avoid any damage during installation Please ensure that both installers grip the monitor as shown in photos below To lift and maneuver the monitor please use the handles provided and ...

Страница 23: ...iability for the condition Vent caps can be easily damaged The set should always be lifted DO NOT SLIDE and always PDNH XVH RI UDLVHG FXVKLRQV XQGHU WKH DOXPLQLXP IUDPH LI SODFHG ÁDW RQ UHDU VLGH The vents SHOULD NOT be covered or obstructed BACK OF MONITOR WEATHERPROOF ENCLOSURE VENTILATION Please note that caps are easily damaged Do not lay monitor with rear side down without proper protection u...

Страница 24: ...V LPSURYHV WKH DLU WLJKW LQWHJULW RI WKH À LQJ DQG therefore MUST NOT be removed 2QO ZDOO PRXQW À LQJ DQG WHUPLQDO FRYHU VFUHZV PD be removed by the installer Under no circumstances should non SANYO screws be used as replacements ANTI TAMPER INK SCREWS VHFXULW À LQJ SRLQW LV SURYLGHG RQ WKH EDFN SODWH LQ order to secure the monitor to the installation point with a security device This is NOT for l...

Страница 25: ... VFUHZV PXVW EH UHSODFHG DQG WLJKWHQHG REAR A V SHIELD COVER TERMINAL COVER Check point 1 Check point 2 Check gasket is in place inside the cover Gasket is important to seal cable area DEOHV PXVW ÀW LQ WKH VKDSH RI WKH recess of the terminal base GASKET IN THE TERMINAL COVER MAKE SURE CORD FITS IN THE MOULD SHAPE GASKET IN THE RECESS OF THE TERMINAL BASE ...

Страница 26: ...icular care not to drop or bump the set during handling installation MAINS LEAD ADHESIVE TREATMENT The steel back plate is protected from corrosion using a polyester powder coating Good care and attention must be taken to prevent scratching the surface Any uncoated metal will corrode poten tially affecting the integrity of the enclosure Similarly the same care and attention applies to the aluminum...

Страница 27: ...hen the screen temperature returns WR ZLWKLQ VSHFLÀFDWLRQ 1 Connect the in line waterproof AC cord line up and push together connectors A B so they are tight and then twist C until A B cannot be pulled apart To disconnect unscrew C and pull con nector A B apart 2 Remove the covers A for access to connect required cables Re position the covers and replace screws If LD Net connection is required rem...

Страница 28: ...DW DZD IURP WKH PRQLWRU 7KH H WHUQDO VXUIDFH RI WKH FDELQHW ÀQQHG DUHD PXVW QRW EH FRYHUHG RU WKH DLUÁRZ UHVWULFWHG LQ anyway by enclosing the LCD monitor The operating temperature range of this monitor is guaranteed 0 C 40 C 32 F 104 F It is not recommended to install the screen in direct sunlight without adequate shading as this will cause the WHPSHUDWXUH RI WKH SDQHO WR ULVH DERYH WKH PD LPXP V...

Страница 29: ...s These limits are designed to provide reasonable protection against harmful interference when the equipment is operated in a commercial environment This equipment generates uses and can radiate radio frequency energy and if not installed and used in accordance with the instruction manual may cause harmful interference to radio communications Operation of this equipment in a residential area is li...

Страница 30: ...hip rights in the Software to you The Software provided hereunder may contain or be derived from portions of materials provided to SANYO under license by a third party supplier 5 FHSW DV H SUHVVO SHUPLWWHG E VWDWXWH RX PD QRW L XVH WKH 6RIWZDUH LQ FRQMXQFWLRQ ZLWK DQ RWKHU FRPSXWHU KDUGZDUH RWKHU WKDQ WKH SURGXFW L FRS DOO RU SDUW RI WKH 6RIWZDUH L LQFRUSRUDWH DOO RU DQ RI WKH 6RIWZDUH LQWR RWKHU ...

Страница 31: ...page 10 You can connect your DVD player to the Y Pb Pr terminals instead RI XVLQJ D VFDUW OHDG 7KLV FDQ VXSSRUW KLJK GHÀQLWLRQ LQ DQDORJXH component form RGB H V can be used as a PC input via the BNC terminals Both options support a large range of resolutions refer to the INSTRUCTION MANUAL on page 17 AV2 OUT can be used to output the incoming AV2 signal to the other monitor 4 AV3 Composite CVBS s...

Страница 32: ... Personal preference mode Standard Normal viewing mode Dynamic Suitable for brightly lit rooms Soft Low contrast setting Eco Suitable for dimly lit rooms and gives a cin ema like effect UHH H To switch picture still on or off Green Press this button for more than 5 seconds installa tion mode will appear Remote control Remote control battery installation QVWDOO WZR µ YROW EDWWHULHV VR WKDW WKH µ DQ...

Страница 33: ...chedule Weekday On Program AV1 RGB AV2 AV3 PC DVI Network Menu Setup PIP POP Setup Initial Settings Text Language Tile Mode AV2 Setting Western Eastern Russian Arabic Farsi Tile Mode Active H V_Sets H V Location Bezel H V Adjustment RGBHV YPbPr Auto Adjust H Position V Position Clock Phase Language H V Position Duration Transparence PIP POP Mode Main Sub Source PIP Position Time Action Active Powe...

Отзывы: