approximately 10 seconds. When you find
a track to which you wish to listen, press
the button again to cancel the Scan play
and resume normal play.
Shuffle play
When
Shuffle button is pressed,
indicator will appear and the tracks on the
disc are played in a random order. When
all the tracks have been played, they will
be played again in a different random
order. To cancel the Shuffle play, press the
button again.
How to stop playing the CD and listen
to the radio
Press
Stand-by button once. The
CDF-M200 will be turned off and the radio
mode will be set.
2. Tune the radio to a desired station and
receive a broadcast.
To resume CD play
Tune the radio to FM 89.1 MHz and press
Standby button of the
Play
will resume from the point at which it stopped.
INSTALLATION
Before installation
l
When mounting the unit in your car,
make sure the unit is level. If you can not
mount the unit level due to your cars design,
make sure there is no more than
tilt.
l
In order to protect the disc player from
shocks during shipping, a shipping screw
is attached to the disc player. Remove the
screw
player can not play a disc with
the screw in.
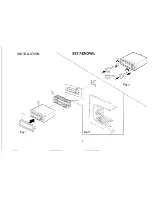
How to install (See page 5.)
1. Install the supplied trim panel
to the unit.
2. Insert the supplied mounting bracket
into DIN-standard Cutout 182 x
53 mm in the dashboard or a console.
3. Bend the stoppers of the mounting
bracket to the out side until the bracket is
tightened in the cutout (Fig.2).
4. Insert the unit into the mounting bracket
until it locks in place.
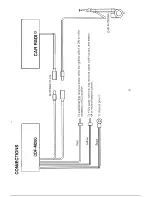
CONNECTION (See page 6.)
Wire colour code
RED: Connect this wire to a terminal that
receives power while the ignition switch is
ON or in the Accessory (ACC) position-
Never connect the wire to the car battery
directly or the car battery may be drained.
Note: If the vehicle does not have an ACC
terminal, connect this wire to a terminal
which receives
power while the
ignition switch is On, and stands 4A or
more of electric current.
YELLOW: Connect this wire to +
3
Содержание CDF-M200
Страница 2: ...LOCATION OF CONTROLS DIGITAL DISPLAY ...
Страница 6: ... INSTALLATION Fig ...
Страница 7: ...0 a t ...

