


-5-
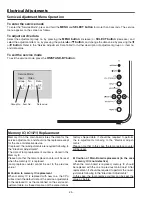
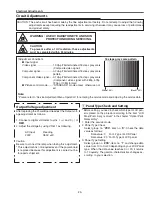
[Adjustment Condition]
●
Input signal
Video signal ....................... 1.0Vp-p/75
W
terminated, 16 steps gray scale
(Composite video signal)
Computer signal ................... 0.7Vp-p/75
W
terminated, 16 steps gray scale
pattern
Component Video signal ...... 0.7Vp-p/75
W
terminated, 16 steps gray scale
(Component video signal with 480p, 575p,
70p or 1080i format)
●
Picture control mode ........ “STANDARD” mode unless otherwise not-
ed.
Note:
* Please refer to “Service Adjustment Menu Operation” for entering the service mode and adjusting the service data.
White 100%
Black 100%
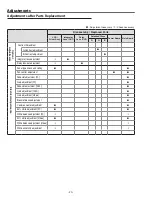
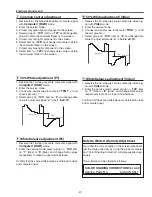
Circuit Adjustments
CAUTION: The each circuit has been made by the fine adjustment at factory. Do not attempt to adjust the following
adjustments except requiring the readjustments in servicing otherwise it may cause loss of performance
and product safety.
Electrical Adjustments
16 steps gray scale pattern
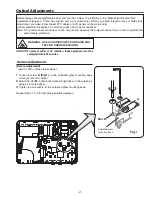
After replacing the Power Board readjust the Output volt-
age adjustment as follows.
1. Connect a digital voltmeter to pins 1 (+) and 3 (-) of
K6d
.
. Adjust the voltage by using VR611 as following.
AC Input
Reading
30V
380V ±V
Caution:
Be sure to connect the lamp when taking this adjustment.
* This adjustment is not required even if the power board
is replaced because this adjustment is carried out be-
fore parts shipment.
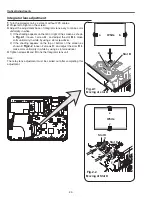
Output Voltage adjustment
* Before setting, you need to check which type of LCD pan-
el is placed on the projector according to the item "LCD
Panel/Prism Ass'y removal" in the chapter "Optical Parts
Disassembly".
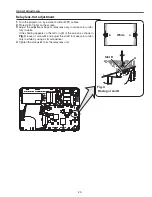
1. Enter the service mode.
. Panel Type Check
Select group no. “
290
”, item no. “
0
”. Check the data
value as follows;
Data value: 0 For L-Type of LCD Panel
Data value: 0 For R-Type of LCD panel
3. Panel Type Setting
Select group no. “
290
”, item no. “
1
” and change data
value from 10 to 0 or 0 depending on your LCD Panel
type. When the data value reaches 0 or 0, it returns
to 10 quickly. The gamma-characteristics changes ac-
cording to your selection.
z
Panel Type Check and Setting
WArNING : uSe uV rAdIAtIoN eYe ANd SKIN
ProtectIoN durING SerVIcING.
cAutIoN:
to prevent suffer of uV radiation, those adjustments
must be completed within 25 minutes.
Содержание 1 122 356 20
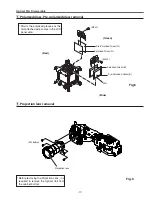
Страница 18: ... 18 Optical Parts Disassembly m Optical Unit Top removal M3x8 x5 Optical top Fig 7 ...
Страница 53: ... 53 IC Block Diagrams FA5502 P F Control IC621 L3E6100D D A S H LCD Driver IC501 IC531 IC561 ...
Страница 54: ... 54 IC Block Diagrams L3E07072 LCD Driver Gamma Correction IC401 M62393 DAC IC3531 ...
Страница 55: ... 55 IC Block Diagrams NJW1141 Audio Control IC5001 ...
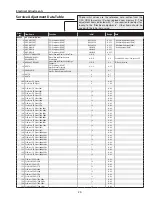
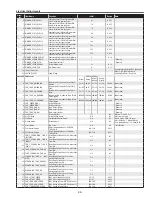
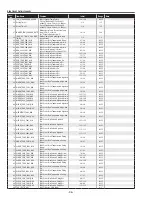
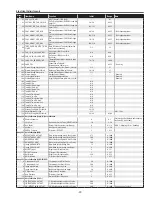
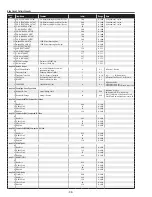
Страница 74: ...Key No Part No Description Key No Part No Description KR6 XW55A00 KP6 XW50A00 Electrical Parts List 74 ...
Страница 81: ...KR6 XW55A00 KP6 XW50A00 81 Mechanical Parts List ...
Страница 82: ... KR6AD Jun 2007 DC 350 Printed in Japan SANYO Electric Co Ltd ...
Страница 92: ...A8 SCH_KR6AD 1 3 4 5 6 7 8 9 10 11 1 13 14 15 16 A B C D E F G H I J K L A B C D E F G H I J K L NO DATA ...