SANUS VuePoint F180d Скачать руководство пользователя страница 5

5

1/4-20 x 3/4 in.

10-24 x 1 in.

5⁄16 in. x 2 3⁄4 in.

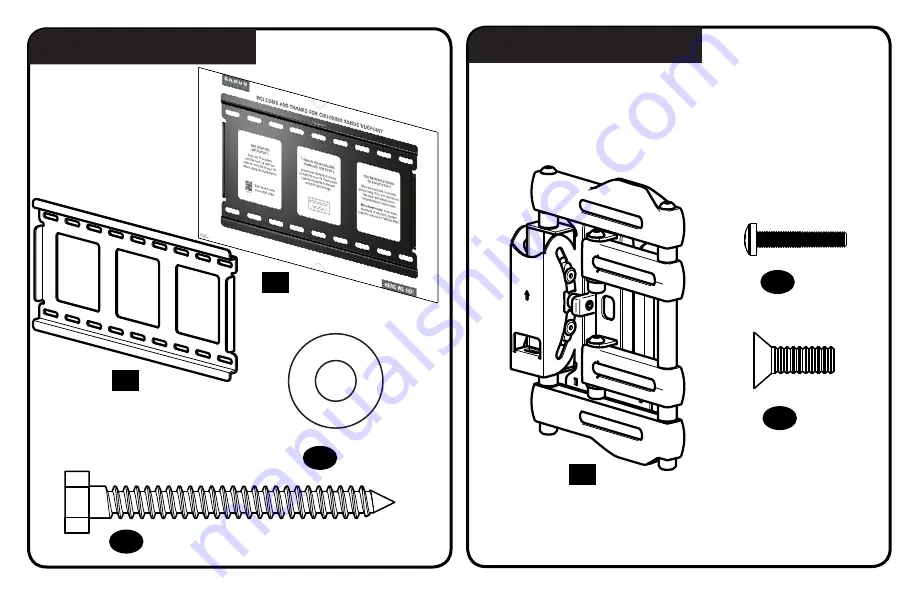
STEP 2 Parts and Hardware

STEP 3 Parts and Hardware

.695 x .350 x.075 in.

16

x1

15

x1

19

x1

Wall Plate

Wall Plate Template


Lag Bolts

Lag Bolt Washers

18

x4

20

x2

21

x1

Locking Screw

Wall plate Screw

Arm Assembly

17

x4

Содержание F180d

Страница 1: ...F180d INSTRUCTION MANUAL Scan for easy install video san us 964 We ll Make It Stress Free If you have any questions along the way just give us a call 1 888 333 9952 We re ready to help...

Страница 2: ...r have doubts about the safety of the installation assembly or use of this product contact Customer Service at 1 888 333 9952 Do you have all of the tools needed Before getting started let s make sure...

Страница 3: ...0 7 87 20 00 15 75 40 00 11 81 30 00 11 81 30 00 12 00 30 49 12 11 2 85 7 24 15 00 38 10 0 38 0 97 OFFSET 3 00 7 61 OFFSET Dimensions in cm NOTE TV shifts 3 in 7 61 cm to the right or left when in the...

Страница 4: ...e starting assembly verify all parts are included and undamaged If any parts are missing or damaged do not return the damaged item to your dealer contact Customer Service Never use damaged parts Suppl...

Страница 5: ...16 in x 2 3 4 in STEP 2 Parts and Hardware STEP 3 Parts and Hardware 695 x 350 x 075 in 16 x1 15 x1 19 x1 Wall Plate Wall Plate Template Lag Bolts Lag Bolt Washers 18 x4 20 x2 21 x1 Locking Screw Wal...

Страница 6: ...6 x4 23 x1 24 x2 25 Cable Ties 18 in 457 2 mm 2 5 in 63 4 mm Cable Tunnel Kit Additional Hardware x5 22...

Страница 7: ...m inches inch dimensions are approximate Measure the width and height of your TV hole pattern in cm Record your measurements Width__________cm x Height ________ cm 75 mm 7 5 cm 3 in 100 mm 10 cm 4 in...

Страница 8: ...0 3 0 7 5 3 0 7 5 in cm in cm Assemble TV bracket extenders 02 onto TV bracket 01 as illustrated Secure using eight screws 03 in the corner holes shown 30 0 x 30 0 40 0 x 40 0 01 B 03 02 11 81 30 0 11...

Страница 9: ...rews 03 in the corner holes shown 60 0 x 40 0 01 01 C 40 0 x 20 0 20 0 x 40 0 D in cm in cm 03 Assemble TV bracket extenders 02 onto TV bracket 01 as illustrated Secure using eight screws 03 in the co...

Страница 10: ...all use the shorter screws Spacers and longer screws are supplied to accommodate Round irregular back TVs TVs with inset mounting holes Extra space needed for cables Too Long CAUTION Verify adequate t...

Страница 11: ...n A B C or D over your TV hole pattern making sure the bracket is centered over the TV hole pattern and level Secure bracket using your screw washer Flat Back or spacer screw washer Round Back Extra S...

Страница 12: ...e your stud Verify and mark the center of the stud by nding the stud edges using an awl a thin nail or an edge to edge stud nder 2 Position the wall template 15 at your desired height and line up the...

Страница 13: ...plate 16 using washers 17 and lag bolts 18 Tighten the lag bolts 18 only until the washers 17 are pulled firmly against the wall plate 16 CAUTION Avoid potential personal injury or property damage All...

Страница 14: ...Hang the arm 19 onto the wall plate 16 by first hooking the top support then resting the arm 19 into place 2 Install wall plate screws 20 to secure arm to wall plate 16 NOTE Arm 19 can slide side to...

Страница 15: ...tance with this step 3 4 3 Fold first section of the arm 19 against the wall plate 16 to provide stability 4 Hang the TV bracket 01 onto the arm 19 by first hooking the top support then resting the TV...

Страница 16: ...16 5 5 Secure the TV bracket 01 to the arm 19 with locking screw 21 IMPORTANT This locking screw 21 must be installed to secure the TV bracket 01 onto the arm 19 19 01 19 21 21 01...

Страница 17: ...17 Manage Cables Cable Ties Cables can be routed through the cable channels on the top and bottom of the arm 19 and secured to the arm with cable ties 22 for a cleaner look 19 16 22 19 01 16...

Страница 18: ...clip and the adhe sive pad and pry off the plastic clip 2 Peel off the adhesive pad with your ngers 3 If adhesive residue remains use a cloth soaked in an organic solvent to wipe away the residue NOTE...

Страница 19: ...em from interfering with or rubbing against the tunnel when moving the TV This could cause the tunnel to separate from the clips TIP Taping the cables wires in place above and below the tunnels to hol...

Страница 20: ...vement LEVEL ADJUSTMENT To adjust the leveling of your TV loosen the locking screw 21 level your TV then tighten locking screw 21 IMPORTANT This locking screw 21 must be installed to secure the TV ont...

Отзывы: