6901-002034 <02>
24
3-2
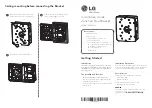
10 mm
(3/8 in.)
English
1.
Level wall plate
[01]
and mark the hole locations.
2.
Drill pilot holes as illustrated.
3.
Insert lag bolt anchors
[05]
. Then insert lag bolts
[04]
using a drill and
the Allen Driver Bit
[03]
.
CAUTION:
Be sure the anchor
[05]
is seated fl ush with the concrete surface.
Français
1.
Mettez la plaque murale
[01]
à niveau et marquez les emplacements
des trous.
2.
Percez des avant-trous tel qu’illustré.
3.
Lag ancres boulon Insérer
[05]
. Insérez ensuite les boulons tire-fond
[04]
à l’aide d’une perceuse et d’un embout d’entraînement Allen
[03]
.
ATTENTION:
Assurez-vous que la douille à expansion
[05]
ne dépasse pas
de la surface de béton.
Deutsch
1.
Richten Sie die Wandplatte
[01]
aus, und markieren Sie die Stellen für
die Bohrlöcher.
2.
Bohren Sie Vorbohrungen wie in der Abbildung dargestellt.
3.
Führen Sie die Ankerschraubendübel
[05]
ein. Schrauben Sie dann die
Ankerschrauben
[04]
mit einem Bohrer und dem Sechskanteinsatz
[03]
fest.
ACHTUNG:
Stellen Sie sicher, dass der Dübel
[05]
bündig mit der Betonober-
fl äche abschließt.
Español
1.
Nivele la placa mural
[01]
y marque la ubicación de los orifi cios.
2.
Realice los orifi cios como se indica en la ilustración.
3.
Inserte los anclajes
[05]
. Luego inserte los tornillos
[04]
utilizando un
taladro y una broca de desarmador de tipo Allen
[03]
.
PRECAUCIÓN:
Cerciórese de que el anclaje
[05]
quede nivelado respecto de
la superfi cie de hormigón.
Português
1.
Nivele a placa de parede
[01]
e marque os locais dos orifícios.
2.
Perfure orifícios guia conforme mostra a ilustração.
3.
Insira as proteções do parafuso sextavado
[05]
. Insira os parafusos
sextavados
[04]
usando uma furadeira e a broca com ponta Allen
[0
3]
.
ATENÇÃO:
Verifi que se a âncora
[05]
está nivelada com a superfície de
concreto.
Nederlands
1.
Plaats de wandplaat
[01]
en markeer de locaties van de gaten.
2.
Boor de montagegaten zoals in de illustratie wordt getoond.
3.
Plaats de pluggen
[05]
voor de bouten. Plaats vervolgens de bouten
[04]
met behulp van een boor en vervolgens de inbussleutel
[03]
.
LET OP:
Het anker
[05]
dient helemaal in het betonnen oppervlak te worden
geplaatst.
Italiano
1.
Mettere a livello la piastra a muro
[01]
e contrassegnare le posizioni
dei fori.
2.
Praticare i fori guida come illustrato.
3.
Inserire le protezioni delle viti
[05]
. Quindi, inserire le viti
[04]
con un
trapano avvitatore e inserto esagonale
[03]
.
ATTENZIONE:
Assicurarsi che il tassello
[05]
sia inserito a livello rispetto alla
superfi cie in calcestruzzo.
Ελληνικά
1.
Ευθυγραμμίστε την πλάκα τοίχου
[01]
και σημειώστε τις θέσεις των
οπών.
2.
Ανοίξτε τις οπές οδηγούς όπως φαίνεται στην εικόνα.
3.
Τοποθετήστε τα ούπα των ξυλόβιδων
[05]
. Στη συνέχεια τοποθετήστε
τις ξυλόβιδες
[04]
χρησιμοποιώντας ένα δράπανο και τη μύτη τύπου
Allen
[03]
.
ΠΡΟΣΟΧΗ:
Βεβαιωθείτε ότι το ούπα
[05]
είναι επίπεδο με την επιφάνεια
σκυροδέματος.
Norsk
1.
Sørg for at veggplaten
[01]
er i vater, og marker hvor hullene skal være.
2.
Bor pilothull, som vist.
3.
Sett i veggankre for franske treskruer
[05]
. Sett deretter i de franske
treskruene
[04]
med en drill og unbrakodrillbiten
[03]
.
ADVARSEL:
Pass på at veggankeret
[05]
er i fl ukt med betongoverfl aten.
Dansk
1. Sæt
vægpladen
[01]
vandret på og markér hullernes placering.
2.
Bor styrehullerne som illustreret.
3. Indsæt
betonankrene
[05]
. Indsæt derefter de franske skruer
[04]
med
en boremaskine og unbracobitten
[03]
.
ADVARSEL:
Sørg for, at beton-ankeret
[05]
fl ugter med betonoverfl aden.
Svenska
1.
Se till att väggplattan
[01]
är rak och markera hålplatserna.
2.
Borra styrhål enligt bilden.
3.
Sätt i träskruvsskydd
[05]
. Sätt sedan i träskruvarna
[04]
med en borr
med borrspets sexkant
[03]
.
VARNING:
Se till att förankringen
[05]
sitter plant mot betongytan.
Русский
1.
Выровняйте настенную пластину
[01]
и отметьте расположение
отверстий.
2.
Просверлите направляющие, как показано на рисунке.
3.
Вставьте защитные шайбы для болтов
[05]
. Затем установите
болты
[04]
используя дрель и насадку с под шестигранные болты
[03]
.
ВНИМАНИЕ:
Убедитесь, что анкерный болт
[05]
установлен заподлицо с
бетонной поверхностью.
All manuals and user guides at all-guides.com
Содержание VLL10
Страница 15: ...6901 002034 02 15 M4 M5 20 18 14 08 20 18 14 11 1 3 02 02 4x All manuals and user guides at all guides com...
Страница 17: ...6901 002034 02 17 2x All manuals and user guides at all guides com...
Страница 23: ...6901 002034 02 23 All manuals and user guides at all guides com...
Страница 27: ...6901 002034 02 27 All manuals and user guides at all guides com...
Страница 29: ...6901 002034 02 29 01 02 All manuals and user guides at all guides com...
Страница 32: ...6901 002034 02 32 1 2 3 All manuals and user guides at all guides com...
Страница 33: ...6901 002034 02 33 4 5 All manuals and user guides at all guides com...