background image


44 


Change the Network Setting 

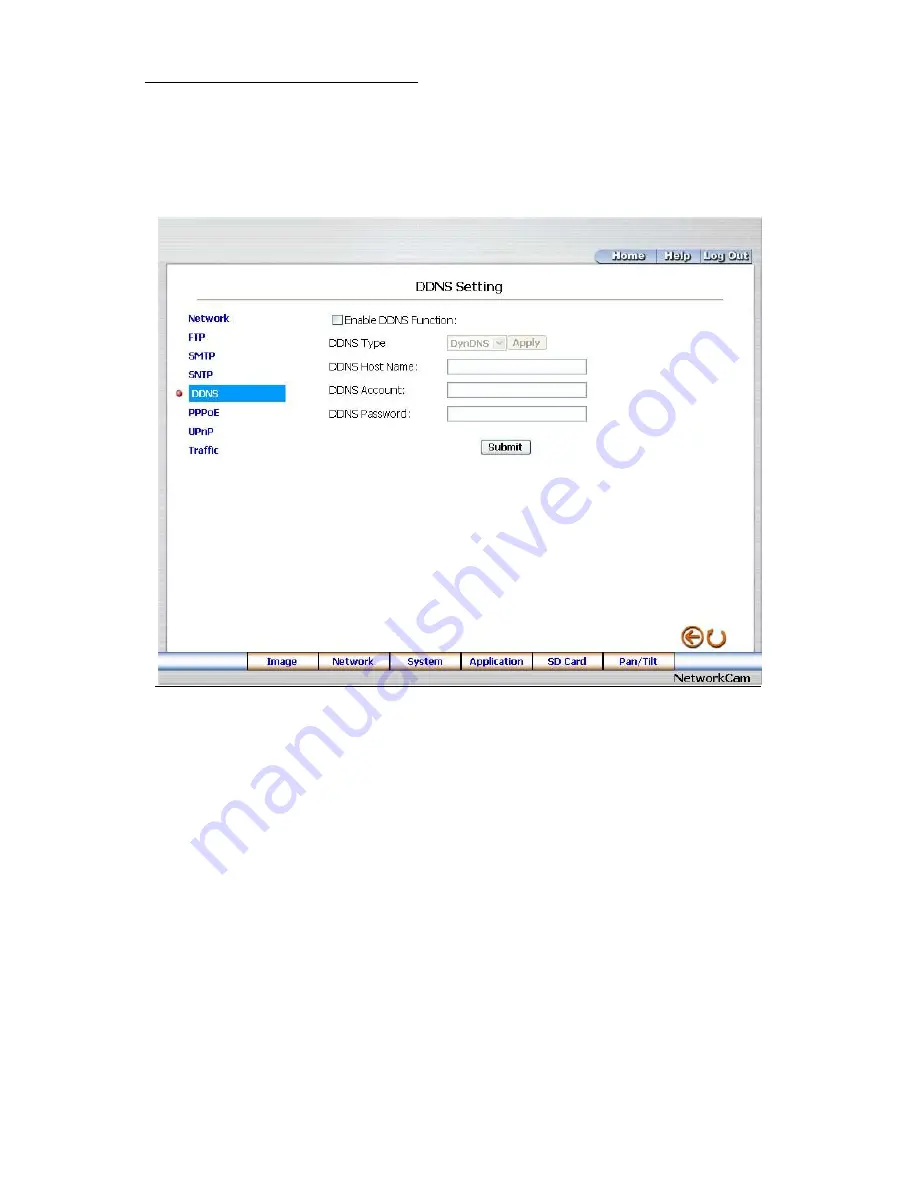
 DDNS. 

The 

Network

 page has, on its upper left, the 

DDNS

 icon. Please follow the steps below to change the 

DDNS setting through the network if necessary. 

1. 

Click the 

DDNS

 button at upper left above to enter the 

DDNS Setting

 page. 


2. 

Click 

Enable DDNS Function

 to checkmark the attached box and activate the function. 

3. 

Click 

DDNS Type

 to open the list of three DDNS modes to choose from: 

DynDNS

hn

, and 

adsldns

.

 Click the 

Apply

 button and connect their website automatically and visit it. Type in your 

dynamic IP Address and Email Address. If they are accepted by the website, you will get an Email 

containing your DDNS Account and DDNS Password in your Email box. 

4. 

Type in the 

DDNS Host Name

, the 

DDNS Account

 and the 

DDNS Password

5. 

Click the 

Submit

 button to submit the new setting. 

6. 

Click the 

Home

 button to return to the home page. 


NOTE: Please refer to section 5.1.8 (PPPoE & DDNS) for more details.


Содержание SNC-240

Страница 1: ...Version 1RN 2008 USER MANUAL IP Camera Model SNC 240 SNC 360...

Страница 2: ...VIDEO Vertrieb AG Any duplication even on a digital data medium requires an approval in writing of SANYO VIDEO Vertrieb AG Reprint even in extracts is forbidden Errors and technical alterations are o...

Страница 3: ...THE USB FUNCTION 14 3 INSTALLATION 16 3 1 CONNECTING WITH AN NVR 16 3 2 CONNECTING WITH A DVR 17 3 3 CONNECTING WITH A MULTIPLEXER 17 3 4 UPDATING SYSTEM SOFTWARE 17 3 5 NETWORK CAMERA SD CARD TROUBLE...

Страница 4: ...cting the Network camera 34 5 1 2 Change Image Setting 36 5 1 3 Change the Network Setting 39 5 1 4 Change the System Setting 49 5 1 5 Change the Application Setting 58 5 1 6 Change the SD card Settin...

Страница 5: ...block ventilation openings Do not place anything on top of the unit that might spill or fall into it Do not attempt to service this unit yourself as opening or removing covers may expose you to danger...

Страница 6: ...mall size file so it can save more images over a longer time and can be set extremely fast The device also has a built in website server providing many Internet functions and protocols including the M...

Страница 7: ...AD CCD sensor 480 TV lines Built in web server Our comprehensive Plug Play features PnP video codec installation of automatic video codec or any component PnP IP address supports UPnP protocol PnP con...

Страница 8: ...e Motion JPEG and the MPEG4 5 levels of compression provided The file size of a M JPEG compressed image depends on the image s actual content Images with a lot of detail will generate bigger files The...

Страница 9: ...vis external events Operating Environment Operation temperature 41 122 F 5 50 C Humidity 20 80 RHG non condensing WARNING Avoid aiming the camera at the sun or other extremely bright lights Irrespecti...

Страница 10: ...is port includes ALARM OUT GROUND ALARM IN and ALARM RECOVER for connecting with external devices WARNING You can t use general RS 232 cables to link up with the I O connectors in the rear panel of th...

Страница 11: ...n chart below for details 4 RS 485 D 5 GND Ground contact 6 ALARM RESET INPUT This pin connects to an alarm clear device for clearing an alarm 7 ALARM IN INPUT This is an alarm input that can be progr...

Страница 12: ...12...

Страница 13: ...tocol If the switch points upwards the device can change the setup of network function enable disable via the network 4 STATIC IP If the switch points down the device can t obtain an IP address from t...

Страница 14: ...en the SD card and the PC Once you ve connected your Network camera to your computer the Windows system will detect the connection and ask you what you want to do with your SD card In other words if t...

Страница 15: ...15 WARNING After changing the settings please click the Apply button All of the options will be effective after removing the USB connector...

Страница 16: ...factory default Static IP address 192 168 1 168 But the Network camera Static IP address can only appear if there is a connection between the Network camera and another device If there is no such conn...

Страница 17: ...se ensure the SD card is working and the file of the system firmware is intact 1 Format an SD card using the FAT16 format if it is unformatted there are no limitations to an SD card s capacity SD Card...

Страница 18: ...her than UPDATE OK RESET PLEASE please write down the error messages shown on the screen and inform your technical support while ignoring the following steps 10 Power off the Network camera when this...

Страница 19: ...ra 6 Make sure that the SD card is inserted in a correct position in step 5 or the Network camera will suffer permanent physical damage 7 If the message CSUM ERROR appears in step 8 it implies a probl...

Страница 20: ...ists please contact your technical support and ignore the following steps 4 Please make sure the function of SD CARD ENABLE is activated in the ALARM and SCHEDULE pages if no cross sign appears beside...

Страница 21: ...21 4 Turn off the power before inserting the SD card Otherwise the unit may shut down...

Страница 22: ...Physical specifications of the RJ 45 cable for Ethernet Wire Type Cat 5 Connector Type RJ 45 Max Cable Length 100 m Hub Wiring Configuration Straight through or Cross Over PC Wiring Configuration Stra...

Страница 23: ...23 4 1 2 Connect to a LAN Hub INTRANET The RJ 45 PIN configuration for connecting with a LAN Hub is shown below RJ 45 LAN CAMERA TO PC NETWORK CARD uplink...

Страница 24: ...if the LAN unit isn t connected to a DHCP server Otherwise please follow the instructions given below Set the IP MASK and GATEWAY The following is a sample setting IP 192 168 1 X MASK 255 255 255 0 G...

Страница 25: ...8 1 1 Therefore if the connected network is identified as Class C for example the first three sets of numbers of the Network camera IP address must be the same as in the network address If the connect...

Страница 26: ...Software Follow the procedure below to install the TCP IP communication program in your computer Click the Start menu from your computer and point to the Settings Control Panel Double click the Networ...

Страница 27: ...e Configuration tag and check if the TCP IP is included among the network component list If the TCP IP is included please process section 4 5 If it is not included please follow section 4 4 to install...

Страница 28: ...installation the PC may be restarted 4 5 TCP IP configuration setting Click Start Settings Control Panel Network Select TCP IP and then click Properties Before processing the Network camera installati...

Страница 29: ...ass type as the server If there is no DHCP server please select specify an IP address and type in the IP address of your PC This IP address must be different from other network IP devices but in the s...

Страница 30: ...s below to ensure whether you have established the connection successfully Click Start Programs MS DOS Prompt Type in ping 192 168 1 168 then enter See the sample screen below This IP is the Network c...

Страница 31: ...ase re check all the hardware and software installations by repeating steps 1 to 5 If you still can t establish the connection after rechecking please contact your dealer If you receive a response as...

Страница 32: ...32...

Страница 33: ...zones or watching recorded data through the TCP IP protocol The details are listed as follows RJ 45 PIN configuration for Ethernet PIN NO PIN Assignment 1 TX 2 TX 3 RX 4 Not Connected 5 Not Connected...

Страница 34: ...priate spaces 6 Click the OK button to set your entries and automatically exit the page NOTE The default User Name and Password are admin and 9999 respectively NOTE The page headlined Enter Network Pa...

Страница 35: ...he MEMORY CARD window if the SD card is inserted Click the Pan Tilt button to change the Pan Tilt Zoom settings Click the button to change the time date display mode Click the button to switch the hig...

Страница 36: ...ode 2 Adjust the image setting including Device Title Resolution Quality Frame rate MPEG4 mode only Format and Viewer Type MJPEG mode only if necessary 3 Click the Submit button to submit the new imag...

Страница 37: ...page while the new image setting acts on the images to effect the desired changes instantly If the setting has not been changed by the above steps any re entry onto the home page will find images in...

Страница 38: ...ck this button to install the default settings in all the entries for image parameters on this page II SNC 360 MPEG4 mode Device Title Type in the camera title in the given space Resolution Scroll to...

Страница 39: ...tton in the home page to enter the Network page 2 The accessible networks here are the FTP MJPEG mode only the SMTP MJPEG mode only the SNTP the DDNS the PPPoE the UpnP and the Traffic 3 Fill in the I...

Страница 40: ...0 and 255 It is used to identify the subnet where the Network camera is sited Default Gateway Type in the 4 byte Gateway in the relevant blank space each unit value must be between 0 and 255 Primary N...

Страница 41: ...bmit button to submit the new FTP setting of the recording 4 Click the Home button to return to the home page Description of function keys FTP IP Address Enter the FTP server DOMAIN NAME in the approp...

Страница 42: ...Password and the DOMAIN NAME of the SMTP server and set the recipient s e mail address if necessary 4 Click the Submit button to submit the new SMTP setting 5 Click the Home button to return to the h...

Страница 43: ...for Daylight Saving Time Changes to checkmark the attached box and activate the function 4 Click the Submit button to submit the new SNTP setting 5 Click the Home button to return to the home page Des...

Страница 44: ...to open the list of three DDNS modes to choose from DynDNS hn and adsldns Click the Apply button and connect their website automatically and visit it Type in your dynamic IP Address and Email Address...

Страница 45: ...tton and connect this website automatically and enter it Type in your dynamic IP Address and Email Address If they are accepted by the website you will get an Email containing your DDNS Account and DD...

Страница 46: ...page 2 Click the PPPoE mode to activate the function 3 Type in the PPPoE Account and the PPPoE Password 4 Click the Submit button to submit the new setting 5 Click the Home button to return to the hom...

Страница 47: ...the UPnP Max Expired Age the SSDP Port and the UPnP Port 4 Click Enable UPnP Memory Card Access to checkmark the attached box and activate the function 5 Click the Submit button to submit the new sett...

Страница 48: ...above to enter the Network Traffic page 2 Type in the Maximum Upload Bandwidth and the Maximum Download Bandwidth 3 Click the Submit button to submit the new setting 4 Click the Home button to return...

Страница 49: ...e With SNTP Server 3 Click the Submit button to submit the new Date and Time settings 4 Click the Home button to return to the home page Description of function keys The Local Time Shows the current d...

Страница 50: ...e chosen 6 Enter the Timestamp Format you have chosen 7 Click the Submit button to submit the new user s setting 8 Click the Home button to return to the home page Description of function keys Enable...

Страница 51: ...ser s settings 4 Click the Home button to return to the home page Description of function keys User List The list shows the registered user s and the corresponding authority Delete Deletes a selected...

Страница 52: ...the Digital I O Setting page 2 Mark the Digital Input ON or OFF and the Digital Output ON or OFF Click your choices to enable 3 Click the Submit button to submit the new user s settings 4 Click the Ho...

Страница 53: ...echanism Setting page 2 Mark the Audio Mechanism ON or OFF 3 Click the Submit button to submit the new user s settings 4 Click the Home button to return to the home page NOTE This setting is for turni...

Страница 54: ...the RS232 Setting page Description of function keys Baud rate Eight different speeds can be used 2400 baud per second 4800 baud 9600 baud 19200 baud 28800 baud 38400 baud 57600 baud and 115200 baud T...

Страница 55: ...function keys Baud rate Eight different speeds can be used 2400 baud per second 4800 baud 9600 baud 19200 baud 28800 baud 38400 baud 57600 baud and 115200 baud Type Choose one of the types Device ID Y...

Страница 56: ...mware page 2 Click the Browse button to select the UPDATE BIN file which was copied into your computer 3 Click the Update button 4 DO NOT power off the Network camera while this update process is runn...

Страница 57: ...upper left above to enter the Event Log page 2 Choose one of the three buttons shown on the page to view an event when necessary The three buttons are titled First Page Previous 20 and Next 20 Descrip...

Страница 58: ...ion Setting page default 2 For the storage setting type in the required number of images you wish to set in Pre Alarm Memory Buffer and Alarm Memory Buffer respectively in their corresponding blank sp...

Страница 59: ...mbers entry 4 If AVI is your choice enter its recording rate and duration in seconds and click Submit for their setting Description of function keys MJPEG Format One image per file Max MJPEG Numbers S...

Страница 60: ...SMTP button on the left side to enter the SMTP Application Setting page 2 Enter the attached file number as and when necessary The maximum number which can be used is 8 3 Click the Submit button to su...

Страница 61: ...below to change the Language setting via the network if necessary 1 Click the Language button on the left side to enter the Language Setting page 2 You have an option as to which language to use The d...

Страница 62: ...ode 2 Click Enable Record UPLOAD Via FTP to checkmark the attached box and activate the function MJPEG mode only 3 Click Enable Record Save Into SD card to checkmark the attached box and activate the...

Страница 63: ...n to submit the new schedule setting 4 Click the Remove All Schedules button to clear out all the data of the schedule setting Description of function keys Schedule Check uncheck the first seven boxes...

Страница 64: ...tivate the function 5 Click Enable Alarm Upload Via SMTP to checkmark the attached box and activate the function MJPEG mode only 6 Enter the Alarm Duration you have chosen 7 Click the Submit button to...

Страница 65: ...use button to see the popup menu After setting the target zone please click Save setting 4 Enables disables the motion detection function 5 Set up the sensitivity 6 Click the Submit button to submit t...

Страница 66: ...e to display the images therein 3 Each file can be deleted by clicking the attached DELETE hyperlink NOTE You can t directly click the hyperlink of the file in the FILELIST of MEMORY CARD page with th...

Страница 67: ...be clicked to view the particular corresponding angle of the position in which it is set 4 Select the connecting port The RS 232 communication port functions as a connector to an external control devi...

Страница 68: ...properties Type in the IP address in a four part formula for example 192 168 1 101 the first three parts must be identical to the above numbers only the last part can be changed to your own number whi...

Страница 69: ...DDNS Enter the DDNS host name for example abc123 homeip net Type in DDNS Account for example abc123 Enter the DNS Password for example 7777 Submit The settings are now complete Close the IE browser 3...

Страница 70: ...etecton Advanced MD zone position sensitivity MPEG4 Resolution VGA QVGA MPEG4 Quality 5 Levels Bitrate from 3Mbps to 128Kbps MPEG4 Frame rate 25 24 15 fps at all resolutions Video fine tune Brightness...

Страница 71: ...64 KB MJPEG Watermark Digital Signature MJPEG Motion Detecton Advanced MD 96 zone 5 levels sensitivity MPEG4 Resolution Full D1 Half D1 CIF MPEG4 Quality 5 Fixed Levels and Customized Bitrate From 64K...

Страница 72: ...commands Use any of the following ways to set the IP address within thirty seconds after booting the Network camera re cycle the power Setting IP using the method below can only be done on the Etherne...

Страница 73: ...rp s IP address MAC address ping IP address Example arp s 192 168 1 100 00 0C 0C 00 00 01 ping 192 168 1 100 The device responds to the ping in the examples above if the new address has been configure...

Страница 74: ...Figure 1 Figure 1 Create an account After clicking Sign up now you will enter the Create Account page Please complete the form at the bottom of the page to create your account You will receive an e m...

Страница 75: ...ts item as shown in Figure 4 Click Add Host Service and its 5 service items will appear The Add Dynamic DNS Host item helps to add a new DDNS as shown in Figure 5 Each member may have only one free ac...

Страница 76: ...76 Figure 4 Figure 5...

Страница 77: ...s s he likes from the right hand side of the Hostname s drop down list NOTE You don t have to set the IP Address in the same format as the Network camera s IP Address It will renew the IP Address auto...

Страница 78: ...8 0 22 ZOOM x 2 3 2 5 2 1 5 1 ZOOM x 3 3 2 5 2 1 5 1 ZOOM x 4 3 2 5 2 1 5 1 For SNC 360 only 2 When the frame rate is lower or equal to 15 frames second Highest High Medium Low Lowest FULL D1 2 25 1 9...

Отзывы: