background image

4

Santa Fe Oasis105 Installation & Operation Instructions

Santa-Fe-Products.com | 800.533.7533

Items Included in Box:

• Santa Fe Oasis105 Dehumidifier

• Santa Fe Oasis105 Dehumidifier Leveling Feet

• 8’ Drain Hose and Drain Adapter

• MERV-13 Filter (Dimensions: 1” x 12” x 14”)

Important Precautions

•  Do not install the Santa Fe Oasis105 dehumidifier with the intake or exhaust of the unit within 14” of a wall or other 

obstruction. Avoid directing the discharge air at people. The dehumidifier should be used in the upright position

•  Do not place the unit where curtains or debris can be drawn into the intake and restrict airflow.

•  The device is designed to be installed indoors in a space that is protected from rain and flooding.

•  Do not operate in standing water or place the unit near open water. If used near a water source; be certain there is no  


chance the unit could fall into the water or get splashed and that it is plugged into a dedicated circuit and Ground Fault Circuit 

Interrupter (GFCI) protected outlet.

•  Install the unit with enough space to access all sides for maintenance and service. The top panel needs to be removed in 

order to do repairs.

•  DO NOT use the dehumidifier as a bench or table.

•  DO NOT place the dehumidifier directly on structural building members without vibration absorbers or unwanted noise may 

result. Place the Santa Fe Oasis105 dehumidifier on supports to raise the base of the unit.

Location Considerations

•  Locate the dehumidifier near a suitable drain  

(8’ drain hose included). Allow for proper 

drainage and routing of needed drain pipes. 

•  Locate the dehumidifier in an area where the 

cord’s length (9’) easily reaches a 115 VAC 

electrical outlet with a minimum of a 15 Amp 

circuit capacity.

•  The unit is designed to operate while level. If 

the unit is placed on an unlevel surface, refer 

to section below (Installing Leveling Feet). 

Failure to level the unit may result in leakage or 

improper drainage.

•  The unit should be suspended with a hang kit 

from the floor joists if there is any possibility  

of flooding. A flooded unit is not covered by  

warranty. Feet will be installed as a securing  

measure after the hang kit is put on the  

dehumidifier. DO NOT hang the Santa Fe  

Oasis105 dehumidifier from its’ cabinet.

•  Allow sufficient clearance to handle the unit’s overall dimensions as well as any optional return and supply ductwork to the unit. 
•  Allow sufficient clearance for filter removal and to prevent airflow obstruction.

Installing Leveling Feet


• Lay down a protective pad (pillow, blanket, etc.).

• Carefully turn unit onto side.

•  Install leveling feet and adjust to the desired position to ensure unit is level for proper drainage.

• Carefully bring unit to upright position.

•  Wait a minimum of 10 minutes before operating.

Dehumidifier Set Up

9' POWER CORD

TOP VIEW

MINIMUM

CLEARANCE

FOR PROPER 

AIR FLOW OF 

RETURN AIR

2" 

RETURN AIR

SUPPLY AIR

A

B

PRIMARY

DRAIN

ACCESS

MINIMUM CLEARANCE

FOR PROPER AIR FLOW 

OF SUPPLY AIR

B

14" 

6" 

A

MINIMUM

CLEARANCE

FOR FILTER

REMOVAL

SECONDARY

DRAIN

ACCESS

CONTROL

PANEL

Содержание OASIS105

Страница 1: ...tile and energy efficient dehumidifier the Santa Fe Oasis105 is perfect for a wide range of applications including whole home basements attics and crawl spaces It features onboard digital controls var...

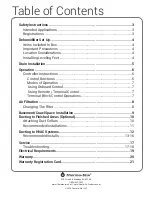
Страница 2: ...rain Installation 5 Operation 6 Controller Instructions 6 Control Functions 6 Modes of Operation 7 Using Onboard Control 7 Using Remote Terminal Control 7 Terminal Block Control Operations 7 Air Filtr...

Страница 3: ...or use as a shelf or table Before leaving the unit unattended ensure children do not have access to the equipment Do not allow children to play with or near the unit or in its air flow The unit is de...

Страница 4: ...Location Considerations Locate the dehumidifier near a suitable drain 8 drain hose included Allow for proper drainage and routing of needed drain pipes Locate the dehumidifier in an area where the co...

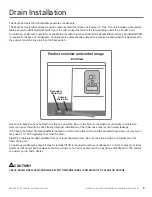
Страница 5: ...y Drain Port Secondary Drain Port End View PVC Trap Use care to keep the hose as flat to the floor as possible Be sure the hose is not kinked or otherwise restricted so water can pass through the hose...

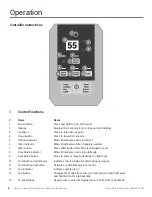
Страница 6: ...tor When lit indicates a filter change is needed 7 Filter button Press Filter button after filter is changed to reset 8 Dark Mode indicator When lit indicates unit is in Dark Mode 9 Dark Mode button P...

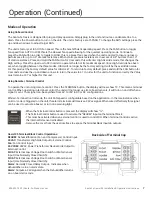
Страница 7: ...4 but less than 1 0 of static resistance Press and Hold the FAN button for 3 seconds this will enter High Override mode this changes the High setting Press the up arrow to 99 in order to operate the...

Страница 8: ...ulling on the top of the filter frame Step 2 Replacing the Filter Angle the bottom of the MERV 13 filter and gently slide the filter into the filter slot Do not force If resistance is felt check align...

Страница 9: ...Place dehumidifier in a central location that does not restrict the airflow of the air intake and air outlet 3 The dehumidifier must be installed on a level floor to ensure water drains out of the uni...

Страница 10: ...not included with the unit Attaching Duct Collars Return Air Inlet A 10 diameter duct collar and a front panel are attached to the unit Supply Air Outlet Two 10 diameter duct collars attach to the out...

Страница 11: ...assive grill will prevent the unfinished room from being placed under a negative pressure and also allow the dehumidifier to focus on keeping the unfinished area dry as well The onboard dehumidistat c...

Страница 12: ...ted stagnant air flow areas When ducting to two or three areas use 8 or larger diameter branch ducting When ducting to four or more areas use 6 or larger diameter branch ducting Provisions must be mad...

Страница 13: ...th a backdraft damper If the existing system has multiple returns instead of installing a dedicated return to the Santa Fe Oasis105 it is possible to select one to disconnect from the existing HVAC sy...

Страница 14: ...t the supply of the dehumidifier to the air supply of the HVAC system with a backdraft damper Optional Duct the supply of the Oasis105 to a 10 x 10 x 10 tee damper with a gravity draft damper adjusted...

Страница 15: ...static requires HI fan setting Anything greater than 0 7 of static requires HI override 99 Anything greater than 0 9 is not recommended HVAC Supply Oasis105 Supply Backdraft Damper Air Handler Option...

Страница 16: ...n Install a 6 insulated duct from outside teeing into the 8 return duct of the Ultra Series Dehumidifier to provide outdoor air ventilation optional The supply of the Oasis105 Dehumidifier should be d...

Страница 17: ...tes every hour Dehumidifier will not operate until incoming air dew point reads above 40 F No E3 Low refrigerant Evaporator coil temp is too high during extended operation Dehumidifier will go into lo...

Страница 18: ...r will circulate air for 15 minutes every hour Dehumidifier will not operate until incoming air temp reads above 40 F No E8 Communication from power board is not being received 1 There is a cable conn...

Страница 19: ...in an area that may become wet a GFCI protected circuit is recommended The unit should not be used in areas prone to flooding Consult local electrical codes for any further information An optional rem...

Страница 20: ...any costs related to changes to a Product or Component that may be required by any codes laws or regulations that may become effective after initial purchase of the Product by Customer Customer Respon...

Страница 21: ...allation Operation Instructions Register your product using the serial number and part number above at www thermastor com registration WARRANTY WARRANTY REGISTER YOUR PRODUCT PART NUMBER SERIAL NUMBER...

Страница 22: ...Santa Fe Products com 800 533 7533...

Отзывы: