background image


7


How to Use the Printer


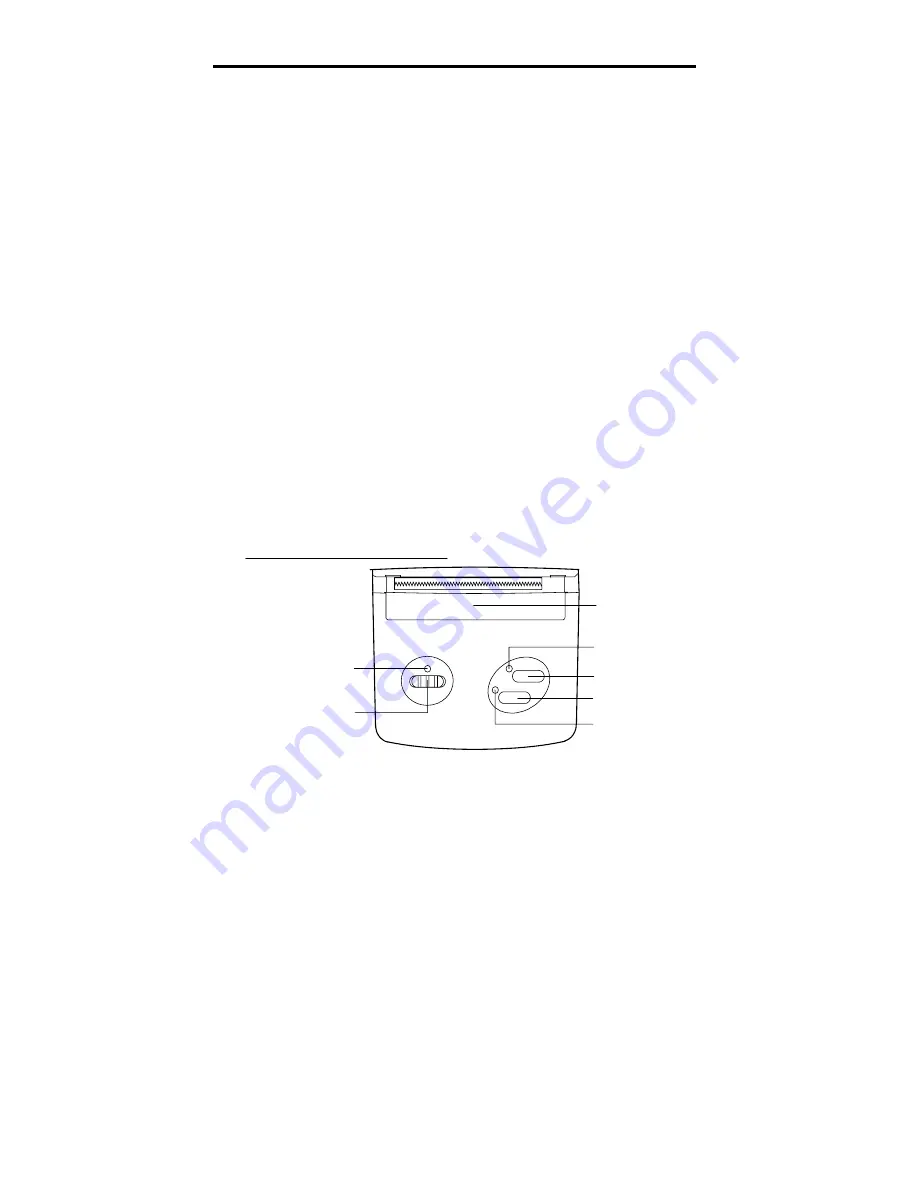
1. Description of the operation sections


      (1) Power switch (slide type) 
            Setting the switch to ON turns on the power. The POWER LED goes on. 
   (2) POWER LED (green) 
      Turning on the power turns on the LED. 
   (3) SELECT switch 
 

Changes over the ONLINE/OFFLINE status. 


To temporarily stop printing, press this switch to establish the OFFLINE status. 


(The SELECT LED goes off.) Pressing this switch again establishes the ONLINE 
status (The SELECT LED goes on) and printing is restarted. 


Note: The FEED switch functions are enabled at the OFFLINE status. 


Also note: If the power is turned on with the switch pressed, the hexadecimal 
dump printing mode is established. 

 
   (4) FEED switch 

When you press this switch at the OFFLINE status, paper will be continuously 
fed. 
Note: If the power is turned on with the switch pressed, test printing is performed   

 
   (5) SELECT LED (green) 

The LED goes in green when the ONLINE status is established. At the OFFLINE 
status, it goes off.   
Note: When the LED is turned on at the ONLINE status, it indicates that the 
printer is ready for printing data (except when test printing is in progress.) 
 

      (6) PAPER END LED (red) 

The LED goes on with paper roll not found. 
 

   (7) Paper cutter 

This cuts off the paper sheets. 
Note: By pulling up on paper, you can cut off a sheet. 

POWER

OFF

ON

FEED

SELECT

⑤SELECT LED

①POWER switch

④FEED switch

③SELECT switch

⑥PAPER END LED

②POWER LED

⑦Paper cutter

Name of the operation sections

PE

Содержание Printy 3 BL-80RS II

Страница 1: ...nter you must read this instruction manual well for proper operation Be sure to save this manual and keep it at hand Head office Taisou Ikebukuro Building 5F 2 61 1 Ikebukuro Toshima ku Tokyo 171 0014...

Страница 2: ...ctions 7 2 Connecting the AC adapter 8 3 Setting the battery pack 9 3 1 Charging the battery pack 9 3 2 Attaching the battery pack 10 3 3 Removing the battery pack 10 4 Inserting the paper roll into t...

Страница 3: ...ions 23 Precautions on Handling the Printer Be acknowledged that in principle if your purchased product and system becomes defective due to a fault of our product or system any inconvenience shall be...

Страница 4: ...anual WARNING A mistake or negligence to observe this warning may cause severe injury or even death CAUTION A mistake or negligence to observe this warning may cause injury or physical damage Meanings...

Страница 5: ...ack or do not leave it where it is exposed to direct sunlight inside a car in the hot sun near afire or a heater and other places where there are high temperatures 50 C or higher This may cause an acc...

Страница 6: ...etc Use the specified thermal paper rolls If trouble such as a paper jam occurs turn off the power before trying to take any action Lack of paper may prevent the reception of data Take the greatest ca...

Страница 7: ...thermal paper Use double sided adhesive paper on the rear surface of the thermal paper to paste things 8 Touching thermal paper with sweaty hands may cause fingerprints or unwanted discoloring 9 When...

Страница 8: ...akes easy to carry around Each section of the printer has been well designed and is simple in its handling especially for loading paper into it Printing Your printer provides high speed printing with...

Страница 9: ...designations printer Paper cover POWER LED green Power switch Paper cutter SELECT LED green SELECT switch PAPER END LED red FEED switch Battery cover Main unit rear surface Power jack Serial input co...

Страница 10: ...sed the hexadecimal dump printing mode is established 4 FEED switch When you press this switch at the OFFLINE status paper will be continuously fed Note If the power is turned on with the switch press...

Страница 11: ...not attempt to use any AC adapter or AC cable other than the ones specified When using the AC adapter do not bring it near children It may cause an electric shock because children might misuse its cor...

Страница 12: ...NK character and consecutive character 1 Plug the power cord into the AC outlet 2 Attach the battery pack When charging only one battery you can set it to either A or B channel When charging the two s...

Страница 13: ...direction and set it 3 3 Removing the battery pack CAUTION Observe for safety purposes When removing the battery take care not to drop the battery pack onto your foot 1 Detach the battery pack and sl...

Страница 14: ...dge of paper roll as you see in Figure 1 3 Open the paper cover 4 Carefully insert the tip of paper roll as straight as possible into the paper insertion port The automatic paper feeding function will...

Страница 15: ...remove it 3 Remove jammed paper in such a manner that does not damage the internal mechanism 4 Attach the paper cutter Set the hook of the paper cutter to firmly attach it Note If you scratch or defor...

Страница 16: ...rinting begins Pressing the SELECT switch establishes the operation setting mode Note For how to choose the operation setting mode see 8 1 Setting the operating functions 7 Printing a hexadecimal dump...

Страница 17: ...EED button END Push SEL button Setting mode Version No Year month day International character Japanese Character inter line space setting interval 0 dot 24 dot system Gothic type character Whether SEL...

Страница 18: ...er set Character set 24 dot ANK Gothic type 24 dot method Gothic style Character set 24 dot ANK Ming type 24 dot method Ming type Character set 16 dot ANK Gothic type 16 dot method Gothic type Charact...

Страница 19: ...disabled Battery mode Available ON Battery mode enabled Note When the battery mode is enabled the number of dynamic partitions is automatically changed according to the voltage value The number of do...

Страница 20: ...tus You can output the internal printer status 0120 028 600 Shvp voltage 600 6 00V Temperature 028 28 C Head resistance 0120 120 Note The precision of these output values is approximate and for refere...

Страница 21: ...the battery voltage The following two functions are available for checking the battery voltage 1 Soft reset when the power supply voltage drops below 5 1V The power is turned off The power switch is s...

Страница 22: ...SEL LED PE LED Head resistance at initialization Below 64 189 or more Total dot head resistance average value Replace the printer head SEL LED PE LED Head temperature HTHERM 80 or more 60 or lower Wai...

Страница 23: ...se soft cloth in water with a slight amount of a neutral detergent added squeeze it well and wipe the printer with it then wipe it with dry cloth Do not use volatile chemical agents as thinner or benz...

Страница 24: ...e Service life Pulse resistance Anti abrasion in the case of 25 C and rated energy 50 million pulses or more printing ratio 25 30 km or greater Data input control Serial input RS 232C Japanese charact...

Страница 25: ...st 1 FG Frame ground 3 RxD Input RS 232C data input signal TxD 3 5 CTS Input RS 232C data to send signal RTS 7 2 TxD Output RS 232C data output signal RxD 2 4 SBUSY Output RS 232C data accept disabled...

Страница 26: ...r than specified you should be aware that the printing quality or thermal head service life may not be guaranteed or the other troubles may occur 2 AC adapter BL 100W The AC 100 AC cable dedicated for...

Страница 27: ...24 NOTE...

Страница 28: ...25 NOTE...

Страница 29: ...inquiries 171 0014 Taisou Ikebukuro Building 5F 2 61 1 Ikebukuro Toshima ku Tokyo Japan Phone 81 3 3986 0646 representative Fax 81 3 3988 5876 Opens at 9 00 am and closes at 5 00 pm except 12 00 to 1...

Отзывы: