background image

6

Power Source

Mains Power

•  This unit is designed to operate with an 

DC 12V 1.5A power supply.

•  Unwind the cable to its full length. 

Connect one end of the cable to the DC 

IN Socket at the rear of the unit then 

connect the mains adapter to the mains 

socket. Make sure the mains adapter is 

fi rmly inserted into the mains socket. 

The unit is now connected and ready to 

use.

•  To switch the unit off  completely, unplug 

the mains plug from the mains socket.

DC IN

Ensure all connections are connected before 

connecting to the mains power socket.

Connections

Using Earphones

Turn down the volume before connecting the 

earphones. Slowly raise the volume with the 

earphones on until you reach your desired volume. 

When earphones are connected, the speaker is 

automatically disabled.

Long-term exposure to loud music may cause hearing 

damage. It is best to avoid extreme volume when using 

earphones, especially for extended periods of time.

DC IN

Содержание S6VDAB12

Страница 1: ...Instruction Manual DAB Radio S6VDAB12...

Страница 2: ...nction 8 Automatic Alarm Repeat 8 Snooze Function 8 Sleep Function 8 Display Backlight 9 System Reset 9 Software Version 9 DAB Operation 10 DAB Auto Scan 10 Secondary Services 11 Manual Tuning 11 Pres...

Страница 3: ...ure to include this manual Check that the voltage marked on the rating label matches your mains voltage Damage Please inspect the unit for damage after unpacking Do not continue to operate the unit if...

Страница 4: ...Sandstr m DAB Radio We recommend that you spend some time reading this instruction manual in order that you fully understand all the operational features it offers You will also find some hints and t...

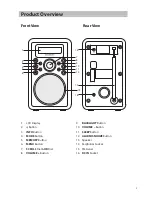
Страница 5: ...utton 7 SCROLL Dial OK Dial 8 VOLUME Button 9 BACKLIGHT Button 10 VOLUME Button 11 SLEEP Button 12 ALARM SNOOZE Button 13 Speaker 14 Earphones Socket 15 FM Aerial 16 DC IN Socket 1 3 5 2 4 6 7 8 10 12...

Страница 6: ...use To switch the unit off completely unplug the mains plug from the mains socket DC IN Ensure all connections are connected before connecting to the mains power socket Connections Using Earphones Tu...

Страница 7: ...B station for a short period of time Manual clock setting is not required Setting the Alarm Make sure you have preset FM and DAB stations before setting the Alarm if you want to wake up to DAB or FM r...

Страница 8: ...ayed To cancel this function repeatedly press the ALARM SNOOZE button until Alarm O shows on the display Snooze Function When the alarm has triggered press the ALARM SNOOZE button to temporarily switc...

Страница 9: ...reception problems you may want to reset and try again If you move to another part of the country and pick up the local and national DAB stations in that area your previously tuned channels may no lo...

Страница 10: ...ains power and then switched on from standby for the first time the unit will automatically enter DAB mode and start automatically scanning During the scan the LCD display will show Scanning together...

Страница 11: ...e SCROLL dial to cycle through the DAB channels which are numbered from 5A to 13F 3 After your desired channel number is selected press the OK dial to confirm the top line will now display the channel...

Страница 12: ...e display will show the radio mode DAB and the digital audio bit rate being received Signal Strength The display will show a slide bar to indicate the signal strength the stronger the signal the longe...

Страница 13: ...ereo and mono mode when auto mode is selected but you can override this and switch this function manually by changing it to mono mode This is helpful when receiving poor signal reception During stereo...

Страница 14: ...on provides clock and date information automatically so there s no need to manually set this information In the unlikely event that the broadcaster does not transmit any clock information the display...

Страница 15: ...position of the aerial The display is blank This may occur if the broadcaster changes the label of a service or removes a label while tuned The unit will try to retune or perform a scan To clean the u...

Страница 16: ...r where you purchased the product All trademarks are the property of their respective owners and all rights are acknowledged Visit Partmaster co uk today for the easiest way to buy electrical spares a...

Отзывы: