background image

TABLE OF CONTENTS

www.saproducts.com 

IMPORTANT INFORMATION ............................................................................................... 2

1. REGISTRATION ................................................................................................................ 3

2. UNDERSTANDING YOUR SAFE ...................................................................................... 4

3. SAFE OPERATION............................................................................................................. 5

4. LOCKED OUT OF THE SAFE............................................................................................... 7

5. INTERNAL LIGHTING .........................................................................................................7

6. PROPER PLACEMENT AND MOVING OF SAFE ................................................................8

7. KEEPING YOUR SAFE DRY...............................................................................................8

8. SECURING YOUR SAFE ....................................................................................................9

9. LOADING YOUR SAFE ......................................................................................................10

10. HINGES AND INTERNAL MECHANISMS.........................................................................10

LIFETIME WARRANTY........................................................................................................ 11

FACTORY PRESET COMBINATION...................................................................................... 12

Содержание DIAMOND SA-DIA1-COM

Страница 1: ...nd follow all safety rules carefully before operating your security safe Failure to do so will void your warranty 101121 SECURITY SAFE INSTRUCTION MANUAL FOR SA DIA1 COM SA DIA2 COM SA DIA3 COM SA DIA1 COM DP SA DIA2 COM DP AND SA DIA3 COM DP ...

Страница 2: ...STANDING YOUR SAFE 4 3 SAFE OPERATION 5 4 LOCKED OUT OF THE SAFE 7 5 INTERNAL LIGHTING 7 6 PROPER PLACEMENT AND MOVING OF SAFE 8 7 KEEPING YOUR SAFE DRY 8 8 SECURING YOUR SAFE 9 9 LOADING YOUR SAFE 10 10 HINGES AND INTERNAL MECHANISMS 10 LIFETIME WARRANTY 11 FACTORY PRESET COMBINATION 12 ...

Страница 3: ...ecommends that you do not store loaded firearms Always follow the firearm safety rules set out by the firearm s manufacturer A Sanctuary safe or any other firearm storage device cannot take the place of other safety procedures including advising children of the dangers of firearms SA Consumer Products and its distributors of the Sanctuary safes do not recommend suggest advise promote or otherwise condo...

Страница 4: ...gistering your Sanctuary safe we will be able to expedite and address any problems or challenges you may have which would otherwise require a notary letter and proof of payment The information you record onto this page will be required in the event you cannot access the contents of your Sanctuary safe Please fill out all the required information below and retain for your records and safe keeping PL...

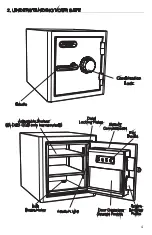
Страница 5: ...YOUR SAFE Handle 4 Combination Lock Active Locking Plates Key Hooks Battery Compartment Adjustable Shelves SA DIA1 COM only has one shelf Door Organizer Storage Pocket Bolt Down Holes Dead Locking Plates Interior Light ...

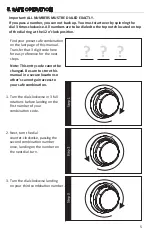
Страница 6: ... this manual Transfer that 3 digit code here for easy reference for the next steps Note This entry code cannot be changed Be sure to store this manual in a secure location so other s cannot gain access to your safe combination 1 Turn the dial clockwise in 3 full rotations before landing on the first number of your combination code 2 Next turn the dial counter clockwise passing the second combinatio...

Страница 7: ... giving access to your safe Note If the handle will not rotate the safe is still locked Return to step 1 of this section to accurately re enter your code Step 4 5 To close your safe turn the handle clockwise returning it to the original locked position IMPORTANT You must follow the next step to fully lock your safe Step 5 6 Turn the dial atleast 3 times in either direction to securely lock the saf...

Страница 8: ...lighting will be automatically turned off when the handle is returned to it s original locked position If you wish to have your lighting activated while accessing the contents of your safe be sure to keep the handle in this open and unlocked position Internal Light 1 Locate the 2xAA batteries Install them into the battery compartment on top of the door panel in the proper orientation The unit will ...

Страница 9: ... rust or mildew Internal dehumidifiers should not be in direct contact with the side or back walls 6 PROPER PLACEMENT AND MOVING OF SAFE 1 To maximize burglary protection and stability securing the safe to the floor or wall is recommended 2 3 Always ensure the safe is in an isolated and dry area Never place the safe in direct contact with a wet floor When installing your safe on a concrete floor use o...

Страница 10: ...our safe door and locate and remove the four black caps on the safe floor or back wall This will provide access to the factory drilled bolt down holes To secure your safe to the floor it will first be necessary to drill pilot holes in the floor surface For the hardware provided concrete floor installation we recommend using a hammer drill and 3 8 concrete drill bit to drill the four corresponding holes...

Страница 11: ...will put pressure against the door when it is closed As a good safety precaution store heavier items either on the floor of the safe or away from the middle of the shelves 10 HINGES AND INTERNAL MECHANISMS The hinges and internal locking mechanism are permanently lubricated thus needing no maintenance Opening the door panel of your safe may void your warranty Always consult our customer service exp...

Страница 12: ...ada Proof of registration and copy of sales receipt must be on file at the time of claim Visit our website at www saproducts com to register your safe Lifetime warranty only applies to the original owner of the safe SA Consumer Products Inc shall only be responsible and liable when the safe is used in compliance with the directions specified in your new Sanctuary Safe Owner s Manual SA Consumer Pr...

Страница 13: ... you can not back up You must start over by spinning the dial 3 times All numbers are to be dialed to the top notch located on top of the dial ring at the 12 o clock position 12 FACTORY PRESET COMBINATION Contact Customer Service at cs saproducts com or 888 792 4264 ...

Отзывы: