INSTALLATION AND USE INSTRUCTIONS FOR Viro
Privacy
MECHANICAL SAFES WITH KEY AND COMBINATION LOCK OR WITH COMBINATION LOCK ONLY
SAFETY INFORMATION:
during handling of the safe use appropriate personal protection and suitable lifting equipment
according to the products weight. Pay particular attention when closing of the door to avoid pinching your hands between safe
front and door.
The safe is equipped with one lock operated by a combination device with key or knob opening. This device is placed on the
safe door and consists on three combination locks ordered in vertical position, each one with 20 positions or releases. The safe
is supplied closed with the opening factory code 0-0-0.
N.B. : Models provided with just the combination lock can be opened by turning the knob and are not
equipped with any key. To use them correctly, it is recommended to follow instructions contained in the
next paragraphs using the knob instead of the key. All setting, check and change code operations must be
made with the safe door open and the lock in closed position (deadbolts must be completely out).
1 - Installation
Safe must be installed in a suitable place difficult to
attack with big burglary tools (i.e. clubs, crowbards,
etc.) and a humidity and condensation free
environment where walls are not particularly wet
and at least 10 cm deeper than the safe
The owner must ensure that the keys are contained
in the sealed envelope. After having checked the
correct working of all safe components (see sections
2
-
6
) follow the instructions below:
1.
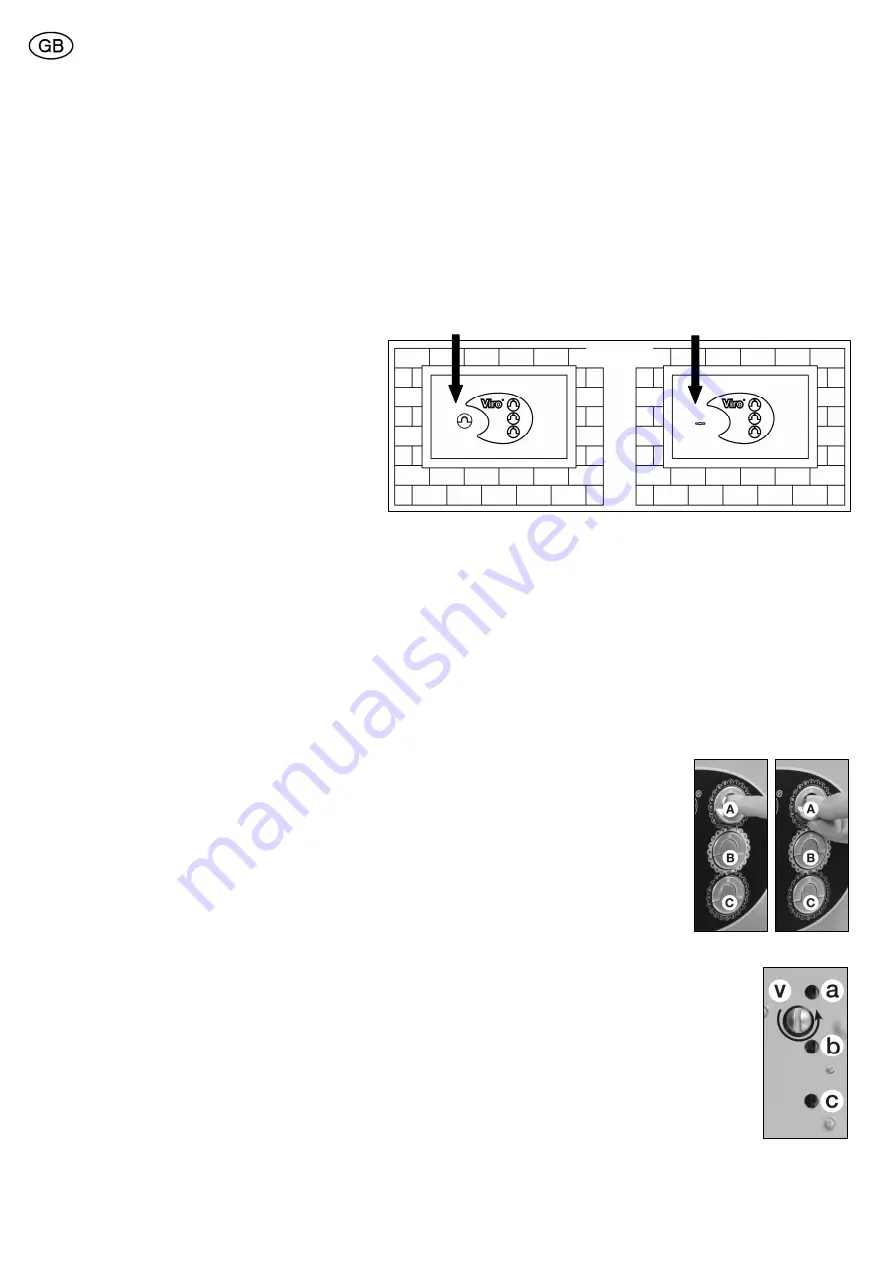
Make a hole into the wall. To grant perfect hold it should have following features:
•
Optimal Depth: the safe door should be perfectly aligned to the wall (see Fig. 1).
•
A free space of 5÷10 cm. on all the 4 sides for filling with cement.
Empty spaces inside the wall should be filled with bricks until a plane and stable surface for the safe has been built.
Furthermore, for a better pull-resistance it is recommended to insert steel rings 10 mm Ø into the folded fins on the back
case.
2.
Protect the front of the safe with transparent plastic film fixed with adhesive tape or similar.
3.
Fix the safe into the hole after checking the correct position i.e. door hinges are positioned on right-hand side when you face
it and the installing surface is plane (see Fig. 1).
Never turn the safe upside down: in that case, Viro is not
responsible for any working defects of the safe.
4.
Wall the safe with CEM II/A-LL 42,5 R (UNI EN 197-1) cement and sand in proportion 400 kg/m
3
. N.B.: to further increase
the resistance to attack it is recommended to wrap the safe with electrowelded net before walling it.
5.
After the installation and in order to avoid condensation inside the safe, it is recommended to leave
the door open for a couple of days.
2 - Opening
1.
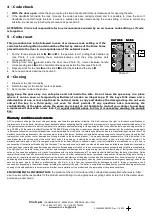
Pull up the three knobs handles A
A
A
A, B
B
B
B and C
C
C
C (see Photo I) and bring them in the position “zero”
(yellow dots corresponding Nr. 0) rotating them counter-clockwise until they stop (see Photo II).
2.
For first opening jump to section 3, otherwise dial the memorized code, rotating clockwise the
three knobs A
A
A
A, B
B
B
B and C
C
C
C clockwise on their numerical position.
3.
Open the safe rotating the key (or the knob) clockwise.
3 - Code setting
1.
With the door open
, turn the key (or the knob) counter-clockwise letting the deadbolts come out as for
closing the safe.
2.
By means of a coin, rotate counter-clockwise the change combination screw “V
V
V
V” placed inside the door, until
it stops (see Photo III).
3.
Set the chosen code on the three external knobs A
A
A
A, B
B
B
B and C
C
C
C rotating them clockwise so that the yellow dot
of each knob goes on the chosen numerical position (from 0 to19) considering that each release
corresponds a number. For example, to set the code 5-8-10, rotate the knobs clockwise: 5 releases for knob
A
A
A
A, 8 releases for knob B
B
B
B and 10 releases for knob C
C
C
C.
4.
Put the change combination screw “V
V
V
V” back to the starting position (upright standing) by rotating it clockwise
until it stops.
Before closing the safe, it is very important to check that the code has been correctly
inserted as per section 4.
Fig. 1
VERSIO
VERSIO
VERSIO
VERSION WITH KNOB
N WITH KNOB
N WITH KNOB
N WITH KNOB
VERSION WITH KEY
VERSION WITH KEY
VERSION WITH KEY
VERSION WITH KEY
Photo
I
Photo
II
Photo
III


