background image

4/8-channel H.264 DVR User Manual

33

4.5

4.5

4.5

4.5 Record

Record

Record

Record playback

playback

playback

playback

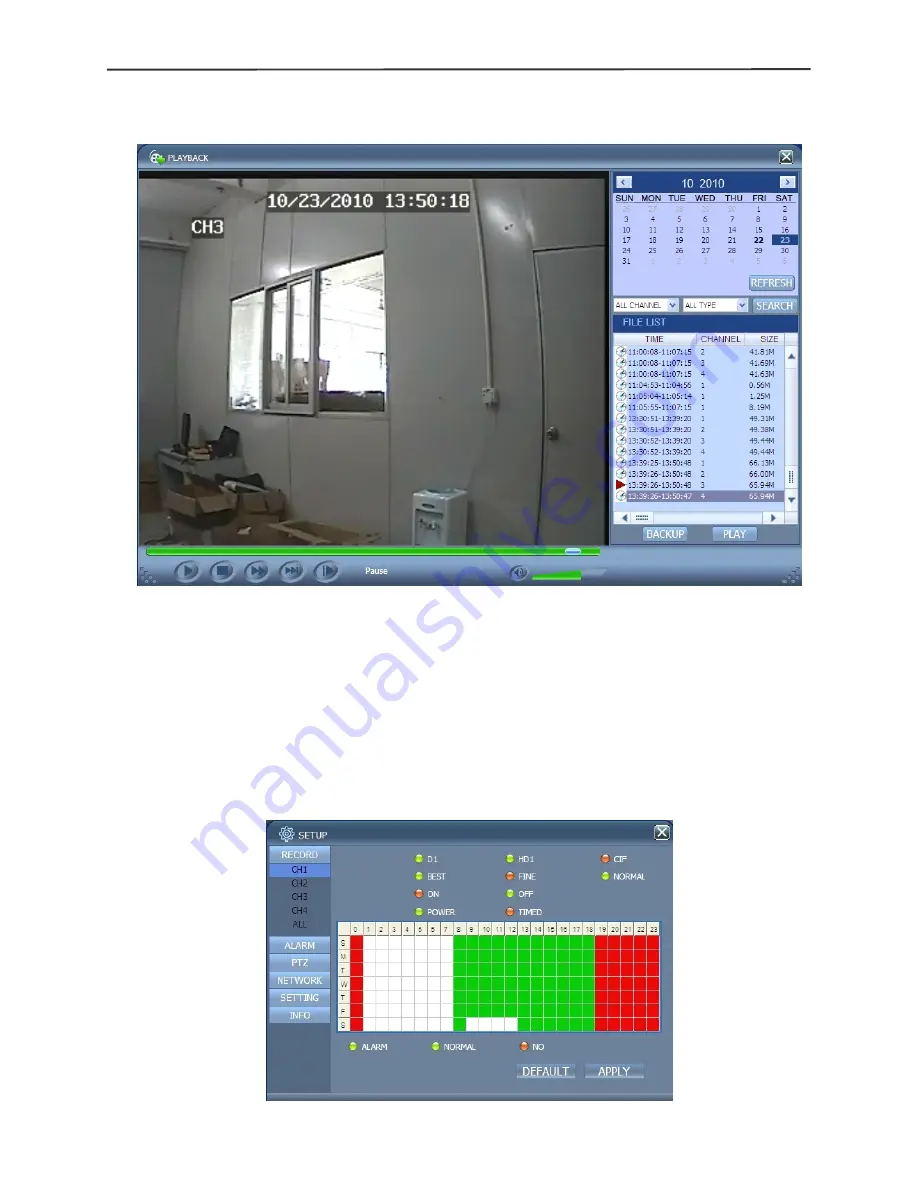
Click "PLAYBACK"to enter the Record Playback screen, as shown below:

First select the date of the record to be played and the channel and record types, and
then click “Search”. The eligible record files will appear in the file list, with the bold
numbers denoting dates with record data, as shown in the figure above. Select the file
to be played back, and double-click this file or click “Playback” to play it. A control bar
will appear at the bottom of the picture for pause, stop, fast forward, slow play and next
frame control. Click “Backup”. This file will be saved in the designated directory directly
(see Figure 4.10 for the saving directory).

4.6

4.6

4.6

4.6 Recording

Recording

Recording

Recording mode

mode

mode

mode

Click “Setup” →“RECORD” to enter the remote recording mode, as shown below:

The setup method is the same as the mainframe menu. See “Recording Mode” in

Содержание SA-2107A

Страница 1: ...1 4 8 channel Embedded Digital Video Recorder ...

Страница 2: ...ck installation installation installation installation 9 2 1 HDD Installation 9 2 2 Boot 9 2 3 System login 9 2 4 Shortcut menu 10 2 4 1 Main menu 10 2 4 2 Lock 10 2 4 3 Channel switching 10 2 4 4 Video search 10 2 4 5 PTZ Control 10 2 4 6 MUTE 11 2 4 7 Manual recording stop recording 11 Chapter Chapter Chapter Chapter 3 3 3 3 Advanced Advanced Advanced Advanced settings settings settings settings...

Страница 3: ...etwork network network network 31 4 1 Functional characteristics 31 4 2 Installation and download of controls 31 4 3 IE log in 32 4 4 Real time preview 32 4 5 Record playback 33 4 6 Recording mode 33 4 7 Alarm setup 34 4 8 PTZ control 34 4 9 Network setup 34 4 10 System setup 35 4 11 Host info 35 Chapter Chapter Chapter Chapter 5 5 5 5 Client Client Client Client software software software softwar...

Страница 4: ...eet meet DVR DVR DVR DVR s s s s long long long long time time time time and and and and much much much much data data data data reading reading reading reading and and and and writing writing writing writing requirements requirements requirements requirements Chapter Chapter Chapter Chapter 1 1 1 1 Overview Overview Overview Overview 1 1 1 1 1 1 1 1 Introduction Introduction Introduction Introduc...

Страница 5: ...ed parameter value fast recovery Flexible USB interface for mouse 1 4 1 4 1 4 1 4 Technical Technical Technical Technical parameters parameters parameters parameters Main specifications features Specific description Operating system LINUX OS Video compression format Main profile H 264 Video input 4 8 channels BNC Video output 1 channel BNC Audio input 4 8 channels RCA Audio output 1 channel RCA Di...

Страница 6: ...oller ID matching User authority Support multi level user authority distribution Time date format Support adjustable Power DC12V 3A Working temperature 0 50 Working humidity 10 90 1 5 1 5 1 5 1 5 Product Product Product Product appearance appearance appearance appearance and and and and interface interface interface interface definition definition definition definition 1 5 1 1 5 1 1 5 1 1 5 1 Fron...

Страница 7: ... 15 Remote control infrared receiver No Physical interface Interface description 1 1 4 8CH Video in Connect analog video camera signal input standard BNC connector 4 channel has 4 BNC connector 2 Video out CVBS output and connect the monitor 3 1 4 8CH Audio in Connect active audio signals such as pickup 4 Audio out Connect the audio output 5 VGA Connect VGA monitor such as computer monitor 6 NETWO...

Страница 8: ...re keys 0 9 Channel selection number keys PTZ PTZ Control Single and multi split screen Quit shortcut menu Shortcut menu Direction buttons Next on the left and right OK ESC Exit Return MENU Enter the main menu STARTRE C Start recording please refer to 2 4 6 for the method STOPREC Stop recording please refer to 2 4 6 for the method Video Search Stop playing Fast backward Fast forward Frame movement...

Страница 9: ...ontrol PTZ control is available if clicking direction or and icon There is a volume bar in volume control interface Move mouse to a position and click right button the corresponding volume will be shown in the right side of the volume bar click to exit The operations like color adjustment can be referred to above volume adjustment If there are many options in the option box click the left button a...

Страница 10: ...er indicator POWER is on the monitor will display 4 8 channel monitoring image If non formatted harddisk exists in the equipment harddisk formatting information will be shown If boot record mode is on or boot time is in the setting time the system will start automatic recording function the REC indicator will be on to indicate the system is working normally Note Note Note Note 1 If harddisk failed...

Страница 11: ...2 4 1 Main Main Main Main menu menu menu menu Click Main Menu to enter the main menu interface please see 3 1 2 4 2 2 4 2 2 4 2 2 4 2 Lock Lock Lock Lock When the password function is on please see 2 3 click right button in monitoring interface and select Lock in the pop up menu the system interface can be locked immediately password is required to log in if operation to mainframe menu is needed 2...

Страница 12: ...essed The setup of this menu will be invalid if you exit directly A significant characteristic of this product is when you move the cursor to any option the prompting message of this option will be displayed automatically in the lower part of the screen 3 2 3 2 3 2 3 2 Recording Recording Recording Recording mode mode mode mode Enter the Recording Mode screen from Main Menu Recor as shown below Ch...

Страница 13: ...g modes by marking them into different colors such as red green and background color which represent alarm recording general recording or no recording within each hour respectively FILE FILE FILE FILE LENGTH LENGTH LENGTH LENGTH Left click or press Enter to select the File length with the 4 options of 15min 30min 45min and 60min 3 3 3 3 3 3 3 3 Video Video Video Video search search search search E...

Страница 14: ...n which channel file is displayed can be modified in the following list Record Record Record Record type type type type There are 3 options all normal and alarm After selection and confirmation the searched message will be displayed automatically as a list as shown below Notes Notes Notes Notes 1 In the Detailed File list by which recording channel is the current record file recorded is displayed ...

Страница 15: ...d file After Enter is pressed in the Backup check box a will appear in this box indicating that this record file has been selected The move the cursor to the option box on the right and click Backup when the screen will display the backup progress message of the file as shown below Notes Notes Notes Notes When the available space of the backup device is less than the capacity of the record file th...

Страница 16: ...n click Enter for formatting in the pop up prompt message dialog box otherwise click Cancel After clicking Format HDD the system will prompt You will lose all data by formatting the harddisk Will you continue Then press Enter and the system will prompt Formatting and then Formatting Successfully The system will restart automatically USB USB USB USB FORMART FORMART FORMART FORMART formatting the da...

Страница 17: ...time format time zone and summer time can be set up in this screen 3 6 3 3 6 3 3 6 3 3 6 3 User User User User password password password password DEVICE DEVICE DEVICE DEVICE ID ID ID ID Enter digits directly to set up the DVR number P P P PASSWORD ASSWORD ASSWORD ASSWORD Press Enter to select ENABLE or DISABLE the user password If this option is enabled the user has to enter his her password upon...

Страница 18: ...r to enter the setup screen of this option as shown below N N N Name ame ame ame Move the cursor to the input box of this option and press Enter to enter the input screen of this option Numerical English and Chinese pinyin input methods are supported Position Position Position Position Move the cursor to this option and press Enter to change over between name positions there are 5 setup options to...

Страница 19: ...MERA AMERA SYSTEM SYSTEM SYSTEM SYSTEM Left click or press Enter to change over between the two camera systems of PAL and NTSC Volume Volume Volume Volume setup setup setup setup Move the cursor to Volume Setup left click or press Enter to enter the Volume Setup screen and press Left Right or drag the cursor with the mouse directly to adjust the volume Note Note Note Note The system will restart w...

Страница 20: ... The space of the harddisk is not enough Please change the disk after shutdown VIDEO VIDEO VIDEO VIDEO LOSS LOSS LOSS LOSS On When the video of a certain channel is lost this channel will display in the lower part of the Video Preview screen Video Loss A A A ALARM LARM LARM LARM MANAGE MANAGE MANAGE MANAGE OUTPUT OUTPUT OUTPUT OUTPUT the time of the DVR outputting the alarm signal to the outside w...

Страница 21: ...ding sender address SEND SEND SEND SEND PW PW PW PW the password of the mailbox used to send mails R R R RECV ECV ECV ECV EMAIL EMAIL EMAIL EMAIL the address used to receive the picture transmitted after the DVR motion detection alarm If the alarm frequency of the system is high the number of pictures sent will also be larger Please pay attention to the space of your mailbox timely lest the normal...

Страница 22: ... controller operation Use display mode to select full screen or blank Mouse operation Left click the mouse and drag the motion box to set the area of dynamic detection Motion Motion Motion Motion detection detection detection detection setup setup setup setup procedures procedures procedures procedures A Turn On the corresponding channel in the Channel Switch option B Set the sensitivity level as ...

Страница 23: ...andard supported by your mobile phone Service Service Service Service port port port port with a setting range of 1 024 65 535 this port has to be mapped on the router and its setup method is the same as the mapping method of the port in network setup For For For For more more more more detailed detailed detailed detailed mobile mobile mobile mobile phone phone phone phone installation installatio...

Страница 24: ...Stop Stop bit bit bit bit with the options of 1 and 2 1 by default VERIFY VERIFY VERIFY VERIFY with the 5 options of None Odd Even Mark Space None by default Address Address Address Address Complete the PTZ code of the corresponding channel Just Just Just Just set set set set protocol protocol protocol protocol baud baud baud baud rate rate rate rate and and and and address address address address...

Страница 25: ... the PC is occupied by any other service please modify it to an unused port WEB WEB WEB WEB port port port port the http port usually being 80 by default If the administrator modifies the WEB port to any other port such as 88 you have to postfix the IP with the port number and enter http 192 168 1 19 88 in the address bar when accessing the DVR via the IE IP IP IP IP address address address addres...

Страница 26: ...r the host name registered on the dynamic domain name resolution server User User User User name name name name Enter the user name registered on the dynamic domain name resolution server Password Password Password Password Enter the password registered on the dynamic domain name resolution server 3 8 3 8 3 8 3 8 Domain Domain Domain Domain name name name name application application application a...

Страница 27: ...nk below and enter the website to activate the account 3 Login After successful activation open the home page http www dyndns com to log in After successful login click Services Dynamic DNS as shown below 4 Application for free domain name After entering the Dynamic DNS Services screen click Dynamic DNS Free to apply for a free dynamic domain name as shown below ...

Страница 28: ...below Click Enter the hostname select the service type and then enter the dynamic IP address usually being the dynamic IP address of the network of the DVR host to be tied in the Add New Hostname screen as shown below Complete the application for the dynamic domain name as prompted ...

Страница 29: ...4 8 channel H 264 DVR User Manual 28 ...

Страница 30: ...ding Port forwarding procedures 1 Set the host IP address See the relevant section 2 Log in the router If the IP address of the router is 192 168 1 1 After this IP has been entered in the IE address bar a login prompt box will appear as shown below Click Enter to enter the main screen of the router as shown below ...

Страница 31: ... Click Applications Gaming as shown below As shown above fill in the IP and the port number in the corresponding files and select Both in Protocol The tick below Enable denotes selected After setup click Save Setting to save the settings ...

Страница 32: ...ownload download of of of of controls controls controls controls Automatic Automatic Automatic Automatic installation installation installation installation of of of of plug in plug in plug in plug ins s s s unit unit unit unit First add the IP address of the DVR as a reliable site of the system For example if the IP address of the DVR is 192 168 1 100 first open IE Attributes Internet Options Sec...

Страница 33: ...ut you have chosen the WAN option the effect of the preview image will be non real time 4 4 4 4 4 4 4 4 Real time Real time Real time Real time preview preview preview preview After logging in the client end successfully enter the real time preview screen directly and perform video connection automatically as shown below Play Play Play Play control control control control opening or closing the im...

Страница 34: ...th record data as shown in the figure above Select the file to be played back and double click this file or click Playback to play it A control bar will appear at the bottom of the picture for pause stop fast forward slow play and next frame control Click Backup This file will be saved in the designated directory directly see Figure 4 10 for the saving directory 4 6 4 6 4 6 4 6 Recording Recording...

Страница 35: ... the same as the mainframe menu See Alarm Setup in Chapter 3 for details 4 8 4 8 4 8 4 8 PTZ PTZ PTZ PTZ control control control control Click Setup PTZ to enter the PTZ Control mode See Figure 5 6 See Chapter 3 Network Setup in this manual for the setup method 4 9 4 9 4 9 4 9 Network Network Network Network setup setup setup setup Click Setup Network Setup to enter the Network Setup mode as shown...

Страница 36: ...wise the image may have a delay File File File File SAVE SAVE SAVE SAVE PATH PATH PATH PATH setting the record saving directory during remote recording and remote backup IE IE IE IE password password password password setting the IE login password Note This password may be cleared in the main menu of the DVR 4 11 4 11 4 11 4 11 Host Host Host Host info info info info Click DVR HOST to enter the Ho...

Страница 37: ...IE password NETWORD NETWORD NETWORD NETWORD Select web styles LAN is the local area network INTERNET is the wide area network Notice After Notice After Notice After Notice After the the the the successful successful successful successful login the login the login the login the interface interface interface interface is is is is the the the the same same same same as as as as that that that that of...

Страница 38: ...nnel H 264 DVR User Manual 37 Click File F as shown in the following image select open the local files F When opening the root of the record file please select the format as 264 as shown in the following image ...

Страница 39: ...le list select one of the files to be played Click OPEN as shown in the following image Then click PLAY option as shown in the following image After clicking PLAY option click the button of the player button to enter the following interface as shown in the following image ...

Страница 40: ...w Normal Fast File Deletion Next Hour avi avi avi avi AVI Format transmission Capture bitmap OSD Decrease video Volume Control Note Note Note Note 1 Double click the image to enlarge the image 2 When converting the AVI format you should click ST button Then click AVI to select the time periods Audio Audio Audio Audio Setup Setup Setup Setup Click SETTING AUDIO CHANNEL SETUP Normal video Bar as sho...

Страница 41: ...n good connection whether BNC cable is used for too long time and is aging and ensure N system P system selection is right 3 The system can not detect the harddisk A If the system can not detect the harddisk please confirm that harddisk data cable is connected well to power cable harddisk s interface in main board is good we recommend to re plug harddisk data cable again please confirm power adapt...

Страница 42: ...10 E mail alerting is not functioning A Please follow the instruction strictly check whether there is any letter error or unnecessary space and please check your mail server s functionality if SSL ordinary shutdown 11 Can not find any information record when playback A please check the harddisk data cable connection and whether system time is adjusted illegally Try it several times and test whethe...

Страница 43: ...nt end even short delay A 1 It s normal if less than 10 seconds 2 Confirm the DVR environment network speed is guaranteed 19 Serious image delay during cell phone monitoring A 1 Change the wireless network into 2 5G 2 Confirm the DVR environment network speed is guaranteed 3 Do not put cell phone in a weak signal area 4 It s normal if less than 10 seconds Appendix Appendix Appendix Appendix 2 2 2 ...

Страница 44: ...4 8 channel H 264 DVR User Manual 43 ...

Отзывы: