background image

70

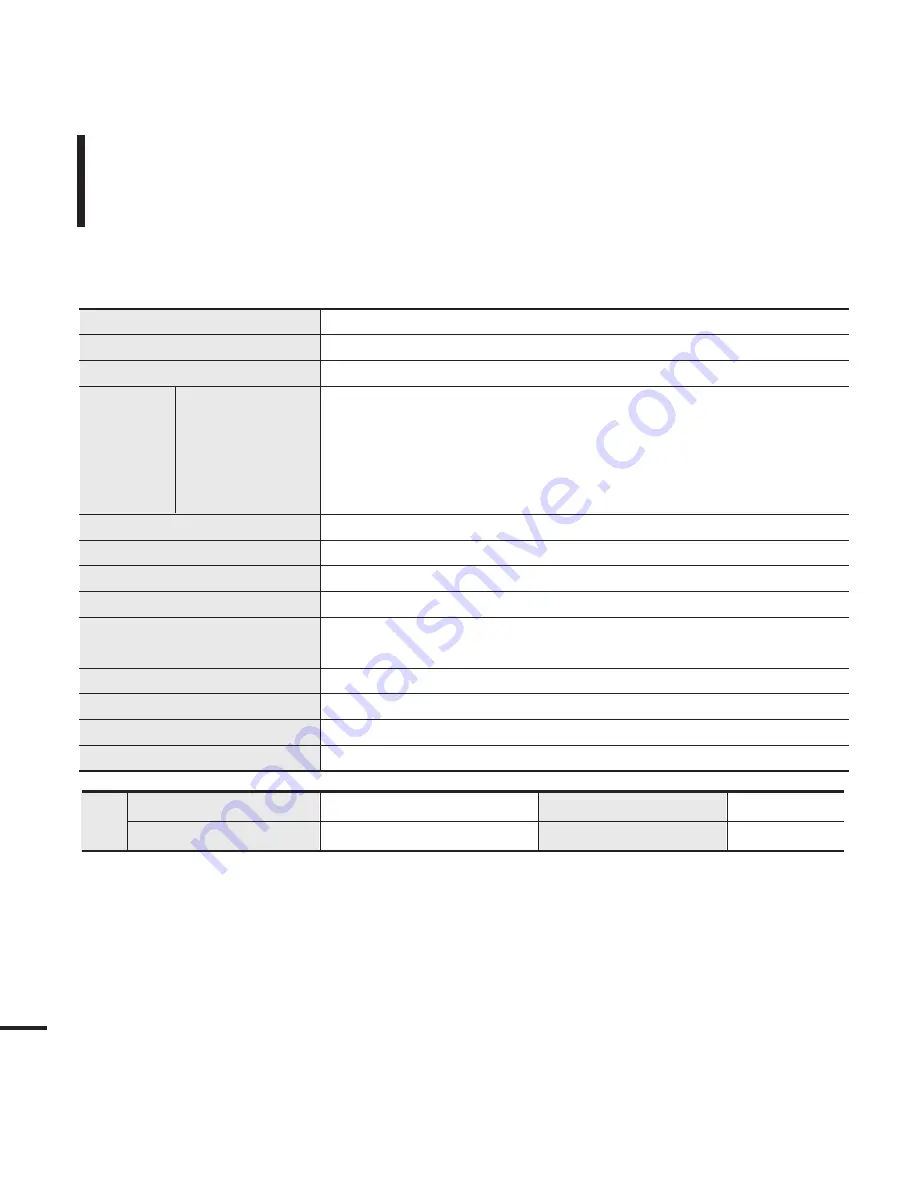
Product Specifications

● 

The contents of this Manual are subject to change without prior notice for further
improvement.

Model Name

YP-T9

Power

3.7V (Li-Polymer Rechargeable)

Built-in Battery Power

740 mAh

AUDIO: MPEG1/2/2.5 Layer3(8kbps~320kbps, 8kHz~48kHz),

WMA(5kbps~320kbps,8kHz~48kHz)

File                 Compatibility

Video: SVI (Video: MPEG4, Audio: MP3 (44.1kHZ, 128kbps), 

Resolution: 208X176, Frame Rate: 15fps)

Image: JPG (Progressive, Sequential Scanning, File Size: less than 3MB)

Supported Number of folders and Files

Folder: Max. 500, File: Max. 5000(Include folder)

Earphone Output

20mW (16

)

Output Frequency Range

20Hz~20KHz

Noise Ratio

85 dB with 20kHz LPF(based on 1KHz 0 dB)

Play Time

Maximum of 30 hours for music playback (based on: MP3 128kbps, 

Volume: 20, Normal Mode), Maximum of 6 hours for video playback

Temperature Range for Operation

-5~35 °C (23~95°F)

Case

Plastic

Weight

1.73 oz

Dimension (WxHxD)

1.67 X 3.27 X 0.43 inches

FM

FM Frequency

87.5~108.0MHz

FM T.H.D

1%

Radio FM Signal to Noise Ratio

55dB

FM Useable Sensitiivity

10dBµ

Содержание YPT9JABXAA

Страница 1: ...YP T9J ...

Страница 2: ...rience ringing in your ears while using the earphones remove the earphones immediately and or lower the volume To avoid a risk of traffic accident Do not use the earphones while you are driving a bicycle automobile or motorcycle It can cause a serious accident and furthermore is prohibited by law in some areas Using the earphones while walking in particular on a crosswalk can lead to a serious acc...

Страница 3: ...er causes Failure to follow all instructions lead to physical injuries or damage to the product Do not cause excessive impact on the product by dropping it Do not place heavy objects on top of the product Prevent any foreign particles or dust from entering into the product Always use the accessories provided by or approved by Samsung Do not spray water on the product Never clean the product with c...

Страница 4: ...Studio 20 Chapter 3 Multimedia function Listening to Music 22 Listening to Music 22 Section Repetition 25 Creating Playlists Using Samsung Media Studio 26 To Play a Playlist 28 Using Music menu 31 Video 34 Video 34 Using Video menu 37 Photo Viewing 38 Photo Viewing 38 Using Photo menu 40 Text Viewing 42 Text Viewing 42 Using Text menu 43 Listening to FM Radio 47 Listening to FM Radio 47 Setting a ...

Страница 5: ...Setting 58 Setting Music 58 Setting Record 60 Setting Time 61 Setting Display 63 Setting Language 64 Setting System 65 Chapter 5 Troubleshooting Troubleshooting 67 Chapter 6 Appendix Menu Tree 69 Product Specifications 70 ...

Страница 6: ...s Basic Information Checking the Accessories Design of accessories is subject to change for the purpose of improvement without notice Player Earphones USB Cable Installation CD AH30 00087D AH39 00899A AH80 00138A ...

Страница 7: ...nt Right Side and Top Earphone Connection Jack Neck String Hole Microphone Screen Display Section Repeat A B Recording Button Back Button Move File Browser Button Move Volume Control Button Select Button MENU Button Power Play Pause Button ...

Страница 8: ...8 Bottom and Left Side USB Connection Port Hold Switch Components Continued Basic Information Earphone Connection Top Earphones ...

Страница 9: ... Display 2 Playback Display 4 Sound Mode Display 5 Music Title Display 6 Play Status Bar 7 Play Time Display 8 Battery Status Display 10 Total Play Time Display 9 Current Track Playing Total Number of Tracks Display 1 Mono Stereo Display 3 Frequency Location Display 2 Frequency Display 4 Battery Display 5 Preset Manual Add Preset Remove Preset Display Music FM Radio Audio Track 1 00 01 42 00 05 06...

Страница 10: ...ress to move to the selected menu confirm and save your selection Press and hold to quickly scan tracks Press to move to next track Press to increase the volume or move to an upper item menu Press to reduce the volume or move to a lower item menu Press to display the menu screen Buttons Functions and Use Push in the direction of the arrow to lock the button functions Press and hold to quickly scan...

Страница 11: ...r When connected with the USB cable it takes about 4 hours for the player to fully charge although this may vary depending on your PC environment Battery Use Recharge and store within the temperature range of 5 C 35 C 40 F 95 F Do not overcharge longer than 12 hours Excessive charging or discharging may shorten the battery s life Battery life naturally shortens slowly over time NOTE If you are cha...

Страница 12: ...ng the Power Off Press and hold the button Power is turned off 1 Press the button to select Music and then press the button 2 Press the button to select the desired music file 3 Press the button The music file will begin playing NOTE Power is automatically turned off when none of the buttons have been pressed for a preset period of time Default 1 minute in the pause mode Page 61 NOTE Audio Track 1...

Страница 13: ...ton to increase the volume or the button to decrease it In Hold mode all buttons are disabled This function is useful when you are walking or jogging 1 Push the HOLD switch in the direction of the arrow 2 Push the HOLD switch in the opposite direction of the arrow to release the Lock function Audio Track 1 Hold 00 01 42 00 05 06 ...

Страница 14: ... the selected folder Use the button to return to the previous step 3 Press the button to select a folder of your choice 6 Press the button The selected file will start playing Press the button The File Browser folder list containing Music Text Pictures and Video appears 2 Press the button to select a file of your choice 5 1 Press the button to select File Browser ...

Страница 15: ...asic Use 15 If a product malfunction occurs you can re initialize the system Press and hold the MENU and A B buttons at the same time The system will be initialized Your settings and files will not be affected Reset Function ...

Страница 16: ... CD ROM drive of your PC 2 Click NEXT Media Studio installation starts An icon is created on the desktop after installation is complete and Media Studio starts The T9 gives you freedom Fill up your T9 now free Get Unlimited Downloads Choose from over 2 Million Songs Manage your existing MP3 Library with any of these great music services Choose a service and get your first 30 days on us 1 Click Ins...

Страница 17: ...ct the USB cable to the USB port on your PC USB Connected appears on the screen display of the player CAUTION If you connect the player through a USB hub the connection may be unstable Please connect the player to the computer directly For use in conjunction with your PC the following is required Pentium 300MHz or higher USB Port 2 0 Windows XP Service Pack 2 or higher DirectX 9 0 or higher 100MB ...

Страница 18: ... Please refer to Help for more information on how to use Media Studio Click MENU Help Help from the menu on the top of the Media Studio program 3 3 2 YP T9 YP T9 MTP Media Studio enables you to select and organize files and folders in preparation for transfer to your player ...

Страница 19: ... Click icon to display etc list The ETC list includes file types ex TXT XOV etc other than music photo and video files 3 Click Add Folder on the bottom of Media Studio The Open Folder window will appear Before you start Connect the player to your PC Media Studio must be installed on your PC To add folders to Media Studio 3 Click Add File on the bottom of Media Studio The Open window will appear 4 ...

Страница 20: ... Music Recognition ServiceSM CDDB is a registered trademark of Gracenote The Gracenote logo and logotype the Gracenote CDDB logo and logotype and the Powered by Gracenote CDDB logo are trademarks of Gracenote Music Recognition Service and MRS are service marks of Gracenote Perform the following steps to transfer files from your PC to the player 4 3 2 Portable window YP T9 MTP YP T9 ...

Страница 21: ...music photo and video files 3 Select the file to transfer in the left file list Do not disconnect the USB cable during file transfer This may cause damage to the player or your PC CAUTION When transferring a photo or video file to the player using Media Studio it is automatically converted into JPG photo or SVI video format before transfer The file size is automatically adjusted too You can t tran...

Страница 22: ...or alphabetical order Genres To play by genre Playlists To play by Playlist NOTE MP3 and WMA music files are compatible with this player MP1 or MP2 files which have a changed extension to MP3 may not play on the player If you press the button in Music mode the S mark appears on the screen and the Street mode is set to On Press again to make the S mark disappear and set the Street mode to off Page ...

Страница 23: ... paused 2 Press the button again The music will play from the point where it stopped To search within a track 1 Press and hold the button while the selected track is playing It searches to the beginning or the end of the track 2 Release the button at the point you wish to start It starts playing from the point you release the button ...

Страница 24: ...inning To play the previous next track Press the button within 5 seconds of play The previous track will start playing Press the button The next track will start playing CAUTION When playing VBR files the previous track may not play even if you press the button within 5 seconds of the play Listening to Music Continued Listening to Music ...

Страница 25: ...Play a file of your choice Press the A B button again during Section Repeat Section Repeat will be canceled 2 Press the A B button at the beginning of the section you want to repeat The starting point is set and A will appear in the screen display window 3 Press the A B button again to set the ending of the section you want to repeat A B will appear on the screen and the specified section starts t...

Страница 26: ... top of Media Studio The My Album window appears 2 Click New Album on the bottom The Creation window appears 3 Type in the album title and click OK A new album playlist will be created and stored in the My Album section of Media Studio on your computer 1 2 3 3 A playlist is a list of your favorite songs ...

Страница 27: ...lick on a desired album in the right window 4 Select files that you want to transfer in the My PC window 1 Click My Album on the top of Media Studio The My Album window appears 2 Click Portable in the right corner of the window The Portable window appears 3 Select a desired album in the My Album list 4 Click icon The selected album will be transferred to the player and stored in File Browser Playl...

Страница 28: ...o Play a Playlist You can easily listen to your favorite music by adding it to a Playlist Listening to Music To make your own Playlist Method 1 Music Song 1 Song 2 Song 3 Song 4 Song 5 1 Press the button on your player to select File Browser and then press the button 2 Press the button to select Music and then press the button The file list appears 3 Press the button to select a file to add to the...

Страница 29: ... select a file to add to the playlist and then press the MENU button 4 Press the button to select Add to Favorites and then press the button The mark appears next to the selected file and the file is included in File Browser Playlists Favorites NOTE If you want to remove a file from the Favorites select a file marked with and then press the A B button Alternately you can press the MENU button to s...

Страница 30: ...on The Playlist s will appear 3 Press the button to select the playlist of your choice then press the button The music files saved in the selected Playlist will appear 4 Press the button to select the file to play and then press the button The music file will start playing Playlists Favorites Ballad Jazz To Play a Playlist Continued Listening to Music ...

Страница 31: ...s the MENU button when you are in the music playback mode 2 Press the button to select DNSe and then press the button 3 Press the button to select the desired mode and then press the button Select either 3D User 3D Studio 3D Stage 3D Club Normal Rock House Dance Jazz Ballad Rhythm Blues Classical or User EQ Using Music menu Listening to Music Street Mode DNSe Play Mode Music Backgrou Play Speed Sk...

Страница 32: ...press the button Select either FLASH1 FLASH2 FLASH3 Album Cover Photo or Auto Selecting Auto will play a FLASH1 to FLASH3 background image each time a different file is played Using Music menu Continued Listening to Music Street Mode DNSe Play Mode Music Backgrou Play Speed Skip Interval Street Mode DNSe Play Mode Music Backgrou Play Speed Skip Interval NOTE If there is an image contained in the t...

Страница 33: ...ect the play speed and then press the button Select either 3 2 1 0 Normal 1 2 or 3 The larger the number the faster the speed of play Negative numbers equal slower play 1 Press the MENU button when you are in the music playback mode 2 Press the button to select Skip Interval and then press the button 3 Press the button to select the desired skip interval and then press the button Select either 1tr...

Страница 34: ...button The selected video file starts to play NOTE When transferring a video file to the player using Media Studio it is automatically converted into SVI format before transfer The file size is automatically adjusted too Press and hold the BACK button to move to the main menu 1 2 To stop playing the video file Press the button in Video mode Each time you press the button the player stops playing t...

Страница 35: ...r 3 Play Position Indicator 2 File Name 4 Current Play Time Indicator 5 Volume Level Indicator 6 Full play time for the current video 1 2 3 4 5 6 To move to a certain position of the current video file 1 In a horizontal view press and hold the button This enables you to scroll through the current video file 2 Release the button when you have moved to the desired position The video starts playing f...

Страница 36: ...deo Press the button This will move to the next video Video Continued Video any story 2 To set a bookmark Press the A B button at the desired scene A bookmark is created at the currently played stopped point Once you bookmark a specific scene that you want to see again you can enjoy it at any time you want NOTE You can set a maximum of 20 bookmarks ...

Страница 37: ...ton 4 Press to select the desired bookmark and press the button Playback will start from the selected bookmark Go to Delete To Remove a bookmark 1 Press the MENU button in Video mode The Bookmark menu appears 2 Press the button 3 Press the button to select Delete and press the button 4 Press to select a bookmark to remove and press the button It will remove the selected bookmark Go to Delete Using...

Страница 38: ...review mode 2 Press the button to select the desired photo and then press the button The selected photo is displayed NOTE When transferring a photo file to the player using Media Studio it is automatically converted into JPG format before transfer The file size is automatically adjusted too You can also use the File Browser to search for a photo file Page 14 You can keep listening to music even if...

Страница 39: ...umber total number of photos Photo test0 1 20 1 2 3 4 Slideshow Viewing To stop the slideshow 1 Press the MENU while viewing a photo 2 Press the button to select Start Slideshow and then press the button The slideshow will start Press the button in Slideshow mode This will stop the slideshow Start Slideshow Zoom As Music Backgr ...

Страница 40: ...ss the button to select the desired scale factor and then press the button You can select either 100 200 or 400 4 Press the to move to the portion of the photo to magnify 5 To cancel the magnification select 100 from the Zoom options and then press the button This returns to the original size 100 200 400 NOTE Press the button in the Photo Viewing mode to display the Zoom Setting menu ...

Страница 41: ...he photo 3 Press the button to select As Music Background and then press the button The Music Background Image Setting menu appears 4 Press the button to select Yes and then press the button The selected photo file is set to a background image for music NOTE Press the A B button while viewing a photo to display the Music Background Setting menu Audio Track 1 00 01 42 00 05 06 ...

Страница 42: ...e Browser to search for a text file Page 14 This product supports the TXT file format in Text mode You can keep listening to music even if you select Text Press the button if you want to play a music while viewing text Press the button again to stop playing the music Press and hold the BACK button to move to the main menu 1 2 To scroll the text by the line Press the button Once you set Scroll By P...

Страница 43: ...nt to read again you can enjoy it at any time you want Press the A B button while viewing text A bookmark is set on the current text screen with the symbol displayed on the top left corner The bookmark can be deleted by pressing the A B button in the bookmarked page Using Text menu Text View NOTE You can set a maximum of 20 bookmarks ...

Страница 44: ...button 4 Press the to select the desired bookmark and press the button It will move to the selected bookmark To remove a bookmark 1 Press the MENU button while viewing text 2 Press the button to select Bookmark and then press the button The Bookmark menu appears 3 Press the button to select Delete and then press the button 4 Press the to select the removed bookmark and press the button It will rem...

Страница 45: ...oll option 1 Press the MENU button while viewing text 2 Press the button to select Scroll By and then press the button The Scroll option menu appears 3 Press the button to select the desired option and then press the button You can select either Page or Line Page Use the button to scroll through the file by the page Line Use the button to scroll through the file by the line NOTE You can press the ...

Страница 46: ...Horizontal To set the text viewer color 1 Press the MENU button while viewing text 2 Press the button to select Text Viewer Color and then press the button The Text Viewer Color menu appears 3 Press the button to select the desired text viewer color Select either Auto Blue Green Orange Pink or Purple Selecting Auto will set the viewer color to the same as the main menu Go to 1st Page Bookmark Scro...

Страница 47: ...onnect the earphones then turn on the player and check the battery Press the button to select FM Radio and then press the button FM radio reception will start To use Mute function Press button during listening to FM radio Sound is muted Press button once again to sound back NOTE Press and hold the BACK button to move to the main menu ...

Страница 48: ...he button Moves to frequencies whenever the button is pressed NOTE To scan for an incoming frequency select MANUAL To listen to a memorized frequency select PRESET To switch from PRESET to Manual mode press MENU and use the button to select Go to Manual Mode and press the button You will switch to MANUAL mode To switch from MANUAL mode to Preset mode press MENU and use the button to select Go to P...

Страница 49: ...etting is canceled and frequencies set up to then are stored 2 Press the button to select Auto Preset and then press the button The Auto Preset Confirm window will appear 3 Press the button to select Yes and then press the button The Auto Preset window will appear and up to 30 frequencies will be set automatically Go to Preset Mo Add to Preset Auto Preset FM Region FM Sensitivity If Auto Preset is...

Страница 50: ...ess the button to select FM Radio then press the button to select PRESET You will see PRESET in the top right corner Once presets are set the unit will automatically be in Preset mode when FM Radio mode is selected 2 Press the button The preset number is selected and you can listen to the stored radio frequency You can also set the preset frequency by pressing MENU to select Add to Preset in MANUA...

Страница 51: ...e button to select the frequency that you want to remove from the PRESET list and press the button The Delete Preset window will appear 4 Press the button to select Yes and press the button The selected preset number will be deleted If you don t want to delete the preset number select NO Before you start Follow the steps below to delete frequencies while listening to FM radio You can also remove t...

Страница 52: ... 3 Press the button to select the search level and then press the button You can select from High Middle and Low The higher FM Sensitivity is the more frequencies can be received Frequency range by region Korea US Search for FM frequencies in 100 kHz increments between 87 5 MHz 108 0 MHz Japan Search for FM frequencies in 100 kHz increments between 76 0 MHz 108 0 MHz Other Countries Search for FM ...

Страница 53: ...our voice or FM broadcasts 2 Press the button to select the desired recording mode and press the button The appropriate window appears 3 Press the A B button Recording starts and the file name is displayed To stop recording 1 Press the A B button while in recording You will see a message that prompts you to confirm your choice 2 Press the button to select Yes or No and press the button Yes will pl...

Страница 54: ...adcasting In FM Radio mode press and hold the A B button An automatically created file name appears and the recording starts You can record FM radio broadcasts Recording Voice FM Radio Recording Do not place the microphone too close or too far away during recording as this can affect the recording quality Voice recording does not perform properly when the battery is low You can make a voice record...

Страница 55: ...imum of 999 files for each of voice and FM radio recording NOTE File names during recording 1 During recording a recording file name is automatically generated The file name contains the type V or F month mm date dd hour hh minutes mm and seconds ss 2 The recording type is as follows Voice V Radio F FM 3 For example the file name V0801103020 indicates a voice recording was made 10 o clock 30 minut...

Страница 56: ...layer and check the battery 1 2 1 Press the button to select Game and then press the button The Game menu appears 2 Press the button to select the desired game and then press the button The games bundled with the player may be added or changed without notice Press and hold the BACK button to move to the main menu NOTE ...

Страница 57: ...hile dodging obstacles on the road Press the button to make the motorbike jump to avoid obstacles Pizza Deliver This game provides you with animated players and simulates the feel of a baseball stadium Press the button to select a menu or function Press the button to pitch or hit the ball BaseBall ...

Страница 58: ...ing setting Press the button to move to the previous item Press the button to move to the next item Press the button to move up or down through the current menu Press the button to select or save the menu Press and hold the BACK button to move to the main menu If you do not press any buttons for approximately 1 minute in the Settings screen settings will be canceled and the player will return to t...

Страница 59: ...select User EQ in DNSe Play Mode Select playback mode such as repeat settings Select from Normal Repeat Repeat One and Shuffle Play Speed Adjust the playback speed of music voice recordings Select either 3 2 1 0 Normal 1 2 3 The higher the number is the faster the playback speed is Skip Interval Set the playback interval within a track when you press the button during playback Select either 1 Trac...

Страница 60: ... Recording Bit Rate You can choose the recording quality for FM radio Select one from 96kbps 128kbps 160kbps 192kbps The greater the number is the better the quality is but the file size is bigger Voice Recording Bit Rate You can select the voice recording quality Select one from 32kbps 64kbps 96kbps 128kbps The greater the number is the better the quality is but the file size is bigger Setting Re...

Страница 61: ...n 30 min 60 min 90 min or 120 min LCD Off If no button is pressed within the time set shown below the display screen will automatically turn off Select either 15 sec 30 sec 1 min 3 min 5 min or Always On Press any button to turn it back on Auto Power Off Automatically turns power off when no buttons are pressed after the preset time in the pause mode Select either 15 sec 30 sec 1 min 3min or 5 min...

Страница 62: ...s the button to select Yes and press the button The set time date will be saved No will cancel the time setting 1 Press the button to select Date Time Set and then press the button Date Time Setting Time Date Time Set Sleep LCD Off Auto Power Off Screen Saver Date Time Set AM PM Hour Min AM 3 8 Year Month Date 2006 5 19 Setting Time Continued Settings ...

Страница 63: ...e background color will be changed Music Background You can select a background image to add to your listening experience Select either FLASH 1 FLASH 2 FLASH 3 Album Cover Photo or Auto Selecting Auto will automatically change the background image between FLASH1 to FLASH3 each time a different file is played Text Viewer Color You can set the background color for text Choose one of 6 colors Text Vi...

Страница 64: ...a ID3 Tag Set the track information language Select from Afrikaans Basque Catalan Chinese S Chinese T Czech Danish Dutch English Estonian Finnish French German Greek Hrvatski Hungarian Icelandic Italian Japanese Korean Norwegian Polish Portuguese Romany Russian Slovak Slovene Spanish Swedish Turkish and Vietnamese Setting Language Set the language for the menu and track information ID3 Tag Setting...

Страница 65: ...ped If set to Off the last file will play from the beginning If set to On the last file will play from the point it was previously stopped Button Sound Sets the beep sound for button operations to on or off Select either On or Off Volume Limit You can avoid hearing damage by setting the volume limit when using earphones On will limit the maximum volume level up to 20 The maximum volume level when ...

Страница 66: ...factory settings No Cancels default settings Default Set System Booting Mode Resume Button Sound Default Set Memory Firmware Version Regarding the Built In Memory The actual built in memory available is slightly less than indicated as the internal firmware uses a portion of the memory NOTE Setting System Continued Settings ...

Страница 67: ...tem The screen may not be visible under direct sunlight When LCD Off is selected from Settings Display the LCD will be turned off Press any button and see if it turns on The power is automatically turned off when the battery is fully discharged Recharge the battery Battery life differs from what is stated in the Manual The battery time may vary depending on the sound mode and display setting Produ...

Страница 68: ...ed Check if there is enough battery power Check if the USB cable is securely connected Reconnect if necessary Check if the memory is full Press and hold the MENU and A B buttons at the same time to reset the system Check if the USB cable has been disconnected during file or data transmission If this is the case it may cause serious damage not only to files data but also to the product You have to ...

Страница 69: ...on Time Date Time Set Sleep Timer LCD Off Auto Power Off Screen Saver Display Color Theme Music Background Text Viewer Color Text Viewer Type LCD Brightness Language Menu ID3 Tag System Booting Mode Resume Button Sound Volume Limit Default Set Record FM Recording Bit Rate Voice Recording Bit Rate Menu Tree You can quickly view the menu structure Chapter 6 Appendix Troubleshooting Menu Tree ...

Страница 70: ...ogressive Sequential Scanning File Size less than 3MB Supported Number of folders and Files Folder Max 500 File Max 5000 Include folder Earphone Output 20mW 16Ω Output Frequency Range 20Hz 20KHz Noise Ratio 85 dB with 20kHz LPF based on 1KHz 0 dB Play Time Maximum of 30 hours for music playback based on MP3 128kbps Volume 20 Normal Mode Maximum of 6 hours for video playback Temperature Range for O...

Страница 71: ...ited to private non commercial use by end user consumers for licensed contents No rights are granted for commercial use The license does not cover any product unit other than this product unit and the license does not extend to any unli censed product unit or process conforming to ISO IEC 11172 3 or ISO IEC 13818 3 used or sold in combination with this product unit The license only covers the use ...

Страница 72: ...e harmful interference and 2 this device must accept any interference received including interference that may cause undesired operation Caution Any changes or modifications in construction of this device which are not expressly approved by the party responsible for compliance could void the user s authority to operate the equipment Note This equipment has been tested and found to comply with the ...

Страница 73: ...hat the product Trade Name Samsung Electronics Co Ltd Model Number YP T9 has been tested according to the FCC CISPR22 95 requirements for Class B devices and found compliant with the following standards EMI EMC FCC Part 15 Subpart B This device complies with part 15 of the FCC Rules Operation is subject to the following two conditions 1 This device may not cause harmful interference and 2 This dev...

Страница 74: ...anty is only valid when the warranty card is properly completed and upon presentation of the proof of purchase consisting of original invoice or sales slip confirmation indicating the date of purchase dealer s name model serial No and product number Samsung reserves the right to refuse warranty service if this information has been removed or changed after the original purchase of the product from ...

Страница 75: ... with technical or safety standardsin current force or failure to comply with productmanual instructions Accidents Acts of God or any cause beyond the control of Samsung caused by lightning water fire public disturbances and improper ventilation Unauthorized modifications carried out for the product to comply with local or national technical standards in countries for which the Samsung product was...

Страница 76: ...USING THE ALLEGED DAMAGE WITHOUT LIMITING THE FOREGOING PURCHASER ASSUMES ALL RISK AND LIABILITY FOR LOSS DAMAGE OR INJURY TO PURCHASER AND PURCHASER S PROPERTY AND TO OTHERS AND THEIR PROPERTY ARISING OUT OF THE USE MISUSE OR INABILITY TO USE THIS PRODUCT SOLD BY SAMSUNG NOT CAUSED DIRECTLY BY THE NEGLIGENCE OF SAMSUNG THIS LIMITED WARRANTY SHALL NOT EXTEND TO ANYONE OTHER THAN THE ORIGINAL PURCH...

Страница 77: ...REV 0 0 If you have any questions or comments relating to Samsung products please contact the SAMSUNG customer care center Samsung Electronics America Inc 1 800 SAMSUNG 7267864 www samsung com ...

Отзывы: