background image

setting up your new washing machine 

_15

01 SETTING UP

'UDLQ

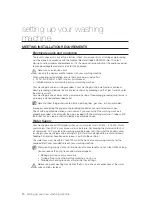
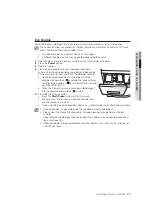
Samsung recommends a standpipe height of 65 cm. The drain hose must be routed through 
the drain hose clip to the standpipe. The standpipe must be large enough to accept the outside 
diameter of the drain hose. The drain hose is attached at the factory.

)ORRULQJ

For best performance, your washing machine must be installed on a solidly constructed floor. 
Wood floors may need to be reinforced to minimize vibration and/or unbalanced loads. Carpeting 
and soft tile surfaces are contributing factors to vibrations and the tendency for your washing 
machine to move slightly during the spin cycle.

Never install your washing machine on a platform or poorly supported structure.

6XUURXQGLQJWHPSHUDWXUH

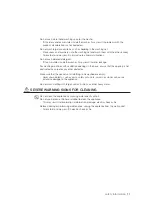
Do not install your washing machine in areas where water may freeze, since your washing 
machine always retains some water in its water valve, pump, and hose areas. Frozen water in 
the lines can cause damage to belts, the pump, and other components.

$OFRYHRUFORVHWLQVWDOODWLRQ

To operate safely and properly, your new washing machine requires minimum clearances of:

Sides – 25 mm

Rear – 51 mm

Top – 25 mm

Front – 465 mm

If both the washing machine and a dryer are installed together, the front of the alcove or closet 
must have at least 465 mm unobstructed air opening. Your washing machine alone does not 
require a specific air opening.

,167$//,1*<285:$6+,1*0$&+,1(

STEP 1

6HOHFWLQJDORFDWLRQ

Before you install the washing machine, make sure the location:

Ř +DVDKDUGOHYHOVXUIDFHZLWKRXWFDUSHWLQJRUƃRRULQJWKDWPD\REVWUXFWYHQWLODWLRQ
Ř ,VDZD\IURPGLUHFWVXQOLJKW
Ř +DVDGHTXDWHYHQWLODWLRQ
Ř :LOOQRWEHIUHH]LQJEHORZņ)RUņ&
Ř ,VDZD\IURPKHDWVRXUFHVVXFKDVRLORUJDV
Ř +DVHQRXJKVSDFHVRWKDWWKHZDVKLQJPDFKLQHGRHVQőWVWDQGRQLWVSRZHUFRUG

Содержание WF1600WC(C/W)

Страница 1: ...ssibilities Thank you for purchasing this Samsung product To receive more complete service please register your product at www samsung com register WF1702WC C W WF1700WC C W WF1602WC C W WF1600WC C W This manual is made with 100 recycled paper ...

Страница 2: ...ted by Eco Bubble protects against impact and abrasion damage to the water proofing layer minimizing damage to outdoor clothing and also protecting other forms of delicate fabrics Ř ő 4XLFN DVK No time to lose 15 minutes wash will give you time to run out before it s too late Our 15 minute Quick Wash program can be the solution to your busy life Now you can wash your favorite clothes in 15 minutes ...

Страница 3: ...rtant information on the installation use and care of your new Samsung washing machine Refer to it for descriptions of the control panel instructions on how to use the washing machine and tips for making the most of its state of the art features and functions The Troubleshooting and information codes section on page 33 tells you what to do if something goes wrong with your new washing machine ...

Страница 4: ...escribed in this manual and not all warning signs may be applicable If you have any questions or concerns contact your nearest service center or find help and information online at www samsung com 03257 17 6 7 6 0 2 6 1 35 87 216 KDW WKH LFRQV DQG VLJQV LQ WKLV XVHU PDQXDO PHDQ WARNING Hazards or unsafe practices that may result in VHYHUH SHUVRQDO LQMXU GHDWK DQG RU SURSHUW GDPDJH CAUTION Hazards o...

Страница 5: ...t or any other obstacles Use the new hose sets and old hose sets should not be reused 16758 7 21 287 7 0 5 Correct Disposal of This Product Waste Electrical Electronic Equipment Applicable in the European Union and other European countries with separate collection systems This marking on the product accessories or literature indicates that the product and its electronic accessories e g charger hea...

Страница 6: ...tion the electric wires within the cable may be damaged and this may result in electric shock or fire Keep all packaging materials well out of the reach of children as packaging materials can be dangerous to children If a child places a bag over its head it may result in suffocation When the appliance or power plug or power cord is damaged contact your nearest service centre This appliance must be ...

Страница 7: ... moves noise or problems with the product 6 9 5 51 1 6 16 25 86 1 If the appliance is flooded cut the water supply and power immediately and contact your nearest service centre Do not tough the power plug with wet hands Failure to do so may cause electric shock If the appliance generates a strange noise a burning smell or smoke unplug the power plug immediately and contact your nearest service cent...

Страница 8: ...ric shock burns or injury Do not insert your hand or a metal object under the washer while it is operating This may result in injury Do not unplug the appliance by pulling at the power cord always grip plug firmly and pull straight out from the outlet Damage to the cord may cause short circuit fire and or electric shock Do not attempt to repair disassemble or modify the appliance yourself Do not use...

Страница 9: ...y hose connector is properly tightened Failure to do so may result in property damage or injury Check if the rubber seal is not contaminated by foreign substances waste thread etc If the door is not closed completely it may result in water leakage Open the faucet and check if the water supply hose connector is firmly tightened and that there is no water leaking before using the product If the screw...

Страница 10: ...ic shock or injury due to water leakage Do not touch the inside of the tub during or just after drying as it is hot This may result in burns Do not insert your hand into the detergent box after opening it This may result in injury as your hand may be caught by the detergent input device Do not place any objects such as shoes food waste animals other than laundry into the washer This may result in ...

Страница 11: ...chines with ventilation openings in the base ensure that the opening is not obstructed by carpet or any other obstacles Make sure that the pockets of all clothing to be washed are empty Hard sharp objects such as coins safety pins nails screws or stones can cause extensive damage to the appliance Do not wash clothing with large buckles buttons or other heavy metal 6 9 5 51 1 6 16 25 1 1 Do not cle...

Страница 12: ... Detergent and additives information 29 Which detergent to use 29 Detergent drawer CLEANING AND MAINTAINING YOUR WASHING MACHINE 30 30 Draining the washing machine in an emergency 30 Cleaning the exterior 31 Cleaning the detergent drawer and drawer recess 32 Cleaning the debris filter 33 Cleaning the water hose mesh filter 33 Repairing a frozen washing machine 33 Storing your washing machine TROUBLE...

Страница 13: ...achine and make sure you ve received all of the parts shown below If your washing machine was damaged during shipping or if you do not have all of the parts contact Samsung Customer Service or your Samsung dealer 6SDQQHU ROW KROH FRYHUV ROG RW 6HOHFWHG PRGHO RVH JXLGH DS Ƃ HU DWHU VXSSO KRVH ROW KROH FRYHUV The number of bolt hole covers depends on the model 3 5 covers HWHUJHQW GUDZHU RQWURO SDQHO...

Страница 14: ...pes Improperly connecting the equipment grounding conductor can result electrical shock Check with a qualified electrician or serviceman if you are unsure if the washing machine is properly grounded Do not modify the plug provided with the washing machine If it does not fit the outlet have a proper outlet installed by a qualified electrician DWHU 6XSSO Your washing machine will fill properly when your...

Страница 15: ... areas where water may freeze since your washing machine always retains some water in its water valve pump and hose areas Frozen water in the lines can cause damage to belts the pump and other components OFRYH RU FORVHW LQVWDOODWLRQ To operate safely and properly your new washing machine requires minimum clearances of Sides 25 mm Rear 51 mm Top 25 mm Front 465 mm If both the washing machine and a ...

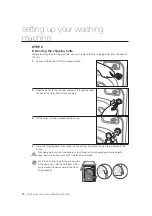
Страница 16: ...of the hole Repeat for each bolt 3 Fill the holes with the supplied plastic covers 4 Store the shipping bolts away safely in case you have to move the washing machine in the future Packaging materials can be dangerous to children keep all packaging material plastic bags polystyrene etc well out of the reach of children Insert the cap fixer one of the accessories in the vinyl pack into the hole from...

Страница 17: ...hten by hand The water supply hose must be connected to the washing machine at one end and to the water tap at the other Do not stretch the water supply hose If the hose is too short replace the hose with a longer high pressure hose 2 Connect the other end of the cold water supply hose to your sink s cold water tap and tighten it by hand If necessary you can reposition the water supply hose at the...

Страница 18: ...the screws firmly while lifting the adaptor upwards Turn part 2 following the arrow and connect 1 and 2 4 Connect the water supply hose to the adaptor When you release part 3 the hose automatically connects to the adaptor making a click sound After you have connected the water supply hose to the adaptor ensure that it is connected correctly by pulling the water supply hose downwards 5 Connect the o...

Страница 19: ...peat the previous steps Do not use your washing machine if there is a water leak This may cause electric shock or injury Ř If the water tap has a screw type tap connect the water supply hose to the tap as shown Use the most conventional type of tap for the water supply In case the tap is square or too big remove the spacing ring before inserting the tap into the adaptor 51 1 ...

Страница 20: ...ain pipe branch must be above the sink siphon so that the end of the hose is at least 60 cm above the ground 3 ln a drain pipe We recommend using a 65 cm high vertical pipe it must be no shorter than 60 cm and no longer than 90 cm The standpipe drain requires Ř PLQLPXP GLDPHWHU FP Ř PLQLPXP FDUU DZD FDSDFLW OLWHU SHU PLQXWH STEP 5 3RZHULQJ RXU ZDVKLQJ PDFKLQH Plug the power cord into a wall socket...

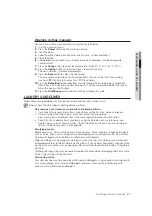
Страница 21: ...ner pre soaking agent bleach and stain removal product RPSDUWPHQW Additives e g fabric softener or former fill no higher than lower edge MAX of A 6 16758 7 216 1 Load your laundry into the washing machine Do not overload the washing machine To determine the load capacity for each type of laundry refer to the chart on page 27 Ř 0DNH VXUH WKDW ODXQGU LV QRW FDXJKW LQ WKH GRRU DV WKLV PD FDXVH D ZDWHU...

Страница 22: ...op operation is not a problem Ř Neutral detergent is recommended for wool course for improved washing results and for improved care of the wool fibers ő4XLFN DVK For lightly soiled garments and less than 2kg laundry that you require quickly Ř The values 15 minutes can vary from the indicated values depending on water pressure water hardness water inlet temperature room temperature type and amount o...

Страница 23: ...and no spin cycle is performed after the final drain Rinse Hold All Lamps Turn Off The laundry remains soaking in the final rinse water Before the laundry can be unloaded either a Drain or Spin cycle must be performed OPTION SELECTION BUTTON Press this button repeatedly to cycle through the wash options Pre Wash Rinse Intensive Pre Wash Rinse Pre Wash Intensive Rinse Intensive Pre Wash Rinse Intensi...

Страница 24: ...l courses Even if the power is turned on and off repeatedly the setting is retained Activating Deactivating If you want to activate or deactivate the Sound Off function press the Temp and Spin buttons at the same time for 3 seconds HOD HQG You can set the washing machine to finish your wash automatically at a later time choosing a delay of between 3 to 19 hours in 1 hour increments The hour display...

Страница 25: ...Ř Add the appropriate amount of detergent into the detergent compartment and add the fabric softener to softener compartment just under the fiber softener base line MAX of A Ř When the Prewash course is selected add detergent into the prewash compartment as well 5 Press the Start Pause button Ř Press the Start Pause button to start the wash Ř The amount of the laundry is automatically detected and ...

Страница 26: ...to select the appropriate cycle according to the type of material Cotton Synthetics Hand Wash For Wool 15 Quick Wash Super Eco Wash Outdoor Care The relevant indicators will illuminate on the control panel 8 At this time you can control the wash temperature the amount of rinses the spinning speed and the delay time by pressing the appropriate option button 9 Press the Start Pause button and the wa...

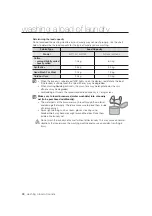
Страница 27: ...U ODXQGU DFFRUGLQJ WR WKH IROORZLQJ FULWHULD Ř Care Label Sort laundry into cottons mixed fibres synthetics silks wools and rayons Ř Colour Divide whites and colours Wash new colour items separately Ř Size Placing items of different sizes in the same load will improve the wash action Ř Sensitivity Wash delicate items separately using the Delicate wash cycle for pure new woollen items curtains and s...

Страница 28: ...egraded Ř KHQ ZDVKLQJ HGGLQJ RU XYHWV WKH ZDVK WLPH PD EH OHQJWKHQHG RU WKH VSLQ efficiency may be degraded Ř RU HGGLQJ RU XYHWV WKH UHFRPPHQGHG ORDG FDSDFLW LV NJ RU OHVV Make sure to insert brassieres water washable into a laundry net to be purchased additionally Ř 7KH PHWDO SDUWV RI WKH EUDVVLHUHV PD EUHDN WKURXJK WKH PDWHULDO and damage the laundry Therefore make sure to place them inside a fine...

Страница 29: ...ZHU Your washing machine has separate compartments for dispensing detergent and fabric softener Add all laundry additives to the correct compartment before starting your washing machine Do NOT open the detergent drawer when your washing machine is running 1 Pull out the detergent drawer on the left side of the control panel 2 Add the recommended amount of laundry detergent directly into the deterg...

Страница 30: ...from the guide hook 4 Take off the emergency drain cap closing the emergency drain tube 5 Allow all the water to flow into a bowl Remain water maybe more than you expected Prepare larger bowl 6 Re attach the cap to the emergency drain tube and then fix the emergency drain tube to the guide hook 7 Replace the filter cover 1 1 7 7 5 25 1 Wipe the washing machine surfaces including the control panel wit...

Страница 31: ... out 2 Remove the liquid detergent divider from the detergent drawer 3 Wash all parts under running water 4 Clean the drawer recess with an old toothbrush 5 Replace the liquid detergent divider by pushing it firmly into the drawer 6 Push the drawer back into place 7 To remove any remaining detergent perform a rinse cycle without any laundry in the drum 5HOHDVH OHYHU LTXLG GHWHUJHQW GLYLGHU ...

Страница 32: ...n the filter cover by using a key or coin 3 Unscrew the emergency drain cap by turning it to the left and drain off all the water 4 Unscrew the debris filter cap 5 Wash any dirt or other material from the debris filter Make sure the drain pump propeller behind the debris filter is not blocked 6 Replace the debris filter cap 7 Replace the filter cover Do not open the debris filter cap while the machine is...

Страница 33: ... washing machine 2 Pour warm water over the tap to loosen the water supply hose 3 Remove the water supply hose and soak it in warm water 4 Pour warm water into the washing machine drum and let it sit for 10 minutes 5 Reconnect the water supply hose to the water tap and check if the water supply and drain are operating normal 6725 1 285 6 1 0 1 If you need to store your washing machine for an exten...

Страница 34: ...e is running with sufficient water pressure Ř Make sure the detergent is added to the center of the detergent drawer 9LEUDWHV RU LV WRR QRLV Ř Make sure your washing machine is on a level surface If the surface is not level adjust the washing machine feet to level the appliance Ř Make sure that the shipping bolts are removed Ř Make sure your washing machine is not touching any other object Ř Make s...

Страница 35: ... only one item of clothing needs washing such as a bathrobe or pair of jeans the final spin result might be unsatisfactory and an UE error message will be shown in the display window cE 3E Ř Call the after sales service Sd Ř This occurs when too much foaming is detected It is also displayed while foaming is removed When the removal is finished the normal cycle proceeds This is one of the normal oper...

Страница 36: ...below 1 Remove laundry or any contents in the machine and turn off the machine 2 Press the Temp button and Delay End button simultaneously and press the Power button in addition Then the machine turns on 3 Press the Start button to activate Calibration Mode 4 The drum rotates clockwise and counterclockwise approximately for 3 minutes 5 When Calibration Mode is finished End En appears on the display...

Страница 37: ...z 15 6XSHU FR DVK 3 0 3 0 z yes z 40 1200 1000 z 102 2XWGRRU DUH 2 0 2 0 yes z 40 1200 1000 z 84 1 A cycle with a prewash takes approx 15 minutes longer 2 The cycle duration data has been measured under the conditions specified in Standard IEC 60456 EN 60456 Please run Calibration Mode after the installation see page 36 3 Course time in individual homes may differ from the values given in the table...

Страница 38: ... clean only Can be hung to dry Can be bleached in cold water Dry on clothes hanger Do not bleach Tumble dry normal heat DQ EH LURQHG DW ņ PD Tumble dry reduced heat DQ EH LURQHG DW ņ PD Do not tumble dry 3527 7 1 7 19 5210 17 Ř This appliance is manufactured from recyclable materials If you decide to dispose of this appliance please observe local waste disposal regulations Cut off the power cord s...

Страница 39: ...ITY 7 0 kg 6 0 kg POWER CONSUMPTION MODEL WF1702 WF1700 WF1602 WF1600 WASHING 220 V 150 W 240 V 150 W WASH AND HEATING 220 V 2000 W 240 V 2400 W SPIN MODEL WF1702 WF1602 WF1700 WF1600 230V 530 W 500 W PUMPING 30 W 3 7 MODEL WF1702 WF1700 WF1602 WF1600 PAPER 1 0 kg PLASTIC 1 0 kg 63 1 5 92 87 216 MODEL WF1702 WF1602 WF1700 WF1600 rpm 1200 1000 The appearance and specifications of the product are sub...

Страница 40: ...Program duration of the standard program RWWRQ bņ DW IXOO ORDG min 216 216 RWWRQ bņ IRU SDUWLDO ORDG min 122 122 RWWRQ bņ ZLWK SDUWLDO ORDG min 117 117 HLJKWHG WLPH LQ OHIW RQ PRGH min 2 2 Airborne noise emissions DVK dB A re 1 pW 59 59 6SLQ dB A re 1 pW 77 74 Dimensions 8QLW GLPHQVLRQV Height mm 846 Width mm 598 Depth 5 mm 474 1HW ZHLJKW kg 55 URVV ZHLJKW kg 57 3DFNDJH ZHLJKW kg 2 Water Pressure ...

Страница 41: ...selected by adding the Intensive option to the cotton 60 C and cotton 40 C program are suitable to clean normally soiled cotton laundry and they are the most efficient concerning water and energy consumption for this type of laundry The Eco Bubble option always turns on in the cotton 60 C program and cotton 40 C program Please run Calibration Mode after the installation see page 36 In these program...

Страница 42: ......

Страница 43: ......

Страница 44: ...Contact SAMSUNG WORLD WIDE If you have any questions or comments relating to Samsung products please contact the SAMSUNG customer care center ...

Отзывы: