background image


URP-SU110 Quick Reference Guide 

12


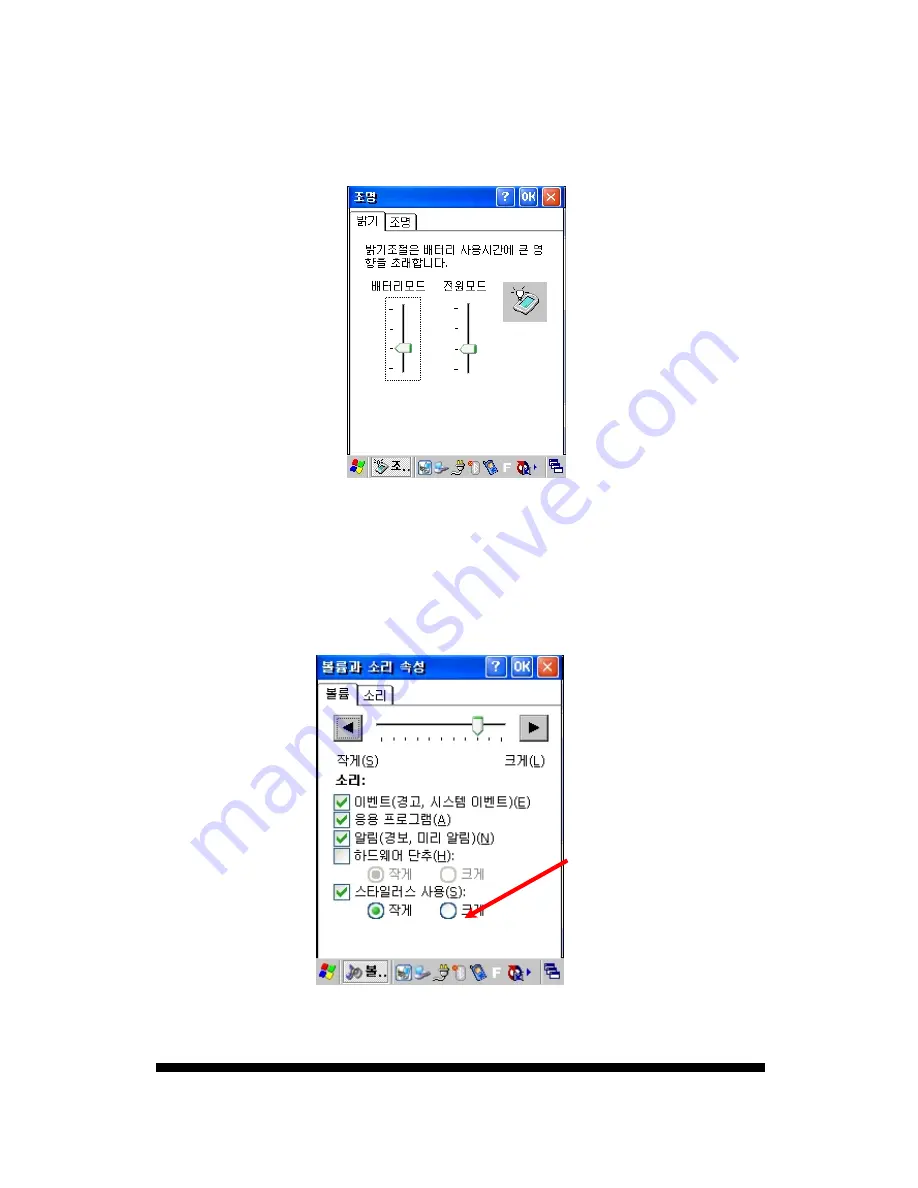
Fig 7. Adjusting Brightness 


3.2 Sound Setting   

Adjust sound as you like. 


3.2.1 Volume and Sound 

1. [Start] –> [Settings] -> [Control Panel]-> [Volume and Sound]   

  [Task Bar] -> Sound Icon


Volume Tab: Adjust volume 

Sound Tab: Adjust various sounds. 


Fig 8. Adjusting Volume and Sound


Содержание URP-SU110

Страница 1: ...URP SU110 Quick Reference Guide CAUTION This PDA device is designed for hand held operation only ...

Страница 2: ...eatures 16 4 1 Reading Barcode 16 4 2 Running Multi R W MIFARE Diagnostics 4 2 3 Types 4 3 UHF 900Mhz Read Write 17 4 4 Wireless LAN Setting 21 4 5 Bluetooth Setting 23 4 6 Using Keypad 26 4 6 1 Number Keypad 26 4 6 2 Alphabet Characters 26 4 6 3 Symbols 26 4 6 4 Changing Language 26 4 6 5 Device Setting or Running Function Using Keypad 26 5 Application Program 26 5 1 Flash Disk 27 5 2 Installing ...

Страница 3: ...e interference by one or more of the following measures Reorient or relocate the receiving antenna Increase the separation between the equipment and receiver Connect the equipment into an outlet on a circuit different from that to which the receiver is connected Consult the dealer or an experienced radio TV technician for help CAUTION Changes or modifications not expressly approved by the party re...

Страница 4: ...es with CDMA 5 Battery Adaptor 6 PDA Holder 7 USB Cable Type A 8 Hand Strap connect to PDA 9 Strap for Stylus Pen and PDA 9 User s Manual If you find any of the above items missing or defective please contact our Customer Service Center or retailer Refer to Fig 1 for more information 1 4 6 1 URP SK010 2 Adaptor 3 Standard Battery 4 Synchronization Cable 5 Earpieces 6 Stylus Pen 7 Hand Strap for PD...

Страница 5: ...is user s manual will use the following names of parts Fig 2 Front View 11 Battery 13 RFID Antenna 13 Earpiece Connector 6 Navigation Key 8 Arrow Key 21 IrDA Port 9 RST Key 8 Power Key 7 Microphone 1 LCD and Touch Screen 3 Scanner Screen 4 SD Card Slot 5 LED Light 5 Adaptor Connector 12 Antenna Holder ...

Страница 6: ...en When you are using CDMA the first LED at the top right corner turns on green Otherwise it will be turned off When you are using barcode scanner or RFID the second LED at the top right corner turns on green Otherwise it will be turned off 6 Adaptor Connection To recharge battery connect the external power adaptor to this opening 7 Speaker Delivers various sounds to indicate functions 8 Power Key...

Страница 7: ...so turn it off by going to Start Stop Temporarily under the Task Bar 3 To turn the power off press reset key for about five seconds Use caution as certain settings of PDA might return to default settings 2 2 Standby Mode If you do not use the PDA for a certain length of time it will enter the Idle Mode and automatically convert to Standby Mode Standby Mode turns off the power but remembers program...

Страница 8: ...soon as possible 2 3 1 Checking Battery Life Run Power program on Control Panel and you can check the remaining battery life 2 3 2 Battery Low If battery capacity drops under 20 this means that battery is becoming low It would be necessary to recharge battery as soon as possible 2 3 3 Battery Too Low If battery capacity drops under 5 this means that battery is becoming too low and the device will ...

Страница 9: ...rally charged in full if you use the device continuously for few hours after charging main battery Secondary battery is not used unless main battery is extremely low or detached for replacement Discharging Battery It depends on how you use the device but battery life is generally 6 16 hours Battery life is shortened when you use wireless LAN or view videos on the device and lengthened when you use...

Страница 10: ...r adjusting the screen it will count 30 seconds to resume main screen If you touch the screen however it will immediately resume main screen If adjustment fails you need to start again Fig 4 Selecting Stylus 1 Click Start on Task Bar and go to Settings Control Panel 2 Double click on Stylus on Control Panel ...

Страница 11: ...ive times to proceed to Stylus Properties Click OK on top right corner to finish settings 3 1 2 Brightness Setting Brightness is set to about 40 by default However it may seem too bright or too dark according to your preference Brightness is most closely related to power consumption How to Set 1 Start Settings Control Panel Light Brightness Tab Adjust the brightness of screen Light Adjust the dura...

Страница 12: ...djusting Brightness 3 2 Sound Setting Adjust sound as you like 3 2 1 Volume and Sound 1 Start Settings Control Panel Volume and Sound Task Bar Sound Icon Volume Tab Adjust volume Sound Tab Adjust various sounds Fig 8 Adjusting Volume and Sound ...

Страница 13: ... down buttons to set the year 4 Select the day on the calendar To set time use arrow keys or spin control with the cursor set to hour minute or second If you select the time zone the first time you can adjust time by changing the time zone Fig 9 Setting Date and Time 3 4 Power Setting 1 Start Settings Control Panel Power 3 4 1 Battery Tab Battery Tab shows the remaining power on Main Battery and S...

Страница 14: ...t power configuration appropriately you can extend battery life If you travel a lot use minimal functions to save battery power 3 5 Memory Allotment and Use To allot memory follow Start Settings Control Panel and run System 1 Select Memory Tab 2 Move the memory bar to set memory allotment 3 Press OK to finish settings ...

Страница 15: ...lled on the device However some programs might lose the last used data with warm reset When You Need Warm Reset If the device stops while operating a certain application program you cannot turn the power off or run another program In this case you can recover the device using warm reset If the device does not work normally due to a certain reason run warm reset to restart memory and embedded devic...

Страница 16: ... for the system to reboot in cold reset and you need to set time and date again after cold reset 4 Major Features This chapter explains various basic features of your PDA 4 1 Reading Barcode Use scanning program to read barcodes 1 Running Scanner Diagnostics Start Program Scanner Samsung Scanner Or open the Scanner icon on the main page 2 Reading Barcode How to Shoot Laser Beam 1 Press the scan ke...

Страница 17: ... cannot read barcode if the laser beam only covers parts of the barcode Fig 14 1D Scanner Program 4 3 UHF 900Mhz Read Write This program is only applied to Samsung Techwin PDA with the 902 75 927 25Mhz module 1D 2D 1D 2D 1 Save Saves barcode value in a file Directory Flash Disk Scanner BarCode txt 2 Clear Deletes barcode value symbol type symbol ID number of success and number of reading on screen...

Страница 18: ...URP SU110 Quick Reference Guide 18 1 Running UHF RFID Start Program Samsung RFID Reader Manager Fig 15 Running UHF Program 2 Reading Tag Data Fig 16 UHF RFID Program ...

Страница 19: ...4 with its Enable Leaks set to 0 basic value 10 no results will show on the screen If Time is set to above 1 it will attempt to read the tag as many times as indicated After making all attempts it will display the results Fig 17 Information Screen Connects serial communication between main processor and RFID module Changes serial communication value between main processor and RFID module Changes R...

Страница 20: ... Setting Run to change the setting value on the RFID page Fig 18 RFID Settings You can set the protocol for your RFID Click Details to change detailed settings The default RFID protocols are EPC C1 GEN2 and Q value is four Fig 19 RFID Detailed Settings ...

Страница 21: ...reless LAN 1 Open the Wireless LAN icon on Task Bar and run Wireless LAN ON Fig 18 Wireless LAN ON OFF 2 Turn on Wireless LAN to go to detailed setting page 3 Go to Wireless Info page and select AP or terminal your device can automatically detect If no AP has been detected enter SSID manually to start the connection ...

Страница 22: ... OK button on the top right corner 6 As you press OK you will be automatically directed to Wireless Info page to begin connecting to Wireless LAN Disconnecting Wireless LAN 1 Click Wireless LAN icon on Task Bar to open the following Wireless LAN setting page 2 Select Wireless LAN OFF Fig 20 Turning Wireless LAN Off ...

Страница 23: ...n Internal Devices Windows Folder Bluetooth Icon Select Bluetooth ON automatically disappears in about 5 seconds 1 Select the Bluetooth icon on Task Bar and run BT ON Fig 21 Turning Bluetooth On Note Turn Bluetooth off when it is not being used to extend battery life Bluetooth Info Internal Devices Flash Disk Bluetooth BT Serial ...

Страница 24: ...ide 24 Fig 22 Bluetooth Info Bluetooth Settings Fig 23 Bluetooth Settings Fig 24 Bluetooth Settings 1 Click BT icon on Task Bar and select options to complete Bluetooth settings 2 When you are finished click OK to close the window ...

Страница 25: ... Off If your phone is turned on press End button for 2 3 seconds to turn it off Press short to enter Press long to lock unlock phone default pass code 0000 Press short to enter Press long to convert to vibration mode Enter number If you are talking this button will end your call Press it for more than 2 seconds to turn power on or off Used to clear numbers one by one Enter phone number and press T...

Страница 26: ...er It is basically set to enter numbers 4 6 2 Alphabet Characters Enter alphabet characters you wish to enter You can use key to change the language 4 6 3 Symbols You can enter symbols regardless of current language on keypad 4 6 4 Changing Language To change language press Key The keypad language will change every time you press Key In default it will change in the following order Number Alphabet...

Страница 27: ...allation wizards must be installed in connection to desktop through ActiveSync Connect ActiveSync to desktop and install a program to automatically install the program on your PDA 5 2 2 Manual Installation If there is no installation wizard offered with a program or it causes a problem during installation you must install the program manually 1 Copy related files cab exe etc to a convenient locati...

Страница 28: ...o Start Programs If there is program icon on desktop you can simply select the icon to run the program 5 7 Using Task Bar Task Bar shows programs that are currently run and basic information such as clocks There also is Start Menu that can be opened up to run various programs Fig 26 Task Bar 5 8 Using Command Bar Generally programs have command bar work window and Task Bar Command bar includes men...

Страница 29: ...cuments on your PC 5 10 Using Software Input SIP If your application program requires key input use Software Input SIP Software Input displays a keyboard or letter recognizer on the screen You may select or write letters Fig 27 Keyboard on SIP 5 11 Internet Explorer This device comes with an Internet browser so you can go online To use the Internet you need wireless LAN connection 5 12 WordPad Wor...

Страница 30: ...tters on Software Input SIP 3 Using application programs on the desktop or task bar 4 Selecting control tools on application programs or dialog boxes Always place your stylus pen back at its place after using it Note Never use a sharp edge such as a regular pen or nail on your touch screen Sharp ends can damage your touch screen Touch screen is very sensitive to shock or sharp ends 7 Network and C...

Страница 31: ...You can transmit file without partnership but you cannot synchronize data As you cannot use synchronization on network set up a partnership if you need synchronization often Transmitting Files Take the following steps to transmit files from your PC to this device 1 Connect the device to your PC through ActiveSync 2 Double click ActiveSync on Tray Icon Once connected the Explore button on the Tool ...

Страница 32: ...the designated adaptor to recharge battery 2 Do not place battery near fire or heating device 3 Never disassemble battery or connect terminals electrically 4 Never cause a shock on or drop the device 5 If you store the battery in a hot or cold place for a long time it will reduce its capacity and shorten its lifespan Always store the battery in room temperature 6 As battery is a consumable item it...

Отзывы: