background image

English - 9

Plug & Play Feature

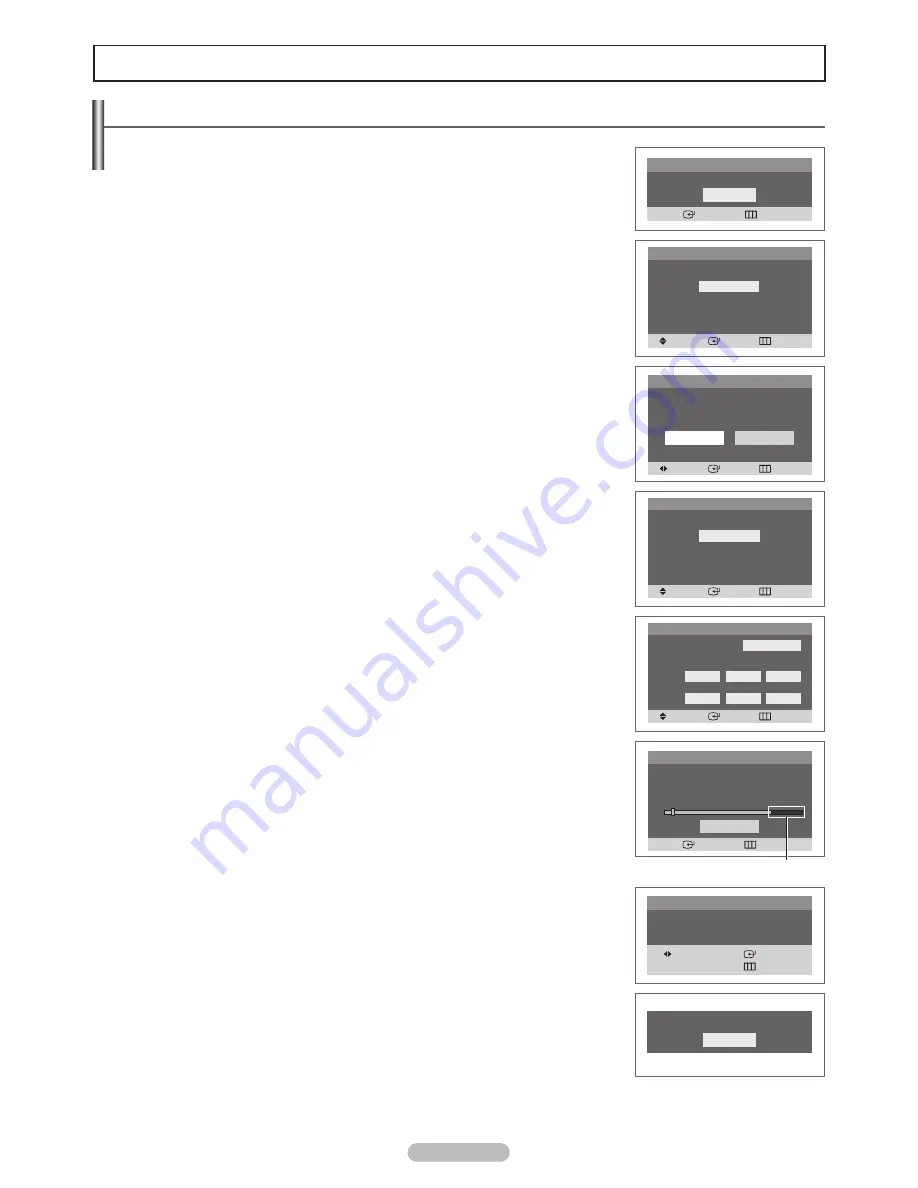
When the TV is initially powered on, basic settings proceed automatically and subsequently:
1

  Press the 

POWER

 button on the remote control. 

The message 

Start Plug & Play

 is displayed.  

Press the 

ENTER

 button, then the 

Language

 menu is displayed.

2

  Press the ▲ or ▼ button to select the desired language, then press the 

ENTER

 button.  

The message 

Select Home Mode when installing this TV at home.

 is displayed.

3

  Press the ◄ or ► button to select

 Shop

 or 

Home

, then press the 

ENTER

 button.  

The 

Check antenna input.

 menu is displayed.

➢ 

 

The default selection is Home.


 

We recommend setting the TV to Home mode for the best picture in your home 

environment.


 

Shop mode is only intended for use in retail environments.


 

If the unit is accidentally set to Shop mode and you want to return to Dynamic (Home) 

mode, press the Volune button and then hold down the 

MENU

 button for five seconds 

on the TV panel.

4

  Make sure that an antenna is connected to the TV.  

Press the 

ENTER

 button, then the 

Antenna

 menu is displayed.

5

  Press the ▲ or ▼ button to select the desired connection. 

Press the 

ENTER

 button to memorize the channels of the selected connection.

6

  Press the 

ENTER

 button to start.  

First analog, then digital channels will be memorized.

When selecting Cable TV:

7

  Press the ▲ or ▼ button to select 

Cable

, then press the 

ENTER 

button.  

The 

Cable System

 menu is displayed.

8

  Press the ▲/▼/◄/► buttons to select the cable system for analog and digital channels 

respectively, then press the 

ENTER

 button.

9

  Press the 

ENTER

 button to start. The TV begins memorizing all available channels.  

Press the 

ENTER

 button to stop.  

After all available channels are stored, the 

Clock Set

 menu is displayed. 

➢ 

When you select 

Cable

 or 

Air+Cable

, it also executes “Clearing Scrambled Channels” 

simultaneously. See page 15.

10

  Press the ◄ or ► button to move to the hour or minute.  

Set the clock by pressing the ▲ or ▼ button, then press the 

ENTER

 button.

11

  The message 

Enjoy your watching.

 is displayed. 

When you have finished, press the 

ENTER

 button.

➢ 

Even if the 

ENTER

 button is not pressed, the message will automatically disappear after 

several seconds.

If you want to reset this feature...

Press the 

MENU

 button to display the menu. 

Press the ▲ or ▼ button to select 

Setup

, then press the 

ENTER

 button.

Press the 

ENTER

 button to select 

Plug & Play

For further details on setting up options, refer to the top of this page.

➢ 

The Plug & Play feature is only available in TV and DTV mode.

Operation

Plug & Play


Move 

 Enter 

 Skip

Language
 

English


Español


Français

Plug & Play


Move 

 Enter 

 Skip

Shop

Home

Select Home Mode 

when installing this TV 

at home.

Plug & Play


Move 

 Enter 

 Skip

Auto Program 

Air 

Cable

Air+Cable

Plug & Play

 Enter            Skip

Stop

Auto Program in progress
STD 120                                     3%

Scrambled Channels Searched


Move 

 Enter 


 Skip

Plug & Play

Clock Set              -- : -- am

 Enter            Exit

Plug & Play

OK

Start Plug & Play

Plug & Play


Move 

 Enter 

 Skip

Start

STD

Auto Program

Cable System

Analog

HRC

IRC

STD

Digital

HRC

IRC

OK

Enjoy your watching.

AA68-03783H-00Eng.indd   9

2007-06-04   ソタネト 2:46:29

Содержание TX-T2085

Страница 1: ...d Ridgefield Park NJ 07660 0511 AA68 03783H 00 Specifications Model Name TX T2082 TX T2085 TX T2782 Screen Size Diagonal 20 inches 27 inches Sound Output 5W X 2 Dimensions WxHxD Body 23 8 x 18 6 x 14...

Страница 2: ...TX T2082 TX T2085 TX T2782 Owner s Instructions Register your product at www samsung com global register Record your Model and Serial number here for future reference Model _______________ Serial No...

Страница 3: ...ges not stationary patterns or dark bars On television models that offer picture sizing features use these controls to view the different formats as a full screen picture Be careful in the selection a...

Страница 4: ...features 5 VOL Press to increase or decrease the volume In the on screen menu use the VOL buttons as you would use the and buttons on the remote control 6 CH Press to change channels In the on screen...

Страница 5: ...s a camcorder or VCR When both the side and rear jacks AV IN are connected to external equipment the side receives priority 3 COMPONENT IN Connect Component video audio 4 SERVICE USB Connect for servi...

Страница 6: ...preset time interval for automatic shut off MTS Press to choose stereo mono or Separate Audio Program SAP broadcast a CAPTION Controls the caption decoder b R SURF Press to automatically return to a p...

Страница 7: ...UT VHF OUT or simply OUT 2 Connect the other end of this cable to the ANT IN terminal on the back of the TV Connecting to a Cable Box that Descrambles Some Channels If your cable box descrambles only...

Страница 8: ...pplied to hook up to the right and left audio input jacks of the TV If your VCR is stereo you must connect two cables Also you can connect to AV IN on the side panel of TV When both the side and rear...

Страница 9: ...he video cable to COMPONENT IN connect the audio cable to COMPONENT IN also This product is an SD grade DTV and must be connected in the resolution of 480i If this product is connected in the resoluti...

Страница 10: ...ess the buttons to select the cable system for analog and digital channels respectively then press the ENTER button 9 Press the ENTER button to start The TV begins memorizing all available channels Pr...

Страница 11: ...morized When selecting Cable TV 7 Press the or button to select Cable then press the ENTER button The Cable System menu is displayed 8 Press the buttons to select the cable system for analog and digit...

Страница 12: ...t STB AV Recv DVD Recv Game Camcorder or DVD Combo input source then press the ENTER button Press the EXIT button to exit Using Automatic Picture Settings Your TV has four automatic picture settings D...

Страница 13: ...Wide is possible The TV must be connected to Digital Air Cable to view these screen sizes To identify whether the current mode is TV Mode or DTV Mode press the INFO button on the remote control To sw...

Страница 14: ...Press the EXIT button to exit Choose Standard for the standard factory settings Choose Music when watching music videos or concerts Choose Movie when watching movies Choose Speech when watching a show...

Страница 15: ...ignal Choose Stereo for channels that are broadcasting in stereo Choose SAP to listen to the Separate Audio Program which is usually a foreign language translation Press the MTS button on the remote c...

Страница 16: ...e EXIT button to exit Press the TURBO button on the remote control repeatedly to select On or Off Clearing Scrambled Channels Digital The Clear Scrambled Channel function is used to filter out scrambl...

Страница 17: ...ield which will be selected Select a second letter or digit by pressing the or button as above Repeat the process to select the last two digits When you have finished press the ENTER button to assign...

Страница 18: ...nel after a certain amount of time For example you may be watching a channel when commercials start You can set the R Surf to 5 minutes then switch channels After 5 minutes the TV will return to the o...

Страница 19: ...rn 4 Press the or button to select Off Timer then press the ENTER button 5 Press the or button to set the hour then press the button to move to the next step Set other items using the same method as a...

Страница 20: ...Translucent Solid and Flashing You can change the opacity of the letter Back Opacity This option consists of Default Transparent Translucent Solid and Flashing You can change the background opacity of...

Страница 21: ...the or button to select Setup then press the ENTER button 2 Press the or button to select Melody then press the ENTER button Press the or button to select On or Off then press the ENTER button Press t...

Страница 22: ...selected press the button to go to a sub rating Press the or to block the sub rating Press the MENU button to save To select a different TV Rating press the or button and then repeat the process The...

Страница 23: ...ans 16 ans and 18 ans will automatically be blocked also Using the V Chip for Digital channels Parental restriction information can be used while watching DTV channels 16 Press the or button to selec...

Страница 24: ...thod is digital High visual quality program If the original production method is analog The digital program displayed on the screen is originally an analog program which has been converted to digital...

Отзывы: