background image


User Info 

1. User Information Settings  
2. This sets the name that appears when you are using the nstant Message or Call function.  
3. You can check the IP address of your PC.  


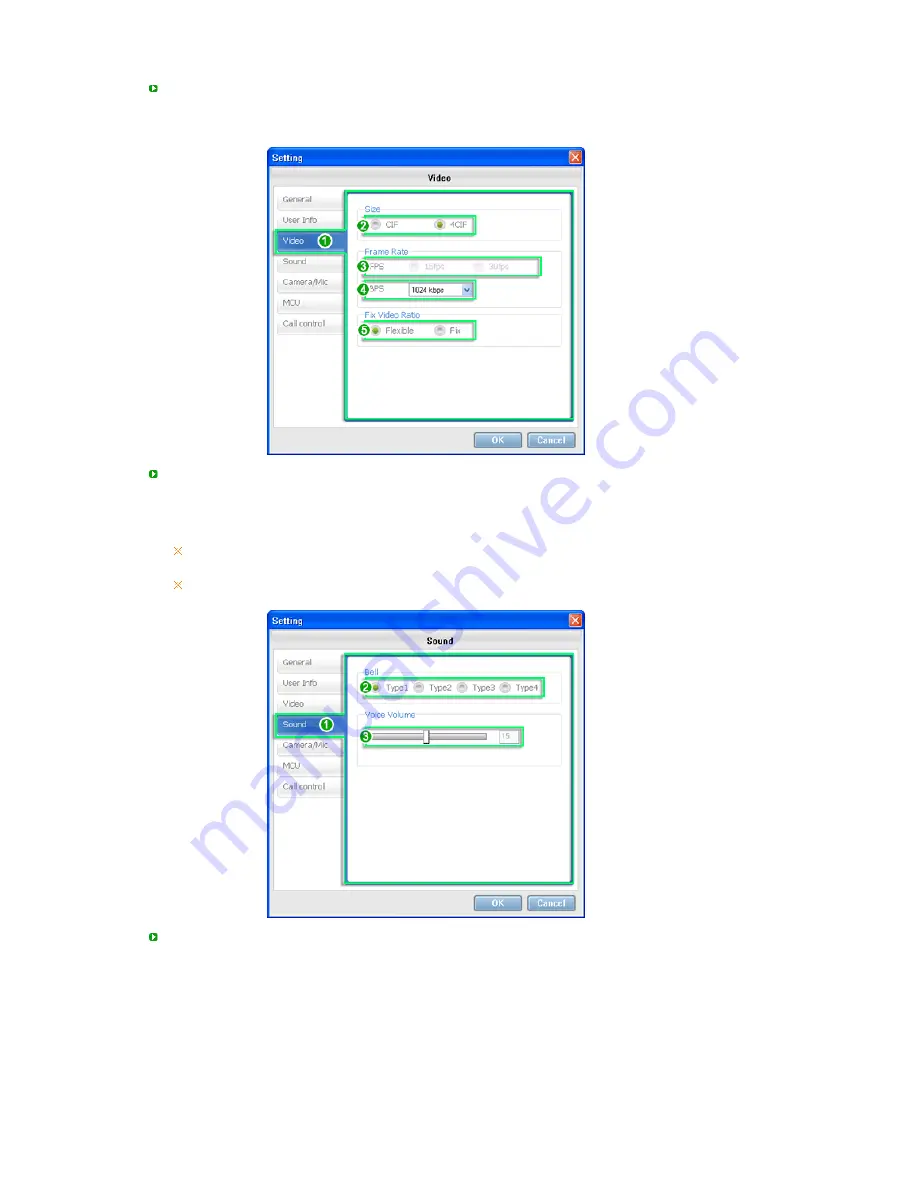
Video 

1. Video Settings  
2. Set the video size.  
3. Set the amount of video data transmitted per second.  
4. Set the amount of multimedia data transmitted per second.  
5. Set the video aspect ratio.  

If you have changed the Size to CIF/4CIF, you have to exit and then restart the SYNCON 
program. Otherwise the program may malfunction. 
Some functions of the 

Video Settings

 may be restricted depending on whether the current 

mode is 

Server

 or 

Non-Server

 mode. 


Sound 

1. Bell sound Settings.  
2. Set the bell type.  
3. Set the voice volume.  


Содержание SyncMaster 220TN

Страница 1: ...Install driver Install programs SyncMaster 220TN ...

Страница 2: ...all times Do not disassemble Disconnect the plug from the outlet Do not touch Ground to prevent an electric shock Power When not used for extended period of time set your computer to DPM If using a screen saver set it to active screen mode The images here are for reference only and are not applicable in all cases or countries Do not use a damaged or loose plug ...

Страница 3: ...re Do not excessively bend the plug and wire nor place heavy objects upon them which could cause damage This may cause electric shock or fire Do not connect too many extension cords or plugs to one outlet This may cause fire Do not disconnect the power cord while using the monitor A surge may be caused by the separation and may damage the monitor Do not use the power cord when the connector or plu...

Страница 4: ...imum of dust Failure to do so may cause electric shock or fire inside the monitor Do not drop the monitor when moving it This may cause damage to the product or the person carrying it Install the monitor base in a showcase or shelf so that the end of the base does not protrude from the showcase or shelf Dropping the product may cause damage to the product or the person carrying it Do not place the...

Страница 5: ...T LCD surface The installation of the bracket must be done by a qualified professional Installing the bracket by unqualified personnel may result in injury Always use the mounting device specified in the owner s manual When installing the product make sure to keep it away from the wall more than 10 cm 4 inches for ventilation purposes Poor ventilation may cause an increase in the internal temperat...

Страница 6: ...th cloth If the connector between the plug and the pin is dusty or dirty clean it properly using a dry cloth A dirty connector may cause electric shock or fire Make sure to unplug the power cord before cleaning the product Otherwise this may cause electric shock or fire Unplug the power cord from the power outlet and wipe the product using a soft dry cloth Do not use any chemicals such as wax benz...

Страница 7: ... the monitor If the monitor is dropped or the casing is damaged turn the monitor off and unplug the power cord Then contact the Service Center The monitor may malfunction causing electric shock or fire Disconnect the plug from the outlet during storms or lightning or if it is not used for a long period of time Failure to do so may cause electric shock or fire Do not try to move the monitor by pull...

Страница 8: ...phone port or AV ports or etc This may cause electric shock or fire If an alien substances or water enters the product turn the product off unplug the power connector from the wall outlet and contact the Service Center When viewing a fixed screen for an extended period of time residual image or blurriness may appear Change the mode to energy saving mode or set a screensaver to a changing picture w...

Страница 9: ...dren s reach as they could damage by hanging onto it A falling product may cause injury to the person or even fatality When not using the product for an extended period of time keep the product unplugged Otherwise this may cause heat emission from the accumulated dirt or degraded insulation causing electric shock or fire Do not place your children s favorite toys or any other objects of interest o...

Страница 10: ...uipment Europe only Applicable in the European Union and other European countries with separate collection systems This marking shown on the product or its literature indicates that it should not be disposed with other household wastes at the end of its working life To prevent possible harm to the environment or human health from uncontrolled waste disposal please separate this from other types of...

Страница 11: ...Save Mode Ex z Turn the power off when using a stationary pattern z Use a Screen saver if possible z Set the Monitor to power off with the PC Display Properties Power Scheme Turn the power off for 4 hours after 20 hours in use Turn the power off for 2 hours after 12 hours in use Screen saver in one color or a moving image is recommended Suggestions for specific applications Ex Airports Transit Sta...

Страница 12: ...patterns When the LCD panel is operated for a long time with a fixed pattern over 12 hours there may be slight difference in voltage between electrodes that work the liquid crystal LC in a pixel The voltage difference between electrodes increases with time forcing the liquid crystal to lean When this occurs the previous image may be seen when the pattern is changed To prevent this the accumulated ...

Страница 13: ...lay music movies and games It is a new concept monitor You also can share the screen being displayed on your network monitor with other users by connecting a projector or other display device to its RGB OUT port You can use this functionality for video conferencing and a variety of shared tasks In addition because Windows XP is installed on your network monitor you can perform Internet searches an...

Страница 14: ...acking Without Stand Monitor With Stand Monitor Simple stand Manual Quick Setup Guide Warranty Card Not available in all locations User s Guide Monitor Driver Natural Color MagicTuneTM software Cable Power Cord RGB IN Cable USB Cable Sold separately ...

Страница 15: ... previous menu Adjust buttons These buttons allow you to adjust items in the menu MagicBright button MagicBright is a new feature providing optimum viewing environment depending on the contents of the image you are watching Currently six different modes are available Custom Text Internet Game Sport and Movie Each mode has its own pre configured brightness value You can easily select one of six set...

Страница 16: ...ay cause damage to your operating sysetm Therefore ensure that the EWF function is enabled When unable to boot up your computer because of a Windows crash please contact your Administrator Be careful as pressing the Power button in client mode will shut down Windows XPe Be careful that if you force shut down Windows it may cause damage 1 Turn the power off by holding down the Power button after sw...

Страница 17: ...or RGB OUT z Connect when using it as a monitor 2 2 Connect the 2 of the USB monitor and a USB device with the USB cable Connect the of the monitor and the USB of the computer with the USB cable z To use 2 you have to connect the to the PC z Make sure to use the USB cable supplied with this monitor to connect the monitor s and your computer s USB LAN LAN Connection Terminal ...

Страница 18: ... Microphone connection terminal Connect a microphone to the MIC terminal USB Connection Terminal Connect USB devices such as a mouse keyboard and external storage devices DSC MP3 external storage etc Kensington Lock z The Kensington lock is a device used to physically fix the system when using it in a public place The locking device has to be purchased separately For using a locking device contact...

Страница 19: ... hub and the LAN port of the host PC The host PC must have an IP address After connecting the LAN and setting the IP address you can view the host PC screen on the monitor Use the RGB IN port to directly connect the monitor to a PC Connect to the RGB OUT port to display the same picture on another monitor such as the projector For presentation purposes Use the USB port to connect an external stora...

Страница 20: ...ntosh computer using the computer connection cable If the monitor and the computer are connected you can turn them on and use them External Device Connection D sub 15 pin port RGB OUT Use it by connecting it to another monitor The picture of the main monitor is displayed on the connected monitor 2 USB Connection Terminal Connect USB devices such as a mouse keyboard and external storage devices DSC...

Страница 21: ...m to the 2 port of the monitor without connecting them to the PC The USB port of the monitor supports High Speed Certified USB 2 0 High speed Full speed Low speed Data Rate 480 Mbps 12 Mbps 1 5 Mbps Connect the port of the monitor and the USB port of the computer with the USB cable Connect the port of the USB monitor and a USB device with the USB cable The use procedures are as the same as those f...

Страница 22: ... using a cable appropriate to the device For the purchase of the cable and external devices ask the service center of the corresponding product z The company is not liable for problems or damages to an external device caused by using an unauthorized cable for the connection z Some products do not follow the USB standard and it may cause a malfunction of the device z If the device malfunctions even...

Страница 23: ...ding on their specifications z Do not use screws that do not comply with the VESA standard screw specifications Do not fasten the screws too tightly as this may damage the product or cause the product to fall leading to personal injury Samsung is not liable for these kinds of accidents z Samsung is not liable for product damage or personal injury when a non VESA or non specified wall mount is used...

Страница 24: ...nal services are installed A Microsoft Windows 2003 Sever A Microsoft Windows XP Professional This manual describes the functions provided by the XPe Client However it does not explain general functionalities of Windows XP Embedded For more general information on Windows XP Embedded refer to Windows XP Embedded Help provided by Microsoft Logon Logon When the client starts you can logon to the serv...

Страница 25: ...hood Remote Desktop Connection and Internet Explorer from the Start menu The audio volume icon VNC server icon Enhanced Write Filter status icon and system time are displayed on the Administrator Taskbar The Administrator privilege is required for adding and removing programs Log off Restart Shut down To log off the current session shut down or restart your client use the Start menu Click Start Sh...

Страница 26: ...an Intel 286 processor and 640K RAM is sufficient This means ICA can be run on any computer that exists at present Thin Wire The default bandwidth required by ICA protocol is 20 kbps on average Therefore even with a Dial Up or ISDN connection a consistent performance is maintained Any program however large it is can be run stably at a low bandwidth Universal Application Client The Citrix ICA proto...

Страница 27: ...the degree of compression for the data to be sent and received and the degree of reliability for sessions 4 To login to the server automatically enter your username password and domain If you do not enter them now you will be prompted to enter them whenever you connect to the server ...

Страница 28: ...lor and size of the window to be displayed 6 If a connection succeeds the server s desktop appears on the client In this step you can make an application run automatically 7 Click Finish to complete creating the new connection ...

Страница 29: ...f data including the display data and keyboard data to control the host remotely a broadband Internet connection is not required You can run a remote desktop on a low bandwidth Internet connection When running a remote desktop on Windows XP Professional you cannot use the operating system of your computer Enabling Your Computer as the Host You must enable the Remote Desktop feature to control it f...

Страница 30: ... remote access service connection from your client computer to your host computer 1 Click Start point to Programs and then click Remote Desktop Connection Or double click the Remote Desktop Connection icon The Remote Desktop Connection window will open 2 Enter the host computer name You can configure detailed settings by clicking the Options button 3 Options General Enter the login information to ...

Страница 31: ...mote Desktop Connection sends and receives compressed screen data If you set the resolution and color quality to the high option the speed may become slow Local Resource Specify whether to use the hard disks and ports ...

Страница 32: ...rams Specify whether to display the Desktop or run an application whenever you are connected The default is Desktop Experience You can select your connection speed and select and share environmental options ...

Страница 33: ...evious administrator connection will be disconnected In RealVNC the server and the viewer communicate via the VNC protocol You must install a RealVNC server on the computer you wish to control remotely and a VNC viewer on the computer which remotely controls the computer where the RealVNC server is installed Hence the RealVNC server program is installed on a XPe client By using this program you do...

Страница 34: ...e lost when restarting or shutting down your client Therefore to store the data written to the registry favorites and cookie folders etc the content stored in the cache should be transferred to the flash An error message is displayed when it is not possible to write to the cache due to a lack of memory If this message is displayed you have to deactivate EWF to flush the EWF cache The user can doub...

Страница 35: ...all The Windows Firewall protect your client further The Windows Firewall allows you to restrict incoming data to your client from other computers thus helping to control your client data more effectively In addition it also provides a barrier between your client and network connections reducing unauthorized access viruses and worms across networks You can think of a firewall as a sentinel which i...

Страница 36: ...g the client take note of these directions carefully Select the Reconnect at logon checkbox in the Map Network Drive dialog box If EWF is activated save the changes to the disk Installing MUI Multi language User Interface The MUI Setup program helps you set up languages on the XPe client In addition you can delete an original language pack to extend the available free disk space If you want to cha...

Страница 37: ... Perform system formatting for your USB memory in order to make it bootable Save the Windows XP Embedded image and the Backup Recovery Utility which will be recovered later to your USB memory Boot up with the USB memory Recover the system using the Windows XP Embedded image and the Backup Recovery Utility in the USB memory For more information refer to the PXE Server User Manual Recovery Using Net...

Страница 38: ...and content sharing during a call PIP function Address book and call history management Instant Messaging Configuring Your Network Configuring a Static IP Before using SYNCON you have to configure your network IP address settings in order to use SYNCON 1 Select and right click My Network Places on the Windows Desktop and then select Properties from the displayed menu 2 Select and right click Local...

Страница 39: ...lowing DNS server addresses in the General tab in the Internet Protocol TCP IP Properties enter an IP address and click the OK button as shown below To use a fixed IP address consult your network administrator Checking your Pc s IP Address Check the IP address of your PC If you do not know the IP address of your PC you cannot use SYNCON s video call function ...

Страница 40: ...llowing screen appears type ipconfig and press the Enter key on the keyboard The current IP address of your PC will be displayed If the network connection is unstable or the LAN cable is disconnected the IP address of the PC will not be displayed The SYNCON Screen Main Screen ...

Страница 41: ...tions 3 Shows the elapsed video call time This only appears when a video call is in progress 4 You can view your phonebook and call history 5 Directly enter the IP address to call 6 Click the Send button to connect to the IP address entered in Step 5 Phonebook and Call History Screens Phonebook Screen 1 Displays the persons registered to your phonebook 2 Displays the groups in your phonebook 3 If ...

Страница 42: ...the time of calls received Incoming calls SYNCON Menus Main Log Out Logs out from the SYNCON system The Log Out function may be restricted depending on whether the current mode is Server or Non Server mode Close Minimizes SYNCON to an icon in the system tray To exit SYNCON use the menu displayed when right clicking the icon in the system tray Actions You can use basic functions such as making a ca...

Страница 43: ...s Edit Group Renames a group name Info If Phonebook is selected the information for the user selected in the phonebook is displayed If Call history is selected the information for the user selected in the call history is displayed Edit Edits the information for the user selected in the phonebook This is only enabled if the Phonebook is selected Save Saves the information stored in the call history...

Страница 44: ...eral 1 General Settings 2 When checked SynCon starts automatically when Windows starts 3 When checked your password is entered automatically in the Login screen 4 When checked your SynCon is logged into the SynCon system automatically The General Settings may be restricted depending on whether the current mode is Server or Non Server mode ...

Страница 45: ...data transmitted per second 4 Set the amount of multimedia data transmitted per second 5 Set the video aspect ratio If you have changed the Size to CIF 4CIF you have to exit and then restart the SYNCON program Otherwise the program may malfunction Some functions of the Video Settings may be restricted depending on whether the current mode is Server or Non Server mode Sound 1 Bell sound Settings 2 ...

Страница 46: ...n Settings MCU Multipoint Conferencing Unit must be set to On For the MCU IP Address and MCU Service Prefix ask your administrator for this information MCU 1 MCU Settings You can hold a video conference with 2 to 6 users 2 When MCU is On the MCU IP Address is activated When it is Off you cannot use the Conference Call function 3 MCU IP Address You can enter the MCU IP address here 4 MCU Service Pr...

Страница 47: ... opened Select a number and click OK The selected number is displayed in input field 4 Even if the Set Call Waiting Set Call Forward of Settings Call control is selected the function will not be available during a video conference The call waiting and forwarding functions will not be supported for all video conference participants including the host of the conference during a video conference Maki...

Страница 48: ...sets the bps 8 Screen Name Shows the screen name and IP address of the user you are talking with 9 Mute Button You can mute the sound from the monitor Once the Mute button is pressed you can only use this button again after 3 seconds 10 Volume Control Bar You can control the volume of the monitor 11 Current Time Call Time The time on the left is the current time and the time on the right is the el...

Страница 49: ...Receiving a Call 1 If the call rings while you are connected to SYNCON click the Connect button The video call will be connected If you do not want to receive a call click the Reject button Disconnecting a Call z Disconnecting a Call Using the Close Button If you want to disconnect a video call click the Close button The Disconnect window is displayed as shown in the figure below Click OK Conferen...

Страница 50: ...d selecting Actions Conference Call from the pop up menu that appears when right clicking A conference call supports up to 5 users besides yourself The screen for a participant may be black during the conference call When this occurs ask your system administrator for assistance Sharing an Office File Sharing an Office File with the Opposite Party 1 Click the Office Sharing button in the video call...

Страница 51: ... want to share a file by selecting Office Sharing from the Actions menu in the SYNCON main screen they are enabled only if a video call is connected to the opposite party Accepting Office File Sharing 1 If the opposite party requests the sharing of an office file the Office Sharing window as shown in the figure below is displayed Click OK Click Cancel if you do not want to share and view the offic...

Страница 52: ...ton of the Office Viewer 2 The Disconnect window is displayed as shown in the figure below Click OK The user who shared the file can exit Office Viewer Managing Persons and Groups Adding and Deleting a Person or Group Entry Adding a Person Entry ...

Страница 53: ...1 Select Add Person from the Tools menu 2 In the Add Person window enter the information for the person you wish to call and click OK 3 You can check that the person is added to the phonebook ...

Страница 54: ... can add a person using the menu displayed when right clicking on the Phonebook screen Adding a Group Entry 1 Select Add Group from the Tools menu 2 In the Add Group window enter a group name and click OK ...

Страница 55: ...3 You can check that the group is added to the phonebook You can add a group using the menu displayed when right clicking on the Phonebook screen Deleting a Person Entry ...

Страница 56: ...Select and right click the entry you wish to delete and select Delete from the displayed menu 2 Click OK You can delete an entry by clicking on it and selecting Delete from the Tools menu Deleting a Group ...

Страница 57: ...ish to delete and select Delete Group from the displayed menu 2 Click OK You can delete a group entry by clicking on it and selecting Delete Group from the Tools menu Editing Viewing the Information for a Person Editing the Information for a Person ...

Страница 58: ...he displayed menu 2 In the Edit Person window change the information and click OK You can edit an entry by clicking on it and selecting Edit from the Tools menu Renaming a Group 1 Select and right click the group entry you wish to edit and select Edit Group from the displayed ...

Страница 59: ...ck OK 3 The group s name is changed You can rename a group entry by clicking on it and selecting Edit Group from the Tools menu Viewing the Information for a Person 1 Select and right click an entry and select Info from the displayed menu ...

Страница 60: ...2 The Info window displays the information for the selected person You can view the information for a person by clicking on that entry and selecting Info from the Tools menu ...

Страница 61: ...er program file at the Internet web site shown below Internet web site http www samsung com Worldwide http www samsung com monitor U S A http www sec co kr monitor Korea http www samsungmonitor com cn China Installing the Monitor Driver Automatic Insert the CD into the CD ROM drive Click Windows Choose your monitor model in the model list then click the OK button If you can see following message w...

Страница 62: ...ME Windows NT Linux Microsoft Windows Vista Operating System Insert your Manual CD into your CD ROM drive Click Start and Control Panel Then double click on Appearance and Personalization Click Personalization and then Display Settings Click Advanced Settings Click Properties in the Monitor tab If the Properties button is deactivated it means the configuration for your monitor is completed The mon...

Страница 63: ...com Click Update Driver in the Driver tab Check the Browse my computer for driver software checkbox and click Let me pick from a list of device drivers on my computer Click Have Disk and select the folder for example D Drive where the driver setup file is located and click OK Select the model that matches your monitor from the list of monitor models on the screen and click Next ...

Страница 64: ...g screens displayed in sequence Microsoft Windows XP Operating System Insert the CD into the CD ROM drive Click Start Control Panel then click the Appearance and Themes icon Click Display icon and choose the Settings tab then click Advanced ...

Страница 65: ... Click Update Driver and select Install from a list or then click the Next button Select Don t search I will then click Next and then click Have disk Click the Browse button then choose A D Driver and choose your monitor model in the model list and click the Next button ...

Страница 66: ...n Samsung Monitor homepage http www samsung com Click the Close button then click the OK button continually Monitor driver installation is completed Microsoft Windows 2000 Operating System When you can see Digital Signature Not Found on your monitor follow these steps Choose the OK button on the Insert disk window Click the Browse button on the File Needed window Choose A D Driver then click the O...

Страница 67: ...evices and choose the monitor that corresponds to the one you connected to your computer and click OK Continue choosing Close button and OK button until you close the Display Properties dialogue box Microsoft Windows NT Operating System Click Start Settings Control Panel and then double click Display icon In the Display Registration Information window click the Settings tab and then click All Disp...

Страница 68: ... Natural Color screen will appear Click on Natural Color in the startup window to install the Natural Color software To install the program manually insert the CD included with the Samsung monitor into the CD ROM Drive click the Windows Start button select Run Enter D Color NCProSetup exe and then press the Enter key If the drive where the CD is inserted is not D enter the applicable drive Uninsta...

Страница 69: ...ware z 32MB Memory above z 60MB Hard disk space above For more information visit the MagicTune website It is recommended using MagicTune in Windows 2000 or later Uninstall The MagicTune program can be removed only by using the Add or Remove Programs option of the Windows Control Panel Perform the following steps remove MagicTune 1 Go to Task Tray Start Settings and select Control Panel in the menu...

Страница 70: ...Visit the MagicTune website for technical support for MagicTune FAQs questions and answers and software upgrades ...

Страница 71: ...turn to the previous menu These buttons allow you to adjust items in the menu Press this button to activate a highlighted menu item AUTO When the AUTO button is pressed the Auto Adjustment screen appears as shown in the animated screen on the center Direct Functions AUTO ...

Страница 72: ...e and position are adjusted automatically Available in Analog mode only To make the automatic adjustment function sharper execute the AUTO function while the AUTO PATTERN is on If auto adjustment does not work properly press AUTO button again to adjust picture with more accuracy If you change resolution in the control panel auto function will be executed automatically OSD Locked Unlock When pressi...

Страница 73: ...justing the current settings Locked Hold down the menu button for more than five seconds to activate the OSD adjustment lock function Unlock Hold down the menu button for more than five seconds to deactivate the OSD adjustment lock function Though the OSD adjustment lock function is activated you can still adjust the brightness and contrast and adjust MagicBright using the Direct button MagicBrigh...

Страница 74: ...sh the MagicBright button to circle through available preconfigured modes Six different modes Custom Text Internet Game Sport Movie Volume Menu Description Volume When OSD is not on the screen push the button to adjust volume SOURCE ...

Страница 75: ... Analog Client OSD Function Picture Brightness Contrast Color MagicColor Color Tone Color Control Gamma Image Coarse Fine Sharpness H Position V Position OSD Language H Position V Position Transparency Display Time Setup SynCon Image Reset Color Reset Information Picture ...

Страница 76: ...You can use the on screen menus to change the brightness according to personal preference MENU MENU Contrast You can use the on screen menus to change the contrast according to personal preference MENU MENU Color Menu Description Play Stop ...

Страница 77: ...color with clearness Intelligent Displays vivid natural color with clearness Color Tone The tone of the color can be changed and one of four modes can be selected Cool Normal Warm and Custom MENU MENU Color Control Adjusts individual Red Green Blue color balance Red Green Blue MENU MENU Gamma Gamma correction changes the luminance of the colors with intermediate luminance Mode 1 Mode 2 Mode 3 MENU...

Страница 78: ...of the monitor s entire display Available in analog mode only MENU MENU V Position Changes the vertical position of the monitor s entire display Available in analog mode only MENU MENU OSD Menu Description Play Stop Language You can choose one of nine languages MENU MENU The language chosen affects only the language of the OSD It has no effect on any software running on the computer H Position You...

Страница 79: ...u will wait before it is turned off 5 sec 10 sec 20 sec 200 sec MENU MENU Setup Menu Description Play Stop SynCon You can enable On or disable Off the SOURCE button Analog Client When disabled Off your monitor can be used as a general monitor only In this case even though the SOURCE button is pressed it does not change to Client mode MENU MENU Image Reset Image parameters are replaced with the fac...

Страница 80: ...Menu Description Information Shows a video source display mode on the OSD screen MENU ...

Страница 81: ...Center or your dealer Can you see Not Optimum Mode Recommended Mode 1680 x 1050 60 Hz on the screen You can see this message when the signal from the video card exceeds the maximum resolution and frequency that the monitor can handle properly Adjust the maximum resolution and frequency that the monitor can handle properly If the display exceeds SXGA or 75 Hz a Not Optimum Mode Recommended Mode 168...

Страница 82: ...equency on the monitor Adjust the resolution and frequency of the video card Refer to the Preset Timing Modes LED is blinking but no images on the screen Is the frequency properly adjusted when checking the Display Timing on the menu Adjust the frequency properly by referring to the video card manual and the Preset Timing Modes The maximum frequency per resolution may differ from product to produc...

Страница 83: ... Plug and Play monitor find Plug and Play monitor by searching new Hardware MagicTune is an additional software for the monitor Some graphic cards may not support your monitor When you have a problem with the graphic card visit our website to check the compatible graphic card list provided http www samsung com monitor magictune MagicTune doesn t work properly Have you changed your PC or video grap...

Страница 84: ...s supported by the Client Monitor If the extension of the file has been changed the file will not be played Check if the power cord and the video cables are properly connected to the computer Check if the computer beeps more than 3 times when booting If it does request an after service for the main board of the computer If you installed a new video card or assembled the PC please check if the adap...

Страница 85: ...ture that allows you to check whether your monitor is functioning properly Self Test Feature Check Turn off both your computer and the monitor Unplug the video cable from the back of the computer Turn on the monitor If the monitor is functioning properly you will see a box in the illustration below This box appears during normal operation if the video cable becomes disconnected or damaged Turn off...

Страница 86: ... trouble with the computer or the video card this can cause the monitor to become blank have poor coloring noise Video mode not supported etc In this case first check the source of the problem and then contact the Service Center or your dealer Judging the monitor s working condition If there is no image on the screen or a Not Optimum Mode Recommended Mode 1680 x 1050 60 Hz message comes up disconn...

Страница 87: ...nization Horizontal 30 kHz 81 kHz Vertical 56 Hz 75 Hz Display Color 16 7 M Resolution Optimum resolution 1680 x 1050 60 Hz Maximum resolution 1680 x 1050 60 Hz Input Signal Terminated RGB Analog 0 7 Vp p 5 separate H V sync Composite H V sync TTL level V high 2 0 V V low 0 8 V Maximum Pixel Clock 146 MHz Power Supply AC 100 240 VAC 10 60 50 Hz 3 Hz ...

Страница 88: ...ou can use it without uneasiness For example the number of TFT LCD sub pixels that is contained in this product are 5 292 000 Design and specifications are subject to change without prior notice Class B Equipment Information Communication equipment for residential use This product complies with the Electromagnetic Compatibility Directives for residential use and can be used in all areas including ...

Страница 89: ...han 60watts Less than 27 W Less than 4 watts Preset Timing Modes If the signal transferred from the computer is the same as the following Preset Timing Modes the screen will be adjusted automatically However if the signal differs the screen may go blank while the power LED is on Refer to the video card manual and adjust the screen as follows Preset Timing Modes Display Mode Horizontal Frequency kH...

Страница 90: ...Frequency The time to scan one line connecting the right edge to the left edge of the screen horizontally is called Horizontal Cycle and the inverse number of the Horizontal Cycle is called Horizontal Frequency Unit kHz Vertical Frequency Like a fluorescent lamp the screen has to repeat the same image many times per second to display an image to the user The frequency of this repetition is called ...

Страница 91: ... br CHILE 800 SAMSUNG 726 7864 http www samsung com cl COLOMBIA 01 8000112112 http www samsung com co COSTA RICA 0 800 507 7267 http www samsung com latin ECUADOR 1 800 10 7267 http www samsung com latin EL SALVADOR 800 6225 http www samsung com latin GUATEMALA 1 800 299 0013 http www samsung com latin JAMAICA 1 800 234 7267 http www samsung com latin PANAMA 800 7267 http www samsung com latin PUE...

Страница 92: ...nl NORWAY 815 56 480 http www samsung com no POLAND 0 801 801 881 022 607 93 33 http www samsung com pl PORTUGAL 80 8 200 128 http www samsung com pt REPUBLIC OF IRELAND 0818 717 100 http www samsung com ie SLOVAKIA 0800 SAMSUNG 726 7864 http www samsung com sk SPAIN 902 10 11 30 http www samsung com es SWEDEN 0771 400 200 http www samsung com se SWITZERLAND 0800 SAMSUNG 726 7864 http www samsung ...

Страница 93: ...green and blue dots The closer the dots the higher the resolution The distance between two dots of the same color is called the Dot Pitch Unit mm Vertical Frequency The screen must be redrawn several times per second in order to create and display an image for the user The frequency of this repetition per second is called Vertical Frequency or Refresh Rate Unit Hz Example If the same light repeats...

Страница 94: ... outside please apply the recommended small amount of cleaner by using soft and dry cloth and polish it Let LCD area not to be forced but to be scrubbed out softly If excessive force is applied you can have a stain on it If you are not satisfied with the quality of the picture you can get better quality of the picture by executing auto adjustment function in display screen that is appeared as wind...

Отзывы: