background image

VCR

GB

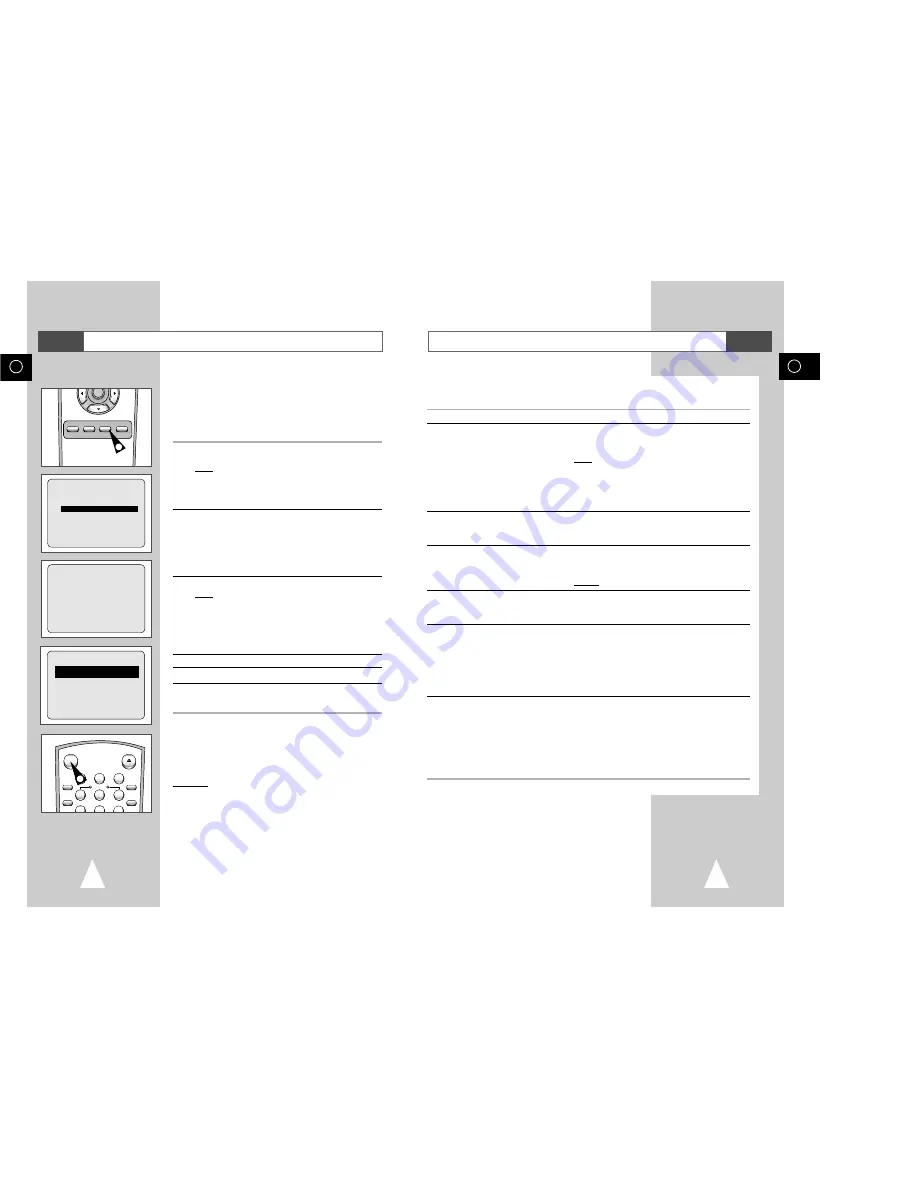
Modifying VI Programming

33

VCR

If you wish to correct the programme displayed or modify certain elements, such as the recording
speed, you can do so before you press SETUP a second time to confirm.

If you wish to...

Then...

Select an input source other 

Press the 

or 

buttons, until the 

PR

selection flashes.

than the tuner (AV1, AV2 or AUX)

Press the INPUT SEL. button one or more times to change the 
input source selection.
Result:

The programme number is replaced by:

• The AV1, AV2 or AUX  source using the INPUT

SEL. button for a satellite tuner or external video
source

The input source must be selected before changing any
other value.

Record a programme every day 

Press the 

or 

buttons, until the 

DAY

selection flashes.

(Monday to Sunday) at the same time

Press the 

$

or

buttons, until the 

DLY

(Daily) value is 

displayed.

Record a programme every week 

Press the 

or 

buttons, until the 

DAY

selection flashes.

on the same day and at the same time

Press the 

$

or

buttons, until the 

W-

(Week) value is 

displayed, followed by the required day.
Example:

W-SA

(Weekly Saturday)

Extend the recording time

Press the 

or 

buttons, until the 

STOP

selection flashes.

Press the 

$

or

buttons to increase or decrease the stop

time.

Select the recording speed

Press the 

or 

buttons, until the recording speed selection

flashes.

Press the 

$

or

buttons until the correct indication is 

displayed:

AUTO

(Auto Tape Speed Select) : see page 34

SP

(Standard Play)

LP

(Long Play)

Select the PDC recording

Press the 

or 

buttons, until the V/P selection flashes.

Press the 

$

or

buttons until the “ON” indication is displayed.

Do not select PDC unless you are sure the programme you 
wish to record is broadcast with PDC. If you do set PDC ON 

(by selecting “ON” in the right - hand column on the screen),
then you must set up the start-time EXACTLY according to 
the published TV schedule. Otherwise the timer recording 
won’t take place.

Using the VI Feature

GB

32

Before presetting your DVD-VCR:

Switch on both the television and your DVD-VCR

Check that the date and time are correct

Insert the cassette on which the programme is to be
recorded (safety tab intact)

Up to six programmes can be preset.

1

To enter a VideoPlus, press the TIMER button. 
Press the 

❷!

and ENTER buttons to select 

VIDEOPLUS

Result:

A message is displayed to allow you to enter the
VI code.

If all six programmes have been set, the message 

TIMER

IS FULL

is displayed. Refer to page 35 if you wish to

cancel a preset recording.

2

Press the numeric buttons to enter the code opposite the 
programme that you wish to record in your television magazine.

If you wish to correct the VI code that you are
entering:

Press the 

button until the digit to be corrected is

cleared

Enter the correct digit

3

Press the SETUP button.
Result:

The information concerning the programme is displayed.

When using the VI function for the first time with
stored stations, the programme number flashes. This one
time, you must enter the station number manually by
pressing the 

$

or

buttons. Refer to the following page if:

The programme number or times flash

You wish to modify the programme

4

If the programme and times are correct, press the RETURN button.

5

Press the STANDBY/ON button to activate the timer.

6

Refer to page 35 if you wish to:

Check that your DVD-VCR has been programmed correctly

Cancel a preset recording

The numbers next to each TV programme listing are
VI code numbers, which allow you to
programme your videorecorder instantly with the remote
control. Tap in the VI code for the programme
you wish to record. 

™ VI is a trademark of Gemstar Development Corporation. The VI

system is manufactured under licence from Gemstar Development Corporation.

VIDEOPLUS

CODE ---------

CODE:0-9

CORRECT:

RETURN           ENTER

1/JAN TUE

12:09

PR DAY  START

STOP

V/P

-- ---- --:--

--:---- -

-- ---- --:--

--:---- -

-- ---- --:--

--:---- -

-- ---- --:--

--:---- -

-- ---- --:--

--:---- -

-- ---- --:--

--:---- -

$

SET:

RETURN     DELETE:CLEAR

TIMER METHOD

STANDARD

VIDEOPLUS

RETURN    

$

ENTER

 SETUP
/ENTER

RETURN               TITLE              SUBTITLE               MARK

A.DUB                 SPEED                TIMER                  INDEX

2

3

4

5

6

7

8

9

SHUTTLE

STANDBY/ON

OPEN/CLOSE

AUDIO

M O D E /
REPEAT

TV/VCR

 CLOCK/
COUNTER

5

1

Содержание SV-DVD3

Страница 1: ...PEN CLOSE L AUDIO R VIDEO AUX 2 3 4 5 6 7 8 9 0 SHUTTLE STANDBY ON OPEN CLOSE AUDIO 3D SOUND SCREEN FIT CLEAR DVD VCR INPUT SEL ZOOM VIEW TRK PROG DISPLAY REC DISC MENU F ADV STEP SETUP ENTER RETURN TITLE SUBTITLE MARK A DUB SPEED TIMER INDEX MODE REPEAT DIGEST SVHS TV VCR CLOCK COUNTER ANGLE A TRK ...

Страница 2: ...QUALIFIED SERVICE PERSONNEL The mains lead on this equipment is supplied with a moulded plug incorporating a fuse The value of the fuse is indicated on the pin face of the plug If it requires replacing a fuse approved to BS1362 of the same rating must be used Never use the plug with the fuse cover omitted if the cover is detachable If a replacement fuse cover is required it must be of the same col...

Страница 3: ...the mains socket and aerial If the remote control is not used for a long period of time remove the batteries and store it in a cool dry place DVD FUNCTIONS Choosing a Connection 45 Disc Menu Language 46 AUDIO Language 46 Subtitle Language 47 Parental 48 Digital Output 49 MPEG 2 Digital Out 50 DTS 50 Dynamic Compression 51 TV Aspect Ratio 52 Black Level 52 Quasi PAL 53 DVD Out 53 A V Receiver Conne...

Страница 4: ...on Number for this player is described on the rear panel of the player Playback Region Number PAL 12 Cm 8 Cm Single sided 240 min Double sided 480 min Single sided 80 min Double sided 160 min Audio Video Audio Video Audio DVD contains excellent sound and video due to Dolby Digital and MPEG 2 system Various screen and audio functions can be easily selected through the on screen menu Video with CD s...

Страница 5: ...und is active 9 A DVD with a DTS soundtrack is loaded 10 The number to the right of the CHAP symbol is the current chapter number 11 The Hi Fi track of a VHS tape is playing The current TV show or video is broadcast in Stereo 12 A Timer Recording is programmed or in progress If blinking there is an error 13 DVD to VHS copy is in progress 1 STANDBY ON 2 AUDIO 3 SHUTTLE 4 MODE REPEAT 5 ZOOM SVHS 6 3...

Страница 6: ...ect the coaxial cable supplied Otherwise no picture will be visible on the screen when the DVD VCR is switched off Make sure that both the television and the DVD VCR are switched off before connecting the cables 1 Connect the coaxial cable as indicated in the above section 2 Connect one end of the SCART cable to the AV1 EURO AV socket on the rear of the DVD VCR 3 Plug the other end into the approp...

Страница 7: ... channels 3 Plug the other end of the audio cable into the appropriate input connectors on your Hi Fi stereo system DVD VCR AV2 DEC EXT V1 EURO AV AUDIO VIDEO R L OUT 2 2 DVD VCR TV AV2 DEC EXT AV1 EURO AV AUDIO VIDEO R L OUT 1 DVD VCR TV AV2 DEC EXT AV1 EURO AV TV You can connect your DVD VCR to a Satellite receiver or other DVD VCR using the SCART cable if the appropriate outputs are available o...

Страница 8: ...n a Scart cable is used the television must be set to the audio video mode AV 1 Switch on the television 2 Switch on the DVD VCR by pressing STANDBY ON on the front of the DVD VCR or STANDBY ON on the remote control 3 Select a programme position on the television to be reserved for use with your DVD VCR 4 Insert the video cassette in the DVD VCR Check that the DVD VCR starts reading the cassette i...

Страница 9: ...DVD SETUP MENU see page 53 If Quasi PAL is On the copy process can not active The copy is only active PAL tape system STANDBY ON SELECT COPY PROG REC EJECT OPEN CLOSE L AUDIO R VIDEO AUX STANDBY ON SELECT COPY PROG REC EJECT OPEN CLOSE L AUDIO R VIDEO AUX SELECT COPY REC EJECT AUDIO VIDEO AUX 1 2 3 The following buttons are used when watching television via the DVD VCR s built in TV tuner 1 TV VCR...

Страница 10: ...get to reset the time when you change clocks from winter to summer time and vice versa 1 Press SETUP on the remote control Result The programming menu is displayed 2 Press the corresponding or buttons to select the Clock option 3 Press the ENTER button to select this option Result The CLOCK SET menu is displayed 4 Press or to select the hour minutes day month and year Result The option selected fl...

Страница 11: ...ION RETURN ENTER Program Clock Install Exit DVD VCR Option Language Install GB 20 Presetting the Stations Automatically You do not need to preset the stations if you have already set them automatically see Plug Auto Set Up on page 13 Your DVD VCR contains a built in tuner used to receive television broadcasts You must preset the stations received through the tuner This can be done Plug Auto Set up...

Страница 12: ... TV STATION TABLE PR CH NAME 1 2 3 003 4 5 SWAPPING ENTER RETURN DELETE CLEAR MAIN MENU INSTALLATION RETURN ENTER Program Clock Install Exit DVD VCR Option Language Install INSTALLATION AUTO SET UP MANUAL SET UP VCR OUTPUT CH CH60 RETURN ENTER Clearing a Preset Station GB 22 If you have stored a TV station That you do not require At the wrong programme position you can cancel it 1 Press the SETUP ...

Страница 13: ... or buttons to select the Option option 3 Press the ENTER button to select this option Result The USER SET menu is displayed 4 Press the corresponding or buttons until the COLOUR SYSTEM option is selected 5 Press the button to select AUTO PAL B W AUTO When playing back a cassette the system standard is automatically selected by the DVD VCR B W Black and White 6 On completion press RETURN twice to ...

Страница 14: ...nding or buttons until the IPC option is selected 5 Press the button to select the IPC intelligent picture control option When intelligent picture control mode is ON the sharpness of the image is adjusted automatically 6 To adjust the sharpness manually press the button to turn the IPC mode OFF 7 Press the or buttons until the picture is displayed according to your preferences If you do not press ...

Страница 15: ...ecting the Cassette Type Auto Repeat Play If you wish to use the tape counter to display the time remaining on a cassette you must indicate the type of cassette inserted 1 Press SETUP on the remote control Result The programming menu is displayed 2 Press the corresponding or buttons to select the VCR option 3 Press the ENTER button to select this option Result The VCR FUNCTION SETUP menu is displa...

Страница 16: ... 1 If you wish to protect a cassette break off the tab using a small screwdriver 2 To re record over a protected cassette safety tab broken cover the hole with adhesive tape Before recording a programme you must have preset the corres ponding station unless you are recording via an external video source If you have not done so refer to pages 20 and 21 1 Switch on the television 2 To monitor the pr...

Страница 17: ...2 Before presetting your DVD VCR Switch on both the television and your DVD VCR Check that the date and time are correct Insert the cassette on which the programme is to be recorded safety tab intact Up to six programmes can be preset 1 To enter a VideoPlus press the TIMER button Press the and ENTER buttons to select VIDEOPLUS Result A message is displayed to allow you to enter the VIDEOPLUS code ...

Страница 18: ...ER button to select STANDARD option Result The TIMER PROGRAMMING menu is displayed 3 Press to select the input source 4 Select the required station by pressing the buttons or INPUT SEL to select the AV1 AV2 or AUX input sources 5 Press to select the recording day 6 Select the required day by pressing the or buttons 7 Press to select the recording start time 8 Select the required hour value by pres...

Страница 19: ... the best possible picture When noise bars or streaks appear during playback adjust alignment manually by pressing the TRK or buttons until the picture is clear and stable Result The tracking bar appears The image is adjusted The tracking bar disappears when you release the button This function allows you to play back any pre recorded cassette 1 Switch on both the television and your DVD VCR 2 Ins...

Страница 20: ...s press 4 To cancel an Index search simply press the II or button 2 1 1 2 etc Prev Seq Seq being played Next Seq etc INDEX INDEX SEARCH 6 You can Stop the cassette at a given frame image Advance one frame at a time No sound is heard when playing back frame by frame 1 Press ll to start playing the cassette ll to stop the tape at a given frame F ADV STEP to advance frame by frame 2 To return to norm...

Страница 21: ...CT COPY REC L AUDIO R VIDEO AUX SELECT COPY REC L AUDIO R VIDEO AUX 1 3 3 The tape counter Indicates the elapsed time in the play and record modes hours minutes and seconds Is reset when a cassette is inserted in the DVD VCR Allows you to find the beginning of a sequence easily If the remaining time is to be calculated correctly you must indicate the type of cassette being used 1 Insert a cassette...

Страница 22: ...his function allows you to start a new recording at a specific position on the cassette while maintaining a very smooth scene change 1 Insert the cassette to be edited in your DVD VCR 2 Press the ll button to start playback 3 When you reach the position from which you wish to start the new recording press the ll button 4 Press the F ADV STEP button again as often as necessary to advance frame by f...

Страница 23: ...HS format tape that you want to see 2 Press PLAY ll to start playing the cassette 3 Press SVHS button to start SQPB If the SQPB is on during normal playback the video output is distorted 4 5 6 7 8 9 0 SHUTTLE 3D SOUND SCREEN FIT CLEAR DVD VCR INPUT SEL ZOOM VIEW DISPLAY MODE REPEAT DIGEST SVHS CLOCK COUNTER ANGLE A TRK 3 3 ZOOM SVHS OPTICAL COAXIAL DIGITAL AUDIO OUT OPTICAL COAXIAL S VIDEO OUT DVD...

Страница 24: ...ENTER DVD SETUP Disc Menu English Audio English Subtitle Automatic Parental Unlocked Audio Options Display Options RETURN ENTER AUDIO LANGUAGE English Francais Deutsch Español Italiano Nederlands Original Others RETURN ENTER DVD SETUP Disc Menu English Audio English Subtitle Automatic Parental Unlocked Audio Options Display Options RETURN ENTER DISC MENU LANGUAGE English Français Deutsch Español I...

Страница 25: ...u forgot your password press power on from a cold start with no disc in the unit Press the REW and F F buttons simultaneously on the front panel for 5 seconds The reset ok message will appear Press the STANDBY ON button MAIN MENU DVD SETUP RETURN ENTER Program Clock Install Exit DVD VCR Option Language DVD RETURN ENTER DVD SETUP Disc Menu English Audio English Subtitle Automatic Parental Unlocked ...

Страница 26: ...mit loud noises such as explosions or raise the volume of quiet passages such as whispering while watching a movie This is convenient for viewing movies late at night 1 Open MAIN MENU With the DVD in stop mode press the SETUP button 2 Select DVD Using the up down and left right buttons move the selection cursor to DVD SETUP then push ENTER to select 3 Select Audio Options Move the selection bar to...

Страница 27: ...NTER to select 4 Set Black Level Move the selection bar to Quasi PAL then push or to select from the following options Adjusts the brightness of the screen 1 Open MAIN MENU With the DVD in stop mode press the SETUP button 2 Select DVD Using the up down and left right buttons move the selection cursor to DVD SETUP then push ENTER to select 3 Set Display Options Move the selection bar to Display Opt...

Страница 28: ...Frame Advance operates only in the forward direction 3 Skip Forward Back While a CD or DVD disc is in Play mode press the Skip Forward Back l l buttons on the remote control or front panel to jump forward and backward through disc chapters tracks Skip Forward will jump to the next chapter track Skip Back will jump to the beginning of the current chapter track Press Skip Back again to jump to the b...

Страница 29: ... 01 C 02 0 01 09 ENG 5 1CH ENG Disc Menu Navigation Screen Fit Playback Many DVDs feature their own menu systems where you can select Titles Chapters Audio Tracks Subtitles and special disc features such as movie trailers and information on the cast Use these buttons to make selections in the Disc menus 1 DISC MENU Button Press to access the DVD s Disc menu if applicable 2 Press or to navigate thr...

Страница 30: ...GEST may not operate during NTSC disc playback A A Skip button Zoom Angle You can zoom in at 2 or 4 times the normal magnification while watching a DVD 1 Open Zoom Magnifying Glass During Playback or STILL mode press the ZOOM button to display the Magnifying Glass icon on the screen 2 Position Magnifying Glass Use the buttons to move the magnifying glass to any position on the screen you want to z...

Страница 31: ...peat Title Press the ENTER button to repeat the title A B Repeat The A B Repeat function allows you to repeat any segment of a DVD or CD Simply mark the beginning point A and the ending point B of the segment you want to review 1 Select A B Repeat Function In Play mode press the REPEAT button then push left right to select A B Repeat A will highlight when A B Repeat is selected NOTE If you are pla...

Страница 32: ...07 08 09 10 11 12 13 14 15 16 Program Order 01 Marks You can insert up to three Bookmarks on your DVDs so you can jump quickly to your favorite scene or song 1 Open Bookmark Menu During playback press the MARK button on the remote control The Mark header will appear on the screen 2 Select Bookmark Placeholder Push the left right buttons to move to one of the three bookmark placeholders The selecte...

Страница 33: ...iles you want to hear then press Enter to select If there are more than 8 folders on the disc press RETURN to view additional folders If there are no folders on the CD R skip to Step 3 3 Select MP3 File Push the up down buttons to select the desired MP3 file If there are more than 8 MP3 files in the selected folder push the left right buttons to view additional MP3 files File names are truncated t...

Страница 34: ...attern when found suffers 2 Carry out the instructions Tuning Your Television for the DVD from interference it may be due to the VCR see page 14 DVD VCR output channel clashing with 3 Carry out the instructions Setting the DVD VCR output the normal TV transmissions in your area Channel see page 24 move the channel number To prevent this you will need to change the several channels down from the or...

Страница 35: ...ección de negociante Dirección del vendedor Endereco de vendedor Adresse des Händlers Adres van handelaar Adresse du marchand Dieuv q unsh tou katasthmatoı Asiakkaan nimi Forhandlerens adresse Handlarens adress SAMSUNG EUROPEAN BLOC WARRANTY DEALER S STAMP SIGNATURE CAUTION CUSTOMER S SIGNATURE ELECTRONICS GB 68 Troubleshooting Guide DVD Disc does not play 5 1 channel sound is not being reproduced...

Страница 36: ...ed by such repair work will not be covered by this warranty 4 This product is not considered to be defective in materials nor workmanship by reason that it requires adaptation in order to conform to national or local technical or safety standards in force in any Country other than the one for which the product was originally designed and manufactured This warranty will not cover and no re imbursem...

Отзывы: