background image

COUNTRY

CONTACT CENTER

WEB SITE

BELGIUM

02 201 2418

www.samsung.com/be (Dutch)
www.samsung.com/be_fr (French)

NETHERLANDS

0900-SAMSUNG (0900-7267864)
( € 0,10/Min)

www.samsung.com/nl

LUXEMBURG

261 03 710

www.samsung.com

Contact Samsung wereldwijd
Wanneer u suggesties of vragen heeft met betrekking tot Samsung producten,
gelieve contact op te nemen met de consumenten dienst van Samsung

DJ68-00611D.indb   18

DJ68-00611D.indb   18

2011.7.11   9:21:26 AM

2011.7.11   9:21:26 AM

Содержание SS7500 Series

Страница 1: ...l imagine the possibilities Thank you for purchasing a Samsung product To receive a more complete service please register your product at www samsung com register Before operating this unit please read the instructions carefully For indoor use only ...

Страница 2: ...aner to clean building waste or debris Do not use this vacuum cleaner with any of the filters removed as this could cause damage to the internal components and void your warranty CAUTION WARNING SYMBOLS USED WARNING Indicates that a danger of death or serious injury exists CAUTION Indicates that a risk of personal injury or material damage exists OTHER SYMBOLS USED Represents something you must NO...

Страница 3: ...or pull the cord around sharp edges or corners Keep the cord away from heated surfaces Do not use extension cords or outlets with inadequate current carrying capacity Do not unplug by pulling on the cord To unplug grasp the plug not the cord Do not mutilate or incinerate batteries as they will explode at high temperatures Do not attempt to open the charger Repairs should only be carried out by a q...

Страница 4: ...7 Assembling the main body and the handy cleaner 08 Charging 09 About the battery OPERATING THE CLEANER 10 10 Using the stick cleaner 10 Using the power brush 10 Using the handy cleaner 11 Using the crevice dusting 11 Emptying the dust bin MAINTAIN TOOLS AND FILTER 13 13 Cleaning the filter 14 Countermeasure to remove anything clogging the cleaner TROUBLESHOOTING 16 ...

Страница 5: ...lamp The button to separate The button to separate power brush power brush power brush power brush shutter shutter Dustbin Dustbin Rear vent Rear vent Power brush Power brush crevice dusting crevice dusting crevice dusting crevice dusting cradle cradle Dustbin Dustbin The button to separate The button to separate the handy cleaner the handy cleaner Handle Handle The button to separate The button t...

Страница 6: ...ck the contents of the package assembling the cleaner Handle Handy cleaner Sub items to assemble the handle and the main body Power brush User manual Charger Crevice Dusting Main body Screw Screw Guiding key Guiding key ...

Страница 7: ...ks into place ASSEMBLING THE MAIN BODY AND THE HANDY CLEANER Insert the air inlet of the handy cleaner into the air inlet of the main body and then push the handy cleaner into the main body until it clicks into place 1 2 3 Handle Handle Guiding parts Guiding parts Guiding key Guiding key Screw Screw Main body Main body Holes on the main body Holes on the main body Power brush Power brush holder ho...

Страница 8: ...eaner does not work Install the cleaner with the charger aligning the charge pins 4 of the cleaner with the charge terminals of the charger The charging lamp is turned on and blink regularly While charging the charge lamp is turned on If the cleaner 5 is separated the lamp is turned off Even if charging is complete the lamp does not turn off or change to brighter blue color This is not a problem w...

Страница 9: ...ge time have decreased after the battery has been used a few times please replace the battery by contacting the Service center as the battery life may have reached its end NOTE Charge the product in the following cases When using the product for the first time after purchasing it or after not using it for a long period When the battery level is low and the suction power is weak When you charge the...

Страница 10: ... off when the handy cleaner power is turned off USING THE POWER BRUSH Since you can change the direction of the power brush by moving the handle of the stick cleaner left or right cleaning is much easier When you clean the floor right in front of the wall the front shutter is activated so that you can clean the dust easily USING THE HANDY CLEANER Lift the button to separate the handy cleaner and 1...

Страница 11: ...To remove it simply pull it out After using it please store it in the crevice dusting cradle of the charger so that you do not lose it See page 5 Crevice Use this to clean the dust from the grooves of window frames corners or gaps Dusting Use this to clean the dust from the grooves of windows corners or gaps EMPTYING THE DUST BIN If the dust bin is full or the sucking power decreases empty 1 the d...

Страница 12: ...dust bin cover 5 Push the dust bin down until it clicks into place 6 operating the cleaner Click Click NOTE Using a plastic bag This method is recommended for people with allergies or asthma Cleaning the dustbin with cold water is also recommended ...

Страница 13: ...ilter 4 until it is clean Dry the filter completely in a well ventilated shady location 5 After assemblying the micro filter and the grill filter hook one 6 side of the grill filter and push the fixing hook of the dust bin cover down until it clicks into place Assemble the assembled dustbin cover and the dust bin 7 maintain tools and filter Click Click Hepa filter Hepa filter Grill filter Grill fi...

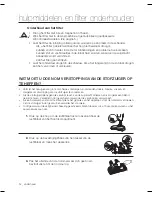
Страница 14: ...ER To prevent clogging while using the cleaner avoid vaccuuming big or sharp objects such as toothpicks blades socks etc If the cleaner is clogged while in use the sucking power may decrease and a vibrating sound may be heard In this case remove the item clogging the product If a foreign object is caught while you use the product the drum will not rotate In this case turn the power of the cleaner ...

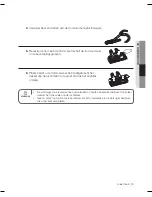
Страница 15: ...g the 5 fixing grooves After fixing the drum insert the air inlet cover into the groove 6 and assemble it by slightly sliding it down NOTE Since an oil papered or wood covered floor may be scratched by the cleaner please check the type of wheels of the air inlet If you cannot remove foreign objects from the cleaner please contact a service center ...

Страница 16: ...e to cool Suction force is gradually decreasing Check for blockage and remove Low or decreasing suction Please check filters If required clean it as illustrated in the instruction This Vacuum cleaner is approved the following EMC Directive 2004 108 EEC Low Voltage Directive 2006 95 EC troubleshooting ...

Страница 17: ...memo ...

Страница 18: ......

Страница 19: ...bilités Merci d avoir choisi un produit Samsung Afin de bénéficier d un service plus complet veuillez enregistrer votre produit à l adresse www samsung com register Avant d utiliser cet appareil veuillez lire attentivement les instructions Utilisation intérieure uniquement ...

Страница 20: ... pas pour le nettoyage de saletés ou débris provenant de la construction N utilisez pas cet aspirateur avec un de ses filtres retiré car cela risque d endommager les composants internes et d annuler la garantie SYMBOLES DANGER ATTENTION UTILISÉS AVERTISSEMENT Indique un danger de mort ou de blessure grave ATTENTION Indique un risque de blessure ou de dégât matériel AUTRES SYMBOLES UTILISÉS Indique...

Страница 21: ...porte sur le cordon ne tirez pas le cordon sur des rebords ou des angles coupants Maintenez le cordon éloigné des surfaces chauffées N utilisez pas de rallonges ni de prises murales ayant une intensité maximale admissible inadéquate Ne débranchez pas l appareil en tirant sur le cordon Pour débrancher tenez la prise et non le cordon Ne détériorez pas les batteries et ne les faites pas brûler car el...

Страница 22: ...pirateur et de l aspirateur portable 08 En cours de charge 09 À propos de la batterie FONCTIONNEMENT DE L ASPIRATEUR 10 10 Utilisation de l aspirateur principal 10 Utilisation de la brosse principale 10 Utilisation de l aspirateur portable 11 Utilisation du suceur plat 11 Vider le réservoir de poussière ENTRETIEN DES OUTILS ET DU FILTRE 13 13 Nettoyage du filtre 14 Mesure à suivre pour retirer un ...

Страница 23: ...rincipale volet de la brosse volet de la brosse principale principale Réservoir de Réservoir de poussière poussière Orifices d aération Orifices d aération arrière arrière Brosse principale Brosse principale suceur plat brosse à suceur plat brosse à épousseter épousseter compartiment pour le suceur compartiment pour le suceur plat la brosse à épousseter plat la brosse à épousseter Réservoir de Rés...

Страница 24: ...ntage de l aspirateur Poignée Aspirateur portable D autres éléments pour le montage de la poignée et du corps de l aspirateur Brosse principale Manuel d utilisation Chargeur Suceur plat Brosse à épousseter Unité principale Vis Vis Cheville Cheville ...

Страница 25: ...EUR ET DE L ASPIRATEUR PORTABLE Insérez l entrée d air de l aspirateur portable dans l entrée d air de l aspirateur principal et appuyer contre l aspirateur portable pour l insérer dans le corps de l aspirateur principal jusqu à ce qu un petit clic se fasse entendre 1 2 3 Poignée Poignée Pièces de Pièces de guidage guidage Cheville Cheville Vis Vis Unité principale Unité principale Trous sur l uni...

Страница 26: ...teur principal ne fonctionne pas Installez l aspirateur sur le chargeur en alignant les broches 4 de charge de l aspirateur avec les bornes de charge du chargeur Le témoin de charge s allume et clignote régulièrement Pendant la charge le témoin de charge reste allumé 5 Lorsque l aspirateur est retiré du chargeur le témoin de charge s éteint Le témoin de charge ne s éteint pas ni passe à une couleu...

Страница 27: ... le temps d utilisation et de charge de la batterie est considérablement réduit après quelques utilisations contactez votre centre d assistance pour remplacer la batterie car celle ci pourrait être en fin de vie REMARQUE Chargez l appareil dans les cas suivants Lorsque vous utilisez l appareil pour la première fois après avoir fait son acquisition ou après une longue période d inutilisation Lorsqu...

Страница 28: ...que lorsque l aspirateur portable est désactivé UTILISATION DE LA BROSSE PRINCIPALE La direction de la brosse principale peut être modifiée en déplaçant le lévier de l aspirateur principal vers la droite ou vers la gauche ce qui rend le nettoyage beaucoup plus facile Lorsque vous nettoyez le sol près du mur la languette avant est activée afin de pouvoir nettoyer la poussière facilement UTILISATION...

Страница 29: ...ilisation et afin de ne pas les perdre stockez les dans le bac du chargeur prévu à cet effet Reportez vous à la page 5 Suceur plat utilisez cet accessoire pour nettoyer la poussière des rainures ou des cadres des fenêtres des coins ou des joints Brosse à épousseter utilisez cet accessoire pour nettoyer la poussière des rainures des fenêtres des coins ou des joints VIDER LE RÉSERVOIR DE POUSSIÈRE S...

Страница 30: ...e réservoir de poussière jusqu à ce qu un petit 6 clic se fasse entendre fonctionnement de l aspirateur portable Clic Clic REMARQUE Utilisation d un sac plastique Cette méthode est conseillée pour les gens ayant des allergies ou de l asthme Le nettoyage du réservoir de poussière est également recommandé ...

Страница 31: ... Séchez complètement le filtre dans un endroit aéré et 5 ombragé Après avoir monté le microfiltre et le filtre à grille insérez un 6 côté du filtre à grille et appuyez sur le crochet de fixation du cache du réservoir de poussière jusqu à ce qu un petit clic se fasse entendre Montez l ensemble du cache du réservoir de poussière et le 7 réservoir de poussière entretien des outils et du filtre Clic C...

Страница 32: ...n de l aspirateur évitez d aspirer des objets grands ou pointus tels que des cure dents des lames des chaussettes etc Si un objet obstrue l aspirateur pendant le fonctionnement de celui ci la force d aspiration pourrait diminuer et un bruit de vibration pourrait se faire entendre Dans ce cas retirez l objet obstruant l appareil Si un objet étranger est coincé pendant que vous utilisez l appareil l...

Страница 33: ...de fixation Une fois la brosse fixée insérez le couvercle de l entrée 6 d air dans la rainure et montez la en la faissant glisser doucement REMARQUE Vérifiez le type de roues de l entrée d air car l aspirateur pourrait endommager les sols revêtus de papier peint ou de parquet Si vous n arrivez pas à extraire des objets étrangers de l aspirateur contactez votre centre d assistance ...

Страница 34: ... la prise Laissez le refroidir La puissance d aspiration diminue progressivement Vérifiez que rien n obstrue l appareil et débouchez le si nécessaire Aspiration faible ou de moins en moins puissante Vérifiez l état des filtres Si nécessaire nettoyez les comme indiqué dans les instructions dépannage ...

Страница 35: ...memo ...

Страница 36: ......

Страница 37: ...ssibilities Hartelijk bedankt voor het aanschaffen van een Samsung product Voor een uitgebreidere service kunt u uw product registreren op www samsung com register Lees deze instructies zorgvuldig door voordat u het apparaat in gebruik neemt Alleen voor gebruik binnenshuis ...

Страница 38: ...in op te zuigen Gebruik deze stofzuiger niet zonder een van de filters Dit kan schade aan interne onderdelen veroorzaken en uw garantie ongeldig maken WAARSCHUWINGSSYMBOLEN IN DEZE HANDLEIDING WAARSCHUWING Geeft aan dat er risico op ernstig of dodelijk letsel bestaat VOORZICHTIG Geeft aan dat er risico op lichamelijk letsel of materiële schade bestaat OVERIGE SYMBOLEN IN DEZE HANDLEIDING Geeft aan...

Страница 39: ...uct niet aan het snoer gebruik het snoer niet als handvat sluit de deur niet op of over het snoer heen en trek het snoer niet om scherpe hoeken of randen Houd het snoer uit de buurt van verwarmde oppervlakken Gebruik geen verlengsnoeren of stopcontacten met onvoldoende stroomtransportcapaciteit Trek de stekker niet aan het snoer uit het stopcontact Pak de stekker beet en niet het snoer Vermink of ...

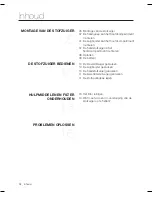
Страница 40: ...fzuiger in het hoofdcompartiment monteren 08 Opladen 09 De batterij DE STOFZUIGER BEDIENEN 10 10 De steelstofzuiger gebruiken 10 De zuigborstel gebruiken 10 De handstofzuiger gebruiken 11 De kierenborstel veger gebruiken 11 De stofopvangbak legen HULPMIDDELEN EN FILTER ONDERHOUDEN 13 13 Het filter reinigen 14 Wat moet u doen om verstopping van de stofzuiger op te heffen PROBLEMEN OPLOSSEN 16 ...

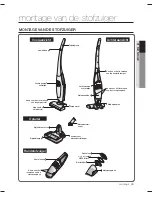
Страница 41: ...an de zuigborstel van de zuigborstel klep van de klep van de zuigborstel zuigborstel Stofopvangbak Stofopvangbak Luchtopening Luchtopening achterzijde achterzijde Zuigborstel Zuigborstel kierenborstel kierenborstel veger veger houder voor houder voor kierenborstel veger kierenborstel veger Stofopvangbak Stofopvangbak Knop voor het losmaken Knop voor het losmaken van de handstofzuiger van de handst...

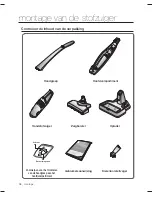
Страница 42: ...g montage van de stofzuiger Handgreep Handstofzuiger Voorwerpen voor het monteren van de handgreep aan het hoofdcompartiment Zuigborstel Gebruikersaanwijzing Oplader Kierenborstel veger Hoofdcompartiment Schroef Schroef Bevestigingspen Bevestigingspen ...

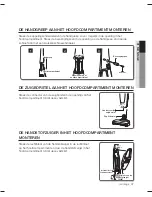
Страница 43: ...FZUIGER IN HET HOOFDCOMPARTIMENT MONTEREN Steek de luchtinlaat van de handstofzuiger in de luchtinlaat op het hoofdcompartiment en duw de handstofzuiger in het hoofdcompartiment totdat deze vastklikt 1 2 3 Handgreep Handgreep Geleiders Geleiders Bevestigingspen Bevestigingspen Schroef Schroef Hoofdcompartiment Hoofdcompartiment Openingen in het Openingen in het hoofdcompartiment hoofdcompartiment ...

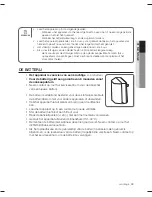
Страница 44: ...steelstofzuiger niet Plaats de stofzuiger in de oplader Lijn de oplaadpunten van 4 de stofzuiger hierbij uit met de oplaadpunten op de oplader Het oplaadlampje gaat branden en knippert regelmatig Tijdens het opladen brandt het oplaadlampje Wanneer de 5 stofzuiger van de oplader wordt gehaald gaat het lampje uit Ook wanneer het opladen is voltooid gaat het lampje niet uit en verandert het evenmin v...

Страница 45: ...jnde servicecentrum Als het oplaadniveau en de gebruikstijd van de batterij na enkele malen gebruik is afgenomen is de levensduur van de batterij mogelijk bijna verstreken Neem contact op met het servicecentrum om de batterij te vervangen OPMERKING Laad het apparaat op in de volgende gevallen Wanneer u het apparaat voor het eerst gebruikt na aanschaf of na een lange periode waarin u het niet hebt ...

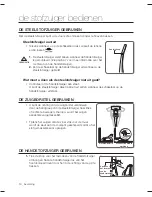
Страница 46: ...elaar op de handstofzuiger uit staat DE ZUIGBORSTEL GEBRUIKEN U kunt de richting van de zuigborstel veranderen door de handgreep van de steelstofzuiger naar links of rechts te bewegen Hierdoor wordt het zuigen aanzienlijk vergemakkelijkt Tijdens het zuigen van de vloer vlak voor de muur wordt de sleuf aan de voorkant geactiveerd zodat u het stof gemakkelijk kunt opzuigen DE HANDSTOFZUIGER GEBRUIKE...

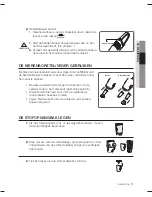
Страница 47: ...eer verwijderen door hem eruit te trekken Bewaar de kierenborstel veger in de houder op de oplader zodat u hem niet kwijt raakt Zie pagina 5 Kierenborstel hiermee kunt u stof verwijderen uit raamprofielen hoeken en gaten Veger hiermee kunt u stof verwijderen van kozijnen hoeken en gaten DE STOFOPVANGBAK LEGEN Als de stofopvangbak vol is of de zuigkracht afneemt moet u 1 de stofopvangbak leegmaken ...

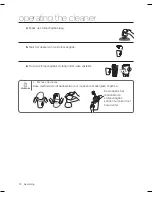
Страница 48: ...stofopvangbak 5 Duw de stofopvangbak omlaag totdat deze vastklikt 6 operating the cleaner Klik Klik OPMERKING Met een plastic zak Deze methode wordt aanbevolen voor mensen met allergieën of astma Daarnaast is het raadzaam de stofopvangbak schoon te maken met koud water ...

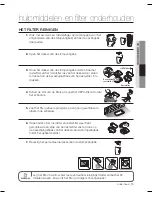
Страница 49: ...otdat 4 het schoon is Laat het filter geheel opdrogen op een goed geventileerde 5 plaats in de schaduw Haak nadat u het microfilter en rasterfilter weer hebt 6 gemonteerd een zijde van het rasterfilter vast en druk op de bevestigingshaak van het deksel van de stofopvangbak totdat het geheel vastklikt Bevestig het gemonteerde deksel aan de stofopvangbak 7 hulpmiddelen en filter onderhouden Klik Kli...

Страница 50: ...t opzuigen van grote of scherpe voorwerpen zoals tandenstokers mesjes sokken en dergelijk om verstopping van de stofzuiger te voorkomen Als de stofzuiger tijdens gebruik verstopt raakt kan de zuigkracht afnemen en is mogelijk een trillend geluid te horen Verwijder in dat geval het voorwerp dat de verstopping veroorzaakt Als een voorwerp vast komt te zitten tijdens het gebruik van het apparaat stop...

Страница 51: ...en Plaats nadat u de trommel weer hebt aangebracht het 6 deksel van de luchtinlaat in de groef en druk het zachtjes omlaag OPMERKING De stofzuiger zou krassen kunnen veroorzaken op houten vloeren en laminaat Controleer daarom het type wielen op de luchtinlaat Neem contact op het met servicecentrum als zich voorwerpen in de stofzuiger bevinden die u niet kunt verwijderen ...

Страница 52: ... afkoelen De zuigkracht neemt geleidelijk af Controleer op verstoppingen en verwijder deze De zuigkracht is zwak of neemt af Controleer de filters Maak de filters zo nodig schoon zoals beschreven in de instructies Deze stofzuiger voldoet aan de volgende richtlijnen EMC richtlijn 2004 108 EEC Laagspanningsrichtlijn 2006 95 EC problemen oplossen ...

Страница 53: ...aantekeningen ...
Страница 54: ...g com be_fr French NETHERLANDS 0900 SAMSUNG 0900 7267864 0 10 Min www samsung com nl LUXEMBURG 261 03 710 www samsung com Contact Samsung wereldwijd Wanneer u suggesties of vragen heeft met betrekking tot Samsung producten gelieve contact op te nemen met de consumenten dienst van Samsung ...

Отзывы: