5-18
4
Record Mode
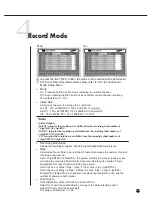
If you press the front “REC” button, the mode to be recorded will be determined.
☛
For Event Recording Mode value setup, refer to 5-19. Event Record
Mode Setup Menu.
●
Mode
On : Pressing the REC button starts recording the current channel.
Off : Even pressing the REC button does not affect current channel recording.
The default is set to “On”.
●
Video Size
Determines the size of a screen to be recorded.
Full D1 : 720 x 480(NTSC) / 720 x 576(PAL)
➝
Large(L)
Half D1 : 720 x 240(NTSC) / 720 x 288(PAL)
➝
Normal(N)
CIF : 352 x 240(NTSC) / 352 x 288(PAL)
➝
CIF(C)
Note
Note
[Video Output]
"Full D1" setup for the resolution is available from the recording sheet number of
7.5ips(NTSC)/6.25ips(PAL)
"Half D1" setup for the resolution is available from the recording sheet number of
15ips(NTSC)/12.5ips(PAL)
"CIF" setup for the resolution is available from the recording sheet number of
15ips(NTSC)/12.5ips(PAL)
●
Recording Resolution
Selects the recording resolution. HH(Very High)/H(High)/N(Normal)/L(Low).
●
Rate
Determines Frame Rate to be recorded. Frame Rate means the number of screen
recorded every second.
Set to 15ips(NTSC)/12.5ips(PAL), the system records too many screens per sec-
ond and play continues intermittently since recording is more detailed. This is
appropriate for concentrated monitoring zone setup.
Set to the one of 30ips /15ips / 10ips / 7.5ips / 5ips / 3ips / 1ips(NTSC)
Set to the one of 25ips /12.5ips / 8.33ips / 6.25ips / 5ips / 2.5ips / 1ips(PAL)
30 ips(NTSC)/25ips(PAL) is supported only when the resolution is CIF, and the
number of camera is odd number.
●
Auto Delete
Click [Off] button at the left bottom to select Off/On.
Select On to limit the search date by moving to the date selecting button.
Select Off not to limit the search date.
The date is limited from 1 to 99.
NTSC
PAL
Содержание SHR-4160N/P
Страница 1: ...16 Channel DVR SHR 4160N P User s Manual ...
Страница 7: ......
Страница 8: ...Chapter 1 Overview 1 ...
Страница 14: ......
Страница 15: ...Chapter 2 Installation 2 ...
Страница 24: ...SHR 4160N P USER S MANUAL 2 9 Please install the fan to be seen from the front view of the set ...
Страница 25: ...2 10 Fixing the fan to the left ...
Страница 26: ...Chapter 3 Connecting with Other Equipment 3 ...
Страница 27: ...1Connecting Video Audio Monitor 3 1 SHR 4160N P USER S MANUAL ...
Страница 28: ...3 2 2Connecting Network Connecting to Internet through Ethernet 10 100BaseT Connecting Internet through ADSL ...
Страница 30: ...3 4 Note Note Refer to Appendix 2 to see which HDD specifications are supplied ...
Страница 33: ...SHR 4160N P USER S MANUAL 3 7 ALARM IN OUT Connection ...
Страница 35: ...Chapter 4 Live 4 ...
Страница 44: ...Chapter 5 Menu Setup 5 ...
Страница 77: ...Chapter 6 PTZ device Control 6 ...
Страница 86: ...Chapter 7 Recording 7 ...
Страница 91: ...Chapter 8 Search Play 8 ...
Страница 101: ...Chapter 9 Backup and Backup Search 9 ...
Страница 107: ...Chapter 10 Smart Viewer 10 ...
Страница 166: ...Chapter 11 Backup Viewer 11 ...
Страница 171: ...SHR 4160N P USER S MANUAL 11 5 Click Next If you agree with the Backup Viewer license click Yes ...
Страница 173: ...SHR 4160N P USER S MANUAL 11 7 Installation is complete Click Finish to terminate the whole installation process ...
Страница 182: ......
Страница 183: ...Appendix 12 ...
Страница 188: ...SHR 4160N P USER S MANUAL 3Outline Drawing 12 5 ...

