


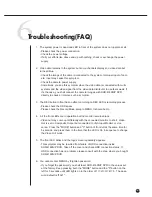


6
Troubleshooting(FAQ)
12-10
1. The system power is dead and LED in front of the system does not operate at all.
- Please check the power connection.
- Check the power voltage.
- If all your efforts like above end up with nothing, check or exchange the power
supply.
2. Video data remains in the system but some channels displays no video data but
turns all blue.
- Check the image of the camera connected to the system. Improper input of cam-
era input may cause this symptom.
- Check the camera power supply.
- Sometimes, you see this symptom when the video data is connected with multi-
systems and the video signal from the video data distributor in use feels weak. If
it’s the case, you shall connect the camera images with SHR-4160N/P DVR
directly to check or improve such a symptom.
3. The REC button in front has no effect on turning on REC LED or recording process.
- Please check the HDD space.
- Please check the Record Mode setup in MENU. It should be On.
4.
All the front LEDs are in operation but the monitor remains black.
- Video out may come out differently with the connected monitor. In short, Video
Out is set to Composite Output but connected to VGA Input Monitor or vice
versa. Press the "MODE" button and "0" button of front left at the same time for
5 seconds, and press them to the time that the LED is On in sequence to change
the Video Out mode.
5. The front LED blinks and the logo screen repeatedly appears.
- This symptom may be resulted from failure of HDD connection inside
SHR-4160N/P DVR. Take off the cover and check HDD connection status. If
HDD connection has no problem, please consult with the shop where you bought
SHR-4160N/P DVR.
6. You cannot enter MENU by forgotten password.
- If you forget the password, you shall reset SHR-4160N/P DVR to the values set
at the factory. Keep pressing both the "MODE" button and the "5" button on the
left for 5 seconds until LED lights on in the order of 1
➝
2
➝
3
➝
4
➝
5. The pass-
word default is "4321".
Содержание SHR-4160N/P
Страница 1: ...16 Channel DVR SHR 4160N P User s Manual ...
Страница 7: ......
Страница 8: ...Chapter 1 Overview 1 ...
Страница 14: ......
Страница 15: ...Chapter 2 Installation 2 ...
Страница 24: ...SHR 4160N P USER S MANUAL 2 9 Please install the fan to be seen from the front view of the set ...
Страница 25: ...2 10 Fixing the fan to the left ...
Страница 26: ...Chapter 3 Connecting with Other Equipment 3 ...
Страница 27: ...1Connecting Video Audio Monitor 3 1 SHR 4160N P USER S MANUAL ...
Страница 28: ...3 2 2Connecting Network Connecting to Internet through Ethernet 10 100BaseT Connecting Internet through ADSL ...
Страница 30: ...3 4 Note Note Refer to Appendix 2 to see which HDD specifications are supplied ...
Страница 33: ...SHR 4160N P USER S MANUAL 3 7 ALARM IN OUT Connection ...
Страница 35: ...Chapter 4 Live 4 ...
Страница 44: ...Chapter 5 Menu Setup 5 ...
Страница 77: ...Chapter 6 PTZ device Control 6 ...
Страница 86: ...Chapter 7 Recording 7 ...
Страница 91: ...Chapter 8 Search Play 8 ...
Страница 101: ...Chapter 9 Backup and Backup Search 9 ...
Страница 107: ...Chapter 10 Smart Viewer 10 ...
Страница 166: ...Chapter 11 Backup Viewer 11 ...
Страница 171: ...SHR 4160N P USER S MANUAL 11 5 Click Next If you agree with the Backup Viewer license click Yes ...
Страница 173: ...SHR 4160N P USER S MANUAL 11 7 Installation is complete Click Finish to terminate the whole installation process ...
Страница 182: ......
Страница 183: ...Appendix 12 ...
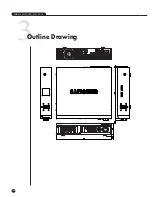
Страница 188: ...SHR 4160N P USER S MANUAL 3Outline Drawing 12 5 ...


