background image

Entering Text

42

Using the Pinyin Mode

Pinyin is a system to mark Chinese pronunciation in 
Latin alphabets. With the pinyin input method, you 
can enter Chinese characters by entering the pinyin 
string from the phone keypad and the phone 
automatically presents the matching alternatives.

This mode allows you to enter Pinyin characters 
with only one key press per letter. 

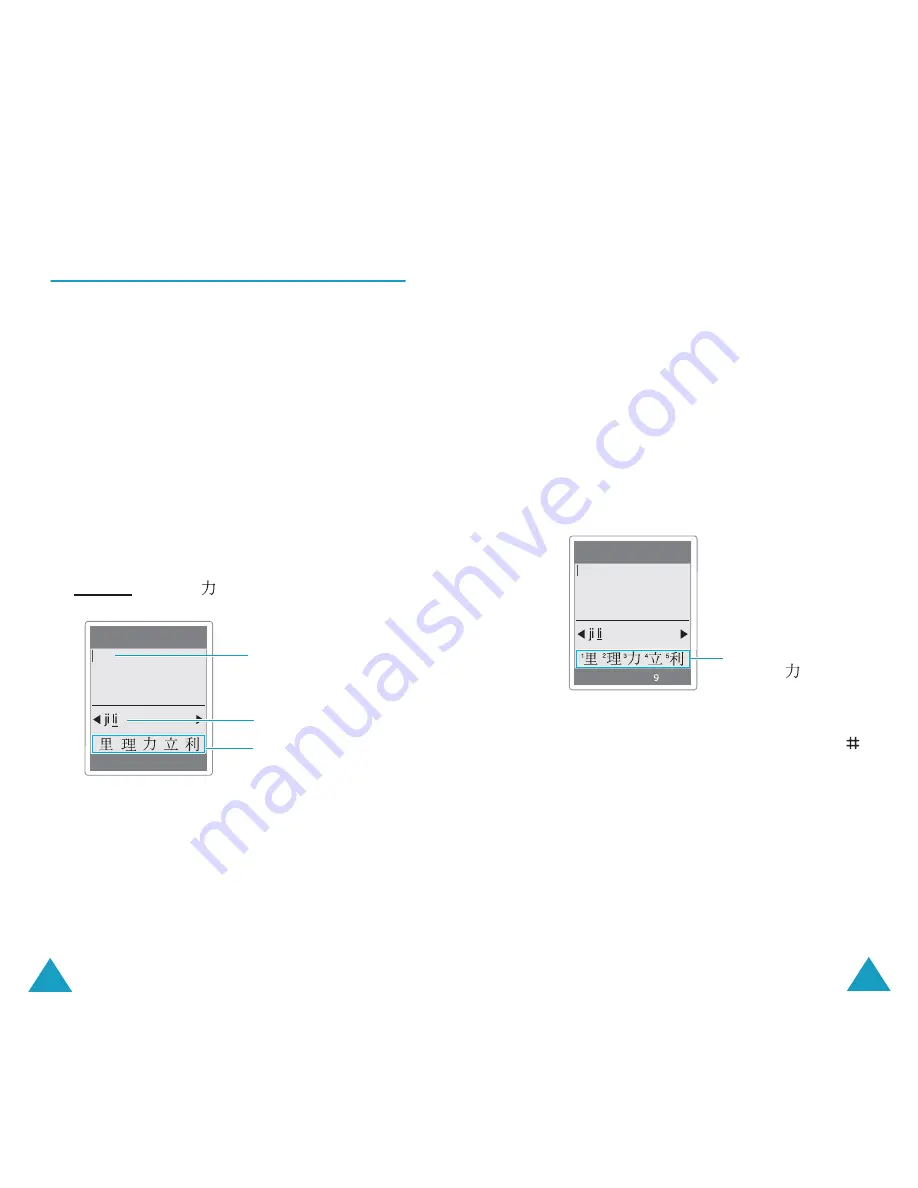
Typing Characters in the Pinyin Mode

1. Press keys corresponding to the phonetic 

spelling, referring to the Roman letters printed 
on the keys. Notice that the choices in the 
Character Selection Map change. 

Example: Typing “

” in the pinyin mode

2. If there are more than one pinyin spelling 

corresponding to your keypress, press the Left 
or Right key to select the spelling you want.

Enter name

Ok

       9

PY

Text Area

Key Stroke Area: press 
the 

5

 and 

keys to 

enter “li.”

Character Selection Map

Entering Text

43

3. If you cannot find the character you want from 

the display, press the Up or Down key to scroll 
through choices in the Character Selection map.

When the character you are typing appears in 
the Character Selection Map, you may select it, 
without completing the Pinyin spelling or 
entering the tone for the character. 

4. To select a character, press the 

1

 key to activate 

the Character Selection Map. A number, 1 to 5, 
is added to the beginning of a corresponding 
character. With the Character Selection Map 
being activated, a normal press on the 

1

 to 

5


key selects the corresponding character.


Notes

:

• To insert a space when entering a text, press the 


key when the cursor blinks in the Text Area.

• To remove the activate character in the Character 

Selection Map, press the 

C

 key. 

Scrolling 

To move the cursor left or right through your text 
message, press the Left or Right key.

Enter name

Ok

PY

Press the 

key 

to enter “

.”

Содержание SGH-E700A

Страница 1: ...n this manual may differ from your phone depending on the software installed or your service provider Printed in Korea Code No GH68 04588A English 02 2004 Rev 1 1 World Wide Web www samsungmobile com...

Страница 2: ...nd Options 25 Call Functions 27 Making a Call 27 Ending a Call 30 Answering a Call 30 Rejecting a Call 30 Adjusting the Volume 31 Accessing Options During a Call 31 Using the Ear microphone 39 Enterin...

Страница 3: ...e Menu 3 4 104 Key Tone Menu 3 5 105 Minute Minder Menu 3 6 105 Quiet Mode Menu 3 7 106 Contents 5 Phone Settings 107 Greeting Message Menu 4 1 107 Display Menu 4 2 108 Language Menu 4 3 110 Security...

Страница 4: ...rd 169 Health and Safety Information 170 Exposure to Radio Frequency Energy SAR Information 170 Precautions When Using Batteries 171 Road Safety 173 Operating Environment 173 Electronic Devices 174 Po...

Страница 5: ...cals Switching Off in Aircraft Wireless phones can cause interference Using them in aircraft is both illegal and dangerous Switching Off in Hospitals Switch off your phone near medical equipment Follo...

Страница 6: ...all the necessary information as accurately as possible Do not cut off the call until given permission to do so Water Resistance Your phone is not water resistance Keep it dry Accessories and Batterie...

Страница 7: ...iew IrDA port Your Phone 11 Key s Description soft keys Perform the functions indicated by the text above them on the bottom line of the display In Menu Mode scroll through the menu options In Idle Mo...

Страница 8: ...ckly accesses your voice mail server Enter numbers letters and some special characters Used for various purposes in different functions When pressed and held while entering a phone number the key ente...

Страница 9: ...en a call is in progress When your SIM card supports ALS Alternate Line Service this icon may appears with the number 1 2 or both like Appears when you are out of a service area When it displays you c...

Страница 10: ...uiet Mode is active Shows the level of your battery The more bars you see the more power you have left Icon Description continued Your Phone 17 External Display Your phone has an external display on t...

Страница 11: ...e the phone to operate at a higher power level than needed 19 Getting Started Inserting Removing the SIM Card When you subscribe to a cellular network you are provided with a SIM card loaded with your...

Страница 12: ...using your phone for the first time A discharged standard battery is fully recharged in approximately 130 minutes Installing the Battery 1 Insert the teeth on the bottom of the battery into the corres...

Страница 13: ...repeatedly fills to show that the battery is charging Getting Started 23 3 When charging is finished and the battery icon becomes solid and Fully charged message is displayed disconnect the adapter fr...

Страница 14: ...wer off animation displays Menu Phonebook Service Provider Wed 17 Sep 12 53 12 53 Wed 17 09 Getting Started 25 Selecting Functions and Options Your phone offers a set of functions that allow you to cu...

Страница 15: ...le Mode key 27 Call Functions Making a Call Using the Number Keypad When the idle screen is displayed enter the area code and phone number and press the key Note If you have set the Auto redial option...

Страница 16: ...l the number you want highlights The call logs are listed with the following icons Dialled calls Received calls Missed calls Call Functions 29 3 To dial the number press the key To view each call reco...

Страница 17: ...ide key option is set to Reject you can press and hold one of the volume keys on the left side of the phone to reject an incoming call see page 114 Call Functions 31 Adjusting the Volume During a call...

Страница 18: ...ys option must be selected Call Functions 33 Putting a Call on Hold You can place the current call on hold whenever you want You can make another call while you have a call in progress if this service...

Страница 19: ...er or make a call in the normal way and press the Options soft key 2 Press the Up or Down key to select the Transfer option and press the Select soft key The two people are connected to each other Cal...

Страница 20: ...ns soft key and select the Join option Press the Select soft key You can add incoming callers by answering the call and selecting the Join option Repeat as needed Call Functions 37 Having a Second Cal...

Страница 21: ...icipant and press the Select soft key The call ends with that participant but you can continue to talk with the other participants 3 End the multi party call by closing the folder or pressing the key...

Страница 22: ...modes appears later in this section is a registered trademark of Tegic Communications Inc and is licensed under U S Patent 5 818 437 5 953 541 6 011 554 Entering Text 41 Changing the Text Input Mode W...

Страница 23: ...Area press the 5 and 4 keys to enter li Character Selection Map Entering Text 43 3 If you cannot find the character you want from the display press the Up or Down key to scroll through choices in the...

Страница 24: ...ters that appear on the display Even though there are many different strokes used to create Chinese characters the strokes are classified into 5 basic categories heng shu pie dian and zhe The basic st...

Страница 25: ...y one or more times to remove strokes to the left Once the Stroke Area is empty pressing the C key removes characters from the Text Area Entering Text 47 Using the Quick English Mode To type a word pr...

Страница 26: ...you have entered press the 0 key Clearing Letters and Words Press the C key one or more times to clear letters to the left Press and hold the key to clear the display l e t s e a t Entering Text 49 Us...

Страница 27: ...ey Clearing Letters and Words Press the C key one or more times to clear letters to the letter Press and hold the key to clear the display Using the Number Mode The number mode enables you to enter nu...

Страница 28: ...o the option you want to choose with the Up or Down key 6 Press the Select soft key to choose the setting Note You can return to the previous menu level by pressing the soft key You can also access th...

Страница 29: ...1 Short message 1 7 2 Multimedia message Using the Menus 55 2 Call records see page 98 2 1 Missed calls 2 2 Received calls 2 3 Dialled calls 2 4 Delete all 2 5 Call time 2 5 1 Last call time 2 5 2 Tot...

Страница 30: ...3 All settings Shown only if it is supported by your SIM card Using the Menus 57 5 Organiser see page 117 5 1 New memo 5 2 Calendar 5 3 To do list 5 4 Clock 5 4 1 Set time 5 4 2 Set date 5 4 3 Set wo...

Страница 31: ...7 2 Media box 7 2 1 Photos 7 2 2 Images 7 2 3 Sounds 7 2 4 Delete all 7 2 5 Memory status 7 3 JAVA world 7 3 1 Downloads 7 3 2 DNS setting 7 3 3 Memory status Shown only if it is supported by your SI...

Страница 32: ...e Ok soft key 4 To Press the dial the displayed number key change the Phonebook entries Options soft key For further details see page 61 Phonebook Menu 61 Changing the Phone Memory Entries Scroll to t...

Страница 33: ...ise press the No soft key Phonebook Menu 63 Add Entry Phonebook 1 2 You can store phone numbers and the corresponding names in the memory of your SIM card In addition you can store up to 1000 names in...

Страница 34: ...dit number option highlights press the Select soft key Phonebook Menu 65 3 Enter a phone number and press the Ok soft key Or To retrieve a number from your Phonebook press the Phonebook soft key Selec...

Страница 35: ...e press the No soft key 2 When you have finished press the soft key or the key to exit Phonebook Menu 67 Send All via Infrared Phonebook 1 5 Via the infrared connection you can send your Phonebook ent...

Страница 36: ...l SIM Phone you can select a memory location SIM card or phone s memory Continue to step 5 4 Press the Save soft key to store the entry You can also delete the entry by pressing the Cancel soft key 5...

Страница 37: ...Yes soft key to delete the number Otherwise press the No soft key 4 When you have finished press the soft key or the key to exit Phonebook Menu 71 Group Setting Phonebook 2 2 You can change the setti...

Страница 38: ...you have finished press the soft key or the key to exit Service Directory Phonebook 3 1 Note This feature may not be available depending on your SIM card The display shows the list of the numbers in...

Страница 39: ...ws you to send and receive short text messages to and from other GSM mobile phones In addition your phone supports the Enhanced Messaging Service EMS which enables you to make short messages consistin...

Страница 40: ...message To view a message scroll to it and press the Select soft key The screen shows the date and time when the message was received memory where the message was stored for the SIM card or for the ph...

Страница 41: ...Messages 77 Add media allows you to add pictures animations and or melodies to the message Select a category Add picture Add animation or Add melody You can then choose a factory set object or an obje...

Страница 42: ...age contents You can scroll to the next or previous message by pressing the Left or Right key To scroll through the message press the Up or Down key Messages 79 You can choose the following options by...

Страница 43: ...can read it Messages 81 Notes When you set the Message reception see page 95 to Automatic you cannot enter the Downloads menu Menu 7 3 1 and cannot also access WAP sites while retrieving a new message...

Страница 44: ...tically Notes Some types of sound or picture may not be able to play or display When the message has an attachment like video clips the Attachment icon appears on the title line You may not play the a...

Страница 45: ...yed 2 Select one of picture you want to add The picture is displayed 3 Press the Add soft key Messages 85 Sound To add a new sound 1 Select the Record new option 2 Press the Record soft key to start r...

Страница 46: ...Note To go back to the edit screen press the soft key or the C key 3 When you finish creating the message select Send from the options 4 Select an entry on the Send screen If it is an empty entry ent...

Страница 47: ...ge Send send the message Properties shows you detailed information about the message Move to My folder moves the message to the My folder for later use Messages 89 Draft Menu 1 2 4 This message box st...

Страница 48: ...s in the box es Otherwise press the No soft key Messages 91 Voice Mail Menu 1 3 When you receive a voice mail your phone displays the icon and you hear an alert Connect To Voice Mail Menu 1 3 1 In Idl...

Страница 49: ...ages 93 In the Broadcast menu option the following options are available Read lets you read the received broadcast messages Archive shows the list of the messages you saved from the temporary list Tem...

Страница 50: ...t settings for sending or receiving MMS message The following options are available Send settings The following options are available Priority allows you to set the priority of message Validity period...

Страница 51: ...nter the server login ID Password enter the server password GPRS setting allows to change the proxy settings for the GPRS network Gateway enter the IP address and IP port APN enter the access point na...

Страница 52: ...ew the last 20 received calls if the caller line identification is available The number or name if available displays together with the date and time when the call was received By pressing the Options...

Страница 53: ...Notes This feature is not intended to be used for billing purposes AOC Advice Of Charge information may display in Idle Mode depending on your SIM card or service provider The following options are av...

Страница 54: ...s or the volume keys on the left side of the phone The more bars you see the louder the volume Sound Settings 103 Alert type lets you specify how you are informed of any incoming calls Melody the phon...

Страница 55: ...to select the tone that the keypad sounds when you press a dial key The following options are available Off the keys do not make any sound Tone each key when pressed makes a different sound Beep each...

Страница 56: ...07 Phone Settings Many different features of your phone can be customised to suit your preferences via the Phone settings menu Greeting Message Menu 4 1 This menu option allows you to set a greeting m...

Страница 57: ...set the style of the text displayed on the idle screen Note When you set the wallpaper image to Calendar the Text position and Text style options don t work Phone Settings 109 Skin Menu 4 2 2 You can...

Страница 58: ...es of your phone For more information see page 167 169 PIN Check Menu 4 4 1 When the PIN Check feature is enabled you must enter your PIN each time you switch the phone on Consequently any person who...

Страница 59: ...rm it by entering it again Privacy Menu 4 4 5 This feature allows you to lock or unlock the usage of the contents such as multimedia messages photos images and sounds To enable or disable the Privacy...

Страница 60: ...is silenced when you hold down one of the volume keys the call is not rejected Phone Settings 115 Fax Mode Menu 4 7 You can use your phone as a modem for faxing when it is connected to computing devic...

Страница 61: ...lder Reset Settings Menu 4 10 This menu option allows you to reset your phone to its default configuration You can reset the sound settings phone settings or all of the settings together 1 Select one...

Страница 62: ...u 5 1 This menu option allows you to create a new memo Note You can also access this menu by holding down the C key in Idle Mode 1 Write your memo of up to 100 characters and press the Ok soft key For...

Страница 63: ...or PM by pressing the Up or Down key and then press the Select soft key 9 Select an alarm melody and press the Select soft key The memo is saved and then displays on the screen Organiser 119 10 You ca...

Страница 64: ...you need to do Call calls you need to make Anniversary anniversaries to be remembered such as wedding anniversaries birthdays or other special days 4 Follow the procedure from step 4 on page 118 onwa...

Страница 65: ...dit allows you to edit the contents of the task Move allows you to move the task to a different date Organiser 123 Copy allows you to copy the task to a different date Delete allows you to delete the...

Страница 66: ...s you to set an alarm to ring at a specific time You can set up to three alarms or set the phone to ring an alarm when it is switched off To set an alarm 1 Select either Morning call Alarm1 or Alarm2...

Страница 67: ...a check mark appears ahead of Auto power If the phone is switched off at the specified alarm time it automatically switches on and rings the alarm It then automatically switches off again Organiser 12...

Страница 68: ...r Right key 5 Press the Ok soft key or the key to view the result The result appears in the Answer box 6 When you have finished press the soft key or the key to exit Organiser 129 Units Available Time...

Страница 69: ...e Reset soft key to reset the watches 4 Press the C or key to exit 131 Network Services These menu functions are network services Please contact your service provider to check their availability and s...

Страница 70: ...n you are satisfied press the Ok soft key The phone sends your settings to the network and the network s acknowledgement displays Network Services 133 Deactivating Specific Call Diverting Options 1 Se...

Страница 71: ...settings to the network and the network s acknowledgement displays Network Services 135 Deactivating Specific Call Barring Options 1 Select the call barring option to be deactivated 2 Select the type...

Страница 72: ...eactivate soft key The phone sends your settings to the network and the network s acknowledgement displays You can also deactivate all call waiting options by selecting the Cancel all option Network S...

Страница 73: ...n be answered on both lines regardless of the selected line 139 Fun Box The Fun box menu contains several fun options WWW services Media box JAVA world WWW Services Menu 7 1 Your phone comes equipped...

Страница 74: ...y and select the Home browser option For details see page 141 Fun Box 141 Using the WAP Browser Menus There are various menu options available when surfing the Wireless Web To access the WAP Browser m...

Страница 75: ...of up to 10 of your favourite Web sites To store a URL address 1 Select an empty location and press the Select soft key 2 Enter the address and press the Ok soft key to save it Fun Box 143 3 Enter th...

Страница 76: ...can delete it using the C key and enter your own choice To enter any special characters for example use the symbolic mode see page 51 Fun Box 145 Bearer you can select the bearer to be used for each...

Страница 77: ...om other sources such as the WAP sites or multimedia messages When you select an image you can use the following options by pressing the Options soft key Send allows you to send the multimedia message...

Страница 78: ...es Menu 7 2 4 2 When a confirming message appears press the Yes soft key to delete all of the images Otherwise press the No soft key Sounds Menu 7 2 4 3 1 Scroll to a sound box and place a check mark...

Страница 79: ...ation display Fun Box 151 Instructions shows you the explanation of control keys offense items and defense items Configuration allows you to turn the sound vibration on or off and select the game spee...

Страница 80: ...ou played The menu is only available when a game has already been played High score shows you the high score table How to play shows you the instruction of this game Option allows you to set the sound...

Страница 81: ...nd Right keys to adjust the brightness of the picture The Up Down and volume keys zoom in and out the image You can set the camera options See page 156 Camera 155 3 Press the Capture soft key or the C...

Страница 82: ...57 Frame this option allows you to use a frame on the picture Press the navigation key to find the frame format you want to use You can preview the image with the frame format by using the Preview sof...

Страница 83: ...re is automatically saved in the My photos menu Menu 8 2 4 To review the taken picture open the folder and press the No soft key You can delete the picture by pressing the Delete soft key return to th...

Страница 84: ...e camera feature The following options are available Photo size sets the image size to one of VGA 640 480 QVGA 320 240 QQVGA 160 120 and Mobile 128 120 The selected image size displays on the capture...

Страница 85: ...of each line via the Own number menu option When you edit the name of a line this name replaces Line 1 or Line 2 as applicable For further details refer to page 70 Setting the Ring Type To distinguis...

Страница 86: ...cession and the phone is now blocked Enter the PUK supplied by your network operator Solving Problems 165 No service displays The network connection was lost You may be in a weak reception area in a t...

Страница 87: ...167 Access Codes There are several access codes that are used by your phone and its SIM card These codes help you protect the phone against unauthorised use Some access codes can be changed using the...

Страница 88: ...succession the SIM card cannot be used anymore Contact your service provider for a new card You cannot change the PUK If you lose the code contact your service provider Access Codes 169 PUK2 The PUK2...

Страница 89: ...and Safety Information 171 SAR tests are conducted using standard operating positions with the phone transmitting at its highest certified power level in all tested frequency bands Although the SAR i...

Страница 90: ...t or bag Short circuiting the terminals may damage the battery or the object causing the short circuiting Dispose of used batteries in accordance with local regulations Always recycle Do not dispose o...

Страница 91: ...g place switch your phone off immediately Hearing Aids Some digital wireless phones may interfere with some hearing aids In the event of such interference you may wish to consult your hearing aid manu...

Страница 92: ...s using radio signals wireless and landline networks as well as user programmed functions which cannot guarantee connection in all conditions Therefore you should never rely solely on any wireless pho...

Страница 93: ...he offender or legal action or both Health and Safety Information 179 Care and Maintenance Your phone is a product of superior design and craftsmanship and should be treated with care The suggestions...

Страница 94: ...181 Glossary To help you understand the main technical terms and abbreviations used in this booklet and take full advantage of the features of your mobile phone here are a few definitions ALS Alterna...

Страница 95: ...Glossary 183 MMS Multimedia Message Service A message service for the mobile environment standardized by the WAP Forum and the 3rd Generation Partnership Program 3GPP For phone users MMS is similar to...

Страница 96: ...of the phone and is protected by the battery SMS Short Message Service Network service sending and receiving messages to and from another subscriber without having to speak to the correspondent The me...

Страница 97: ...ion is selected Press the Select soft key to confirm Each of the two soft keys and performs the function indicated by the text above them on the bottom line on the display Switch On Off Press and hold...

Страница 98: ...ers in Phonebook Enter the number Press the Save soft key Select the memory type and press the Select soft key If you select Phone select the number type and press the Select soft key Enter the name a...

Отзывы: