


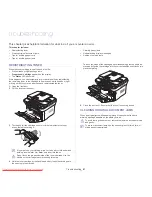


Maintenance
_ 88
13.
maintenance
This chapter provides information for maintaining your machine and the toner cartridge.
This chapter includes:
•
Printing a machine report
•
Monitoring the supplies life
•
Using toner low alert
•
Finding the serial number
•
Cleaning the machine
•
Storing the Toner cartridge
•
Tips for moving & storing your machine
PRINTING A MACHINE REPORT
You can print the machine's information and job report.
1.
Press
Menu
on the control panel.
2.
Press the left/right arrow until
System Setup
appears and press
OK
.
3.
Press the left/right arrow until
Report
appears and press
OK
.
4.
Press the left/right arrow until the report or list you want to print
appears.press
OK
.
To print all reports and lists, select
All Report
.
5.
Press the left/right arrow to appears
Yes
at the
Print?
prompt and press
OK
.
You can use SyncThru™ Web Service to print the machine's
configuration or browse the status. Open the web browser in the
networked computer and type the machine's IP address. When
SyncThru™ Web Service opens, click
Information
>
information
.
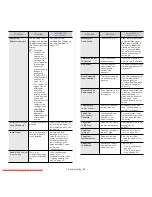
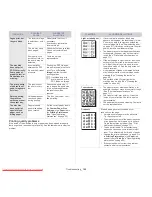
MONITORING THE SUPPLIES LIFE
If you experience frequent paper jams or printing problems, check the
number of pages the machine has printed. Replace the corresponding
parts, if necessary.
1.
Press
Menu
on the control panel.
2.
Press the left/right arrow until
System Setup
appears and press
OK
.
3.
Press the left/right arrow until
Maintenance
appears and press
OK
.
4.
Press the left/right arrow until
Supplies Life
appears and press
OK
.
5.
Press the left/right arrow until the item you want appears and press
OK
.
•
Supplies Info
: Prints the supply information page.
•
Total
: Displays the total number of pages printed.
•
ADF Scan
: Displays the number of pages scanned using the ADF.
•
Platen Scan
: Displays the number of pages scanned using the
scanner glass.
6.
Press
Stop/Clear
to return to ready mode.
USING TONER LOW ALERT
If the amount of toner in the cartridge is low, The
Status
LED blinks red.
You can set the option for this LED to blink or not.
1.
Ensure that you have installed the printer driver with the provided
Printer Software CD.
2.
Double-click the
Smart Panel
icon on the Windows task bar (or
Notification Area in Linux). You can also click
Smart Panel
on the status
bar in Mac OS X.
3.
Click
Printer Setting
.
4.
Click
Setting
>
Toner Low Alert
. Select the appropriate setting and
then click
Apply
.
FINDING THE SERIAL NUMBER
When you call for service or register as a user on the Samsung website, the
machine’s serial number by taking the following steps:
1.
Press
Menu
on the control panel.
2.
Press the left/right arrow until
System Setup
appears and press
OK
.
3.
Press the left/right arrow until
Maintenance
appears and press
OK
.
4.
Press the left/right arrow until
Serial Number
appears and press
OK
.
5.
Check your machine’s serial number.
6.
Press
Stop/Clear
to return to ready mode.
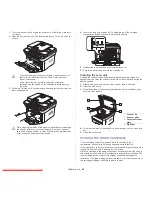
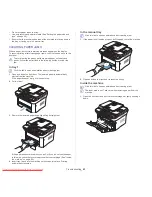
CLEANING THE MACHINE
If printing quality problems occur or if you use your machine in a dusty
environment, you need to clean your machine regularly to keep the best
printing condition and use your machine longer.
•
Cleaning the cabinet of the machine with cleaning materials
containing large amounts of alcohol, solvent, or other strong
substances can discolor or distort the cabinet.
•
If your machine or the surrounding area is contaminated with
toner, we recommend you use cloth or tissue dampened with
water to clean it. If you use a vacuum cleaner, toner blows in the
air and might be harmful to you.
Cleaning the outside
Clean the machine cabinet with a soft, lint-free cloth. Dampen the cloth
slightly with water, but be careful not to let any water drip onto or into the
machine.
Cleaning the inside
During the printing process, paper, toner, and dust particles can accumulate
inside the machine. This buildup can cause print quality problems, such as
toner specks or smearing. Cleaning the inside of the machine clears and
reduces these problems.
Downloaded From ManualsPrinter.com Manuals


