background image

© SAMSUNG Electronics Co., Ltd.

Page 69

BASIC FEATURES

Speed-Dial

You may assign any frequently used numbers to a personal speed dial number list for your station. These
personal speed dial numbers are in addition to the system Speed dial numbers available. Speed dial numbers
can be allocated to buttons which allow you to press the one touch speed dial button to call the number.

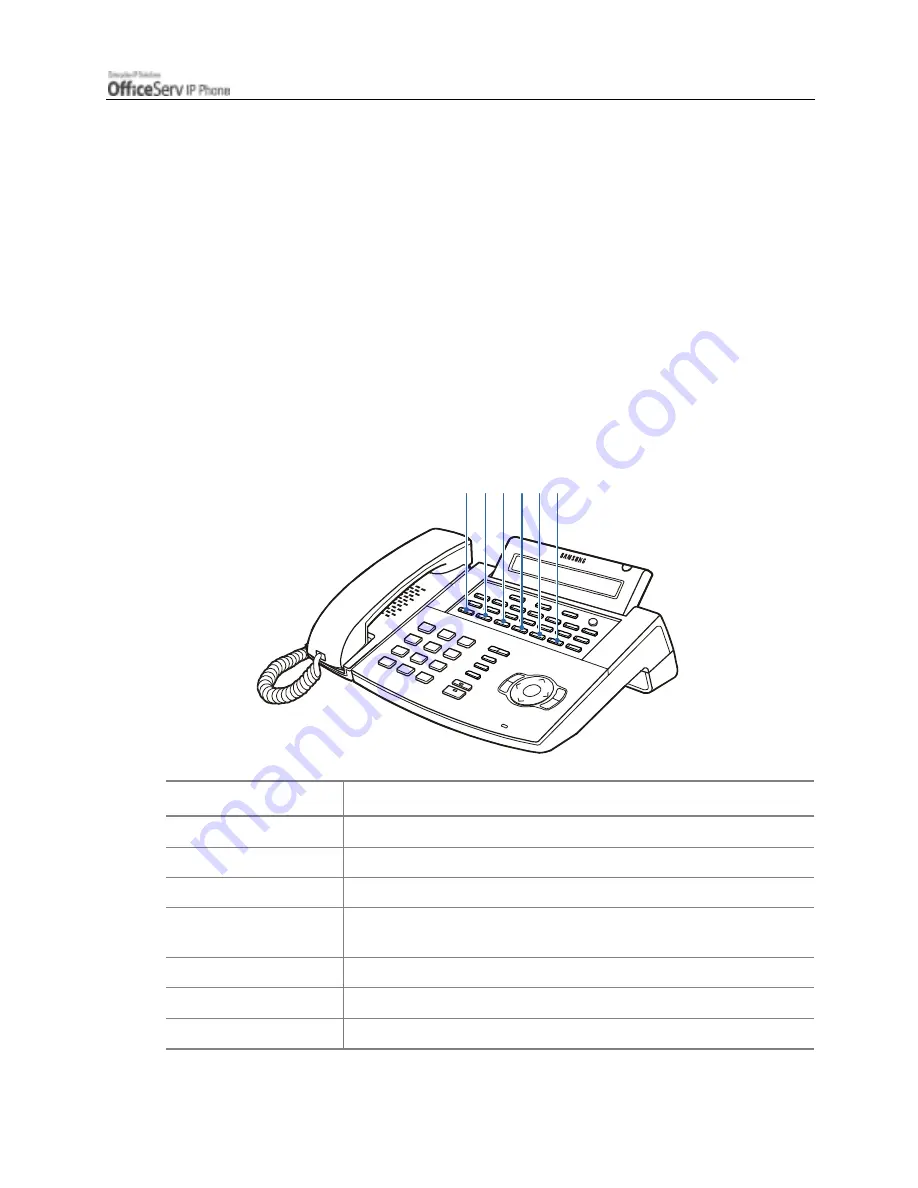
Explanation of Special Feature Buttons

When programming speed dial numbers, the special feature buttons are used and they are

designated as A, B, C, D, E, and F buttons. Each special feature button is explained in the

following table.

A, B, C, D, E, and F buttons of the ITP-5021D/5014D IP phone are the first 6 buttons in the

last row of the programmable buttons located below the LCD screen.

For example, the ITP-5021D IP phone is shown below.

Button

Features

A Button

Not used.

B Button

To insert a FLASH(time loop break).

C Button

To insert a PAUSE.

D Button

To convert from the pulse dialling(mechanical method) to the tone dialling

(Electronic method).

E Button

Used to hide the numbers from showing up on the LCD screen.

F Button

Used to input a speed dial name.

Hold Button

To clear a speed dial number.

A B C D E F

Содержание OFFICESERV ITP-5021D

Страница 1: ......

Страница 2: ...elephone connected to the OfficeServ system A trunk line is directly connected to your phone company s telephone network It allows you to make telephone calls to parties outside your office for exampl...

Страница 3: ...such as CALL OTHER and ANS in a row If the Scroll button is pressed again another menu appears Three Soft buttons are located underneath the LCD screen Among three Soft buttons the one on the left is...

Страница 4: ...tton Function Dial Button Function 0 Trunk access group number 55 0 Page internal zone 0 10 xxx Answer parked calls 55 1 Page internal zone 1 11 Set calls on hold or clear on hold 55 2 Page internal z...

Страница 5: ...rd Busy No Ans 49 Flash 66 Group call pickup 500 529 Station group 67 Night ring answer 53 grp 0 Exclude group 681 Voice Dialler 53 grp 1 Include group 682 Record Voice Dialler 54 zone Transfer page 7...

Страница 6: ...on Button Description Extenders BOSS Director Secretary 1 4 DP Direct Call Pick up Station or station group number DS Direct Station Required station numbers FWRD Call Forwarding 0 FWD Cancel 1 FWD Al...

Страница 7: ...der by using the Volume button to scroll through programmable buttons and then press the right Soft button or press the programmable button to add an extender 4 When the cursor comes to the input area...

Страница 8: ...al characters Special Button Used To enter letters of the alphabet the following special button is used Button A Switch to capital small letters when entering characters The A button of the ITP 5021D...

Страница 9: ...etters as the previous letter used Procedures for entering characters are described below Enter the characters according to the table below Press button A to switch between capital and lower case lett...

Страница 10: ...is 1234 You can change the station passcode if needed 1 Press the Transfer button 2 Press 1 0 1 3 Enter the previous passcode 4 Enter the new passcode The passcode must be a 4 digit number 5 Re enter...

Страница 11: ...d for 0 ANS MODE the answer mode when answering intercom calls 1 EXEC ANS the answer mode when answering calls using the executive secretary hot line You must be a designated Boss or Secretary for thi...

Страница 12: ...e Speaker button or Send button to answer before the no an answer timer expires Otherwise the call will be forwarded Using the Headset Handset Headset Operation The IPT 5021D 5014D IP Phone user can s...

Страница 13: ...de and the LED will light up Press this button again to return the IP Phone back to handset mode and the LED button goes off Enabling Disabling the Key Confirmation Tone You can enable or disable a sh...

Страница 14: ...allows you to make a call or activate the other functions of the OfficeServ system by pressing the dial buttons or function keys directly without picking up the handset or pressing the Speaker button...

Страница 15: ...djustment The Volume button is used for adjusting the volume of the handset speaker and ringer Adjusting Handset Volume 1 During a call using the handset 2 Press the Volume button to increase the hand...

Страница 16: ...aker button 2 Press the Volume button to increase the speaker volume 3 Press the Volume button to decrease the speaker volume Adjusting Ring Volume 1 To increase the ring volume press the Volume butto...

Страница 17: ...rval Dial tone A steady tone that indicates you can begin dialling Ring back tone Indicates the station you dialled is ringing Busy tone Indicates the station you dialled is busy Transfer tone Indicat...

Страница 18: ...tatus indicator turns on or off according to the telephone status Functions Status of LCD Indicators Busy Off hook Steady red Extension Ring Flashing red Trunk Ring Flashing green Recalling Flashing y...

Страница 19: ...ll flash green The trunk button LED will flash red on other IP Phones with the same trunk button While holding a call the green LED of the trunk line will blink In the following table the functions of...

Страница 20: ...one has changed or if the system has initialized you must set the network environment and upgrades through the environment setup menu 1 Connect the power adaptor while pressing the Menu button 2 The e...

Страница 21: ...ailed below 1 Information 1 Version 2 Network 3 Load Option 4 MAC address 2 Network 1 Mode 2 IP 3 Netmask 4 Gateway Items 2 to 4 are only displayed when setting Manual IP 3 Load Upgrade 1 Load Option...

Страница 22: ...two rows of information Use the direction buttons and move to the previous next screen to view other menus Entering Numbers Characters and Full Stop Enter a number or character using the dial buttons...

Страница 23: ...P to let the system automatically set the IP address Using the DHCP option the IP Address Subnet Mask and Gateway values are automatically set and are not displayed on the LCD screen 4 Upon selecting...

Страница 24: ...new IP address and press the Enter button Be careful not to enter a duplicate IP address since the network does not support redundant IP addresses 7 Select 3 Netmask to display the current Netmask ad...

Страница 25: ...is to be downloaded from Select 1 File System to operate programs saved in the IP phone s flash memory Select 2 TFTP down run to download programs saved in a designated TFTP server to the RAM memory...

Страница 26: ...tton The IP phone is rebooted after downloading the Bootrom program and the Environment Setup Main Menu appears The Menu button does not need to be pressed 6 The 4 Format menu is used to delete previo...

Страница 27: ...displayed If the OfficeServ system is set to request the ID and password of the IP phone 2 ID and 3 Password shall be entered 3 The 1 Server IP menu is used for verifying or changing the IP address of...

Страница 28: ...ter verification 1 Use the button to move to the 1 Information menu and press the Enter button 2 The sub menus are displayed Select each menu and verify the settings Especially the 2 Network menu must...

Страница 29: ...n and reboot your IP phone 1 Return to the main menu of the environment setup and select the 6 Exit menu 2 The settings are saved and the IP phone is rebooted You should consult your System Administra...

Страница 30: ...s Using a handset This function allows you to lift the handset and make a call Using a speakerphone This function allows you to make a call through the speakerphone without lifting the handset Call An...

Страница 31: ...n assign a name of up to 11 letters to your extension This allows other extension users with display stations to call you using the directory dial feature and to see your name when you call them 1 Pre...

Страница 32: ...il the other party answers the call If a short signal tone not a ringing tone is heard the receiving extension has set up the Voice Announce or Automatic Answer function 3 Replace the handset or press...

Страница 33: ...finish the call replace the handset or press either the Speaker or End button Voice Page Announce Mode Intercom Calls Only When another station calls you a short signal tone will be heard followed by...

Страница 34: ...tation calls you a short signal tone will be heard and then the IP Phone automatically answers the call 1 The microphone and speaker are turned on and you can communicate hands free 2 For a private co...

Страница 35: ...on corresponding to CBK on the LCD panel 2 When you hear the confirmation signal replace the handset 3 When the reserved station becomes free your IP Phone rings The CALL BACK message will appear on t...

Страница 36: ...to the CAMP on the LCD screen 2 The called station will receive off hook ring tone repeated every few seconds and an available Call button will flash to indicate your call is waiting 3 Wait for the ca...

Страница 37: ...external number To make an external call with a handset follow the procedures below 1 Pick up the handset 2 Press the trunk or trunk group button or dial the trunk group access code e g 0 3 Dial the t...

Страница 38: ...he procedures below 1 Press the Speaker button 2 Press the trunk line or dial the trunk access code 3 Dial the telephone number 4 Finish the call by pressing the Speaker button If the LCR Least Cost R...

Страница 39: ...ccount code before making a call press the ACCT button or dial 4 7 plus a valid code press the ACCT button again and then select a trunk line Ask your System Administrator for more information on auth...

Страница 40: ...button corresponding to NEW on the LCD screen Busy Line Queuing With Callback If there are no available trunk lines you will hear busy tone when you try to make an external call you can set a callback...

Страница 41: ...d if not answered within 30 seconds If you have set a callback your CBK button s LED if programmed will light Cancelling Callback A maximum of 5 callbacks can be set for extensions or external calls l...

Страница 42: ...e direction buttons or the Volume button to select the required number to redial and press the Soft button corresponding to Dial 3 To review details about the previous call prior to dialling it press...

Страница 43: ...press the SAVE button before hanging up This saved number can be redialled at any time by pressing the SNR button or dialling 1 7 The same external trunk line will be selected for you The saved telep...

Страница 44: ...RY button or press the Soft button corresponding to RETRY on the LCD screen 2 The system will reserve the line and automatically redial the same number for you You will hear the call progress tones th...

Страница 45: ...K on the LCD screen 2 Dial the orbit number required 0 9 the PARK button will flash Or press a dedicated PARK button the PARK button will also flash To have the call parked picked up by another statio...

Страница 46: ...lable are system hold general hold automatic hold exclusive hold and consultation hold System Hold 1 While you are engaged in a conversation press the Hold button 2 The call on hold will flash green o...

Страница 47: ...an set Automatic hold on your IP phone by following the procedure below 1 Press the Transfer button 2 Dial 1 1 0 3 To use this function dial 0 0 1 and if this function is not required dial 0 0 0 4 Pre...

Страница 48: ...t other users cannot get it 1 Press the Hold button twice 2 The call will flash green on your IP Phone and this line will show a steady red light on other stations 3 To retrieve the call on hold press...

Страница 49: ...ess the Transfer button you will hear transfer dial tone Your outside call is placed on Transfer hold 2 Dial the extension number 3 Consult with the internal party 4 Press the Transfer button to retur...

Страница 50: ...to the system operator depending upon your OfficeServ system programming 2 When your IP Phone rings lift the handset or press the Send button to answer the recall Retrieving Calls Held at Another Sta...

Страница 51: ...that is ringing at another station Station Call Pickup If a call rings on another station and you know the station number you can answer the call on your IP phone 1 A call is ringing on another statio...

Страница 52: ...roup 2 Pick up the handset and check for dial tone 3 Dial 6 6 4 Or press the flashing GROUP PICKUP button or press GROUP PICKUP button followed by the related group number A group number extender can...

Страница 53: ...DIR button or press the Soft button related to DIR in the CALL menu 2 Select the directory you wish to use PERS Personal Speed Dial Number SYS System Speed Dial Number or STN Station Name 3 Press the...

Страница 54: ...n or group number Or press the DSS button or station group button Your call will be automatically put on transfer hold 3 For blind transfer hang up when you hear ringing Or wait for the called party t...

Страница 55: ...er the internal party answers you may alternate back and forth between the parties by pressing the Transfer button You cannot transfer an Intercom call by pressing the DSS button for the station requi...

Страница 56: ...to send a call directly to a voice mailbox Your IP Phone must have a correctly programmed VT button to accomplish this 1 Press the VT button while you are on a call Or press the Soft button correspon...

Страница 57: ...1 Press the flashing button to answer the waiting call If your IP Phonee has the Automatic Hold feature set your current call will go on hold automatically 2 If Automatic Hold is not set press the Ho...

Страница 58: ...and they are designated as A B C D E and F buttons Each special feature button is explained in the following table A B C D E and F buttons of the ITP 5021D 5014D IP phone are the first 6 buttons in t...

Страница 59: ...er button and dial 1 0 5 without lifting the handset 2 Select a free speed dial number location 00 49 3 Dial either a specific trunk line number or the trunk access code 4 Dial the telephone number to...

Страница 60: ...on or dial 1 6 without lifting the handset 2 Dial the speed dial location number that is programmed with the telephone number you wish to call 3 The telephone number is automatically dialled for you A...

Страница 61: ...the telephone number using the directory feature 1 Press the Transfer button 2 Dial 1 0 6 3 Press the speed dial number location to be assigned with a name 00 49 4 Enter a name Refer to the Things Yo...

Страница 62: ...speed dial use 1 Without lifting up the handset press the Transfer button 2 Dial 1 0 7 3 Locate a vacant SPD button using the Volume button and press the right Soft button 4 Dial the speed dial number...

Страница 63: ...ourself The OfficeServ system also allows each station to pre assign up to 5 conference groups so you can set up a conference call by pressing a single Group Conference programmable button Refer to yo...

Страница 64: ...extension or trunk number that is to be dropped Press the Conference button again to re establish the conference When attempting to add another person to the conference and you are not able to reach...

Страница 65: ...e name 5 Using the Volume button to select MBR1 4 and press the right Soft button 6 Dial the extension number or outside telephone number remembering to dial the trunk access code first and press the...

Страница 66: ...hook or select DND from the LCD screen using the Scroll button and Other Soft button 2 The status indicator and or DND button LED flashes to inform you that the Do Not Disturb mode is set When the IP...

Страница 67: ...indicator is flashing 2 Press the DND button or dial 4 0 0 3 The status indicator goes off One Time DND If you do not wish to be disturbed while you are on a call press the DND button and set the sta...

Страница 68: ...n verify or change the Call Forward settings and the number specified for forwarding from the LCD screen of your IP phone Enabling Call Forwarding can also be achieved using the dial buttons or the Fo...

Страница 69: ...xternal number remembering to insert the trunk access code prior to the external number 6 Press the right Soft button to move the cursor 7 Dial 1 to enable call forwarding to the destination or press...

Страница 70: ...r various types of forwarding calls are described in detail next If your IP phone has the FWD ALL FWD BUSY and FWD NO ANSWER FWD BUSY NO ANSWER buttons you can forward calls by pressing one of these b...

Страница 71: ...de prior to entering the external number 3 Hang up after the confirmation tone is received The station receiving a forwarded call can transfer the call back to the forwarding station This feature is v...

Страница 72: ...call incoming calls can be forwarded to another station station group or an external number 1 Dial 6 0 2 2 Dial the station number group number or external number Remember to insert the trunk access c...

Страница 73: ...r Calls can be forwarded when you are not available to answer the call 1 Dial 6 0 3 2 Dial the station number group number or external number Remember to insert the trunk access code prior to entering...

Страница 74: ...FWD NOANS destinations are both set you may enable both these options simultaneously When you are busy calls will be transferred to the number specified in Forward Busy destination If you do not answ...

Страница 75: ...s you need to set Do Not Disturb 1 Dial 6 0 5 2 Dial the station number group number or external number Remember to insert the trunk access code prior to entering the external number 3 Hang up after t...

Страница 76: ...In addition you can arrange for calls to another station to be forwarded to your IP phone Remote Forwarding To forward all calls to your IP phone to the station you are currently using 1 Dial 6 0 6 at...

Страница 77: ...d CONVENIENT FEATURES To forward calls from a specific station to your IP phone Remote Forwarding 1 Dial 6 0 6 enter the station to follow from is displayed 2 Dial the station number 3 Hang up after t...

Страница 78: ...s one of your programmable buttons making it unnecessary to press the PAGE button followed by the zone number Internal Page You can make a page announcement through the station speakers There are 5 in...

Страница 79: ...re are 4 external zones 5 8 and 9 for all external zones 1 Pick up the handset and check for dial tone 2 Press the PAGE button or 5 5 or select PAGE from the LCD screen by using the Scroll button and...

Страница 80: ...all external zones and internal page zone 0 simultaneously 1 Pick up the handset and check the dial tone 2 Press the PAGE button or 5 5 or select PAGE from the LCD screen by using the Scroll button an...

Страница 81: ...eet Me Page MMPG 1 Pick up the handset and check for dial tone 2 Press the MMPG button or 5 4 or select MMPG from the LCD screen using the Scroll button and Soft buttons 3 Dial the required zone numbe...

Страница 82: ...d Page 93 CONVENIENT FEATURES 5 Press the WAIT or Transfer button 6 Hold the handset until the other party enters the page answer code 5 6 7 The call is automatically connected when the other party en...

Страница 83: ...factory or in a large office when the called person is away from their workstation Call Park and Page 1 Press the PAGE button while connected to the call and the call is automatically on hold You can...

Страница 84: ...r You can also enter the announced number after selecting PARK from the LCD screen 2 You will be connected to the Parked call If the parked call is not retrieved within the pre programmed time the par...

Страница 85: ...ejoining a Page With this option you can listen to the latter part of a page announcement after finishing a call 1 Press the Transfer button or 1 1 0 2 Dial 0 5 1 to enable this option and 0 5 0 to di...

Страница 86: ...the station required is busy 1 Press the Message button or dial 4 3 2 Hang up after hearing confirmation tone 3 The Message button of the receiving station will flash IP phones without the Message bu...

Страница 87: ...ssages you have left on other stations or messages left at your station 1 Dial 4 2 and enter the station number where you left your message 2 To cancel all numbers left at your station dial 4 2 and en...

Страница 88: ...ally 2 The LED on your Message button and status indicator will remain flashing until the station responds Repeat the above steps to respond to all station messages received 3 The LED on your Message...

Страница 89: ...ng them 1 Press the flashing Message button The first station that left its number is displayed on the screen 2 Press the Volume button to scroll through the messages 3 Use the Soft buttons to return...

Страница 90: ...en you are away from your IP phone The caller will see the message on their LCD when they call you and know that you are not available 15 system wide messages are available 01 15 and 5 personal messag...

Страница 91: ...15 Programmable Messages Your personal Programmed Messages using the following procedure 1 Press the Transfer button when your IP phone is in the idle condition 2 Dial 1 1 5 3 Select the Programmed Me...

Страница 92: ...et as a one time alarm or a daily alarm Three short rings will repeat three times Lift the handset to answer the alarm If you do not answer the alarm will ring two more times at 5 minute intervals 1 P...

Страница 93: ...0 Not Set 1 Today or 2 Daily 6 Press the Transfer button to save settings Repeat the above steps to set other alarms as needed Alarm Cancel Procedure for cancelling all previously registered alarms is...

Страница 94: ...d button You can view the alarm message on the LCD screen Refer to the next paragraph Alarm Message for details Alarm Message You can make a 16 character message to be associated with an alarm 1 Press...

Страница 95: ...s based on a 24 hour clock 5 Select the type of alarm between 0 Not Set 1 Today or 2 Daily 6 Enter the message using the dial buttons Refer to Things You Should Know of this guide for procedures on en...

Страница 96: ...creen of your IP phone Cancelling alarms can also be achieved using the dial buttons 1 Press the Transfer button 2 Dial 1 1 2 3 Dial the alarm number 1 2 or 3 4 Press the right Soft button twice 5 Pre...

Страница 97: ...rom the Door Phone or open the door if an optional electric door lock is installed 1 When a call from the Door Phone arrives you will receive three short bursts of ring repeated 2 Lift the handset or...

Страница 98: ...r You can call the Door Phone and listen to what is happening outside or in another room 1 Dial the station number of the Door Phone 2 You can listen or have a conversation when you are connected to t...

Страница 99: ...n or by selecting BOSS from the LCD screen using the Soft buttons 2 If DND is set on the executive station or it is busy all calls will be forwarded to the secretary station When the secretary station...

Страница 100: ...screen using the Soft button The microphone of the IP phone is not active and the other party cannot hear sounds via that source 2 Press the LISTEN button again or select listen from the LCD screen us...

Страница 101: ...r an Account Code 1 Press the ACCT button or select ACCT using the Soft button during an external trunk call 2 Dial the account code Maximum 12 characters including 3 Press the ACCT button again or se...

Страница 102: ...using your phone while you are away You can unlock the IP phone when you return 1 Press the Transfer button 2 Dial 1 0 0 3 Dial your 4 digit station passcode 4 Dial 2 to lock all calls to and from yo...

Страница 103: ...he OHVA feature can be used for intercom and transferred calls OHVA Follow the below procedure to make an off hook voice announcement 1 Dial the extension number or the DSS button 2 If you hear the bu...

Страница 104: ...nnouncing party 2 Press the related CALL button to return to the original party This disconnects the OHVA call OHVA Block You can block Off Hook Voice Announce button on your IP phone OHVA calls will...

Страница 105: ...r OUT soft button If the handset is active in the group a red light will light on the IN OUT button 2 Press the IN OUT button again to remove the IP phone from the group The red light goes off Repeat...

Страница 106: ...Phone s microphone depending on which is in use Thus the other party cannot hear what you are saying 1 Press the MUTE button or select MUTE from the LCD screen using the Soft button The LED of the Mut...

Страница 107: ...can listen to music through the IP phone s speaker if a music source is provided 1 To listen to the music press the Hold button while on hook 2 Press the Hold button again to cancel 3 Use the Volume b...

Страница 108: ...ime or when the other party answers an outgoing call The call duration time is displayed in minutes and seconds and is reset when the call lasts longer than 100 minutes Selecting TIMER from the LCD sc...

Страница 109: ...timer that starts automatically after a short period of time for forwarded and outgoing calls This can be enabled or disabled as follows 1 While on hook press the Transfer button 2 Dial 1 1 0 3 Dial 0...

Страница 110: ...Press the TIMER button or select TIMER from the Other menu on the LCD screen using the Scroll button and Soft button when the IP phone is in idle mode 2 Press the TIMER button again to stop the timer...

Страница 111: ...the order that they arrive at your IP phone If the ring preference option is off you must answer calls by pressing the flashing button In this case you may answer the calls without regard to the orde...

Страница 112: ...n The main menu is displayed when the Menu button is pressed in the idle state You can select from the presented options This menu is displayed when the Menu button is pressed when dialling mode or wh...

Страница 113: ...hone End Button This button is used to disconnect calls or to exit the IP Phone menus and return to the idle display Cancel button The Cancel button is used in menu mode to move to the previous level...

Страница 114: ...ous menu 2 2 2 2 button is used In cases where the phone number is long this button is used for displaying the rear part of the number which is not displayed on the LCD screen 3 3 3 3 button is used U...

Страница 115: ...lume button and move to the preferred menu You can select the menu directly by pressing the dial button corresponding to the menu number Press the Enter button to select the menu underlined by the cur...

Страница 116: ...s required 1 Press the Menu button to display the main menu screen 2 Dial 1 to select 1 OUT CALL LOG or select and press the Enter button 3 The list of recently called numbers is displayed You can rev...

Страница 117: ...s required 1 Press the Menu button to display the main menu screen 2 Dial 2 to select 2 IN CALL LOG or select and press the Enter button 3 The list of recently received numbers is displayed You can re...

Страница 118: ...and names 1 Press the Menu button to display the main menu screen 2 Dial 3 to select 3 SPD NO SEARCH 3 Dial 1 to select 1 PERSON SPD NO or dial 2 to select 2 SYSTEM SPD NO 4 The saved speed dial numbe...

Страница 119: ...ial 3 to select 3 STATION NO or select by using the Volume button and press the Enter button 4 Use the dial buttons to enter the first letter of the name you intend to review and press the Enter butto...

Страница 120: ...ect and press the Enter button 3 Select the type of forward you wish to set a destination for using the direction buttons or the Volume button and press the Enter button Or select using the dial butto...

Страница 121: ...D TYPE The current forward setting is displayed 6 Select the required forward type to be set by using the direction button the Volume button and press the Enter button or by pressing the dial button c...

Страница 122: ...ton to display the main menu screen 2 Dial 6 to select 6 ALARM REMINDER The submenu below is displayed 3 Use the direction button or the Volume button and press the Enter button or select the dial but...

Страница 123: ...he set time when selected 2 DAILY an alarm rings every day at the set time when selected The selected alarm type is saved and you move to the upper menu displaying the submenu shown below 6 To select...

Страница 124: ...ssembling the ITP 5021D 5014D IP phone section of Preparation in this guide The phone does function after booting If the screen of the phone displays IP conflict you should consult your IT Manager Thi...

Страница 125: ...u are using the speakerphone lift the handset and try speaking Excessive echo is emitted during a page announcement or with Auto Answer set If IP phones are too close to each other sound from one spea...

Страница 126: ...y does not send a caller ID the caller ID will not be displayed An alarm does not ring at the programmed time Check the current time is set on the ITP 5021D 5014D Phone correctly If the current time s...

Страница 127: ...ws Item Specification Model ITP 5021D ITP 5014D Weight kg 1 1 1 1 Size mm 266 width X 206 length X 119 height Operating Temperature C 0 to 45 Operating Humidity 10 to 90 non condensing Ethernet 10 100...

Отзывы: