background image

Version 1.1 


November 2014 


Page | 55   


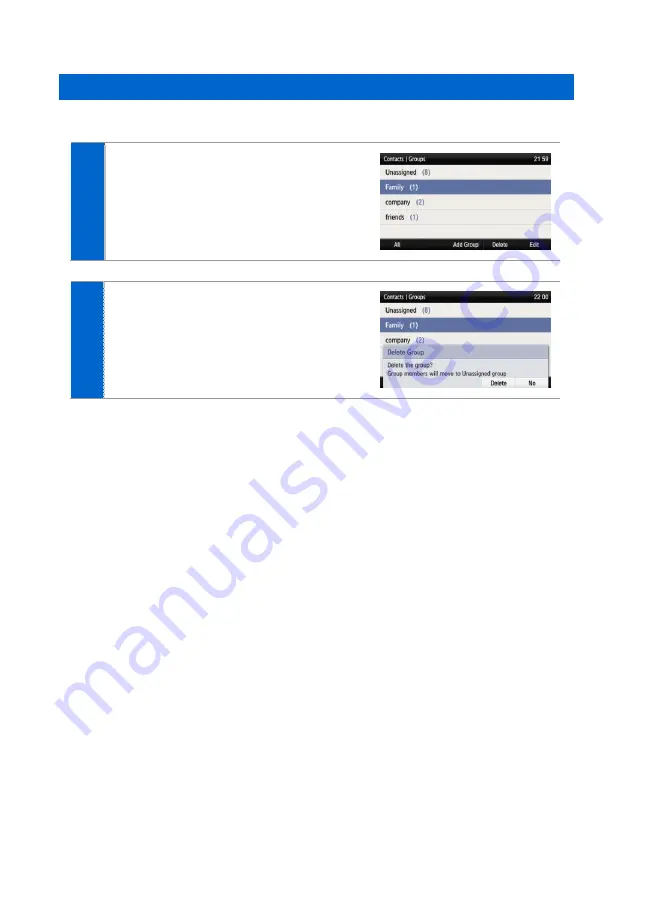
Deleting Groups 

You can delete existing groups. 


Go to 

[Menu]


[Contacts]


[Groups]


, select a group to delete, and press the 

[Delete Group]

 soft button. 


Press the 

[Delete]

 soft button to delete the 

group. 

- The members of the deleted group are moved 

to the Unassigned group. 


Содержание OfficeServ 7000's

Страница 1: ...Version 1 1 November 2014 SMT i5343 and SDM Guide_______________ For OfficeServ 7000 s system Supports phone software version V1 21 and SDM software version V1 21 ...

Страница 2: ...ormation SAMSUNG TELECOMMUNICATIONS AMERICA reserves the right without prior notice to revise information in this publication for any reason SAMSUNG TELECOMMUNICATIONS AMERICA also reserves the right without prior notice to make changes in design or components of equipment as engineering and manufacturing may warrant Copyright 2014 Samsung Telecommunications America All rights reserved No part of ...

Страница 3: ...ow in order to avoid personal injury or fatality Caution Provides information or instructions that you should follow in order to avoid a service failure or damage to your phone Note Indicates additional information for referrence Checks Provides the operator with checkpoints for stable system operation Symbols Caution Indication of a general caution Restriction Indication for prohibiting an action...

Страница 4: ... or moisture remains on the product even after wiping contact the service center When the product is not in use for a long time leave the power plug disconnected from the outlet If an abnormal sound smell or smoke is emitted from the product pull out the power plug immediately and then contact the service center Installation Maintenance Do not place the product in a location with a lot of dust in ...

Страница 5: ...objects on top of the product Do not attempt to disassemble repair or rebuild the product yourself Do not drop the product or apply impact on the product This may damage the screen or exterior and the internal parts Use a soft and dry cloth when cleaning the product Do not spray water directly onto the product and do not use chemicals such as wax benzene alcohol thinner mosquito killer perfume spr...

Страница 6: ...ion to Back Ports 9 Assembling the Wall Mount Bracket 11 Detachment from the Wall Mount Bracket 12 THINGS YOU SHOULD NOW 13 Key Functions 13 Part Names and Functions 15 Front 15 Name and Function 16 Phone Information Display 19 Phone Status Indicator 19 LED Indicator 19 Phone Status Icons 20 Call Status Information 21 Supplementary Functions Menu 22 Usage of Supplementary Functions Menu 22 ...

Страница 7: ... Speaker Phone 33 Quick Search Function 34 Dialing the Last Called Number 34 Answering Calls 36 Receiving a Call via the Handset 36 Receiving a Call via Speaker Phone 36 Video Call 37 Call Mode Setup 37 Making a Video Call 37 Receiving a Video Call 38 Functions Available during Call 39 Call Hold 39 MUTE 40 Call Transfer 41 Conference Function 42 Call Record 42 During Video Calls 43 Volume Control ...

Страница 8: ...stem Options 64 Call 64 Absent Message Settings 64 Station On Off 65 Extension Login 65 Call Forward 66 Program Keys 67 Settings 69 Sound 69 Screen 70 Alarm 74 Presence 75 Password and Lock 78 Bluetooth Headset 79 Deskphone Manager Information 82 Video Call 83 Network Information 83 Phone Information 83 Clear User Data 84 Phone Restart 84 Administrator Mode 84 ...

Страница 9: ...ATION SERVICE 87 Smartphone Interoperation SDM 87 Supported Smart Phones and Tablets 87 System Configuration Diagram 87 Key Functions 88 Registration Methods 88 Deregistration 99 Dashboard 100 Contacts 101 Call Log 111 Program Keys 113 Settings 116 TROUBLESHOOTING 119 ANNEX 122 Product Specifications 122 ...

Страница 10: ... package box includes all the components Phone black model Handset Phone Cradle LAN Cable Quick Guide Camera optional Adapter optional Wall Mount Bracket optional If any components are damaged or missing contact the retailer The camera and power adapter are options If necessary contact the retailer ...

Страница 11: ... to Back Ports 1 If a headset is used connect it to the headset port 2 Connect a handset to the handset port of the phone 3 Connect one end of the PC connection LAN cable provided to the PC connection port of the phone Connect the other end to the PC network port ...

Страница 12: ...5 If PoE is not supported connect the power adapter to the power connection port When the plug of the power adapter is connected to the outlet the phone is booted up The power adapter must be purchased separately When using the power cable pass it through the center hole of phone cradle 6 To make a video call connect a camera to the camera connection port 7 To use a USB connect a USB to the USB co...

Страница 13: ...u want to install the phone and then determine the required positions of the screws by placing the phone at the target location on the wall 2 Remove the desk cradle of the phone 3 Insert the wall mount bracket as shown in the figure 4 Pull off the handset rack and then insert it in the opposite direction as shown in the figure Only the vertical direction changes The forward or back facing directio...

Страница 14: ... phone from the wall mount bracket 1 You can detach the phone from the bracket by pressing the Push section at the bottom of the bracket Detach the phone more easily by pulling the entire bottom of the bracket instead of only the Push section 2 Remove the handset hook and insert it again by changing its direction ...

Страница 15: ...SMT i5343 phone displays various functions on the LCD screen You can enjoy the functions easily using the navigation button OK button or the soft buttons on the right and bottom of the screen Program Keys You can assign a frequently used function to each button For details about how to set up the functions contact the administrator supported on select systems only Bluetooth Headset A user can talk...

Страница 16: ...ction Conference You can speak to more than one person in a conference call by pressing the Conference button Call Forwarding A call can be forwarded to another number when calls cannot be received DND If this function is selected the phone does not ring even when a call is made to the phone USB Charging With a phone to which a power adapter is connected you can use the USB charging function to ch...

Страница 17: ...Version 1 1 November 2014 Page 15 Part Names and Functions Front Black Model The color or image of the product in this manual may be different from the actual ones ...

Страница 18: ... while receiving an incoming call Back Button This button moves to a previous item Menu Button This button displays menu items Headset Button This button is used to talk using a headset Volume Button This button is used to control the volume of the handset speaker key tone etc Mute Button This button prevents the user s voice from being relayed to the other party during a call when activated Speak...

Страница 19: ...is used to call the previous number LCD Screen The configuration of the LCD screen is as follows At the top of the screen the icons representing phone function settings are displayed On the main screen selectable menus the call processing status or various messages are displayed Soft menus are displayed at the bottom depending on each status Left Program Keys These buttons are used to select desir...

Страница 20: ...Function Navigation Direction Keys These buttons are used to edit the content on the screen or navigate between menu items OK This button is used to select or save the item where a cursor is placed in a menu mode This button is used to check the caller information received from an outbound line while receiving a call Direction key OK button ...

Страница 21: ... of the following buttons are on or off depending on the status Button LED LED Status Description Speaker Red indicator light turns on The speaker phone feature is enabled Mute Red indicator light turns on The microphone is muted and the user s voice cannot be heard by the other party Headset Red indicator light turns on The headset is used for the call Program Keys Blinks fast in red 0 3 sec When...

Страница 22: ...Type of headset in use general ear jack EHS Bluetooth Bluetooth headset connected not connected Bluetooth smartphone connected not connected Smartphone connection status AOM connection status Galaxy Tab 10 1 PC client connection status Communication setup status when a USB camera is connected video audio video disabled Using Wi Fi hotspot May not be supported in some countries Locked ...

Страница 23: ... describes the icons displayed depending on the phone communication service setup status and communication status Animation Image Description General registered Auto Answer DND Call Forwarding Not Registered Outgoing call Incoming call In a call In a private call On hold ...

Страница 24: ...gh interworking with the system and displayed as a menu on the right side of a screen The supplementary functions menu varies depending on the system version Usage of Supplementary Functions Menu While pressing the Function soft button at the bottom of screen press the right selection button of the menu you want to use Supplementary Functions Menu of Waiting Screen Supplementary Functions Menu of ...

Страница 25: ... dial button on a text input screen the input mode is changed The input mode status is displayed as an icon in the status area of the top right corner of the LCD 2 Korean characters the English alphabet and numbers can be input using the dial buttons Inputting special characters Press the button to select the special character input mode and select characters using the navigation button to input o...

Страница 26: ... The phone is registered by using the information from the server PnP Plug Play The phone is automatically registered if the environment supports PnP To use the PnP function the system administrator must configure the environment for PnP in advance Contact the administrator to check whether the environment supports PnP 1 When the power is connected during initialization status the Easy Install sof...

Страница 27: ...e account information and then select a system type PNP If available select PNP 4 Enter the network information When the setup method is Wired Select one from DHCP Static PPPoE Make sure to contact the system administrator because the network connection may fail if incorrect information is entered When the setup method is Wireless When Wi Fi is selected nearby APs are automatically located Wi Fi f...

Страница 28: ...on is entered 6 Enter the 802 1x information and press the soft button Make sure to contact the system administrator because the network connection may fail if incorrect information is entered 7 After configuring LLDP complete easy installation by pressing the Done soft button to restart the phone To modify already entered information select No and press the soft button ...

Страница 29: ... Main Screen Type 2 When you select a main screen type other than Line Program Key Program Key you can select a background screen option When you select Wallpaper the image selected in Menu Settings Screen Background Image is set to the background screen of the selected type When you select Widget a default background screen for each main screen type is used ...

Страница 30: ...tact the system administrator Retrieving Program Keys 1 If you select Line Program Key Program Key in Menu Settings Screen Main Screen Type you can retrieve the configured program keys in the main screen 2 Press the Program Key button to retrieve Adding Program Keys 1 Click the Program Keys button 2 Select an empty button to which you want to add a function by using the left right program key If a...

Страница 31: ...ter entering the name and value press the Save button Editing Deleting Program Keys 1 Press the left right program key button of a button to edit 2 After editing in the program key setup screen press the Save button To delete a program key function press the Delete button ...

Страница 32: ...re shown with numbers indicating their respective counts Press the button on the left of a phone number to view the numbers of missed calls messages and voice messages Use the right button to check the details of each type 2 Press the button on the left of a phone number to view the numbers of missed calls messages and voice messages Use the arrow keys to select an item and press the OK key or use...

Страница 33: ...is the telephone line where the user can make or receive a call to from outside e g home which is directly connected to the switching system of a central office Dialing an Extension Number 1 Pick up the handset check whether the dial tone is audible and then dial the extension number When you enter a phone number the call will be connected automatically 2 When you enter a phone number the call wil...

Страница 34: ...le 2 Press a key specified by the manufacturer to make a general call e g 9 and enter an external phone number 3 When you enter a phone number the call will be connected automatically 4 If the other party receives the call begin the conversation As the outbound call number may vary per system contact the system administrator ...

Страница 35: ...a phone number the call will be connected automatically 3 Start the conversation when the other party answers the call If the handset is picked up during the call the speaker is turned off and the conversation can be continued through the handset 4 When a call ends press the Speaker button again If you are using the handset put it down ...

Страница 36: ...rch Function is disabled 1 On the dial input screen enter a phone number to call Once you enter the phone number the search result is displayed at the bottom of screen 2 Move to the phone number of the person you want to call by using the navigation button Then press the Call soft button and a call is made to the selected number Dialing the Last Called Number 1 When you press the History soft butt...

Страница 37: ...Version 1 1 November 2014 Page 35 2 Move to the phone number of the person you want to call by using the navigation button Then press the Call soft button and a call is made to the selected number ...

Страница 38: ...gs 2 Converse with the other party 3 Hang up the handset when the call ends Receiving a Call via Speaker Phone 1 When the phone rings press the Speaker button 2 Converse with the other party If the handset is picked up during the call the speaker is turned off and the conversation can be continued through the handset 3 When a call ends press the Speaker button again ...

Страница 39: ...e the Call Mode button at the bottom of the standby screen to toggle between video call and voice call for call mode Video Mode white icon Outgoing calls will be made as video calls Your call will default to voice call if the other party s phone does not support video calls Voice Mode gray icon Outgoing calls will be made as voice calls If no camera is connected the icon is not shown Making a Vide...

Страница 40: ...Call By answering an incoming video call you can start a video call with the caller 1 When there is an incoming call check whether it is a video call by looking at the call mode icon Then pick up the handset or press the Speaker button to answer the call ...

Страница 41: ...old and then resume it when you are ready This feature may work differently on some systems For details about the operation of this function contact the system administrator 1 To hold the current call press the Hold button during the call 2 The call hold message appears If you are in speaker phone mode the standby screen will be shown Use the Resume Call button or Multipurpose Button of Program Ke...

Страница 42: ...nsion line but the user can still hear the voice of the other party 1 To mute your voice during a call press the Mute button The other party cannot hear your voice while the mute function is enabled When Mute is enabled the LED of the button is lit 2 When you press the Mute button again the function is disabled ...

Страница 43: ...e outbound call number first and then enter the phone number 3 When a ring back tone is heard from the other party put down the handset Alternatively wait until the other party receives the call and then hang up the phone after informing them about the call If the other party to whom you are attempting to transfer the call is busy or does not receive the call To return to the original call press t...

Страница 44: ... button and start the conversation You can add another party in the same manner during the conference call Contact the system administrator for information on the maximum number of conference participants allowed This feature may work differently on some systems Please contact the system administrator Call Record If the phone is setup correctly you can record your phone calls 1 During a call go to...

Страница 45: ...Off soft button to turn the video off Press Video On at the bottom of the screen to disable the video off function Press screen zoom in at the bottom of the screen to view the video in full screen Press screen zoom out to return to the default screen Video PIP ON OFF During a video call press the Function soft button and select PIP OFF hide your video from the screen When the PIP is off select Fun...

Страница 46: ...andset speaker or ringtone Volume Control of Handset 1 You can adjust the volume in the following way while in a call using the handset 2 Press the upper part of the Volume button to turn up the handset volume 3 Press the lower part of the Volume button to turn down the handset volume ...

Страница 47: ...ntrol of Speaker 1 You can adjust the volume of the speaker in the following way during a call 2 Press the upper part of the Volume button to turn up the speaker volume 3 Press the lower part of the Volume button to turn down the speaker volume ...

Страница 48: ... upper part of the Volume button while the ringtone is ringing to turn up the ringtone volume 2 Press the lower part of the Volume button while the ringtone is ringing to turn down the ringtone volume Pressing the Volume button in standby mode to adjust the key tone volume ...

Страница 49: ...on on the right side of screen or the soft button at the bottom of screen The features shown may work differently or may be unavailable depending on systems Button Submenu Function Contacts This function provides the save search and register functions of the phone s address book You can also search for users who are registered in the directory server History You can check the recent outgoing incom...

Страница 50: ...on Settings Sound You can select various ringtones and key tones and adjust the volume Screen You can set up the background screen 24 hour time main screen type and LCD power and adjust the LCD brightness Alarm You can set up alarms Presence You can set up presence status and actions for each status Password and Lock You can change the password and lock the phone so that other people cannot use yo...

Страница 51: ...Version 1 1 November 2014 Page 49 Button Submenu Function Phone Restart You can restart the phone ...

Страница 52: ...ings Administrator Mode You can enter the administrator menu Requires administrator password uReady Settings You can enable disable uReady Wi Fi 5G Only Settings You can enable disable the Wi Fi 5G only mode Wi Fi Hotspot You can set up the Wi Fi Hotspot function ...

Страница 53: ...s you can easily manage phone numbers email IDs fax numbers and photos etc stored on your phone In addition you can make calls quickly using the address book System Contacts You can search for users on the system The system contacts are shown only when supported by the system ...

Страница 54: ...ou can make a call to the selected phone number Searching Phone Numbers You can search for phone numbers saved in the contacts by names or numbers 1 Press the Menu Contacts Search soft button 2 Enter a name or phone number and press the OK button to view a list of the searched phone numbers You can search numbers by entering just a part of a name to search After selecting a name in the search list...

Страница 55: ...umber etc and press the Save soft button You can set up numbers office mobile phone home fax others e mail notes ringtone buddy ID and photo Editing Phone Numbers You can edit phone numbers registered in the contacts 1 Press the Menu Contacts Edit Mode soft button select a phone number to edit and press the Edit soft button 2 Enter the modified information and press the Save soft button ...

Страница 56: ... Contacts Edit Mode select a phone number to delete and press the Delete soft button 2 Press the Delete soft button to delete the phone number Add Group You can add new groups 1 Press the Menu Contacts Groups Add Group soft button 2 Enter a new group name and press the Save soft button You can set up the group name and ringtone ...

Страница 57: ...oups You can delete existing groups 1 Go to Menu Contacts Groups select a group to delete and press the Delete Group soft button 2 Press the Delete soft button to delete the group The members of the deleted group are moved to the Unassigned group ...

Страница 58: ...Inbox Outbox Missed and Message history All The recent incoming outgoing calls and messages are displayed Inbox The recent incoming calls and messages are displayed Outbox The recent outgoing calls and messages are displayed Missed Missed calls are displayed Message The recently received sent messages are displayed Use the navigation buttons to navigate to a phone number and press the OK button or...

Страница 59: ...ce Mail You can also exchange text messages with other users and save draft messages Voice Message You can save and check voice messages Select Menu Message Voice Message to access Voice Mail Check voice messages by following the instructions Some features may not be supported on some systems ...

Страница 60: ...der Load Press the soft button at the bottom to load a message from the Draft folder 3 After entering the sender s number and the recipient s number press the OK soft button and then press the Send button to send the message Search You can search for phone numbers in Contacts Each message may have up to 10 recipients The sender s line is associated to charging While the user can simply edit the se...

Страница 61: ...sages is displayed Delete You can delete a selected message Delete All You can delete all the messages 3 Select a message and press the OK button to view the entire message Forward Press the soft button at the bottom to forward the message to another person Reply You can send a reply to the other party Delete You can delete the message ...

Страница 62: ...l You can delete all the messages 3 Select a message and press the OK button to view the entire message Forward Press the soft button at the bottom to forward the message to another person Reply You can send a reply to the other party Delete You can delete the message The read receipts feature is available only on supported systems If this feature is not available contact the system administrator ...

Страница 63: ...Menu Message Draft 2 The list of draft messages is displayed 3 Select a message and press the OK button to view the entire message Forward Press the soft button at the bottom to forward the message to another person Edit You can edit the message Delete You can delete the message ...

Страница 64: ...ct Menu Browser Use the navigation buttons to navigate between the various items shown on the page Select an item and press the OK button to follow its link or run its command This menu is unavailable of no browser server is running To find out more about the server setup contact the server administrator Content of the browser service varies by the server For information about the service contact ...

Страница 65: ...November 2014 Page 63 Language Select Menu Language You can set up the phone language When you select a language the phone restarts in the selected language Languages supported may vary by phone version and system ...

Страница 66: ...Select Menu System Options Call This is used to set the optional functions related to calls You can change settings for CID display phone number dial mode answer mode extension line button AOM display headset mode etc Absent Message Settings 1 Select Menu System Options Absent Message Select a message to send to the other party who tries to call you when you are unavailable ...

Страница 67: ...lay Extension Login 1 Select Menu System Options Extension Login 2 When not using extension login press Use to deregister the phone and show the ID password input screen Enter the account information to use for extension login and press the Login button or the OK key to log in using the account information entered When using extension login press Do not use to register with the original account ag...

Страница 68: ...et calls to be forwarded to a specific number at all times when you are busy or when you do not answer the calls Available settings may vary by system 1 Select Menu Call Forward 2 Select a call forwarding option enter a phone number to transfer calls to and then press the Save soft button to save ...

Страница 69: ...stems For information about using the functions mapped to program keys consult the system administrator Adding Deleting Program Keys 1 Use the arrow keys to navigate to a desired button position and press the Add or OK button 2 Select a type and press the OK key to bring up the function selection window Search for a function or select a function and then press the OK key to complete the selection ...

Страница 70: ...nformation entered is not correct the program key cannot be registered Delete You can delete registered function buttons Editing Program Keys 1 After moving to a desired program key by using the navigation button press the OK or Edit button 2 You can modify the information of a selected program key ...

Страница 71: ...me Press the navigation buttons to adjust volume for handset receiver speaker ringtone key tone headset message notification and alarm respectively Ringtone Select Menu Settings Sound Ringtone You can set up a ringtone Key Tone Select Menu Settings Sound Key Tone You can set up a key tone Short Message Tone Select Menu Settings Sound Short Message Tone You can set up a message alert tone ...

Страница 72: ...round Image 1 Select Menu Settings Screen Background Image 2 Press the navigation buttons to select a background image and a time display method 3 You can display a digital clock an analog clock a world clock and a calendar on the standby screen using widgets 24 Hour Time Select Menu Settings Screen 24 Hour Time Dimming LCD 1 Select Menu Settings Screen LCD Power Settings Dim LCD 2 The screen dims...

Страница 73: ...Version 1 1 November 2014 Page 71 ...

Страница 74: ...ed off Changing the default settings for the screen menu may affect the LCD lifespan and therefore do not change them if possible Default LCD power settings are as follows Screen dim After 30 seconds Screen dim brightness Medium Screen off Custom settings 08 00 to 18 00 Using the LCD power setting function helps extend the LCD lifespan Main Screen Type Select Menu Settings Screen Main Screen Type ...

Страница 75: ...w names 1 3 Name of the program key is shown as the program key is being used If the main screen type is Extension or Extension Program Key program keys work as shown on the screen In other cases they work according to Standby Screen Button Settings Call Screen Button Settings You can set up actions of the buttons on the left right when on the call screen This function is useful for users who freq...

Страница 76: ...arms Add You can add a new alarm 1 At the alarm time the alarm message is displayed and the alarm sound goes off You can set up the alarm volume by going to Menu Settings Sound Volume Alarm Deleting Alarms 1 Select Menu Settings Alarm 2 Delete a selected alarm or delete all alarms Delete You can delete an existing alarm Delete All You can delete all existing alarms ...

Страница 77: ...nformation which is shown to your buddies Go to Menu Settings Presence Select a desired status and press the OK button The presence status is indicated by an icon on the standby screen Icon Description Online Connected to the presence server Meeting In a meeting Eating Having a meal Working Busy working Users in this status may have call forwarding enabled Offline Display Logged out Select this st...

Страница 78: ...nctions provided may vary by systems 1 Go to Menu Presence and select a desired status Press the Action Edit soft button 2 Press the Add soft button at the bottom of the presence setup screen to set your status Press the Save soft button after adding a function Action Setup You can enable disable additional functions for each presence status This feature is used to disable actions for each presenc...

Страница 79: ...ge 77 Default You can reset all additional functions for each presence status 1 Press the Menu Presence Default soft button 2 Press the OK soft button in the popup window to delete all the actions configured for a selected status ...

Страница 80: ...d consult your system administrator The call lock function may not be supported by some systems Menu Lock Change Menu Settings Password and Lock Menu Lock Call Lock 1 Select Menu Settings Password and Lock Call Lock 2 Select a call lock option Unlock Unlock the calling function Trunk Restrict outgoing trunk calls Lock All Restrict all outgoing calls Changing Password 1 Select Menu Settings Passwor...

Страница 81: ...e The headset key can be used on the standby screen Disable The headset key cannot be used on the standby screen This feature is not about usage of the headset itself but about usage of the headset key on the IP phone Headset Mode 1 Select Menu Settings Bluetooth Headset Headset Mode 2 You can set up a headset method to use with the phone Standard This is the standard headset for voice calls Ear J...

Страница 82: ...e is selected press the Register button The Bluetooth headset to connect must be in the pairing standby mode 3 If a Bluetooth headset is connected the Bluetooth icon is activated on the title bar To use the Bluetooth headset you must press the Headset key and activate the Headset mode This feature may work differently on some systems 4 Press the Disconnect button to disconnect the device Press the...

Страница 83: ...devices at least 5 meters away from the wireless LAN area Abnormal operation or noise may occur depending on the environment If the user s body obstructs signal transmission abnormal operation or noise may occur If a part of the body comes in contact with the radio transceiver part of the Bluetooth device or the mobile phone abnormal operation or noise may occur Noise may occur depending on the po...

Страница 84: ...ile device SDM Samsung Deskphone Manager App connection information is displayed Disconnect Disconnect the mobile device Simple Connection Mode If SDM is installed on your smartphone SDM registration can be done simply using the NFC function of your smartphone 1 Enable Menu Settings Deskphone Manager Information Simple Connection Mode 2 Tag the IP phone with a smartphone which is installed with SD...

Страница 85: ... is made as a voice call You can enable disable the video You can show hide your video to the other party when in a video call You can also turn your video off while in a video call Network Information Select Menu Settings Network Information to view the IP address DSN information LAN connection status information etc Phone Information Select Menu Settings Phone Information to view the phone model...

Страница 86: ...ur user password 3 Select Yes in the clear phone confirmation window Phone Restart You can restart the IP phone 1 Select Menu Settings Phone Restart 2 Press the Yes soft button in the popup window to restart the phone Administrator Mode You can enter the administrator mode 1 Select Menu Settings Administrator Mode 2 Enter the administrator mode password ...

Страница 87: ...t This feature may not be supported in some systems or countries Up to 3 devices can be connected over Wi Fi The hotspot feature is supported in wired mode only The use of VoIP over hotspot connection is not guaranteed Abnormal behaviors may occur due to Bluetooth or radio interferences Abnormal behaviors may occur depending on the position of the user due to radio obstacles e g walls and partitio...

Страница 88: ... 2 You can set up frequency and connection mode for the hotspot feature Default values are 2 4G and 802 11b 2 4G 802 11b g n support 5G 802 11a support 3 Set up an SSID and a password to use with the hotspot and press the Save button Default settings are as follows SSID SMT i5343_ phone number Password Samsung ...

Страница 89: ...ure various settings by interoperating with SMT i5343 Supported Smart Phones and Tablets Samsung Galaxy S3 S4 S5 Samsung Note 2 and 3 Galaxy Note 10 1 Tablet Other Android devices may work but have not been tested by Samsung System Configuration Diagram The SDM supports only the program keys when it is installed on a pad The authentication procedure is the same both for smartphones and the pad The...

Страница 90: ...ngs You can configure the SDM settings Registration Methods To use SDM it must be registered with your IP phone The registration and authentication procedures need to be performed only for the first time and connection is established automatically for subsequent instances Note that re registration may be necessary if changes are made to the network settings or settings of the smartphone on which S...

Страница 91: ... with your IP phone To register using NFC The NFC feature of the smartphone must be available The mobile phone number must be registered with the system For devices without mobile phone numbers use user ID authentication The wireless AP connected to the smartphone must be able to communicate with the IP phone 1 Start SDM and select the Start button ...

Страница 92: ...Version 1 1 November 2014 Page 90 2 If NFC is off turn on the NFC by selecting NFC setting at the bottom Enable NFC and S Beam in Settings of the smartphone and use the Back button to return to SDM ...

Страница 93: ...r 2014 Page 91 3 If Wi Fi is off activate it Use the Wi Fi settings below to connect to an AP and then use the Back button to return to SDM It must be possible for the IP phone to connect to the selected wireless network ...

Страница 94: ...pears it means that the Wi Fi and NFC features of the smartphone are ready for use Tag the smartphone on the NFC logo of the IP phone When the screen shrinks tap the screen SDM uses the Android Beam feature For more information see the user manual of your smartphone ...

Страница 95: ...performed and the Dashboard screen is shown 6 If authentication fails ask the administrator whether the mobile phone number of your smartphone is correctly registered in the system You can choose to Press User ID instead and input the User ID and Password for the phone This is found in DM 2 7 1 ...

Страница 96: ...s of the IP phone to communicate with the IP phone no manual work needs to be done to obtain network information of the IP phone To use auto login The SDM user must have the account information to connect to the IP phone The wireless network environment must support multicasting data handling If auto login does not work contact the administrator 1 Launch the app and press the Start button 2 Select...

Страница 97: ...Version 1 1 November 2014 Page 95 3 Enter the account information and select Deskphone IP input 4 Enter the desk phone IP information and select OK ...

Страница 98: ...Simple connection launches SDM and establishes Wi Fi connections and Bluetooth connections automatically without complicated settings Note that this feature may work differently on user environments To use Simple Connection The NFC feature of the smartphone must be available The mobile phone number must be registered with the system For devices without mobile phone numbers use manual registration ...

Страница 99: ...cate with the IP phone 1 Go to Menu Settings Deskphone Manager Information and enable Simple Connection Mode The setting will be preserved until changed by the user 2 Go to Advanced Settings under Settings of your smartphone and enable NFC and S Beam For more information see the user manual of your smartphone ...

Страница 100: ...ess message will appear Using USB Tethering The smartphone and the IP phone can communicate with one another via USB tethering using a USB data cable USB tethering only allows 1 1 data communication between one IP phone and one smartphone Wireless network or data of the smartphone cannot be accessed from the IP phone This feature is useful in an environment without any wireless AP NOT SUPPORTED IN...

Страница 101: ...smartphone which has been registered with the IP phone Deregistering in Settings 1 Go to Settings and IP phone connection settings on the Dashboard screen and select the Deregistration button 2 When deregistration popup is displayed press the Yes button for deregistration ...

Страница 102: ...ange presence status or access key functions Function Description Dashboard Presence You can change your presence status Contacts icon Go to the Contacts screen Call Log icon Go to the Call Log screen Program Key icons Go to the Program Keys screen Settings icon Go to the Settings screen ...

Страница 103: ...w contacts per device View all contacts or contacts on the IP phone View groups View groups in each device View details View details of the selected contact Search Search contacts Add contact Add a new contact Delete Delete a contact Copy to IP phone Copy a contact which has not been saved in the IP phone to the IP phone Dial Make an outgoing call using the IP phone or the smartphone Long touch ac...

Страница 104: ...ntact Function Description Viewing Contact Details Favorites Set the contact as a favorite Dial Make an outgoing call using the IP phone or the smartphone Edit Edit the contact Delete Delete the contact Group Manage group of the contact Copy to IP phone Copy to smartphone Copy the contact to the IP phone or the smartphone ...

Страница 105: ...ave the contact Supported fields vary for each device Function Description Add Edit Contacts Select location to save Select IP phone or Smartphone Register change remove photo Register change or remove a photo Enter name Enter a short name or the full name Add group View groups list and select a group Select type Select a type if any ...

Страница 106: ...to bring up the screen shown below You can select multiple groups for the contact or create a new group Function Description Select Group Create new group Create a new group Select Group Select a group to which the contact will belong Enter name Enter a group name If already exists the warning popup window will appear ...

Страница 107: ...e the list of groups in each device When deleting selection mode is enabled for the list Function Description Group List View contacts View the list of contacts Create group Add a new group Delete Delete a group Long touch action Edit or delete a group name ...

Страница 108: ...1 November 2014 Page 106 Editing Group Name Long touch on the groups list and select Edit Group Name to bring up the popup window below where you can enter a group name Enter a name and press OK to finish editing ...

Страница 109: ...ter a name and select members Function Description Add group Select location to save Select IP phone or Smartphone Enter name Enter a group name If already exists the warning popup window will appear Add member Open the member selection screen Search contact Search contacts by entering a keyword ...

Страница 110: ... enabled for the list If you add a contact to a group the device selection window is not displayed The contact automatically belongs to the group Function Description Contacts in Group Search Search for contacts in the group Add contact Create a contact in the group Adding Members Manage group members add or remove Delete Delete a group member ...

Страница 111: ...can add remove group members The top bar indicates the currently selected contact Function Description Adding Members Select remove group members Add members to the group or remove existing group members Search contact Search contacts by entering a keyword ...

Страница 112: ...nitials and phone numbers After entering a keyword you can search for directory names or phone numbers The directory search function may not be supported by some systems Function Description Search Directory Search Search Perform a real time search for the text entered in the search window Directory name search Search by name in the directory service Directory number search Search by number in the...

Страница 113: ...og entries or delete all call logs The call log of IP phone is synchronized in real time Function Description Call Log Call log for each device View call log for each device All IP phone View View call logs by type All Incoming Outgoing Missed Viewing Call Log Details View detailed information of a call log entry Delete Delete a call log Delete all Delete all call logs ...

Страница 114: ...a call log entry You can view all call history of the selected number You can also dial the number or access contact information of the number Function Description Viewing Call Log Details Dial You can make a call using the IP phone or smartphone Delete Delete a call log Add Edit Add edit a contact ...

Страница 115: ... use program keys and the AOM function Function Description Program Keys Change device Select a device name to change the device Change page Swipe the top title bar left right to navigate between pages Add function Add a function Long touch action View details or delete a function Edit Delete Edit or delete a function Settings Go to the Settings screen ...

Страница 116: ...program keys Multiple actions may be assigned to a program key After editing deleting press Done to apply changes This feature may work differently on some systems Function Description Edit Delete Function Edit Go to the Edit screen Delete Select a function to delete Done Apply changes ...

Страница 117: ...ings for the function For descriptions of available functions contact the administrator Function Description Add Edit Function Screen Select function Go to the function selection screen where a desired function can be selected Input Enter or search values for the function Done Apply changes made for adding editing function ...

Страница 118: ...Contact view setting You can view the address book of the smartphone from the IP phone Connection Info Setting Optional settings for IP phone connection IP phone call setting Optional settings for IP phone incoming calls Application Info Check and upgrade application information Presence Scenario Additional functions and action settings for each presence status ...

Страница 119: ...mber can be registered manually If there is an FMC number the IP phone is automatically registered and cannot be modified Also SDM can be deregistered from the IP phone IP Phone Call Setting You can enable disable IP phone incoming call notification If the checkbox is selected the notification window appears when there is an incoming call You can also configure screen off status sound vibration et...

Страница 120: ... add delete or change functions for each presence status IP Phone Auto Login When the IP phone is logged out you can log it in again using NFC tagging In order to use this feature the user must register SDM at least once to receive automatic login account information from the IP phone or enter the login account information manually ...

Страница 121: ...it The phone starts but none of its functions are available If the IP conflict message appears on the phone screen it means that the same IP address is used by another device phone or PC Please contact the system administrator If the ID conflict message appears on the phone screen it means that the same ID is used by another device phone or PC Please contact the system administrator When the hands...

Страница 122: ...Version 1 1 November 2014 Page 120 ...

Страница 123: ...When you broadcast the speaker sound may echo Maintain a distance of 1m from the phone Caller ID does not appear on the LCD screen Ask the service provider whether the caller ID service is activated Caller ID will not appear on the screen if the caller has requested the telecommunication service provider to hide their number If the user is calling from an area where the caller ID service is not av...

Страница 124: ...eight LCD Color Graphic LCD 480 272 pixels Adapter input power AC 100 250 V 50 60 Hz 1 0 A Adapter output power DC 12 V 2 A PoE input power DC 48 V 802 3 af PoE device 802 3 af standard support for class 3 Operating conditions Temperature 0 45ºC Humidity 10 90 Class B Device Broadcasting communication device for home use This device obtained EMC registration mainly for home use Class B and may be ...

Страница 125: ...hone Model name SMT i5343 Model name SMT i5343 Certificate number KCC CMM SCT SMT i5343 Certificate number YL10004 13003 Certifier Manufacturer Samsung Electronics Co Ltd Certifier Manufacturer J Technology Co Ltd Rating 12 V 2 A Adapter 48 V 0 3 A PoE Rating 12 V 2 A Adapter 48 V 0 3 A PoE Customer Hotline 1588 4141 Customer Hotline 1588 4141 Device name Wireless device for wireless connection sy...

Отзывы: