background image

English  51

W

arr
anty (U

.S

.A)

Warranty (U.S.A)

PLEASE DO NOT DISCARD. THE PAGE REPLACES THE WARRANTY PAGE IN 

THE USE & CARE GUIDE

SAMSUNG GAS RANGE / COOKTOP

LIMITED WARRANTY TO ORIGINAL PURCHASER WITH PROOF OF PURCHASE

This SAMSUNG brand product, as supplied and distributed by SAMSUNG ELECTRONICS 
AMERICA INC. (SAMSUNG) and delivered new, in the original carton to the original 
consumer purchaser, is warranted by SAMSUNG against manufacturing defects in 
materials or workmanship for the limited warranty period, starting on the date of 
delivery to the original consumer purchaser, of:

One (1) Year Parts and Labor

This limited warranty is valid only on products purchased and used in the United 
States that have been installed, operated, and maintained according to the 
instructions attached to or furnished with the product. To receive warranty service, 
the purchaser must contact SAMSUNG at the address or phone number provided 
below for problem determination and service procedures. Warranty service can 
only be performed by a SAMSUNG authorized service center. The original dated 
bill of sale and/or proof of delivery must be presented upon request as proof 
of purchase to SAMSUNG or SAMSUNG’s authorized service center to receive 
warranty service. 

SAMSUNG will provide in-home service within the contiguous United States 
during the warranty period at no charge, subject to availability of SAMSUNG 
authorized servicers within the customer’s geographic area. If in-home service is 
not available, SAMSUNG may elect, at its option, to provide transportation of the 
product to and from an authorized service center. If the product is located in an 
area where service by a SAMSUNG authorized servicer is not available, you may 
be responsible for a trip charge or required to bring the product to a SAMSUNG 
authorized service center for service.

To receive in-home service, product must be unobstructed and accessible to the 
service agent. 

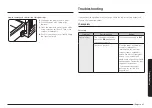
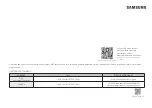
Code symbol

Meaning

Solution

Gas leakage in the gas 
connection section.

1. 

Disconnect power. Open the 
back cover. Check there are 
signs of combustion in the 
gas connection section.

2. 

If there are signs of 
combustion, replace GPR 
and TCO and check the gas 
leakage.

3. 

If there are no signs of 
combustion, check wire-TCO, 
Wire main - sub connection 
status and PBA S/W version.

** If these solutions do not solve the problem, contact a local Samsung service 

center or call 1-800-SAMSUNG (1-800-726-7864).

Содержание NSG6 83 Series

Страница 1: ...Gas Slide in Range User manual NSG6 83...

Страница 2: ...e Follow the gas supplier s instructions If you cannot reach your gas supplier call the fire department Installation and service must be performed by a qualified installer service agency or the gas su...

Страница 3: ...sit or lean on an open door Never completely remove the leveling legs If you remove the leveling legs the range will not be secured by the Anti Tip device properly Radio Apparatus Notice CAUTION Any...

Страница 4: ...These limits are designed to provide reasonable protection against harmful interference in a residential installation This equipment generates uses and can radiate radio frequency energy and if not i...

Страница 5: ...s the optimum temperatures for griddle cooking Enhanced convenience with easy maintenance The Samsung gas oven range combines all the benefits of 3 separate home appliances a gas range a gas oven and...

Страница 6: ...n safety 13 Overview 14 Layout 14 What s included 14 Control panel 15 Before you start 15 Clock 15 Oven vent cooling vent 16 Cooktop 16 Ignition 17 Cookware 18 Griddle 19 Gas oven 20 Using the oven ra...

Страница 7: ...ately after cooking Know the location of the gas shut off valve and how to shut it off Make sure the Anti Tip device is properly installed on the range See the installation instructions for more infor...

Страница 8: ...not to allow the pet to access the product Fire safety WARNING To reduce the risk of fire electric shock personal injuries and or death observe the following precautions Do not store place or use fla...

Страница 9: ...power outlet Do not modify the power plug power cord or power outlet in any way Do not put a fuse in a neutral or ground circuit Use a dedicated 120 volt 60 Hz 20 amp AC electrical circuit with a time...

Страница 10: ...facturer s instructions and all codes and requirements of the authority having jurisdiction The qualified agency performing this work assumes the gas conversion responsibility Installation of this ran...

Страница 11: ...urn the knob quickly Make sure the flame stays on Do not place any objects other than cookware on the cooktop This cooktop is designed for use with a wok or wok ring attachment To flame food you must...

Страница 12: ...are that your hands do not touch the burners when they are on Turn off the burners when you change a pan or pot To warm liquid such as sauces stir it while warming Opening a window or turning on a ven...

Страница 13: ...ing cycle stand away from the oven If the self cleaning cycle malfunctions turn off the oven disconnect the power supply and contact a qualified service technician Turn off the surface burner while th...

Страница 14: ...rawer 06 Cooling vent 07 Oven vents 08 Oven light 09 Broil oven burner 10 Convection fan 11 Oven rack system 12 Bake oven burner What s included Surface burner grates 2 and griddle 1 Surface burners a...

Страница 15: ...e 13 Smart Control Activates the Easy connection 14 Stop Clear Cancel the current operation but not the timer 15 Start OK Start a function or set the time Long press to start or set Before you start Y...

Страница 16: ...stion problems and ensures good performance Do not block the vent or its surroundings Use caution when placing items near the vent Hot steam can cause them to overheat or melt Cooktop STEP 1 Put all i...

Страница 17: ...oking Left Rear LR 9 500 BTU General heating Low simmering General food casseroles General purpose cooking Ignition CAUTION 3 2 1 1 Make sure all surface burners are properly installed To light a burn...

Страница 18: ...to the range and call a qualified service technician NEVER use an open flame to locate a leak If you set and use the knob button of safety knob the original safety function does not work normally Coo...

Страница 19: ...r ignite plastic items or cause build up of dangerous pressure in closed plastic containers You may get severe burns if you touch the surfaces near the vent while the oven is operating Make sure you h...

Страница 20: ...s surfaces and griddle itself cool down If you leave the griddle on the cooktop it may become very hot when you use the cooktop or oven Use oven gloves when placing or removing the griddle Do not over...

Страница 21: ...all roasts 2 Turkey Large roasts Hams 1 CAUTION Do not cover an oven rack with aluminum foil This will hamper heat circulation resulting in poor baking Do not place aluminum foil on the oven bottom Th...

Страница 22: ...s 3 and 5 Cookies 3 and 5 Cooking mode Make sure to close the door before you start cooking If you leave the door open for 20 30 seconds while the oven is in convection baking roasting baking or broil...

Страница 23: ...gular heat NOTE When using convection cooking always pre heat the oven for the best results When you have finished cooking the cooling fan will continue to run until the oven has cooled down For perfo...

Страница 24: ...ill be very hot For information about broiler temperatures rack settings and cooking times for different foods see Broiling guide on page 24 Use the Broil Rack for the best results Recipe guide Broili...

Страница 25: ...help to reduce splatter and smoke for high fat foods such as chicken wings Air Fry is designed for baking on a single oven rack Place food on rack position 3 for best results Before using a baking wa...

Страница 26: ...d salt and pepper to taste Homemade Potato Wedges 25 30 450 30 35 Cut them into wedges Brush with 3 tbsp of oil Add salt and pepper to taste Item Amount oz Temperature F Time min Tips Frozen Frozen Ch...

Страница 27: ...nd meat should be chilled in a refrigerator before they are placed in the oven Even when chilled they should not stand for more than 1 hour before cooking begins and should be removed promptly when co...

Страница 28: ...press Cook Time enter a different time and then press Start OK If necessary press Keep Warm after setting the cooking time Then Keep Warm will start when the cooking time has elapsed Delay Start The D...

Страница 29: ...00 F Hot will appear in the display Because this function produces the best results when started while the oven is cool we recommend that you wait until the oven has cooled down and Hot disappears fro...

Страница 30: ...abbath and Holidays For more information visit the website at http www star k org With the Sabbath option The oven temperature can be set higher or lower after you have set this option The display doe...

Страница 31: ...an be safely removed from the oven but you should not turn off the Sabbath option and turn the oven back on until after the Sabbath Holidays After the Sabbath observance turn off the Sabbath option by...

Страница 32: ...nversion Converts regular baking temperatures to convection baking temperatures 4 Time format 12hr 24hr Set the clock to display the time in the 12 hour or 24 hour format 5 Energy saving Automatically...

Страница 33: ...pad 5 Press Start OK to save the change NOTE This adjustment does not affect the broiling or the self cleaning temperature and is retained in memory after a power failure Temp Unit F C Change the tem...

Страница 34: ...2 3 1 Press and hold for 3 seconds 2 Press 5 to enter Energy saving 3 Press 1 or 2 to turn Energy saving on or off 1 to on 12Hr 2 to off Hr 4 Press Start OK to save the change Sound Mute unmute the r...

Страница 35: ...toring Check the status of the oven Monitor the on off status of each cooktop burner Oven Remote Control Set or adjust oven settings remotely My Cooking Turn the oven off remotely Once cooking starts...

Страница 36: ...h the surface Do not spray any type of cleanser into the manifold holes The ignition system is located in those holes and must be kept free of moisture Voice control To use the Range s Voice Control f...

Страница 37: ...ur soil off of the racks using a plastic scouring pad If the racks do not slide in and out smoothly after you have cleaned them rub the side rail guides with wax paper or a cloth containing a few drop...

Страница 38: ...ft brush or soft cloth covered with water CAUTION Do not use alkaline detergents sulfuricacid hydrochloric acid organic solvents or disinfectants Surface can be damaged Burner controls Make sure all s...

Страница 39: ...rrosion of the gas valves or ports Keep oven vent ducts unobstructed Clean vents frequently to avoid grease buildup Burner grates and components Turn off all surface burners and make sure they have al...

Страница 40: ...event the burners from igniting To avoid falling down the grates make sure to remove both sides grates first Do not attempt to remove center oval burner cap from the head Burner reinstall guide Round...

Страница 41: ...roduce poor baking results and cause permanent damage to the oven interior The aluminum foil will melt onto and adhere to the interior oven surfaces Do not force the oven door open during the self cle...

Страница 42: ...400 F 204 C 6 Press Stop Clear to display the time of the day CAUTION Do not use the surface burners while the gas oven is performing a self cleaning cycle WARNING Be sure all controls are off and all...

Страница 43: ...elf cleaning cycle is complete The oven is still very hot when the door unlocks Escaping hot air and or steam could burn you Replacing the oven light Oven light The oven light is a standard 40 watt ap...

Страница 44: ...rom vertical Fig 1 5 Lift the door up and out until the hinge arms are clear of the slots Fig 2 How to reinstall the door 1 Firmly grasp both sides of the door at the top 2 With the door at the same a...

Страница 45: ...the range check the tables starting below and then try the suggested actions Checkpoints Gas safety Problem Possible cause Action You smell gas The surface burner knob is not in the Off position and t...

Страница 46: ...technician The burners do not burn evenly Surface burner components and caps are not assembled correctly and level See page 39 The surface burners are dirty Clean the surface burner components See pa...

Страница 47: ...cooling fan is not visible but you will hear it running whenever the electronics get hot and turn off when the electronics are cool This is normal operation to cool the oven cooling fan automatically...

Страница 48: ...ling or popping sound This is normal This is the sound of the metal heating and cooling during any cooking or cleaning function Problem Cause Action Excessive smoking during a self cleaning cycle This...

Страница 49: ...towel Racks become dull and hard to slide if they are left in the oven during a self clean cycle Fan noise This is normal The convection fan runs until the function is over or the door is opened The...

Страница 50: ...hat and restart oven 2 To reset error disconnect power or tap Stop Clear after opening the oven door at least 60 seconds Problem Cause Action Food does not bake or roast properly in the oven The wrong...

Страница 51: ...very must be presented upon request as proof of purchase to SAMSUNG or SAMSUNG s authorized service center to receive warranty service SAMSUNG will provide in home service within the contiguous United...

Страница 52: ...econditioned product Replacement parts and products are warranted for the remaining portion of the original product s warranty or ninety 90 days whichever is longer All replaced parts and products are...

Страница 53: ...ll provide in home service during the one 1 year warranty period at no charge subject to availability within the contiguous Canada In home service is not available in all areas To receive in home serv...

Страница 54: ...PECIAL INCIDENTAL OR CONSEQUENTIAL DAMAGES CAUSED BY THE USE MISUSE OR INABILITY TO USE THIS PRODUCT REGARDLESS OF THE LEGAL THEORY ON WHICH THE CLAIM IS BASED AND EVEN IF SAMSUNG HAS BEEN ADVISED OF...

Страница 55: ...m ca support English or www samsung com ca_fr support French Model Serial Please attach your receipt or a copy to this manual You may need it along with your model and serial number when calling for a...

Страница 56: ...RY CALL OR VISIT US ONLINE AT U S A Consumer Electronics 1 800 SAMSUNG 726 7864 www samsung com us support CANADA 1 800 SAMSUNG 726 7864 www samsung com ca support English www samsung com ca_fr suppor...

Страница 57: ...Estufa deslizante de gas Manual del usuario NSG6 83...

Страница 58: ...tamento de bomberos La instalaci n y el servicio t cnico deben ser realizados por el proveedor de gas o un instalador o agencia de servicio t cnico calificados DISPOSITIVO ANTIINCLINACI N ADVERTENCIA...

Страница 59: ...inclinan sobre ella Nunca retire por completo las patas niveladoras Si las retira por completo la estufa no estar asegurada correctamente al dispositivo antiinclinaci n Aviso del sistema de radio PRE...

Страница 60: ...S 003 de Canad Estos l mites fueron dise ados para brindar una protecci n razonable contra las interferencias perjudiciales en una instalaci n residencial Este equipo genera utiliza y puede irradiar e...

Страница 61: ...en una superficie grande y ofrece temperaturas ptimas para cocci n en comal Mayor comodidad con un mantenimiento sencillo Los hornos estufas de gas Samsung combinan todos los beneficios de 3 electrod...

Страница 62: ...ici n 14 Qu incluye 14 Panel de control 15 Antes de comenzar 15 Reloj 15 Conductos de ventilaci n y refrigeraci n del horno 16 Placa de cocci n 16 Encendido 17 Utensilios de cocina 18 Comal 19 Horno d...

Страница 63: ...del horno los quemadores superficiales y las superficies interiores mientras cocina o inmediatamente despu s de haberlo hecho Conozca la ubicaci n de la v lvula de cierre de gas y sepa c mo cerrarla A...

Страница 64: ...por su cuenta Si una mascota toca el operador el producto puede encenderse de manera no intencional Por ese motivo debe tener cuidado de no permitir que las mascotas tengan acceso al producto Segurida...

Страница 65: ...n da ados ni un tomacorriente flojo No modifique el enchufe el cable de alimentaci n ni el tomacorriente No coloque un fusible en el circuito neutral o de conexi n a tierra Utilice un circuito el ctr...

Страница 66: ...conforme a las instrucciones del fabricante y todos los c digos y requisitos de la autoridad competente La agencia calificada que realice este trabajo asume la responsabilidad por la conversi n del g...

Страница 67: ...an utensilios de cocina sobre la placa de cocci n Esta placa de cocci n est dise ada para utilizarse con un wok o un anillo para wok Para flamear la comida debe tener una campana de ventilaci n Al fla...

Страница 68: ...es de fre rlas La humedad de cualquier tipo puede provocar que la grasa caliente burbujee y caiga por los costados de la sart n Siempre aseg rese de que los controles est n en la posici n Off Desactiv...

Страница 69: ...no funcionar con un quemador superficial encendido Se recomienda abrir una ventana o encender un ventilador o campana extractora durante y despu s de la autolimpieza No ase la carne demasiado cerca d...

Страница 70: ...n 07 Conductos de ventilaci n del horno 08 Luz del horno 09 Quemador para asar 10 Ventilador de convecci n 11 Sistema de las parrillas del horno 12 Quemador para hornear Qu incluye Rejillas para los...

Страница 71: ...12 Reloj configura la hora del reloj 13 Smart Control Control inteligente activa la conexi n sencilla 14 Stop Clear Detener Borrar cancela la operaci n actual pero no el temporizador 15 Start OK Inic...

Страница 72: ...de combusti n y garantiza un buen funcionamiento No bloquee el conducto de ventilaci n ni sus alrededores Tenga cuidado cuando coloque objetos cerca del conducto de ventilaci n El vapor caliente puede...

Страница 73: ...asero izquierdo LR 9 500 BTU Potencia general cocci n a fuego lento Alimentos en general guisos Cocci n general Encendido PRECAUCI N 3 2 1 1 Aseg rese de que todos los quemadores superficiales est n i...

Страница 74: ...servicio calificado NUNCA utilice una llama abierta para localizar una p rdida Si configura y utiliza el bot n de la perilla de seguridad la funci n de seguridad original no funcionar normalmente Ute...

Страница 75: ...e derretir o inflamar los objetos de pl stico o causar una acumulaci n de presi n peligrosa en los recipientes de pl stico cerrados Puede sufrir quemaduras graves si toca las superficies cerca del con...

Страница 76: ...sta que las parrillas de la placa de cocci n las superficies y el comal mismo se enfr en Si deja la parrilla encima de la placa de cocci n puede calentarse mucho cuando utilice la placa de cocci n o e...

Страница 77: ...tama o y jamones 1 PRECAUCI N No cubra las parrillas del horno con papel de aluminio Esto obstruir la circulaci n del calor e impedir una buena cocci n No coloque papel de aluminio sobre la base del h...

Страница 78: ...Galletas 3 y 5 Modo de cocci n Aseg rese de cerrar la puerta antes de empezar a cocinar Si deja la puerta abierta durante 20 30 segundos cuando el horno est en los modos de asar hornear por convecci n...

Страница 79: ...ormal NOTA Cuando utilice la cocci n por convecci n siempre precaliente el horno para obtener los mejores resultados Cuando termine de cocinar el ventilador de refrigeraci n seguir funcionando hasta q...

Страница 80: ...btener informaci n sobre las temperaturas de la parrilla la configuraci n de las parrillas y los tiempos de cocci n para diferentes alimentos consulte Gu a para asar a la parrilla en la p gina 24 Util...

Страница 81: ...deja para freidora de aire para atrapar la grasa Esto contribuir a reducir las salpicaduras y el humo en alimentos con alto contenido graso como las alitas de pollo Este modo est dise ado para hornear...

Страница 82: ...0 35 425 450 20 25 Papas fritas caseras 25 30 425 25 30 Pele las papas y c r telas en bastones con un grosor de de pul gada Sum rjalas en agua fr a durante 30 minutos ntelas con 3 cucharadas de aceite...

Страница 83: ...echarse a perder r pidamente como leche huevos pescado carne roja y de ave debe conservarse en un refrigerador antes de colocarse en el horno Incluso estando refrigerada no debe dejarla reposar durant...

Страница 84: ...necesario presione Keep Warm Mantener caliente despu s de ajustar el tiempo de cocci n De esta forma se iniciar la funci n Mantener caliente cuando haya transcurrido el tiempo de cocci n Inicio retar...

Страница 85: ...e Hot Caliente en la pantalla Como esta funci n produce los mejores resultados cuando se inicia mientras el horno est fr o recomendamos que espere hasta que el horno se enfr e y a que el mensaje Hot C...

Страница 86: ...solo para cocinar en festividades jud as y Sabbath Para obtener m s informaci n visite el sitio web http www star k org Con la opci n Sabbath La temperatura del horno puede configurarse m s alta o baj...

Страница 87: ...forma segura del horno pero no debe desactivar la opci n Sabbath ni volver a encender el horno hasta despu s de las festividades o el Sabbath Despu s del Sabbath desactive la opci n Sabbath para esto...

Страница 88: ...uras normales de horneado en temperaturas de horneado por convecci n 4 Formato de hora 12 h 24 h Configura el reloj para que muestre la hora en formato de 12 o 24 horas 5 Ahorro de energ a Apaga autom...

Страница 89: ...OTA Este ajuste no afectar la temperatura para asar a la parrilla o del modo de autolimpieza y se almacenar en la memoria tras una interrupci n de energ a el ctrica Unidad de temp F C Cambie el format...

Страница 90: ...undos 2 Presione 5 para ingresar a Ahorro de energ a 3 Presione 1 o 2 para activar o desactivar el ahorro de energ a 1 activado 12 h 2 desactivado h 4 Presione Start OK Iniciar Aceptar para guardar el...

Страница 91: ...i n Compruebe el estado del horno Controle el estado de encendido apagado del quemador de cada placa de cocci n Control remoto del horno Configure o ajuste las opciones del horno de forma remota Mi co...

Страница 92: ...o en estos orificios y no debe humedecerse Control por voz Para utilizar la funci n de control por voz de la estufa debe instalar en su dispositivo m vil la aplicaci n Bixby Amazon Alexa o el Asistent...

Страница 93: ...de las parrillas usando un estropajo de pl stico Si las parrillas no se deslizan suavemente despu s de limpiarlas frote las gu as de las parrillas con papel de cera o un trapo humedecido con unas gota...

Страница 94: ...gua PRECAUCI N No utilice detergentes alcalinos cido sulf rico cido hidrocl rico solventes org nicos ni desinfectantes Puede da arse la superficie Controles del quemador Aseg rese de que todas las per...

Страница 95: ...el horno libres de obstrucciones Limpie con frecuencia las ventilaciones para evitar la acumulaci n de grasa Rejillas de los quemadores y sus componentes Apague todos los quemadores superficiales y as...

Страница 96: ...emadores Para evitar que las parrillas se caigan aseg rense de quitar las dos parrillas laterales primero No intente retirar la tapa del quemador central ovalado del cabezal Gu a de reinstalaci n de q...

Страница 97: ...causar da os permanentes en el interior del horno El papel de aluminio se derretir sobre las superficies internas del horno y se pegar No fuerce la puerta del horno para abrirla durante el ciclo de a...

Страница 98: ...ar Detener Borrar para mostrar la hora PRECAUCI N No utilice los quemadores superficiales cuando se est ejecutando un ciclo de autolimpieza del horno de gas ADVERTENCIA Aseg rese de que todos los cont...

Страница 99: ...a puerta se desbloquea El aire o vapor caliente que sale podr a provocarle quemaduras Reemplazo de la luz del horno Luz del horno La luz del horno es una bombilla est ndar de 40 vatios para artefactos...

Страница 100: ...1 5 Eleve la puerta hasta que los brazos de las bisagras salgan de las ranuras Fig 2 C mo reinstalar la puerta 1 Tome con firmeza ambos lados de la puerta en la parte superior 2 Con la puerta en el n...

Страница 101: ...stran a continuaci n y a continuaci n intente las acciones sugeridas Puntos de control Seguridad del gas Problema Causa posible Medida Si hay olor a gas La perilla del quemador superficial no est en l...

Страница 102: ...ponentes y las tapas del quemador superficial no est n montadas correctamente y a nivel Consulte la p gina 39 Los quemadores superficiales est n sucios Limpie los componentes de los quemadores superfi...

Страница 103: ...os controles y las se ales mantenga presionado Bake Hornear y el n mero 1 durante 3 segundos Problema Causa Medida El ventilador del horno hace ruidos o no se apaga Solo el modelo de horno deslizante...

Страница 104: ...e Espere a que se enfr e y restablezca los controles El ciclo de autolimpieza no bloquear la puerta del horno si la temperatura del horno es demasiado alta La puerta se debe bloquear antes de comenzar...

Страница 105: ...r muy fuerte Esto es temporal El aislamiento alrededor del interior del horno libera olor las primeras veces que se utiliza el horno Problema Causa Medida Es dif cil deslizar las parrillas del horno E...

Страница 106: ...se debe reiniciar Su control digital se ha da ado Reemplace el fusible o reinicie el disyuntor La comida no se hornea o asa correctamente en el horno Se seleccion el modo de cocci n incorrecto Consult...

Страница 107: ...durante el per odo de garant a sin cargo alguno sujeto a la disponibilidad de los centros de servicio autorizados de SAMSUNG dentro del rea geogr fica del cliente Si el servicio a domicilio no est dis...

Страница 108: ...or la parte restante de la garant a del producto original o por noventa 90 d as lo que sea mayor Todas las piezas y productos reemplazados son propiedad de SAMSUNG y usted debe devolverlos a SAMSUNG E...

Страница 109: ...r SAMSUNG y cualquier servicio no autorizado anular esta garant a Se debe presentar el original de la factura de venta con fecha como prueba de compra a SAMSUNG o al centro de servicio autorizado de S...

Страница 110: ...FIRMA O CORPORACI N CON RESPECTO A ESTE PRODUCTO SER VINCULANTE PARA SAMSUNG SAMSUNG NO SER RESPONSABLE DE LA P RDIDA DE INGRESOS O BENEFICIOS DE LA IMPOSIBILIDAD DE REALIZAR AHORROS U OTROS BENEFICIO...

Страница 111: ...ngl s o www samsung com ca_fr support franc s N de modelo N de serie Adjunte su comprobante o copia a este manual Es posible que lo necesite al llamar para pedir asistencia junto con los n meros de se...

Страница 112: ...L O VIS TENOS EN L NEA EN EE UU Consumer Electronics 1 800 SAMSUNG 726 7864 www samsung com us support CANAD 1 800 SAMSUNG 726 7864 www samsung com ca support Ingl s s www samsung com ca_fr support Fr...

Страница 113: ...Cuisini re gaz encastrable Manuel d utilisation NSG6 83...

Страница 114: ...ons de la compagnie de gaz Si vous ne pouvez joindre votre fournisseur de gaz appelez le service d incendie L installation et l entretien doivent tre effectu s par un installateur qualifi un organisme...

Страница 115: ...s m me vous tenez debout vous asseyez ou vous appuyez sur une porte ouverte Ne retirez jamais compl tement les pieds de nivellement Si vous les retirez la cuisini re ne sera pas correctement retenue p...

Страница 116: ...on ues pour fournir une protection raisonnable contre les interf rences nuisibles dans une installation r sidentielle Cet appareil g n re utilise et peut mettre de l nergie de fr quence radio et s il...

Страница 117: ...ur de mani re homog ne sur une large surface et fournit des temp ratures optimales pour la cuisson sur le gril Confort accru entretien facile La cuisini re gaz Samsung r unit les fonctions de 3 appare...

Страница 118: ...3 Vue d ensemble 14 Disposition 14 Ce qui est inclus 14 Tableau de commande 15 Avant de commencer 15 Horloge 15 vent du four vent de refroidissement 16 Table de cuisson 16 Allumage 17 Ustensiles de cu...

Страница 119: ...c s respectez les pr cautions suivantes Ne touchez aucune partie de la cuisini re y compris mais sans s y limiter les br leurs du four les br leurs de surface ou les surfaces int rieures pendant ou im...

Страница 120: ...rds tranchants de l appareil La cuisini re peut devenir chaude en cours de fonctionnement Pour des raisons de s curit les enfants ou les personnes qui ne savent pas se servir de la cuisini re ne doive...

Страница 121: ...cordon d alimentation endommag s ni de prise murale mal fix e Ne modifiez pas la fiche le cordon ou la prise d alimentation de quelque fa on que ce soit Ne placez pas de fusible dans un circuit neutr...

Страница 122: ...un technicien qualifi conform ment aux consignes du fabricant et tous les codes et exigences de l autorit comp tente L agence qualifi e qui effectue ce travail assume la responsabilit de la conversio...

Страница 123: ...mme reste allum e Ne placez pas d autres objets que des ustensiles de cuisine sur la table de cuisson Cette table de cuisson est con ue pour tre utilis e avec un wok ou un anneau de wok Pour flamber l...

Страница 124: ...Des dommages ou un incendie pourraient se produire si la table de cuisson est chaude Assurez vous toujours que les aliments frire sont d congel s et secs L humidit sous quelque forme que ce soit peut...

Страница 125: ...us que le four est compl tement froid N utilisez que les ustensiles de cuisine recommand s pour les fours gaz Pour viter d endommager les boutons de commande des br leurs faites toujours cuire et ou g...

Страница 126: ...du four 08 clairage du four 09 Br leur du four gril 10 Ventilateur de convection 11 Syst me de grilles du four 12 Br leur du four de cuisson Ce qui est inclus Grilles de br leurs de surface 2 et gril...

Страница 127: ...rt Control Commande intelligente Active Easy connection connexion ais e 14 Stop Clear Arr t suppression Annule le fonctionnement en cours mais pas la minuterie 15 Start OK Commencer OK Permet de d mar...

Страница 128: ...e combustion et d assurer de bonnes performances N obstruez pas l vent ou ses environs Faites attention lorsque vous placez des objets proximit de la fente d a ration La vapeur chaude peut les faire s...

Страница 129: ...rapide G n ral Cuisson g n rale Arri re gauche ArG 9 500 BTU Chauffage g n ral Mijotage faible Aliments courants casseroles Cuisson g n rale Allumage MISE EN GARDE 3 2 1 1 Assurez vous que tous les b...

Страница 130: ...et appelez un technicien de service qualifi N utilisez JAMAIS une flamme nue pour rep rer une fuite Si vous r installez le bouton de s curit de mani re incorrecte la fonction de s curit initiale ne f...

Страница 131: ...fente d a ration peut faire fondre ou enflammer des articles en plastique ou d velopper une pression dangereuse dans des r cipients en plastique ferm s Vous risquez de vous br ler gravement si vous to...

Страница 132: ...les autres surfaces et le gril lui m me n aient totalement refroidi Si vous laissez le gril sur la table de cuisson il peut devenir tr s chaud lorsque vous utilisez la table de cuisson ou le four Uti...

Страница 133: ...jambons 1 MISE EN GARDE Ne recouvrez pas une grille de four avec du papier d aluminium Cela g nera la circulation de la chaleur entra nant une mauvaise cuisson Ne placez pas de papier d aluminium sur...

Страница 134: ...et 5 Mode de cuisson Assurez vous de fermer la porte avant de commencer la cuisson Si vous laissez la porte ouverte pendant 20 30 secondes lorsque le four est en mode cuisson r tissage par convection...

Страница 135: ...une chaleur ordinaire REMARQUE Lorsque vous utilisez la cuisson par convection pr chauffez toujours le four pour obtenir un meilleur r sultat Une fois la cuisson termin e le ventilateur de refroidisse...

Страница 136: ...Pour plus d information sur la temp rature du gril les r glages de la grille et les temps de cuisson de diff rents aliments consultez la section Guide de cuisson au gril la page 24 Utilisez la grille...

Страница 137: ...cup rer les gouttures Cela aidera r duire les claboussures et la fum e des aliments riches en mati res grasses comme les ailes de poulet Le mode de friture l air chaud est con u pour cuire sur une seu...

Страница 138: ...aison 25 30 425 25 30 Pelez les pommes de terre et coupez les en b tonnets d une paisseur de pouce Faites tremper dans l eau froide pendant 30 minutes Badigeonnez avec 3 cuil l res soupe d huile Salez...

Страница 139: ...lle et la viande doivent tre refroidis au r frig rateur avant d tre plac s au four M me r frig r s ils ne doivent pas attendre plus d une heure avant le d but de la cuisson et doivent tre retir s rapi...

Страница 140: ...OK Commencer OK Au besoin appuyez sur Keep Warm Maintien au chaud apr s avoir r gl le temps de cuisson Ensuite la fonction Maintien au chaud se mettra en marche lorsque le temps de cuisson sera coul M...

Страница 141: ...t donn que cette fonction donne des r sultats optimaux lorsqu elle est lanc e pendant que le four est froid nous vous recommandons d attendre que le four ait refroidi et que l indication Hot chaud dis...

Страница 142: ...tilisez cette option pour la cuisson lors du Sabbat et des f tes juives uniquement Pour plus d informations consultez le site Internet http www star k org Avec l option Sabbat La temp rature du four p...

Страница 143: ...r en toute s curit mais vous ne devez pas teindre l option Sabbat et remettre le four en marche avant la fin du sabbat ou des f tes Apr s l observation du Sabbat d sactivez l option Sabbat en appuyant...

Страница 144: ...ment les temp ratures pour la cuisson classique en temp ratures pour la cuisson par convection 4 Format de l heure 12 h 24 h R gle l horloge pour qu elle affiche l heure au format 12 heures ou 24 heur...

Страница 145: ...rature de cuisson au gril ou d autonettoyage et reste en m moire apr s une coupure de courant Unit de temp rature F C R gle la commande du four pour afficher les temp ratures en degr s Fahrenheit ou...

Страница 146: ...z sur 1 ou sur 2 pour activer ou d sactiver la fonction d conomie d nergie 1 pour activer 12Hr 2 pour d sactiver Hr 4 Appuyez sur Start OK Commencer OK pour enregistrer la modification Son Active ou d...

Страница 147: ...du four Surveillez l tat de marche arr t de chaque br leur de la cuisini re Commande distance du four R gler ou ajuster distance les param tres du four Ma cuisson teindre le four distance Une fois la...

Страница 148: ...risez aucun type de nettoyant dans les orifices du collecteur Le syst me d allumage se trouve dans ces trous et doit tre prot g de l humidit Commande vocale Pour utiliser la fonction de commande vocal...

Страница 149: ...es grilles l aide d un tampon r curer en plastique Si les grilles ne coulissent pas en douceur apr s le nettoyage frottez les guides des rails lat raux avec du papier cir ou un chiffon imbib de quelqu...

Страница 150: ...ux imbib d eau MISE EN GARDE N utilisez pas de d tergents alcalins d acide sulfurique d acide chlorhydrique de solvants organiques ou de d sinfectants La surface risquerait d tre endommag e Commandes...

Страница 151: ...nnes ou des orifices de gaz Gardez les conduits de ventilation du four d gag s Nettoyez r guli rement les orifices de ventilation pour viter l accumulation de graisse Grilles de br leurs et composants...

Страница 152: ...s de s allumer Pour viter de faire tomber les grilles veillez d abord retirer les deux grilles lat rales N essayez pas d enlever le chapeau du br leur central ovale de la t te Guide de r installation...

Страница 153: ...ltats de cuisson m diocres et des dommages permanents l int rieur du four Le papier d aluminium fondra sur les surfaces int rieures du four et y adh rera N exercez pas de force pour ouvrir la porte du...

Страница 154: ...afficher l heure de la journ e MISE EN GARDE N utilisez pas les br leurs de surface pendant que le four gaz ex cute un cycle d autonettoyage AVERTISSEMENT Assurez vous que toutes les commandes sont l...

Страница 155: ...se d verrouille L air chaud ou la vapeur qui s chappe pourrait vous br ler Remplacement de l clairage du four clairage du four L clairage du four est une ampoule standard de 40 watts Il s allume lorsq...

Страница 156: ...l ext rieur jusqu ce que les bras des charni res soient d gag s des fentes Fig 2 Comment r installer la porte 1 Saisissez fermement les deux c t s de la porte en haut 2 En positionnant la porte dans l...

Страница 157: ...yez les actions sugg r es Points de contr le S curit en mati re de gaz Probl me Cause possible Action Vous sentez une odeur de gaz Le bouton du br leur de surface n est pas la position Arr t et le br...

Страница 158: ...ce sont sales Nettoyez les composants du br leur de surface Consultez la page 39 Probl me Cause Action Flammes du br leur de surface tr s grandes ou jaunes Le mauvais orifice de br leur est install V...

Страница 159: ...dissement s teint automatiquement lorsque le four devient froid Probl me Cause Action L clairage du four lampe ne s allume pas Le verrouillage de la porte du four est activ L cran affiche l ic ne Verr...

Страница 160: ...tement ou d clatement C est normal Il s agit du bruit du m tal qui chauffe et refroidit pendant une fonction de cuisson ou de nettoyage Probl me Cause Action Une fum e excessive se d gage pendant un c...

Страница 161: ...iles faire glisser si elles sont laiss es dans le four pendant un cycle d autonettoyage Bruit du ventilateur C est normal Le ventilateur de convection fonctionne jusqu ce que la fonction soit termin e...

Страница 162: ...l me Cause Action Les aliments ne cuisent pas ou ne r tissent pas correctement dans le four Le mode de cuisson s lectionn n est pas le bon Consultez la page 22 Les grilles du four n ont pas t position...

Страница 163: ...e dans les tats Unis contigus pendant la p riode de garantie sous r serve de la disponibilit de r parateurs agr s SAMSUNG dans la zone g ographique du client Si le service domicile n est pas disponibl...

Страница 164: ...i l utilisation de nettoyants autres que les nettoyants et tampons recommand s ou ii des d versements durcis de mati res sucr es ou de plastique fondu qui n ont pas t nettoy s conform ment aux instru...

Страница 165: ...r se pr valoir du service de garantie l acheteur doit contacter SAMSUNG afin d tablir les proc dures relatives au diagnostic et l intervention n cessaire Pour tre couverte par la garantie la maintenan...

Страница 166: ...VAISE UTILISATION DE CET APPAREIL OU D UNE INCAPACIT UTILISER CET APPAREIL QUELLE QUE SOIT LA BASE L GALE SUR LAQUELLE REPOSE LA PLAINTE ET M ME SI SAMSUNG A T AVERTIE DE L VENTUALIT DE TELS DOMMAGES...

Страница 167: ...ng com ca support anglais ou www samsung com ca_fr support fran ais Num ro du mod le Num ro de s rie Veuillez joindre votre re u ou une copie ce manuel Vous pourrez en avoir besoin ainsi que du num ro...

Страница 168: ...US OU VENEZ NOUS VOIR EN LIGNE L ADRESSE TATS UNIS Consumer Electronics 1 800 SAMSUNG 726 7864 www samsung com us support CANADA 1 800 SAMSUNG 726 7864 www samsung com ca support anglais www samsung c...

Отзывы: