background image

GB

19

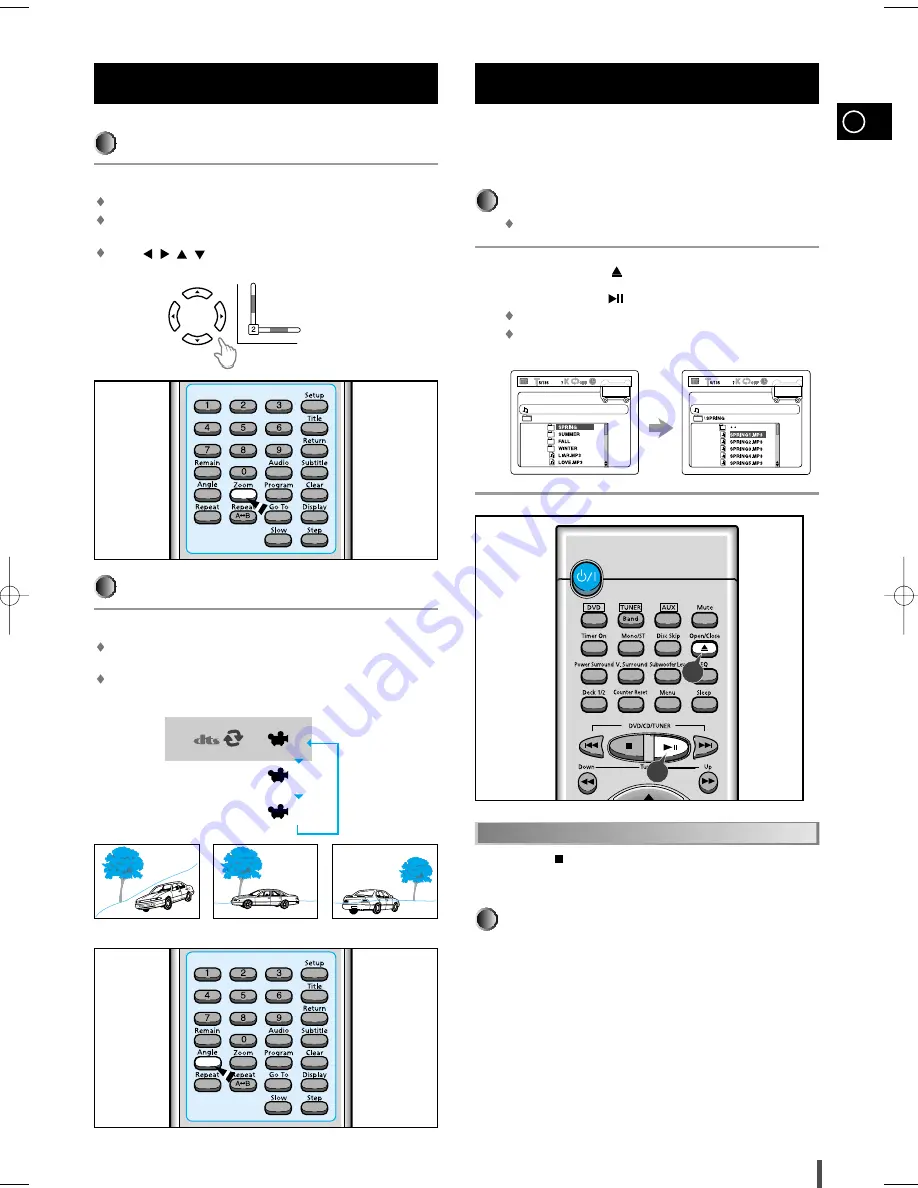
To enlarge an image 

Press the Zoom button.

Images can be enlarged 2x and 4x.

During DVD playback, press the 

Zoom

button to zoom in 2X/4X/nor-

mal, in that order.

Press (

/

/

/

)  to  move the enlarged portion you want to watch.

Various DVD Functions

Selecting the desired Screen Angle

Press the Angle button.

This function only works with discs on which multiple angles have been
recorded.

During playback, press the Angle button to select the desired angle in
1/3, 2/3, 3/3, normal, in that order.

OFF

1/3

2/3

3/3

This system is incorporated with an MP3 decoder. You can
play back MP3 tracks (files)recorded on CD-Rs,CD-RWs,and
CD-ROMs.

Starting Playback

It is recommended to turn on your TV when playing back an MP3 disc.

Press the Open/Close(

) button to load a disc.

Press the Play/Pause(

) button.

After detecting the disc, playback starts.

The on-screen bar and the contents recorded on the MP3 disc will
be shown on the TV if it is turned on.

MP3 Playback

1
2

What is MP3?

MP3 is an abbreviation of Motion Picture Experts Group (or
MPEG) Audio Layer 3. MP3 is simply a file format with a
data compression ratio of 1:10 (128 Kbps*). 
That means,by using MP3 format, one CD-R or CD-RW can 
contain 10 times as much data volume as a regular CD can.
*Bit rate is the average number of bits that one second of
audio data will consume. The measuring unit used is Kbps
(1000 bits per second).
To get a better audio quality, choose a higher bit rate. The
most popular bit rate for encoding (recording)is 128 Kbps.

Press the Stop (    ) button.

To stop during playback

1

2

 MAX-Ds750 GB-1~24   5/22/03 10:45  Page 19

Содержание MAX-DS750

Страница 1: ...Instruction Manual THREE CD CHANGER DVD MINI COMPACT SYSTEM MAX DS750 ...

Страница 2: ... this unit This symbol alerts you to important operating and maintenance instructions accompa nying the unit WARNING To reduce the risk of fire or electric shock do not expose this appliance to rain or moisture CAUTION TO PREVENT ELECTRIC SHOCK MATCH WIDE BLADE OF PLUG TO WIDE SLOT FULLY INSERT CLASS 1 LASER PRODUCT KLASSE 1 LASER PRODUKT LUOKAN 1 LASER LAITE KLASS 1 LASER APPARAT PRODUCTO LASER C...

Страница 3: ...19 System Setup 21 Setting up the Language Features 23 TUNER Searching for and Storing the Radio Stations 23 Selecting a Stored Station 24 Improving Radio Reception 24 TAPE DECK Listening to a Cassette 25 CD Synchro Record Feature 25 Recording a Compact Disc 25 Recording a Radio Programme 26 Copying a Cassette Dubbing 26 Selecting the Cassette Playback Mode Deck 2 Only 26 OTHER FUNCTIONS Timer Fun...

Страница 4: ...D Synchro Recording 17 Search Function buttons Tuning Mode or Stop button 18 Demo Dimmer 19 Cassette Deck 2 20 Multi Jog 21 Enter 22 Headphone Jack Connector 23 Subwoofer Level 24 Sound Mode 25 Volume 26 3D Sound 27 Compact Disc Compartment 28 Open Close 29 Disc Change 30 Disc Selection buttons 31 Window Display 32 Function Selection buttons 33 CD Repeat 34 Memory 33 34 2 1 3 4 5 6 7 8 14 13 16 15...

Страница 5: ...Frequency Time etc 6 FM Mode STEREO 7 EQ 8 D S P 9 CD RW 10 Tape Reverse Mode 11 CD Synchro Recording 12 Tuner Frequency unit 13 SLEEP 14 CD Playing Disc Mode or CD Repeat Mode 15 MP3 CD 16 Clock 17 Playing Disc Number 18 Recording 19 Tape 1 2 20 Tuning Mode Auto 21 FM RDS Mode 22 CD Program or Tuner Memory to Program 23 Tuner Preset ...

Страница 6: ...d DVD Timer On Mono ST Power Surround V Surround Deck 1 2 Counter Reset SubwooferLevel EQ Menu DVD CD TUNER Tuning Enter Volume Down Up Sleep Disc Skip Open Close TUNER Band AUX Mute TAPE AUX button Mute button EQ button Subwoofer Level button Sleep button Menu button Direction Enter button Disc Number Skip button Open Close button Volume Control buttons Speaker output volume control Play Pause bu...

Страница 7: ...Slow Slow button Setup button Title button Return button Subtitle button Clear button Display button Step button Audio button Go To button Number 0 9 buttons Remain button Angle button Repeat button Zoom button Repeat A B button Program button Follow these precautions to avoid leaking or cracking cells Place batteries in the remote control so they match the polarity to and to Use the correct type ...

Страница 8: ...ERMINAL option 3 AM AERIAL CONNECTOR TERMINAL 4 MAIN SPEAKER CONNECTOR TERMINALS 5 DIGITAL OUT JACK 6 SUBWOOFER SPEAKER CONNECTOR TERMINALS 7 LINE OUT 8 SUB WOOFER PRE OUT 9 AUX INPUT 10 S VIDEO OUT 11 VOLTAGE SELECTOR option 12 VIDEO OUT DIGITAL OUT 1 2 3 5 4 6 7 8 9 10 11 12 ...

Страница 9: ...h your mini compact system on The loudspeaker and subwoofer connector terminals are located on the rear of the system The subwoofer generates low pitched tones Ex Explosion the sound of spacecraft flying the sound of pondering etc Press and hold the clamp of the speaker terminal on the rear of the unit Insert the end of the speaker cord into the terminal Match the polarity colors Red to red and bl...

Страница 10: ...ect digital audio equipment DAT deck MD recorder etc Remove the dust cap 1 from the DVD CD DIGITAL OUT jack Then connect an optical cable plug to the DVD CD DIGITAL OUT jack When the DVD CD DIGITAL OUT jack is not being used Attach the supplied dust cap DVD CD Digital Out Jack Connection of the subwoofer optional SUBWOOFER IN DIGITAL OUT The subwoofer generates low pitched tones Ex Explosion the s...

Страница 11: ...ecting to an amplifier with Dolby Pro Logic support Connection for better sound OPTICAL INPUT DIGITAL OUT DIGITAL OUT While playing a DTS disc no sound is reproduced In this case connect to an external amplifier ...

Страница 12: ...ception If reception is poor e g distance from transmitter too great walls blocking the radio waves etc install an out door aerial Connecting the SW Aerial option How to connect a COAXIAL TYPE aerial Connect a 75Ω antenna to the FM antenna terminal Plug the connector on the FM aerial supplied into the coaxial socket 75Ω marked FM on the rear of the system Follow the instructions given on Page 23 t...

Страница 13: ...ing the unit For each step you have a few seconds to set the required options If you exceed this time you must start again Switch the system on by pressing On Standby Press Timer Clock twice Result CLOCK is displayed Press Enter on the front panel Result The hour flashes To Turn the Multi Jog knob to the Increase the hours Right Decrease the hours Left When the correct hour is displayed press Ente...

Страница 14: ...n is automatically selected when DISC SKIP is pushed To select a specific disc press the corresponding Disc 1 2 3 button on the front panel or Disc Skip on the remote control until the required disc indicator flashes If you use the Disc 1 2 3 function when listening to the radio or to a tape the system switches automatically to the DVD CD mode If the disc selected is not loaded the next disc is pl...

Страница 15: ...X 4 X 8 PLAY Skipping through a Chapter Press the and button Each time the button is pressed during playback it moves to the next or previous chapter and plays it However you cannot skip forward or backward through consecu tive the chapters SEARCH SEARCH To move directly to a title chapter or time Press the Go To button Each time the button is pressed it repeats as shown below Press Number 0 9 but...

Страница 16: ...APTER TIME TITLE TIME REMAIN TIME DISC REMAIN TIME TRACK DISC TIME TRACK TIME Press the Repeat A B button at the beginning A of the segment you want to review Press the Repeat A B button again at the end B of the segment you want to review The segment will begin repeating A B Repeat Playback Repeat playback allows you to repeat a chapter title or track Playing Repeatedly Press the Repeat button Ea...

Страница 17: ...uttons to select the desired chapter You can use also just the Left Right button Press the Enter button The selected track number is programming and the cursor moves to the next number At this time you can continue programming if you want to When programming more than 10 tracks select and then press the Enter button The program selection screen where you can program up to 10 additional tracks appe...

Страница 18: ...Clear button When you have entered a wrong number You can program or change particular tracks for VCD or CD discs in the same manner Selecting the Audio Language Press the Audio button Depending on the number of languages recorded on a DVD disc a different audio language KOREAN ENGLISH JAPANESE etc is selected each time the button is pressed Selecting the Audio Language Subtitle Language Depending...

Страница 19: ... turn on your TV when playing back an MP3 disc Press the Open Close button to load a disc Press the Play Pause button After detecting the disc playback starts The on screen bar and the contents recorded on the MP3 disc will be shown on the TV if it is turned on MP3 Playback 1 2 What is MP3 MP3 is an abbreviation of Motion Picture Experts Group or MPEG Audio Layer 3 MP3 is simply a file format with...

Страница 20: ... CD R or CD RW discs make sure that the recording ses sion is properly terminated or they will not be playable Depending on disc properties and recording quality some CD R RW may not be playable CD RW has a lower reflection rate than CD R media and consequently it will take a longer to read CD R discs CD RW discs recorded at high speed tend to be difficult for the DVD player to read If the recordi...

Страница 21: ...op mode press the Setup button Press the Left Right button to select the system Press the Up Down button to select the desired item Press the Enter button or Right button Move to the detailed items Then press the Left button to return to the previous step Press the Up Down button to select the desired sub item and then press the Enter button System Setup Press the Setup button again To End the Sys...

Страница 22: ...s the Enter button There are up to 8 rating levels on a disc If LEVEL 6 is selected a disc which contains rating LEVEL 7 and above cannot be played If you select NEW PASSWORD the screen changes and enables you to enter the new password DIGITAL OUTPUT Select this if Dolby Digital 5 1 CH connections have been made Sends a digital signal that carries the Dolby Digital 5 1 or DTS multichannel informat...

Страница 23: ...the volume by Turning the Volume knob on the front panel or Pressing the VOL or buttons on the remote control Select the FM stereo or mono mode by pressing Mono ST Searching for and Storing the Radio Stations 1 2 3 4 5 6 7 Using the DVD player s Setup function you can customize the Menu Language Subtitle Language and Disc Menu Language To set up the language feature Press the Setup button from the...

Страница 24: ...on the remote control until PRESET is displayed Turning Multi jog on the front panel left or right until the desired station is found or press to select the desired station or Select the desired station by pressing the station number stored using the button on the remote control Result The desired station is now received You can improve the quality of radio reception by Rotating the FM or AM MW ae...

Страница 25: ...ways Synchronised recording Direct recording This feature enables you to synchronize the start of the recording with the start of the disc or track of your choice Switch the system on by pressing On Standby Insert a blank cassette in Deck 2 Select the CD function by pressing DVD CD on the front panel Load a compact disc Select the required disc Select the required track and press CD Synchro or pre...

Страница 26: ... program of your choice You can only record on cassettes in Deck 2 You do not need to adjust the volume as it has no effect on the recording Switch the system on by pressing Standby On Insert a blank cassette in Deck 2 Select the TUNER function by pressing TUNER Select the radio station that you wish to record by pressing Tuning or on the remote control or by press the Down or Up on the front pane...

Страница 27: ...nel Result VOL XX is displayed where XX corresponds to the volume already set Press Tuning Down and Up to adjust the volume level and press Enter on the front panel Result The source to be selected is displayed Turn the Multi Jog knob to select the source to be played when the system switches on If you select You must also TAPE cassette Insert a recorded cassette in one of the decks before setting...

Страница 28: ...l real sound To select Power Surround Press Power Surround button on the front panel P SURR is displayed To cancel this function press Power Surround button again and OFF is displayed for a few seconds You can turn the sound off temporarily on your system Example You wish to answer a telephone call Press Mute To switch the sound back on at the same volume as before press Mute again or the Volume b...

Страница 29: ...ep Change the remaining time by repeating Steps 1 and 2 To cancel SLEEP function press Sleep one or more times until OFF is displayed Setting the System to Switch off Automatically Connecting Headphones 1 2 3 90 MIN 2 1 The microphone enables the user to mix in his or her vocals to sing along with the music Preparation Plug the microphone with a 6 3ø mic jack into microphone terminal Turn the Mic ...

Страница 30: ...grams illustrate the precautions to be taken when using or moving your mini compact system GB 30 Connecting to an External Source Safety Precautions 1 2 3 4 5 6 Ambient operating conditions Ambient temperature 5 C 35 C Humidity 10 75 Do not expose the unit to direct sun radiation or other heat sources This could lead to overheating and malfunction of the unit VOLUME UP DOWN Remove the batteries fr...

Страница 31: ... the tape mechanism It always takes a little time to become familiar with a new appliance If you have any of the problems listed below try the solutions given They may save you the time and inconvenience of an unnecessary service call If the above guidelines do not allow you to solve the problem take a note of The model and serial numbers normally printed on the rear of the system Your warranty de...

Страница 32: ... Total harmonic distortion 0 5 COMPACT DISC PLAYER Capacity 3 discs Frequency range 20 Hz 20 KHz 1 dB Signal noise ratio 90 dB at 1 KHz with filter Distortion 0 05 at 1 KHz Channel separation 80 dB Disc sizes Diameter 120 or 80 mm Thickness 1 2 mm TAPE DECK Frequency range 125 Hz 8 KHz Signal noise ratio 40 dB Channel separation 30 dB Erasing effect 60 dB AMPLIFIER Output power 4Ω 70W CH RMS total...

Страница 33: ...sc can contain up to 32 subtitle languages These numbers are recorded on DVD discs When a disc contains two or more movies these movies are numbered as Title 1 Title 2 etc These numbers are assigned to the tracks which are recorded on video and audio CDs They enable specific tracks to be located quickly Contains recordings of pictures and sound whose quality is roughly comparable to that of video ...

Страница 34: ...ELECTRONICS THIS APPLIANCE IS MANUFACTURED BY AH68 01237B ...

Отзывы: