background image

English-10

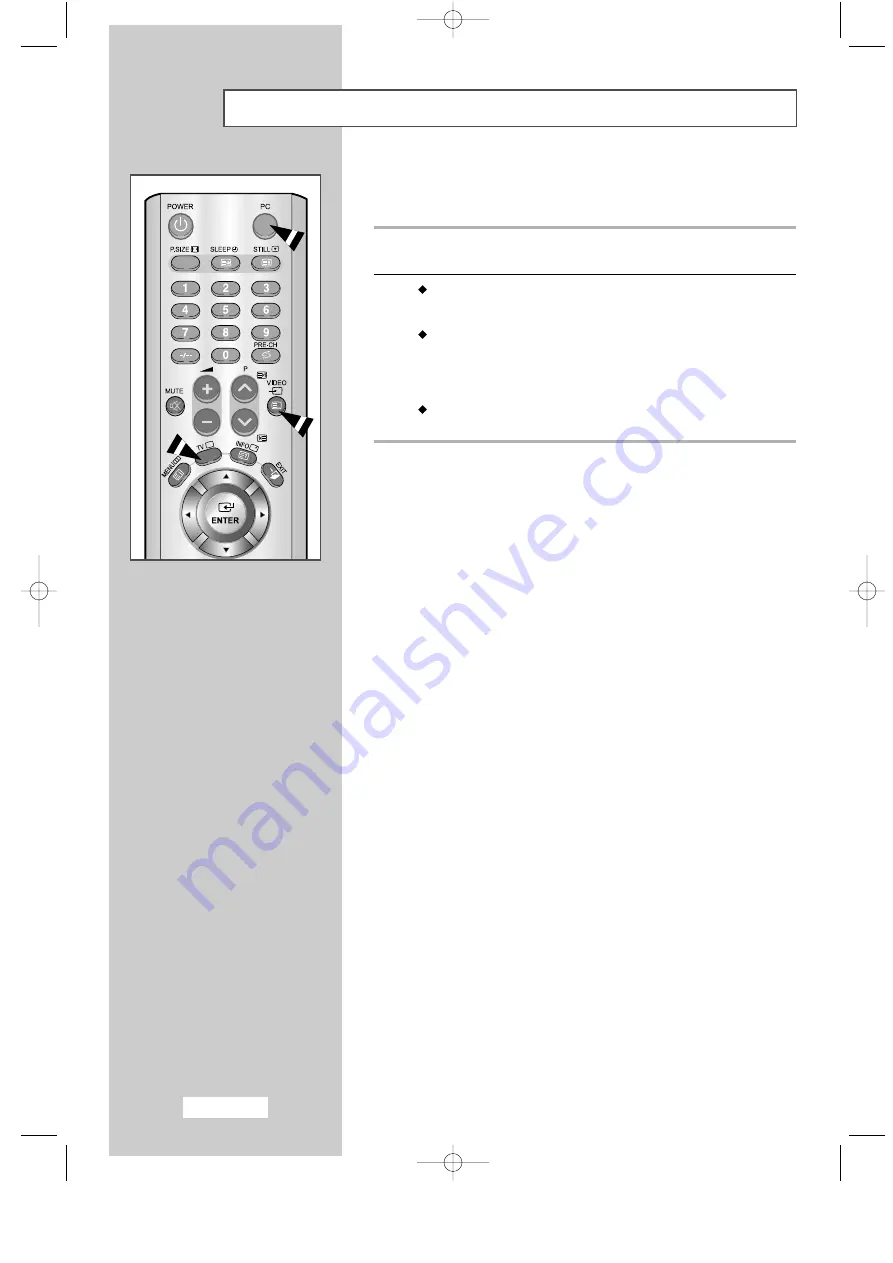
Viewing Pictures From External Sources

Once you have connected up your various audio and video systems,
you can view the different sources by selecting the appropriate input.

1

Check that all the necessary connections have been made

(refer to pages 

8

and 

9

for further details).

2

PC button...

Press the PC button to choose PC mode.

Video button...

Press the Video button to choose Video mode.

The input sources are displayed in the following order:

AV1 - AV2 - AV3 - S-Video.

TV button...

Press the TV button to choose TV mode.

01-BN68-00437D-01Eng  9/24/03 3:58 AM  Page 10

Содержание LW17N23N

Страница 1: ...e reference ON SCREEN MENUS PC DISPLAY PICTURE IN PICTURE PIP TELETEXT AFTER SALES SERVICE Do not hesitate to contact your retailer or service agent if a change in the performance of your product indicates that a faulty condition may be present BN68 00437T 02 ELECTRONICS ThisdeviceisaClassBdigitalapparatus BN68 00437T 01EngCover qxd 6 17 04 5 08 AM Page 1 ...

Страница 2: ...3N Owner s Instructions Before operating the unit please read this manual thoroughly and retain it for future reference ON SCREEN MENUS PC DISPLAY PICTURE IN PICTURE PIP TELETEXT 01 BN68 00437T 01Eng 2 14 04 12 17 AM Page 1 ...

Страница 3: ...xtended period of time the amount of light transmission will also remain varied and as a result the borders may leave traces Digital Ready TV When you select the wide screen 16 9 mode to watch an SD grade digital broadcast and the set top box output is 1080i Digital Ready TV When the TV receives HD grade signals and the set top box output is 1080i When you watch a digital HD grade broadcast on a r...

Страница 4: ... left right and the center of the screen remain fixed for an extended period of time the amount of light transmission will also remain varied and as a result the borders may leave traces When you watch a DVD CD or a video in wide screen 21 9 format on a wide screen 16 9 TV When you connect a computer or a game console to the TV and select the 4 3 screen mode If you connect a DVD player computer or...

Страница 5: ... the furnishing performance or use of this material The Samsung logo is the registered trademarks of Samsung Electronics Co Ltd Microsoft Windows and Windows NT are registered trademark of Microsoft Corporation VESA DPMS and DDC are registered trademarks of Video Electronics Standard Association All other product names mentioned herein may be the trademarks or registered trademarks of their respec...

Страница 6: ...f Contact qualified service personnel During storm conditions especially when there is lightning unplug your set from the mains socket and aerial Keep all power adaptors apart Possible fire hazard Always keep the power adaptor in a well ventilated area Remove and discard the plastic sheet cover Possible fire hazard Keep the power adaptor away from any other heater Possible fire hazard If the remot...

Страница 7: ... 15 Plug Play 16 Selecting TV Mode or an Input Source 18 Editing an Input Source Name 19 Choosing Your Language 20 SETTING THE CHANNELS Storing Channels Automatically 21 Storing Channels Manually 22 Editing the Channels 24 Sorting the Stored Channels 25 Giving Channels Names 26 Fine Tuning Channel Reception 27 SETTING THE PICTURE Changing the Picture Standard 28 Adjusting the Custom Picture 29 Adj...

Страница 8: ...PC Screen Automatically 48 USING THE TELETEXT FEATURE Teletext Feature 49 Displaying the Teletext Information 50 Selecting a Page by Number 51 Using FLOF to Select a Page 52 Storing Teletext Pages 53 RECOMMENDATIONS FOR USE Troubleshooting Before Contacting Service Personnel 54 Power Saver 55 Technical and Environmental Specifications 56 Display Modes 57 Maintenance of Your Television 58 How to co...

Страница 9: ...n the OSD Increases or decreases the level of audio volume and the values of the selected function Moves the selector up or down on the OSD Increases or decreases the channel number POWER Turns ON OFF your set SPEAKER REMOTE CONTROL SENSOR POWER INDICATOR Lights up when you turn the power off Colors may vary depending on the model you purchase 01 BN68 00437T 01Eng 2 14 04 12 18 AM Page 6 ...

Страница 10: ...ur set ensure that all elements are switched off Refer to the documentation supplied with your equipment for detailed connection instructions and associated safety precautions Power Input Option Colors may vary depending on the model you purchase 01 BN68 00437T 01Eng 2 14 04 12 18 AM Page 7 ...

Страница 11: ...r Connect the 15 Pin D SUB connector to the PC video connector Connect the stereo audio cable to the Audio ST jack on the rear of your set and the other end to the Audio Out jack of the sound card on your computer Pin Separate H V Composite H V 1 Red R Red R 2 Green G Green G 3 Blue B Blue B 4 Grounding Grounding 5 Grounding DDC return Grounding DDC return 6 Grounding Red R Grounding Red R 7 Groun...

Страница 12: ...s are connected the sound from the built in speakers will be disabled Connecting Headphones Plug a set of headphones into the 3 5mm mini jack socket on the rear of the set Kensington Slot This television has been designed to apply a burglarproof lock Retractable Stand Tilt the screen until you feel comfortable The maximum tilt angle is 10 degrees in the backward direction Please do not tilt the te...

Страница 13: ...nput 1 Check that all the necessary connections have been made refer to pages 8 and 9 for further details 2 PC button Press the PC button to choose PC mode Video button Press the Video button to choose Video mode The input sources are displayed in the following order AV1 AV2 AV3 S Video TV button Press the TV button to choose TV mode 01 BN68 00437D 01Eng 9 24 03 3 58 AM Page 10 ...

Страница 14: ...r on the rear of the remote control by pressing the symbol downwards and then pulling firmly to remove it 2 Install two AAA size batteries on the battery against on the remote control on the battery against on the remote control 3 Replace the cover by aligning it with the base of the remote control and pressing it back into place Do not mix battery types i e alkaline and manganese 01 BN68 00437D 0...

Страница 15: ...ch off One Two digit channel selection Available source selection Use to see information on the current broadcast All Functions Except Teletext PIP FUNCTIONS PIP ON Picture In Picture On Off POSITION PIP position selection TV VIDEO PIP source selection SIZE PIP size selection SWAP Interchange the main and sub picture P PIP Channel selection Exit the OSD Control the cursor in the menu Select to the...

Страница 16: ...splay mix both teletext information and the normal broadcast Teletext cancel Fasttext topic selection Teletext Functions Teletext hold Teletext mode selection LIST FLOF Teletext store Teletext reveal Teletext size selection P Teletext next page P Teletext previous page 01 BN68 00437D 01Eng 9 30 03 5 43 AM Page 13 ...

Страница 17: ... button again Placing in Standby Mode Your set can be placed in Standby mode in order to reduce the power consumption The Standby mode can be useful when you wish to interrupt viewing temporarily during a meal for example 1 Press the POWER button 2 To switch back on simply press the POWER button again or a numeric button Do not leave your set in Standby mode for long periods of time when you are a...

Страница 18: ...e corresponding channels Used to select a channel numbered ten or over Press this button and the symbol is displayed Enter the two digit channel number Used to increase the volume Used to decrease the volume MUTE Used to switch the sound off temporarily To turn the sound back on press this button again or press the or button MENU Used to display the Used to return to the previous on screen menu sy...

Страница 19: ...8 Languages 3 Press the ENTER button to confirm your choice Result The message Antenna Input Check is displayed with OK selected 4 Press the ENTER button 5 Select your Country by pressing the or button Press the ENTER button Result The country menu is displayed Belgie Deutschland Espania France Italia Nederland Schweiz Sverige UK East Europe Others 6 Select the Hour or Min by pressing the or butto...

Страница 20: ...The options available in the Setup group are displayed 3 Press the ENTER button 4 Press the or button to select the Plug Play Press the ENTER button Result The message Plug Play is displayed 5 For further details on how to set up this feature refer to page 16 and 25 The Sort menu is displayed after the Plug Play ends 02 BN68 00437D 01Eng 9 24 03 3 58 AM Page 17 ...

Страница 21: ...Result The main menu is displayed 2 Press the or button to select the Input Result The options available in the Input group are displayed 3 Press the ENTER button 4 Press the ENTER button Result The TV Video is selected 5 Press the or button to move to the input source that you wish to choose Press the ENTER button Result The input source changes to the one you have chosen 02 BN68 00437D 01Eng 9 2...

Страница 22: ...ayed 3 Press the ENTER button 4 Press the or button to select the Edit Name Press the ENTER button 5 Press the or button to move to the input source that you wish to edit Press the ENTER button Result The following options are available AV 1 AV 2 AV 3 S Video PC 6 Select the required device by pressing the or repeatedly Result The following options are available VCR DVD Cable STB HD STB Satellite ...

Страница 23: ...is displayed 2 Press the or button to select the Setup Result The options available in the Setup group are displayed 3 Press the ENTER button 4 Press the or button to select the Language Press the ENTER button 5 Select a particular Language by pressing the or button repeatedly 6 When you are satisfied with your choice press the EXIT button to return to normal viewing 02 BN68 00437D 01Eng 9 24 03 3...

Страница 24: ...s the ENTER button to search the channels The sub menu is changed from Start to Stop with channel search started Result The search will end automatically Channels are sorted and stored in an order which reflects their position in the frequency range with lowest first and highest last The programme originally selected is then displayed To return to the previous menu press or button to select Return...

Страница 25: ...ons available in the Manual Store group are displayed with the Prog No selected 5 Press the or button to select Colour System Press the ENTER button Select the Colour System required by pressing the or button repeatedly and then press the ENTER button Result The colour standards are displayed in the following order AUTO PAL SECAM NT 4 43 6 Press the or button to select Sound System Press the ENTER...

Страница 26: ...ystem required 9 If you do not know the channel numbers press the or button to select Search Press the ENTER button Start the Search by pressing the or button Press the ENTER button Result The tuner scans the frequency range until the first channel or the channel that you selected is received on your screen 10 Press the or button to select Store Press the ENTER button Select YES by pressing the or...

Страница 27: ... the ENTER button 4 Press the or button to select Add Delete Press the ENTER button Result The state of the current channel is displayed 5 Press the or button to select the channel that you wish to Add or Delete Result If the channel that you wish to edit is not in the memory Add is selected and displayed Otherwise if the channel that you wish to edit is in the memory Delete is selected and displa...

Страница 28: ...s the ENTER button 4 Press the or button to select Sort Press the ENTER button Result The current Prog No Channel and Name are displayed 5 Select the channel number that you wish to change by pressing the or button repeatedly Press the ENTER button Result The selected Channel number and Name are moved to the right side 6 Press the or button to move to the position which you would like to change an...

Страница 29: ... The current Prog No Channel and Name are displayed 5 If necessary select the channel to be assigned to a new Name by pressing the or button Press the ENTER button Result The selection bar is displayed around the name box 6 To Then Select a letter number or symbol Press the or button Move on to the next letter Press the button Move back to the previous letter Press the button Confirm the name Pres...

Страница 30: ...able in the Channel group are displayed 3 Press the ENTER button 4 Press the or button to select the Fine Tune Press the ENTER button 5 Press the or button to select the channel that you wish to Fine Tune 6 Press or button until you reach the setting to obtain a sharp and clear picture and good sound quality To store the setting press the ENTER button 7 To reset the fine tuning select Reset by pre...

Страница 31: ...options available in the Picture group are displayed 3 Press the ENTER button 4 Press the ENTER button Result The Picture Mode is selected 5 Select the required picture effect by pressing the or button repeatedly Press the ENTER button Result The following picture effects are available Dynamic Standard Movie Custom You can also set these options simply by pressing the P MODE Picture Mode button 02...

Страница 32: ...cture Press the ENTER button 5 Select the option Contrast Brightness Sharpness Colour or Tint NTSC only to be adjusted by pressing the or button Press the ENTER button Result The horizontal bar is displayed 6 Press the or button to reach the required setting 7 When you are satisfied with the setting press the MENU button to return to the previous menu or press the EXIT button to return to normal v...

Страница 33: ...ton to select the Picture Result The options available in the Picture group are displayed 3 Press the ENTER button 4 Press the or button to select the Colour Tone Press the ENTER button Result The following options are available Cool 2 Cool 1 Normal Warm 1 Warm 2 5 When you are satisfied with your choice press the EXIT button to return to normal viewing 02 BN68 00437D 01Eng 9 25 03 6 08 AM Page 30...

Страница 34: ... the Size Press the ENTER button 5 Select the required picture format by pressing the or button repeatedly Press the ENTER button Result The following options are available Auto Wide Wide Panorama Zoom 1 Zoom 2 4 3 You can also set these options simply by pressing the P SIZE Picture SIZE button This feature does not work when the PIP Double Window feature is active Press the STILL button on the re...

Страница 35: ...or button Press the ENTER button 7 PC Only Press the or button to select TV Video Press the ENTER button Select the source of the sub picture by pressing the or button and then press the ENTER button Result The sources are displayed in the following order TV AV1 AV2 AV3 S Video PC Only TV Video and Prog No are inactive and not available in TV mode However they become active and available in PC mod...

Страница 36: ...scription PIP ON Used to operate the ON OFF function of PIP directly SWAP Used to interchange the main picture and the sub picture When the main picture is in Video mode and the sub picture is in the set mode you might not hear the sound of main picture when pressing the SWAP button after changing the sub picture channel At this time reselect the main picture channel Used to select the channel of ...

Страница 37: ...he options available in the Sound group are displayed 3 Press the ENTER button 4 Press the ENTER button Result The Sound Mode is selected 5 Select the required sound effect by pressing the or button repeatedly Press the ENTER button Result The following sound effects are available Standard Music Movie Speech Custom You can also set these options simply by pressing the S MODE Sound Mode button 03 B...

Страница 38: ...e Custom Sound Press the ENTER button 5 Select the option Volume L R 100 300 1K 3K 10K to be adjusted by pressing the or button Press the ENTER button Result The Vertical bar is displayed 6 Press the or button to reach the required setting 7 When you are satisfied with the setting press the MENU button to return to the previous menu or press the EXIT button to return to normal viewing If you make ...

Страница 39: ...s the MENU button Result The main menu is displayed 2 Press the or button to select the Sound Result The options available in the Sound group are displayed 3 Press the ENTER button 4 Press the or buttons to select WOW Press the ENTER button 5 Press the or button to select Off On Press the ENTER button 03 BN68 00437D 01Eng 9 25 03 5 08 AM Page 36 ...

Страница 40: ...Off On Press the ENTER button Selecting the Sound Mode You can set the sound mode by pressing the DUAL I II button When you press it current sound mode is displayed on the screen If the receiving conditions deteriorate listening will be easier if the mode is set to Mono If the stereo signal is weak and automatic switching occurs switch to Mono Default Automatic change DUAL 1 Automatic change DUAL ...

Страница 41: ...in the Sound group are displayed 3 Press the ENTER button 4 Press the or button to select Headphone Press the ENTER button 5 Select the option Volume Balance Bass Treble to be adjusted by pressing the or button Press the ENTER button Result The horizontal bar is displayed 6 Press the or button to reach the required setting 7 When you are satisfied with the setting press the MENU button to return t...

Страница 42: ...ound Result The options available in the Sound group are displayed 3 Press the ENTER button 4 Press the or button to select the Sound Select Press the ENTER button 5 Press the or button to select Main Sub Press the ENTER button You can use the sub screen sound mode feature only when the PIP feature is ON 03 BN68 00437D 01Eng 9 25 03 5 08 AM Page 39 ...

Страница 43: ...played 3 Press the ENTER button 4 Press the ENTER button Result The Time is selected 5 Press the ENTER button Press the or button to set the Hour 6 Press the or button to move to Min Press the or button to set the minutes 7 Press the ENTER button Result The clock is set You can also set the time using the numeric buttons on the remote 03 BN68 00437D 01Eng 9 24 03 4 00 AM Page 40 ...

Страница 44: ...s the or button to select the Sleep Timer Press the ENTER button 5 Select the number of minutes after which your set switches On by pressing the or button repeatedly Result The preset time intervals 30 60 90 120 150 180 minutes You can also select this feature by simply pressing the SLEEP button If the sleep timer is already set the screen displays the remaining time and then your set will be swit...

Страница 45: ...on 4 Press the ENTER button Result The Time menu are displayed with Clock selected 5 Press the or button to select the On Timer Press the ENTER button Result The On Timer menu is displayed To Press the Move to Hour Min Prog No and Volume or button Set Hour Min Prog No and or button Volume level Move to Set or button Select On to enable above setting or button 6 Press the or button to select Off ti...

Страница 46: ...layed 2 Press the or button to select Setup Result The options available in the Setup group are displayed 3 Press the ENTER button 4 Press the or button to select Blue Screen Press the ENTER button 5 Select the required option On or Off by pressing the or button 6 Press the EXIT button to return to normal viewing You can view the setting status of the selected source by pressing the INFO button on...

Страница 47: ...ur computer manufacturer or Samsung Dealer 1 First click on Settings on the Windows start menu While Settings is highlighted move the cursor so that Control Panel is highlighted 3 Navigate to the Settings tab on the display dialog box The correct size setting resolution 1280 x 768 pixels If a vertical frequency option exists on your display settings dialog box the correct value is 60 or 60 Hz Othe...

Страница 48: ...enu are displayed 5 Press the ENTER button Result The Image Lock menu is selected 6 Press the or button to select Coarse or Fine Press the ENTER button Result The horizontal bar is displayed 7 Press the or button to adjust the screen quality Vertical stripes may appear or the picture may become blurry 8 When you are satisfied with the settings press the MENU button to return to the previous menu o...

Страница 49: ...tton Result The options available in the PC Setup menu are displayed 5 Press the or button to select Position Press the ENTER button Result You can adjust the image Position 6 Press the or button to adjust the vertical position Press the or button to adjust the horizontal position 7 Press the MENU button to return to the previous menu or press the EXIT button to return to normal viewing Preset to ...

Страница 50: ...NTER button 4 Press the or button to select PC Setup Press ENTER button Result The options available in the PC Setup menu are displayed 5 Press the or button to select Reset Press the ENTER button 6 Select the option Image Reset or Colour Reset to be replaced by pressing the or button Press the ENTER button Result The screen becomes black and returns to the original view a few seconds later Preset...

Страница 51: ...ER button 4 Press the or button to select PC Setup Press ENTER button Result The options available in the PC Setup menu are displayed 5 Press the or button to select Auto Adjustment Press the ENTER button Result The screen quality and position are automatically adjusted and the screen returns to the original view a few seconds later Preset to PC mode by pressing the PC button 04 BN68 00437D 01Eng ...

Страница 52: ...d into numbered pages see diagram Part Contents A Selected page number B Broadcasting channel identity C Current page number or search indicators D Date and time E Text F Status information FASTEXT information Teletext information is often divided between several pages displayed in sequence which can be accessed by Entering the page number Selecting a title in a list Selecting a coloured heading F...

Страница 53: ... providing the Teletext service using the or button 2 Press the TEXT MIX button to activate the teletext mode Result The contents page is displayed It can be redisplayed at any time by pressing the index button 3 If you wish to display the actual broadcast at the same time as the teletext page press the TEXT MIX button again 4 To return to normal viewing press the cancel button 5 Press the TV butt...

Страница 54: ...ndary pages the secondary pages are displayed in sequence To freeze the display on a given page press the hold button Press the hold button again to resume Using the various display options To display Press the Hidden text reveal answers to quiz games for example The normal screen reveal again A secondary page subpage by entering its 4 digit number The next page page up The previous page page down...

Страница 55: ...o the topic that you wish to select the available topics are given on the status line Result The page is displayed with other coloured information that can be selected in the same way 3 To display the previous or next page press the corresponding coloured button 4 To display the subpage see the following steps Press the subpage button Result The available subpages appear Select the required subpag...

Страница 56: ...t colours The LIST FLOF button is used to switch between the LIST and FLOF modes 2 Press the coloured button corresponding to the page that will be replaced 3 Enter the new page number using the numeric buttons 4 Repeat steps 2 and 3 for each page to be stored using a different coloured button each time 5 Press the store button until the corresponding blocks blink 04 BN68 00437D 01Eng 9 24 03 4 01...

Страница 57: ...n Check the picture contrast and brightness settings Check the volume Check the volume Check whether the MUTE button has been pressed on the remote control Adjust the colour settings Check that the broadcast system selected is correct Try to identify the electrical appliance that is affecting the set and move it further away Plug your set into a different mains socket Check the direction location ...

Страница 58: ... this product But the pixels of RED GREEN BLUE and WHITE color seem to be bright sometimes or some of black pixels could be seen This is not from bad quality and you can use it without uneasiness For example the number of TFT LCD sub pixels that is contained in this product are 2 949 120 437T 01Eng qxd 8 25 04 2 32 PM Page 1 ...

Страница 59: ...DC 14 V 4 5 A Power Consumption Normal 52 W Power Saving 3 W Dimensions W x D x H Weight TV Body 18 26 x 3 45 x 13 60 inch 9 7 lbs 463 8 x 87 7 x 345 0 mm 4 4 kg With Stand 18 26 x 7 05 x 14 32 inch 10 4 lbs 463 8 x 179 0 x 363 7 mm 4 72 kg Environmental Considerations Operating Temperature 50 F to 104 F 10 C to 40 C Operating Humidity 10 to 80 Storage Temperature 13 F to 113 F 25 C to 45 C Storag...

Страница 60: ...ync Polarity Frequency kHz Frequency Hz Frequency MHz H V Macintosh 640 X 480 35 000 66 667 30 240 832 X 624 49 726 74 551 49 500 IBM 640 X 480 31 496 59 940 25 175 720 X 400 31 469 70 087 28 322 VESA 640 X 480 37 861 72 809 31 500 640 X 480 37 500 75 000 31 500 640 X 480 43 269 85 008 36 000 800 X 600 35 156 56 250 36 000 800 X 600 37 879 60 317 40 000 800 X 600 48 077 72 188 50 000 800 X 600 46 ...

Страница 61: ...power outlet before cleaning When you clean the TFT LCD and the external panel please apply the recommended small amount of cleaner using a soft dry cloth to polish it Do not force your television screen scrubbing it only softly The use of excessive force can result in stains on the screen Never use flammable cleaning material to clean your television or any other electrical apparatus 04 BN68 0043...

Страница 62: ...ry Remove the cover as shown in the picture 1 Connect the cables as shown in the picture 2 Replace the cover 3 Attach the stand to the TV set as shown in the picture Note The curved side of the stand base should be placed at the back of the TV set as shown in the above figure 4 Colors may vary depending on the model you purchase 04 BN68 00437T 01Eng 2 14 04 12 19 AM Page 59 ...

Страница 63: ...ure the bracket to the wall 2 Use a holes to attach the VESA mount Use b holes to attach the wall mount This installation is to be used when attaching the wall mount to a concrete wall When attaching to other building materials please contact your nearest dealer 04 BN68 00437D 01Eng 9 24 03 4 01 AM Page 60 ...

Страница 64: ...ount the TV on the wall mount bracket The wall mount bracket is sold separately 4 Holder Wall 1EA Rubber 4EA Holder LCD L R 2EA Holder Ass y 1EA Screw FH 4 x 8 10EA Anchor 4EA Screw BH 4 x 25 4EA Colors may vary depending on the model you purchase 04 BN68 00437T 01Eng 2 14 04 12 23 AM Page 61 ...

Страница 65: ...ension lead or consult your dealer for assistance However if there is no alternative to cutting off the plug remove the fuse and then safely dispose of the plug Do NOT connect the plug to a mains socket as there is a risk of shock hazard from the bared flexible cord IMPORTANT The wires in the mains lead are colored in accordance with the following code BLUE NEUTRAL BROWN LIVE As these colors may n...

Страница 66: ...English 63 Memo 04 BN68 00437D 01Eng 9 24 03 4 01 AM Page 63 ...

Страница 67: ...RVICE Do not hesitate to contact your retailer or service agent if a change in the performance of your product indicates that a faulty condition may be present ELECTRONICS 04 BN68 00437D 01Eng 9 24 03 4 01 AM Page 64 ...

Отзывы: