background image

english - 1

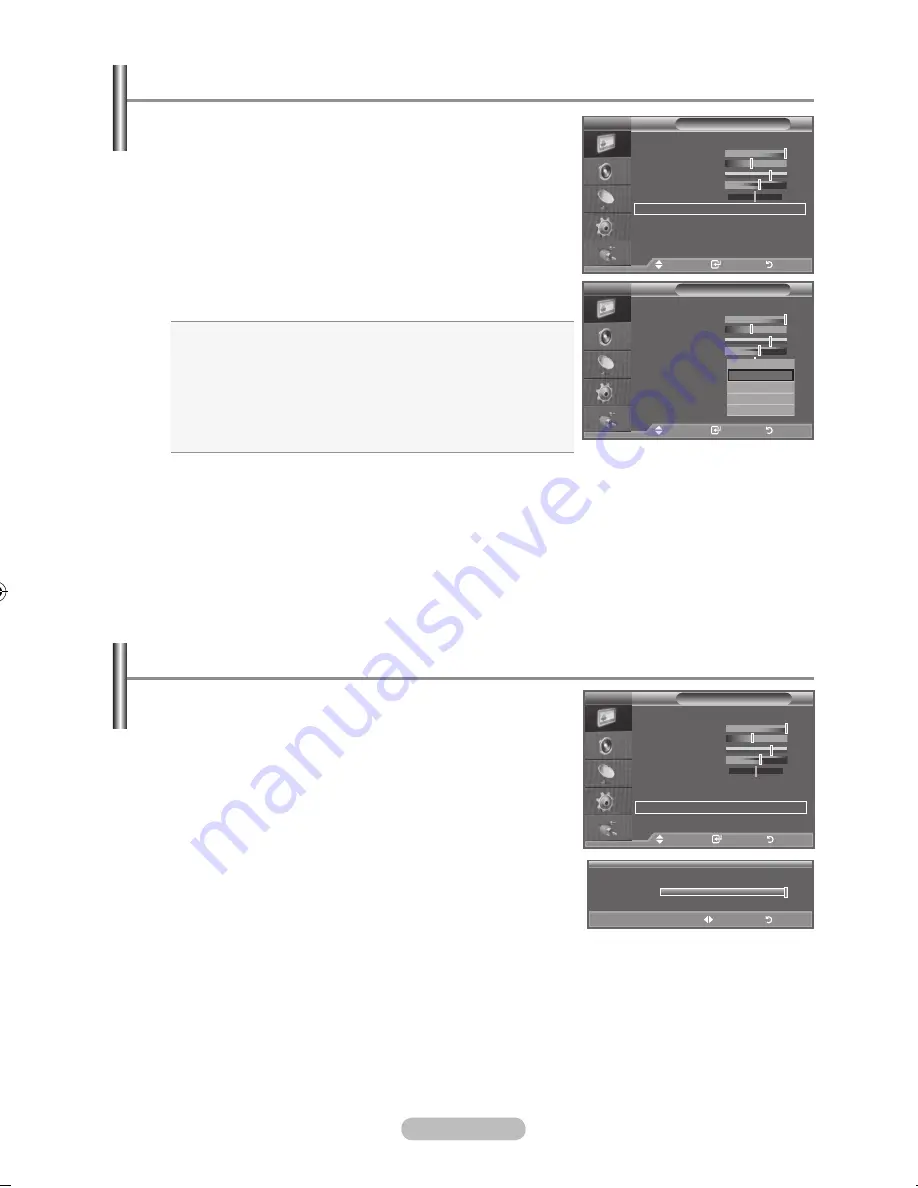
Changing the Colour tone

You can select the most comfortable colour tone to your 

eyes.
1.

  To select the desired picture effect, follow the  


"Changing the Picture Standard" instructions number 1 to 3. 


(On page 15

)

2.

  Press the ▲ or ▼ button to select "Colour Tone", then press 


the 

enter/oK

 button.

.

  Press the ▲ or ▼ button to select the desired colour tone 


setting. Press the 

enter/oK 

button.

.

  Press the 

exIt

 button to exit

♦ 

Cool2:  

Makes the colour temperature bluer than "Cool1" 

menu.

♦ 

Cool1:

 Makes whites bluish.

♦ 

normal:

 Keeps whites white.

♦ 

Warm1:

 Makes whites reddish.

♦ 

Warm2:

  Makes the colour temperature redder than 

"Warm1" menu.

The adjusted values are stored according to the selected Picture mode.
When the picture mode is set to "Dynamic" or "Standard", "Warm1" and "Warm2" cannot be selected.


Picture

mode 

: Dynamic   

Contrast 


  100

brightness 


Sharpness 


Colour 


tint                  g0  

r0

Colour tone 

: Cool1 


Detailed Settings    


backlight 

: 10 


more

tV


move    

enter 

return

Picture

mode 

: Dynamic   

Contrast 


  100

brightness 


Sharpness 


Colour 


tint                  g0  

r0

Colour tone 

:

 Cool1 


Detailed Settings    


backlight 

: 10 


more

tV


move    

enter 

return

Cool 2

 Cool 1

normal

Warm 1

Warm 2

You can adjust the screen brightness by adjusting the lCD 

backlight brightness. (0~10)

activating backlight

1.

  To select the desired picture effect, follow the  


"Changing the Picture Standard" instructions number 1 to 3. 


(On page 15

)

2.

   Press the ▲ or ▼ button to select “Backlight”, then press the    

enter/oK

 button.

.

   Press the ◄ or ► button to decrease or increase the value of   

a particular item.

.

  Press the 

enter/oK

 button.


Press the 

exIt

 button to exit.

Picture

mode 

: Dynamic   

Contrast 


  100

brightness 


Sharpness 


Colour 


tint                  g0  

r0

Colour tone 

: Cool1 


Detailed Settings    


backlight 

: 10 


more

tV


move    

enter 

return

10

backlight


adjust    

return

BN68-01324B-Eng-0911.indd   16

2007-09-21   �� 2:00:52

Содержание LA40F8

Страница 1: ...11 www samsung com in INDONESIA 0800 112 8888 www samsung com id JAPAN 0120 327 527 www samsung com jp MALAYSIA 1800 88 9999 www samsung com my NEW ZEALAND 0800SAMSUNG 726 7864 www samsung com nz PHILIPPINES 1800 10 SAMSUNG 726 7864 www samsung com ph SINGAPORE 1800 SAMSUNG 726 7864 www samsung com sg THAILAND 1800 29 3232 02 689 3232 www samsung com th TAIWAN 0800 329 999 www samsung com tw VIETN...

Страница 2: ... the screen when displaying a still image Watching the LCD TV in 4 3 format for a long period of time may leave traces of borders displayed on the left right and center of the screen caused by the difference of light emission on the screen Playing a DVD or a game console may cause a similar effect to the screen Damages caused by the above effect are not covered by the Warranty Displaying still ima...

Страница 3: ...he Sound Mode 22 Connecting Headphones 22 Setting the Time Setting and Displaying the Current Time 22 Setting the Sleep Timer 23 Switching the Television On and Off Automatically 23 Function Description Choosing Your Language 24 Game Mode Blue Screen Melody Light Effect Energy Saving HDMI Black Level 25 Selecting the Source 26 Editing the Input Source Names 26 USING The DTV FeATuRe Previewing the ...

Страница 4: ...47 Connecting Anynet Devices 47 Setting Up Anynet 48 Scanning and Switching between Anynet Devices 48 Recording 49 Listening through a Receiver 50 Check Points before Requesting Service 50 Recommendations For Use Wall Mount Adjustment Sold separately 51 Using the Anti Theft Kensington Lock depending on the model 52 Troubleshooting Before Contacting Service Personnel 52 Technical and Environmental ...

Страница 5: ...ntact a technician for assistance when installing the wall mounted bracket Samsung Electronics is not responsible for any damage to the product or injury to yourself or others if you elect to install the TV on your own Do not install your Wall Mount Kit while your TV is turned on It may result in personal injury due to electric shock Remove the stand and cover the bottom hole with a cap and fasten...

Страница 6: ... the and buttons on the remote control 4 Press to change channels In the on screen menu use the buttons as you use the and buttons on the remote control Without the Remote Control you can turn on the TV by using the Channel buttons 5 Power Indicator Blinks and turns off when the power is on and lights up in stand by mode 6 Remote Control Sensor Aim the remote control towards this spot on the TV 7 ...

Страница 7: ...her ends to corresponding audio out connectors on the A V device 2 AUDIO OUT R AUDIO L Connect RCA audio cables to AUDIO OUT R AUDIO L on the rear of your set and the other ends to corresponding audio in connectors on the Amplifier or DVD Home Theatre 3 HDMI IN 1 HDMI IN 2 HDMI IN 3 Supports connections between HDMI connection enabled AV devices Set Top Boxes DVD players No additional Audio connec...

Страница 8: ...hile the head phone is connected the sound from the built in speakers will be disabled 6 S VIDEO or VIDEO R AUDIO L Connect RCA or S VIDEO cable to an appropriate external A V device such as VCR DVD or Camcorder Connect RCA audio cables to R AUDIO L on your set and the other ends to corre sponding audio out connectors on the A V device 7 PC IN PC AUDIO Connect to the video and audio output jack on...

Страница 9: ...L CH and the active source button TV DVD CABLE STB VCR on the remote Available source selection Previous channel DTV menu display a This remote can be used to control recording on Samsung recorders Anynet function only b P Next channel P Previous channel c Exit the on screen menu d Control the cursor in the menu e Use to see information on the current broadcast f Runs the Anynet view functions and...

Страница 10: ...t 2 Touch the silver sensor below the mark on the front of the set You also can press the POWER button or the TV DTV button on the remote control to turn the TV on The programme that you were watching last is reselected automatically 3 Press the numeric button 0 9 or channel up down button on the remote control or button on the right side of the set When you switch the set on for the very first ti...

Страница 11: ...DTV ch auto search is performed No Only an ATV search is performed 5 The Auto Store menu is displayed with the Start selected Press the ENTER OK button The channel search will start and end automatically The DTV channel scan menu appears and the DTV channel is automatically updated If the DTV channel is updated the Source in the source list of the Input menu is automatically changed to DTV After a...

Страница 12: ...rt numbers manually and clear any channels you do not wish to watch 1 Press the MENU button to display the menu Press the or button to select Channel then press the ENTER OK button 2 Press the or button to select Auto Store then press the ENTER OK button 3 Press the ENTER OK button The TV will begin memorizing all of the available channels Press the ENTER OK button at any time to interrupt the mem...

Страница 13: ... number of the channel to be stored Press the or button to select C Air channel or S Cable channel Press the button then press the or button to select the required number You can also select the channel number directly by pressing the numeric buttons 0 9 If there is abnormal sound or no sound re select the sound standard required Search When you do not know the channel numbers Press the or button ...

Страница 14: ... out video and audio 5 Press the or button to select Child Lock then press the ENTER OK button 6 Select On by pressing the or button then press the ENTER OK button 7 Press the or button to select Channel List then press the ENTER OK button 8 Move to the field by pressing the or button select a channel to be locked and press the ENTER OK button If you press the ENTER OK button again the symbol next...

Страница 15: ...oadcast These names can be changed allowing you to assign new names Not available in DTV or external input mode 1 Press the MENU button to display the menu Press the or button to select Channel then press the ENTER OK button 2 Press the or button to select Name then press the ENTER OK button 3 If necessary select the channel to be assigned to a new name by pressing the or button Press the ENTER OK...

Страница 16: ... and then press the ENTER OK button Fine Tuning Channel Reception Channel Auto Store Manual Store Channel Manager Sort Name Fine Tune LNA Off Fine Tune P 1 0 Reset TV Move Enter Return Adjust Save Return If the TV is operating in a weak signal area the LNA function can improve the reception a low noise preamplifier boosts the incoming signal Not available in DTV or external input mode 1 Press the ...

Страница 17: ...button 4 Press the EXIT button to exit Adjusting the Custom Picture The adjusted values are stored according to the selected Picture mode In PC Mode Only Contrast and Brightness can be adjusted Tint is only activated for NTSC broadcasting DTV broadcasting Component and HDMI modes You can return to the factory defaults picture settings by selecting the Reset Refer to Resetting the Picture Settings ...

Страница 18: ...ure Mode Dynamic Contrast 100 Brightness 45 Sharpness 75 Colour 55 Tint G50 R50 Colour Tone Cool1 Detailed Settings Backlight 10 sMore TV Move Enter Return Picture Mode Dynamic Contrast 100 Brightness 45 Sharpness 75 Colour 55 Tint G50 R50 Colour Tone Cool1 Detailed Settings Backlight 10 sMore TV Move Enter Return Cool 2 Cool 1 Normal Warm 1 Warm 2 You can adjust the screen brightness by adjusting...

Страница 19: ...TER OK button Press the or button until you reach the optimal setting Reset The previously adjusted white balance will be reset to the factory defaults My Colour Control Pink Green Blue White Reset This setting can be adjusted to suit your personal preferences Pink Green Blue White Changing the adjustment value will refresh the adjusted screen Select the required option by pressing the or button t...

Страница 20: ...e selected mode Zoom Select by pressing the or button Use the or button to move the picture up and down After selecting use the or button to magnify or reduce the picture size in the vertical direction Wide Zoom Move the screen up down using the or button after selecting the by pressing the or ENTER OK button Changing the Picture Size You can select these options by simply pressing the P SIZE butt...

Страница 21: ...n so as to provide a high visual quality If you set DNIe to on you can view the screen with the DNIe feature activated DNIeTM Digital Natural Image engine This feature brings you more detailed image with 3D noise reduction detail enhancement contrast enhancement and white enhancement New image compensation Algorithm gives brighter clearer more detailed image to you DNIeTM technology will fit every...

Страница 22: ...the main screen to view a game or karaoke PIP On Off You can activate or deactivate the PIP function Main picture Sub picture Component 1 2 TV AV1 AV2 HDMI 1 2 3 TV AV1 AV2 PC TV AV1 AV2 Press the PIP button on the remote control repeatedly to activate or deactivate the PIP Source TV AV1 AV2 You can select a source of the sub picture Size You can select a size of the sub picture If main picture is...

Страница 23: ...nse from SRS Labs Inc Auto Volume Off On Each broadcasting station has its own signal conditions and so it is not easy to adjust the volume every time the channel is changed This feature lets you automatically adjust the volume of the desired channel by lowering the sound output when the modulation signal is high or by raising the sound output when the modulation signal is low InternalMute Off On ...

Страница 24: ...the EXIT button to exit If you disconnect the power cord you have to set the clock again You can also set Year Month Day Hour and Minute by pressing the number buttons on the remote control Setting and Displaying the Current Time To Move to Month Day Year Hour or Minute Set the Month Day Year Hour or Minute Confirm the setting Mode Custom Equalizer SRS TS XT Off Auto Volume Off Internal Mute Off R...

Страница 25: ...mer with the setting satisfied set to Yes OffTime Select hour minute and Yes No To activate timer with the setting satisfied set to Yes Repeat Select Once Everyday Mon Fri Mon Sat or Sat Sun Volume Select the required volume level Programme Select the required channel You can set the hour minute and channel directly by pressing the number buttons on the remote control Auto Power Off When you set t...

Страница 26: ...peatedly Press the ENTER OK button 4 Press the EXIT button to exit Choosing Your Language Mode Custom Equalizer SRS TS XT Off Auto Volume Off Internal Mute Off Reset Move Enter Return TV Setup Plug Play Language English Time Game Mode Off Blue Screen Off Melody Off PC Home Theatre PC Off Light Effect In Standby More Move Enter Return Mode Custom Equalizer SRS TS XT Off Auto Volume Off Internal Mut...

Страница 27: ...replaces the noisy picture background If you wish to continue viewing the poor picture you must set the Blue Screen to Off Melody Off Low Medium High The TV power on off melody sound can be adjusted Light Effect Off In Standby In Watching TV Always You can turn on off the LED on the front of TV according to the situation Use it for saving power or when the LED dazzles your eyes Off LED will not co...

Страница 28: ...T Off Auto Volume Off Internal Mute Off Reset Move Enter Return TV Source List TV AV1 AV2 S Video Component1 Component2 PC HDMI1 HDMI2 HDMI3 DTV Move Enter Return Name the device connected to the input jacks to make your input source selection easier 1 Press the MENU button to display the menu Press the or button to select Input then press the ENTER OK button 2 Press the or button to select Edit N...

Страница 29: ...sparency Parental Lock Subtitle Audio Format System Product Information Signal Information Software Upgrade Reset High Medium Low Opaque Off On English PCM Dolby Digital All Favourites Default You can select these options by simply pressing the D MENU button on the remote control Parental Rating Change PIN Mode Custom Equalizer SRS TS XT Off Auto Volume Off Internal Mute Off Reset Move Enter Retur...

Страница 30: ... Press the D MENU button to display the DTV menu 2 Press the or button to select Channel then press the ENTER OK button 3 Press the or button to select Manual Store then press the ENTER OK button 4 Press the or button to select the required option then press the ENTER OK button Channel Channel 21 69 in sequence are displayed in Singapore Frequency The frequency available in the Channel group is di...

Страница 31: ...the DTV menu 2 Press the or button to select Channel then press the ENTER OK button 3 Press the or button to select Edit Favourite Channels then press the ENTER OK button 4 Press the red button in the Edit Favourite Channels menu To add more channels refer to the step 5 on the previous description 5 If you want to check the channel to be stored press RETURN button Press the EXIT button to exit To ...

Страница 32: ...Channels menu select the channel to be previewed by pressing the or button 2 Press the yellow button The selected channel is displayed on the screen Delete 1 In the Edit Favourite Channels menu select the channel to be deleted from the favourite channels list by pressing the or button 2 Press the blue button The selected channel and number will be deleted To add a deleted channel back in to the fa...

Страница 33: ...nels and a icon if the channel is one of the favourite channels 8 Press the blue button to toggle between your TV Radio Data Other and All 9 Press the CH LIST button to exit from the channel List Selecting Channel List While viewing a channel additional information about the current programme may be displayed 1 While viewing a programme press the INFO button The programme information is displayed ...

Страница 34: ...er to the next page View programme information Select a programme of your choice by pressing the button Press the INFO button when the programme of your choice is highlighted Toggle between the Now Next Guide or Full Guide Press the red button repeatedly Display the Favourites and the All Channels list Press the green button repeatedly Scrolls backwards quickly 24 hours Press the yellow button rep...

Страница 35: ...it Save Save the adjusted schedule Cancel Cancel the adjusted schedule Add Programme Add a new schedule Edit Re adjust the selected schedule Delete Delete the selected schedule You can preset the default guide style 1 Press the D MENU button to display the DTV menu 2 Press the ENTER OK button to select Guide 3 Press the or button to select Default Guide then press the ENTER OK button 4 Select Now ...

Страница 36: ...channel list update All channels are displayed in the all channel mode Favourites favourite channels is the list of channels that has been set in the Edit Favourite Channels menu refer to page 29 Viewing All Channels and Favourite Channels Adjusting the Menu Transparency You can set the Transparency of the menu 1 Press the D MENU button to display the DTV menu 2 Press the or button to select Setup...

Страница 37: ...ng you want to lock out Press the ENTER OK button 8 If you want to change the PIN code select Change PIN by pressing the or button Press the ENTER OK button The Enter PIN is displayed 9 Enter your new PIN code by using the numeric buttons 0 9 The Confirm New PIN is displayed 10 Re enter your new PIN code to confirm by using the numeric buttons 0 9 The Your PIN code has been changed successfully me...

Страница 38: ...n 1 Press the D MENU button to display the DTV menu 2 Press the or button to select Setup then press the ENTER OK button 3 Press the or button to select Audio Format then press the ENTER OK button 4 Press the or button to select PCM or Dolby Digital Press the ENTER OK button 5 Press the EXIT button to exit The Audio Format appears according to the broadcasting signal Dolby digital sound is only av...

Страница 39: ...s the ENTER OK button 4 Press the or button to select Software Upgrade then press the ENTER OK button 5 Press the or button to select Software Infomation Manual Upgrade or Satandby Mode upgrade Press the ENTER OK button Software Inforamtion Press the ENTER OK button then the current software version is shown To display the software version information press the ENTER OK button again To switch to a...

Страница 40: ...ferences will be lost and returned to the factory defaults It is recommended that a reset is performed only when serious problems are experienced Return Selecting the Preferred Language Subtitle or Audio You can change the default value for subtitle or audio languages Displays the language information for the incoming stream 1 Press the D MENU button to display the DTV menu 2 Press the or button t...

Страница 41: ...FLOF If you press it in the LIST mode it switches into the List save mode In the List save mode you can save teletext page into list using the store button 6 sub page Used to display the available sub page 7 page up Used to display the next teletext page 8 page down Used to display the previous teletext page 9 cancel Used to display the broadcast when searching for a page 0 reveal Used to display ...

Страница 42: ... sure you enter three digits of the code even if the first digit is a 0 If more than one code is listed try the first one 5 Press the POWER button on the remote control Your VCR should turn on if your remote is set up correctly If your VCR does not turn on after set up repeat steps 2 3 and 4 but try one of the other codes listed for your brand of VCR If no other codes are listed try each VCR code ...

Страница 43: ... 021 026 037 062 MARTA 006 MEI 021 MEMOREX 006 021 024 025 MGA 034 MIDLAND 005 MINOLTA 019 041 075 MITSUBISHI 019 034 041 046 Brand Code MONTGOMERY WARD 020 MTC 002 025 MULTITECH 002 005 025 038 NEC 007 008 018 026 037 062 064 OPTIMUS 020 ORION 073 074 075 076 PANASONIC 021 056 071 072 PENTAX 019 041 075 PENTEX RESEARCH 008 PHILCO 021 056 059 PHILIPS 021 080 PIONEER 019 026 039 053 PORTLAND 015 04...

Страница 44: ...018 STB DVD COMBO 019 DVD Receiver 020 AV Receiver 021 DVD Brand Code ANAM 030 AUDIOVOX 075 AUDIOLOGIC 085 ANABA 072 APEX DIGITAL 070 071 074 086 083 084 088 111 112 AIWA 114 BROKSONIC 062 BLAUPUNKT 074 B K 122 123 CURTIS MATHES 027 CYBER HOME 077 078 079 082 CLARION 080 125 CIRRUS 081 CYBER HOME 065 CINEVISION 095 DAEWOO 066 DENON 146 FARENHEIT 067 068 FISHER 090 GPX 060 GO VIDEO 061 089 133 135 ...

Страница 45: ...DIGITAL 019 CHAPARRAL 035 DIRECT TV 015 016 017 019 022 045 060 061 062 065 066 067 068 DAEWOO 074 DISH NETWORK SYSTEM 069 070 DISHPRO 069 DRAKE 018 024 032 DX ANTENNA 027 ECHOSTAR 025 069 070 071 EXPRESSVU 069 GOI 069 GE 065 GENERALINSTRUMENT 046 047 048 063 064 HTS 069 HOME CABLE 056 HITACHI 022 HUGHES NETWORK 015 017 IQ 020 IQ PRISM 020 JANEIL 059 JERROID 063 JVC 069 070 LG Goldstar 044 073 Bra...

Страница 46: ...re noise at high resolution modes 1920x1080 or 1600x1200 Display Modes Both screen position and size will vary depending on the type of PC monitor and its resolution The resolutions in the table are recommended All resolutions between the supported limits are supported Mode Resolution Horizontal Frequency kHz Vertical Frequency Hz Pixel Clock Frequency MHz Sync Polarity H V IBM 640x350 720 400 640...

Страница 47: ...ructions number 1 to 3 2 Press the or button to select Position then press the ENTER OK button 3 Press the or button to adjusting the Vertical Position Press the or button to adjust the Horizontal Position Press the ENTER OK button 4 Press the EXIT button to exit Adjusting the PC Screen Automatically Auto Adjustment Auto adjustment allows the PC screen of set to self adjust to the incoming PC vide...

Страница 48: ...n to select Home Theatre PC Press the ENTER OK button 3 Press the or button to select Off or On Press the ENTER OK button 4 Press the EXIT button to exit This function is available only in PC mode Setting the Home Theatre PC Move Enter Return TV Setup Plug Play Language English Time Game Mode Off Blue Screen Off Melody Off PC Home Theatre PC Off Light Effect In Standby More Move Enter Return Move ...

Страница 49: ...tween Digital Audio Out Optical on your TV and Digital Audio Input on the receiver Connect only one receiver You can listen to 5 1 channel sound through the home theatre s speakers Otherwise you can only listen to 2 channel stereo sound in other cases Make sure to connect the Digital Audio IN Optical of the home theatre and the TV correctly to listen to TV sound through the home theatre However yo...

Страница 50: ...d press the ENTER OK button It is switched to the selected device 4 If you cannot find a device you want press the or button to select Searching Connections then press the ENTER OK button The meassage Configuring Anynet connection is displayed When searching devices completes the connected devices are listed in the Anynet menu Switching to the selected devices may take up to 2 minutes You cannot c...

Страница 51: ...vice Example When a DVD Recorder is connected the play control menu of the DVD Recorder appears Receiver Sound is output through the receiver Setup You can set the environment for using Anynet TV Remote Control Buttons Available in Anynet Mode Device Type Operating Status Available Buttons Anynet Device After switching to the device when the menu of the corresponding device is displayed on the scr...

Страница 52: ...rching channels When connecting or removing the HDMI 1 3 cable please make sure to search devices again or restart your TV Check if the Anynet Function of Anynet device is set on I want to start Anynet Check if the Anynet device is properly connected to the TV and check if the Anynet HDMI CEC is set to On in the Anynet Setup menu Press the TV button on the TV remote control to switch to TV Then pr...

Страница 53: ...osition is saved TV Rear Panel Auto Wall Mount SERVICE Cable Not supplied 1 Press the MENU button to display the menu Press the or button to select Setup then press the ENTER OK button 2 Press the or button to select Wall Mount Adjustment then press the ENTER OK button 3 Adjust to the desired position using the buttons 4 Press the EXIT button to exit If you press an arrow button when no OSD is dis...

Страница 54: ... system Move the computer s mouse or press any key on the keyboard No picture or black and white picture Adjust the colour settings Check that the broadcast system selected is correct Sound and picture interference Try to identify the electrical appliance that is affecting the set and move it further away Plug your set into a different mains socket Blurred or snowy picture distorted sound Check th...

Страница 55: ... Dimensions WxDxH Body With stand 1094 x 103 x 607 mm 1094 x 290 x 675 mm 1222 x 111 x 687 mm 1222 x 320 x 752 mm 1366 x 120 x 780 mm 1366 x 320 x 845 mm Weight With stand 24 kg 33 kg 37 kg Environmental Considerations Operating Temperature Operating Humidity Storage Temperature Storage Humidity 10 C to 40 C 50 F to 104 F 10 to 80 non condensing 20 C to 45 C 4 F to 113 F 5 to 95 non condensing 10 ...

Страница 56: ...This page is intentionally left blank ...

Отзывы: