background image

LED R&D Lab(VD)

16

1. Product and installation information

2. preparation of Cabinet installation

3. Wall Mount

4. FRAME installation and cable connection

5. Frame Bezel Installation

6. Dehumidification mode guide

7. IP Manual setting Guide

※ Appendix1 

- LED Module and Circuit replacement method

※ Appendix2 

– Update data when replacing TCON

※ Appendix3 

– Gradation Calibration (SMC)

Table of contents

Содержание IAB Series

Страница 1: ...LED R D Lab VD LED Display Install Manual IAB Series LH008IAB LH012IAB LH016IAB Ver 0 9...

Страница 2: ...LED R D Lab VD 1 Revision History Version Date Y M D Description 0 9 2022 04 23 P1 68 standard release...

Страница 3: ...ion 3 Wall Mount 4 FRAME installation and cable connection 5 Frame Bezel Installation 6 Dehumidification mode guide 7 IP Manual setting Guide Appendix1 LED Module and Circuit replacement method Append...

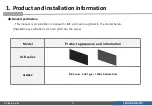
Страница 4: ...IAB series REMARK IAB Series CoB Type 120Hz Refresh Rate 1 Product and installation information Model specification This manual is an installation manual for IAB and can be applied to the model below...

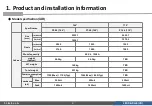
Страница 5: ...1826 1 1372 5 Pixels Horizontal 3840 1920 1920 Vertical 2160 1080 1080 Module quantity 48 X 4 192EA weight Cabinet 26 5kg 26 5kg TBD SET weight 168kg TBD Total weight 301kg TBD Power consumption W 170...

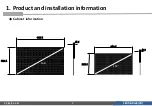
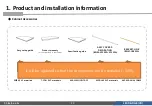
Страница 6: ...LED R D Lab VD 5 Cabinet information 1826 1 49 5 146 3229 1 1372 5 49 5 110 2422 7 1 Product and installation information...

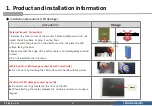
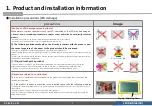
Страница 7: ...LED surface facing the floor 3 Make sure that the edge of the LED module is not damaged by external contact 4 Do not load more than 12 steps Watch out for LED damage caused by static electricity Do no...

Страница 8: ...es containing these ingredients If liquid touches the product If there is water on the product turn off the product immediately dry it enough for more than a day and run the dehumidification mode to r...

Страница 9: ...mage to the surface film and LED so remove the dust from the surface and wash it caution 1 Product and installation information Be careful of damage when cleaning with a gap between Half Cabinet Be ca...

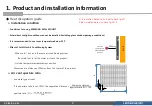
Страница 10: ...me air conditioning system Be careful not to let the warm air touch the product Outside temperature measurement position Measured at a distance of 300mm from the center of the product Air vent apertur...

Страница 11: ...LED R D Lab VD 10 Vertical wall installation if Fan is not applied WALL Air vent area minimum 30mm set ceiling set floor 1 Product and installation information minimum 30mm...

Страница 12: ...east 30mm opening rate 100 At least 30mm opening rate 100 Recommended conditions 500mm or more set floor Recommended conditions 500mm or more set ceiling WALL If the aperture ratio is not 100 the sepa...

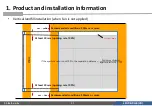
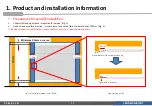
Страница 13: ...is necessary to secure a field of view of about 150mm Fig 2 Like heat dissipation specifications space of 30mm or more is required up and down WALL 150mm 150mm 150mm Need space for side screw position...

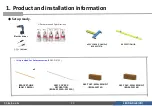
Страница 14: ...tions It is provided for Set accessories BN92 31412Y x2 BRACKET LINK BN61 18825A ASSY COVER P DECORATION BN96 55520A 55523A ASSY ACC WALL MOUNT BN96 54014F ASSY ACC WALL MOUNT BN96 54014E ASSY COVER P...

Страница 15: ...some areas Specification guide SMPS SVC materials T CON SVC materials WALL MOUNT ACC MODULE SVC materials ACC MANUAL CABLE It will be updated so that the components can be revealed 5 30 BRACKET LINK...

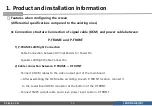
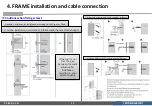
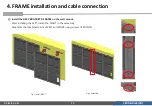
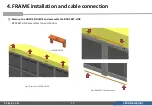
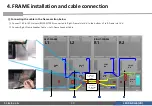
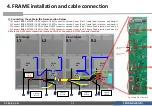
Страница 16: ...le connection between P FRAME P FRONT Connect 4 OCM cables to the video output port of the main board After assembling the OCM cable according to each P FRONT location connect it to the Lower Board OC...

Страница 17: ...tion 3 Wall Mount 4 FRAME installation and cable connection 5 Frame Bezel Installation 6 Dehumidification mode guide 7 IP Manual setting Guide Appendix1 LED Module and Circuit replacement method Appen...

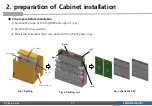
Страница 18: ...p BOX and open it Fig 2 Remove the top cushion Check the set status Two rear parts and four front parts Fig 3 Fig 1 Packing Fig 2 Packing out Fig 3 check the SET LED set Box Top Cushion Bottom Cushion...

Страница 19: ...t the AL screws 4 in total Fig 4 Disconnect the screw of the COVER CORNER part 4 locations Fig 5 When removing the cover corner install the white PAD without disassembling it to prevent damage to the...

Страница 20: ...tion 3 Wall Mount 4 FRAME installation and cable connection 5 Frame Bezel Installation 6 Dehumidification mode guide 7 IP Manual setting Guide Appendix1 LED Module and Circuit replacement method Appen...

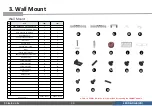
Страница 21: ...HOLDER BOLT 20 8 H HOLDER WALL RING 4 2 I LABEL 2 1 J LEAFLET WALL MOUNT 1 1 K BRACKET SUPPORT LEFT RIGHT 8 6 L SCREW SPECIAL 8 6 M SCREW MACHINE 15 15 N SCREW MACHINE 10 8 O SCREW MACHINE 20 20 P SC...

Страница 22: ...tion 3 Wall Mount 4 FRAME installation and cable connection 5 Frame Bezel Installation 6 Dehumidification mode guide 7 IP Manual setting Guide Appendix1 LED Module and Circuit replacement method Appen...

Страница 23: ...ation according to the Types of Walls It can be installed on concrete or interior walls that are thick enough If the wall is not flat the gap between the walls widens after installation resulting in p...

Страница 24: ...flet to the wall to locate the wall mount Check the horizontal state using a laser leveler Fix the left and right two points to the wall using the enclosed screw According to the leaflet picture Fig 1...

Страница 25: ...ords Since it is difficult to access after installation depending on the environment connect the external terminal HDMI LAN DP etc cable to be used Power cord Connect the outlet power when set operati...

Страница 26: ...in the cabinet Check the gap between the cabinet 2x3 LED modules before installation if there is a gap screw the area of Figure 1 to adjust the height of the low part to the high part Fig1 LED module...

Страница 27: ...DLE Insert HANDLE into FRAME as shown in Figure 1 As shown in FIG 2 push it in the direction of the arrow and fix it Fix two points per worker and lift at the same time Fig 1 Handle point Fig 2 direct...

Страница 28: ...EFT first Fix it to the wall mount using BRACKET WALL attached to the rear BRACKET WALL SHAFT is used when horizontal adjustment between rear FRAME is required Fig 1 Install LEFT first Fig 2 Wall moun...

Страница 29: ...ACKET P FRAME on the wall mount After installing the LEFT install the RIGHT in the same way Assemble the combined parts of LEFT and RIGHT using screws 4 POINTS Fig 1 Install RIGHT Fig 2 Assemble 4 FRA...

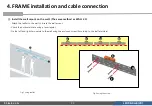
Страница 30: ...ab VD 29 Remove the HOLDER GUIDE and assemble the BRACKET LINK BRACKET LINK assembles top and bottom Fig 1 Remove HOLDER GUIDE Fig 2 BRACKET LINK assemble HOLDER GUIDE 4 FRAME installation and cable c...

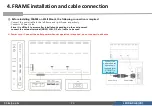
Страница 31: ...le Connect L R Speaker Cable Connecting the cable in the frame section below Connect 10P to 10P Harness BN39 02728A connected to Right Frame Inlet b d to the bottom of Left Frame Inlet b d Connect Rig...

Страница 32: ...nector spread it over the L2 frame fixed injection and hang it Connect BN39 02743A OCM to Main OCM3 connector spread it over the R1 frame fixed injection and hang it Connect BN39 02776A OCM to Main OC...

Страница 33: ...em in order of 3rd and 4th Be sure to comply with the installation order Since it is installed on hanging it is raised and installed at an angle The numbers L1 L2 R1 and R2 of each cabinet are arrange...

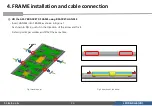
Страница 34: ...the P FRONT connect the OCM cable to the CN701 of the BN41 03045A board After attaching P FRONT to P FRAME connect BN39 02835A of P FRONT and BN39 02833A of P FRAME The pile of cables exposed to the b...

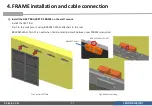
Страница 35: ...two Fig 3 Check operation after installing three Fig 4 Check operation after installing four Check the operation of each ASSY BRACKET P FRONT installation Connect the power of the SET power cord to ch...

Страница 36: ...LED modules by attaching them when the waiting time is long or movement is required after installing the cabinet It is also used when it is necessary to hold the side surface by hand Fig 1 Jig attach...

Страница 37: ...rol method The concept of pushing up the lower side Open the distance between the two modules Figure 1 Adjust the gap by turning the middle gear using the straight driver Right module upper gear left...

Страница 38: ...ACKET SUPPORT assembly position is generally assembled with top bottom center 3POINT Addable depending on the situation After assembling the SCREW SPECIAL into the BRACKET SUPPORT turn it and push the...

Страница 39: ...tion 3 Wall Mount 4 FRAME installation and cable connection 5 Frame Bezel Installation 6 Dehumidification mode guide 7 IP Manual setting Guide Appendix1 LED Module and Circuit replacement method Appen...

Страница 40: ...stallation Install the left and right side bezels first Put the FRAME BEZEL SIDE on the left right side of the CABINET and check if it does not match the screen Move the front position according to mi...

Страница 41: ...e top and screw it Place the FRAME BEZEL SIDE and FRAME BEZEL TOP BOTTOM together so that there is no GAP The M3 screw enters into TOP BOTTOM with FRAME BEZEL SIDE and the M4 screw enters into CABINET...

Страница 42: ...he bottom and screw it In the case of the lower part attach the BEZEL TOP BEZEL BOTTOM When assembling the BEZEL BOTTOM check the IR SENSOR location and attach it M4 M3 M4 M4 FRAME BEZEL TOP FRAME BEZ...

Страница 43: ...tion 3 Wall Mount 4 FRAME installation and cable connection 5 Frame Bezel Installation 6 Dehumidification mode guide 7 IP Manual setting Guide Appendix1 LED Module and Circuit replacement method Appen...

Страница 44: ...he characteristics of LED modules and internal device structures Dehumidification mode is required only when the following conditions are met optional progress Where the vacuum packaging is damaged an...

Страница 45: ...ehumidification mode 2 When dehumidification mode is turned on the dehumidification mode pattern 24 hours change the pattern that gets brighter every 2 hours play Full White in the section from 22 00...

Страница 46: ...humidification mode WAKEUP signals transmitted to MDC RS2323 terminal and WOL LAN terminal other than IR KEY are not exceptional Therefore the WAKEUP signal should not be transmitted to the MDC or WOL...

Страница 47: ...0 Test Pattern LSM UX will be updated later This content should be recognized by the customer who runs the screen Please print it out by the installer and deliver it to the customer user Dehumidificat...

Страница 48: ...r 5 24hr LSM UX will be updated later This content should be recognized by the customer who runs the screen Please print it out by the installer and deliver it to the customer user Dehumidification mo...

Страница 49: ...environment exceeds our product operating specifications we do not provide product warranty services If you are using the product or if there is interior design or other construction at the place deh...

Страница 50: ...ur cf The principle of water forming on the surface of a glass with ice Condensation can cause product failure if the product is condensed In this case you can t get our service guarantee This content...

Страница 51: ...e ambient humidity and the temperature of the screen If the A C and the screen are close please install a wind screen as shown below to prevent condensation Wind screen This content should be recogniz...

Страница 52: ...tion 3 Wall Mount 4 FRAME installation and cable connection 5 Frame Bezel Installation 6 Dehumidification mode guide 7 IP Manual setting Guide Appendix1 LED Module and Circuit replacement method Appen...

Страница 53: ...odel Auto IP setting is as follows shipment specification SYSTEM SLED 192 168 176 50 TCON Cabinet 192 168 176 101 104 FHD model UHD model Manual setting is required due to IP collision when using two...

Страница 54: ...GER NETWORK SLED IP SETTING SYSTEM SLED 192 168 176 50 Toggle Write SLED IP when changing TCON Cabinet 192 168 176 101 TCON Group Start IP Configuration Value Sequentially next group 1 Toggle Write Ca...

Страница 55: ...LED R D Lab VD 54 7 IP Manual setting Guide instructions Return to Default shipment specification during Factory Reset SYSTEM SLED 192 168 176 50 TCON Cabinet 192 168 176 101 104...

Страница 56: ...Thank you...

Страница 57: ...tion 3 Wall Mount 4 FRAME installation and cable connection 5 Frame Bezel Installation 6 Dehumidification mode guide 7 IP Manual setting Guide Appendix1 LED Module and Circuit replacement method Appen...

Страница 58: ...ECIAL SCREW MACHINE Separated in order of outside inside 1 2 Before separation pull the bottom to create a space and remove the CABLE first 1 1 2 2 BEZEL SIDE disassemble Magnet desorption Securing sp...

Страница 59: ...LED R D Lab VD 58 Product disassembly method 2 Internal disassembly of docking station First fully connected state SMPS SMPS SMPS SMPS SYSTEM AC inlet AC inlet...

Страница 60: ...Q ty 1 BN39 02838 A 2 2 BN39 02837 A 1 3 BN39 02836 A 1 4 BN39 02309 G 1 5 BN39 02833 A 4 Disassemble the Harness cable fastened to the SMPS and Board SMPS SMPS SMPS SMPS 1 1 2 3 SYSTEM 4 5 5 5 5 AC i...

Страница 61: ...ssembly Nu m Code Specification Q ty 6 BN39 02839 A 1 7 BN39 02728 A 1 Disassemble the Harness cable fastened to the SMPS and Board 6 7 AC inlet AC inlet SMPS SMPS SMPS SMPS SYSTEM Product disassembly...

Страница 62: ...Code Specification Q ty 8 BN39 02743 B 1 9 1 10 BN39 02743A 1 11 BN39 02776A 1 Disassemble the OCM cable fastened to the system board 9 8 AC inlet AC inlet SMPS SMPS SMPS SMPS SYSTEM 10 11 Product di...

Страница 63: ...ecification Q ty 12 BN96 55466 A Folding L280 24P 1 13 BN96 55465 A Wrinkle Straight L 68P 1 Disassemble the FFC cable fastened to the system board 13 12 AC inlet AC inlet SMPS SMPS SMPS SMPS SYSTEM P...

Страница 64: ...sembly Nu m Code Specification Q ty 14 BN96 49998 H TV SPK IAB 2ch 6ohm 10W 1 Disassemble the speaker cable fastened to the SMPS Board 14 AC inlet AC inlet SMPS SMPS SMPS SMPS SYSTEM Product disassemb...

Страница 65: ...001 003436 M3 L8 PWH ZPC WHITE Total 4 6001 002610 M4 L6 BH ZPC BLACK Total 2 AC inlet AC inlet SMPS SMPS SMPS SMPS Decomposition of Board and Module Disassemble the system tray board and function mod...

Страница 66: ...89 M4 L6 BH ZPC WHITE Total 2 Board decomposition Disassemble the AC Inlet board AC inlet AC inlet SMPS SMPS SMPS SMPS subsidiary part Code Specification Quantity Insulator BN63 20336A PC L245 W476 T0...

Страница 67: ...LED R D Lab VD 66 Speaker disassemble By applying Hook Type it can be disassembled without a separate tool Product disassembly method 2 Internal disassembly of docking station...

Страница 68: ...0 25 Total 4 Bracket Align BN61 16709A Total 12 When disassembling SMPS make sure to check whether it is discharged or not For more information Trouble Shooting SMPS Disassembly AC inlet AC inlet SYST...

Страница 69: ...g current in the SMPS must be discharged If there is no discharge jig use Digital Multimeter or wait enough time before using it DISCHARGE METHOD USING DIGITAL MULTIMER 1 Set the multi meter to test m...

Страница 70: ...LED R D Lab VD 69 Product disassembly method 3 Sub Screen Internal decomposition First fully connected state...

Страница 71: ...L65 68P 36 X 4 Total 144 68 68 68 68 68 68 68 68 68 68 68 68 68 68 68 68 68 68 68 68 68 68 68 68 68 68 68 68 68 68 68 68 68 68 68 68 68 68 68 68 68 68 68 68 68 68 68 68 68 68 68 68 68 68 68 68 68 68...

Страница 72: ...09A Wrinkle Straight L100 68P 6 X 4 Total 24 3 BN96 55417A Wrinkle Fold L230 68P 3 X 4 Total 12 4 BN96 55418A Wrinkle Fold L230 68P 3 X 4 Total 12 68 68 68 68 68 68 68 68 68 68 68 68 68 68 68 68 68 68...

Страница 73: ...bling FFC Cable Num Code Specification Q ty 5 BN96 53430A Straight L160 96P 2 X 4 Total 8 6 BN96 55416A Straight L160 68P 3 X 4 Total 12 96 96 5 6 68 68 68 68 96 96 68 68 Product disassembly method 3...

Страница 74: ...Bridge Board Cabling Harness Cable Num Code Specification Q ty 7 BN39 02569A 13 X 4 Total 52 8 BN39 02834A 2 X 4 Total 8 9 BN39 02835A 1 X 4 Total 4 7 8 9 Product disassembly method 3 Sub Screen Inter...

Страница 75: ...LED R D Lab VD 74 Tcon Upper Lower B d disassemble Code Specification Shape Quantity 6001 003016 M3 L5 PWH ZPC WHITE 22 x 4 Total 88 Product disassembly method 3 Sub Screen Internal decomposition...

Страница 76: ...LED R D Lab VD 75 Code Specification Shape Quantity 6001 003016 M3 L5 PWH ZPC WHITE 120 x 4 Total 480 Bridge B d disassemble Product disassembly method 3 Sub Screen Internal decomposition...

Страница 77: ...floating connector of the bridge board Check the module location that needs to be disassembled Bridge Board Removal mini board No separation required Disassembly of rear screw 23 pieces Module to wor...

Страница 78: ...ent screw Refer to the next page Central Bridge Board assembly Press the floating connector part once Assemble 23 screws Step adjustment point Step adjustment points are not required sections and work...

Страница 79: ...astening screw by the lower height of the module on the front 2 The step difference of the module is corrected by fastening the screw for step control to the step control hole Product reassembly metho...

Страница 80: ...79 Sub Screen Assembling Assembly is in reverse order of disassembly TCON Lower Upper Bridge Left Right mini Assembling FFC Assembling FFC Harness Assembling Final completion Product reassembly metho...

Страница 81: ...Assembling Assemble SMPS and AC inlet System Tray board and integrated module assembly Speaker assembly Assemble FFC cable Harness cable OCM cable Product reassembly method 3 Docking Station Assembly...

Страница 82: ...LED R D Lab VD 81 Hang the top of the FRONT first and then attach the bottom Screen attachment Product reassembly method 4 Screen attachment...

Страница 83: ...Seam control between sub screens X After removing BEZEL the gap between SUB SCREENs can be adjusted to SCREW to adjust the height difference tilt between SUB SCREENs Product reassembly method 5 Sub sc...

Страница 84: ...Lab VD 83 After removing BEZEL you can adjust the height difference tilt between SUB SCREENs with SUB SCREEN top SCREW Product reassembly method 5 Sub screen seam control Seam control between sub scr...

Страница 85: ...LED R D Lab VD 84 Spread between SUB SCREENs and adjust the step using DRIVER Seam control between sub screens Z Product reassembly method 5 Sub screen seam control...

Страница 86: ...tion 3 Wall Mount 4 FRAME installation and cable connection 5 Frame Bezel Installation 6 Dehumidification mode guide 7 IP Manual setting Guide Appendix1 LED Module and Circuit replacement method Appen...

Страница 87: ...when replacing TCON board When replacing the TCON board Replace the Tcon board in the problematic part first Update Tcon data Factory data Gamma data according to the following guide order Be sure to...

Страница 88: ...ponding to the SHOW ID on as shown in the figure below How to check replacement TCON group number Based on the front of the screen below from the right 1 2 3 4 Group Number 1 Group Number 2 Group Numb...

Страница 89: ...tion 3 Wall Mount 4 FRAME installation and cable connection 5 Frame Bezel Installation 6 Dehumidification mode guide 7 IP Manual setting Guide Appendix1 LED Module and Circuit replacement method Appen...

Страница 90: ...89 LED R D Lab VD Calibration Appendix Gradation Calibration SMC Support model S10 S10 S20 S20 S21 note 8 9 10 10 20 Special models flips etc are not supported Mobile Support Specifications...

Страница 91: ...e calibration MCE SMC Preparation material Common Notebook Tripod Lan cable Mobile phone WIFI Router or USB C to LAN gender Support model IFH IER IFR IEA IWJ IWR IWA Only IWJ IWR IWA IAB Feature Packa...

Страница 92: ...le Phone LAN cable Local Area Network Set to the same network 192 168 176 50 IAB 192 168 176 yyy notebook IP Address Setting 192 168 176 zzz Mobile Phone IP When connecting mobile by wire The IP of th...

Страница 93: ...zation SMC Calibration When operating LSM Dynamic Peaking ON OFF at the bottom of S BOX setting menu After replacing the cabinet make sure to specify Ref and calibrate it Caution LSM Setting IP settin...

Страница 94: ...93 LED R D Lab VD MCE2 Check MCE2 icon is shown in mobile phone LOGIN UI is shown on first try admin afg gtc LSM setting Gradation Calibration SMC...

Страница 95: ...ection Fail phrase appears In this case check IP setting again If you connect to IAB using LAN cable rather than WIFI IP setting of mobile phone is required Calibration procedure Enter the IP Click Co...

Страница 96: ...inet If the target is not specified calibration is performed for all modules except the reference 5 Click NEXT button Check if it is set to Select SubModuleCal click click Gradation Calibration SMC Ca...

Страница 97: ...the zoom button on the pop up window 8 Press the Adjust button to start calibration Other button description MEASURE Picture file save button INT GAIN Do not apply the proceeded SMC cal but apply the...

Страница 98: ...selected module Target Do not adjust the unselected module none Maintain existing value Only the modules to be adjusted are finely adjusted compared to the surrounding modules Module Selection Exampl...

Страница 99: ...ent sequence After selecting the module to adjust Click NEXT Click Adjust Calibration complete Before adjustment After adjustment Selective adjustment Selective adjustment Selective adjustment Gradati...

Страница 100: ...only Set Target only Replaced cabinet Replaced cabinet Replace two cabinets Real process All cabinets except Reference are designated as targets and cal is proceeded Target reference Target Target Ta...

Страница 101: ...lowing rules under the file name layoutInfo txt Mobile phone storage location Save under DCIM MCE2 cabinet group cabinet module Configuration information and id information Screen Layout Example Grada...

Страница 102: ...2 Changing Gradation CC Off in LSM 3 Display gray pattern to LSM white gray dark gray Gradation Calibration SMC Manual control...

Страница 103: ...C SMC right sat Check if the menu is 0 If 0 change the TEST pattern to white gray dark gray and use a pattern that becomes 0 6 Click Measure button Image file and Gradation CC value are saved in DCIM...

Страница 104: ...7 After uploading the Gradation CC file to LSM change it to Gradation CC ON Measure before adjustment Measure after adjustment Gradation Calibration SMC Manual control...

Отзывы: