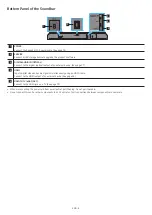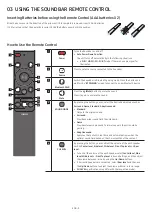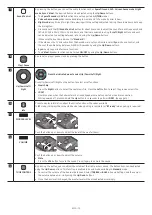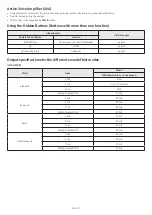
background image

ENG - 15

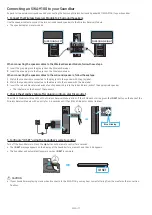
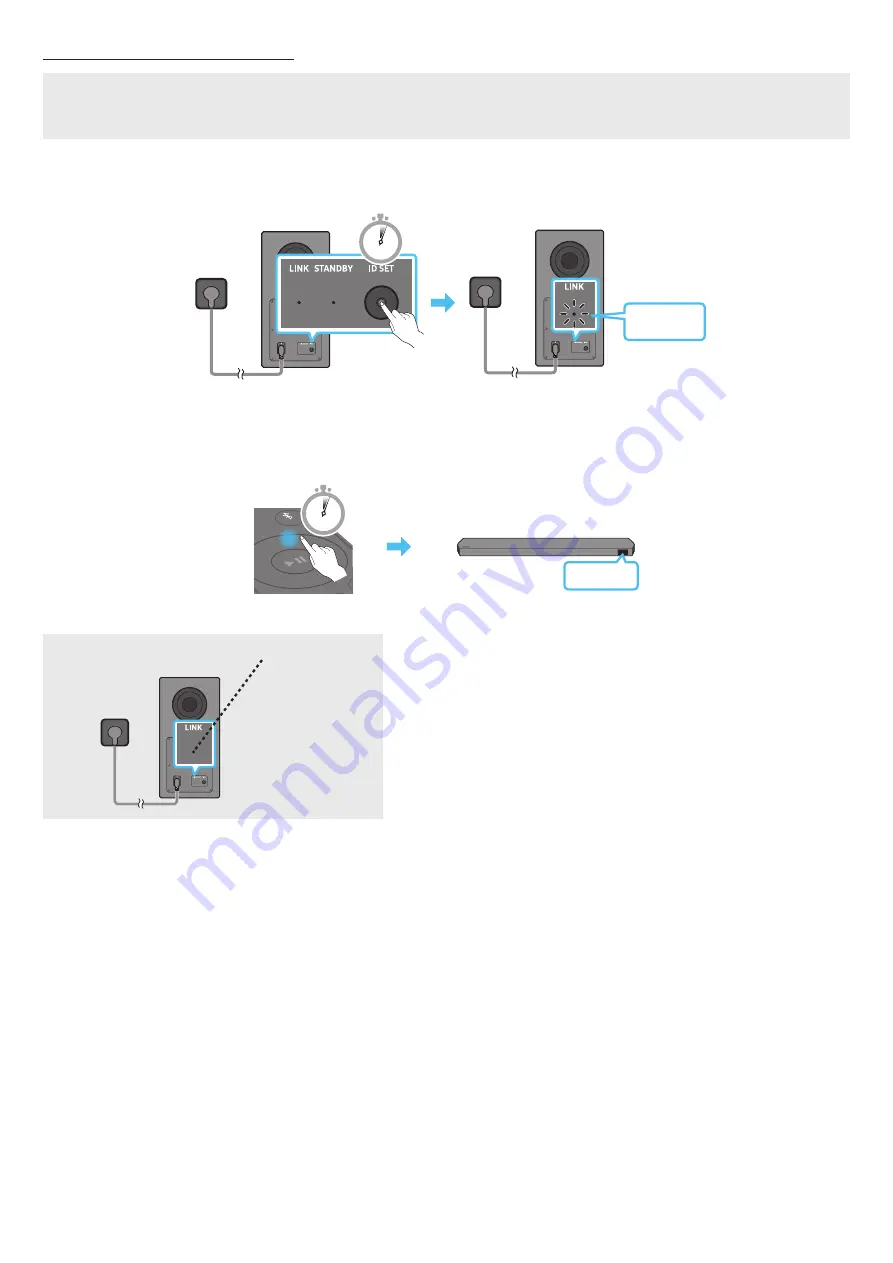
Manually connecting the Subwoofer

Before performing the manual connection procedure below:

•  Check whether the power cables for the Soundbar and subwoofer is connected properly. 
•  Make sure that the Soundbar is turned off.

1. 

Turn off the Soundbar main.

2. 

Press and hold 

ID SET

 on the rear of the subwoofer for at least 5 seconds. 

•  The red indicator on the rear of the subwoofer turns off and the blue indicator blinks.

5 Sec

Blinking 

blue fast

Rear of Subwoofer

Rear of Subwoofer

3. 

Press the 

Up

 button on the remote control for 5 seconds.

•  The 

ID SET

 message appears on the display of the Soundbar for a moment, and then it disappears.

•  The Soundbar will automatically power on when 

ID SET

 is complete.

SOU

ND

MOD

E

PAIR

5 Sec

ID SET

4. 

Check if the LINK LED is solid blue (connection complete).

LINK LED - Blue is On

The LINK LED indicator stops blinking and glows a solid blue when a connection 
is established between the Soundbar and the Wireless Subwoofer.

Содержание HW-Q750B

Страница 1: ...FULL MANUAL HW Q910B HW Q750B Imagine the possibilities Thank you for purchasing this Samsung product To receive more complete service please registeryour product at www samsung com register ...

Страница 2: ...e floor wall in accordance with the installation instructions CAUTION Do not expose this apparatus to dripping or splashing Do not put objects filled with liquids such as vases on the apparatus To turn this apparatus off completely you must pull the power plug out of the wall socket Consequently the power plug must be easily and readily accessible at all times CAUTION forCanada This device contain...

Страница 3: ...uid has been spilled or objects have fallen into the apparatus the apparatus has been exposed to rain or moisture does not operate normally or has been dropped PRECAUTIONS 1 Ensure that the AC power supply in your house complies with the power requirements listed on the identification sticker located on the bottom of your product Install your product horizontally on a suitable base furniture with ...

Страница 4: ... the Rear of Subwoofer 16 Connecting an SWA 9100 to your Soundbar 17 05 Connecting to a TV 19 Connecting the TV that supports HDMI ARC Audio Return Channel 19 Connecting using an Optical Cable 20 Connecting via Bluetooth 21 Connecting via Wi Fi 23 Using the Q Symphony Function 24 Using the Spacefit sound 25 06 Connecting an External Device 26 Method 1 Connecting using an HDMI Cable Capable of Dolb...

Страница 5: ...ware Update 35 Auto Update 35 USB Update 35 Initialization 36 12 Troubleshooting 36 13 License 38 14 Open Source License Notice 38 15 Important Notes About Service 38 16 Specifications and Guide 39 Specifications 39 ...

Страница 6: ...ireless ReceiverModule SpeakerCable For more information about the power supply and power consumption refer to the label attached to the product Label Rear of the Soundbar Main Unit To purchase additional components or optional cables contact a Samsung Service Center or Samsung Customer Care For more information about the wallmount or rubber foot see pages 33 35 Design specifications and App scree...

Страница 7: ...tton to turn the microphone on or off When the microphone is off the LED indicatorwill light red Red On Mic Off Red Off Mic On 3 Source Button Q750B model Press the Source button to change the input source 4 Display Displays the product s status and current mode D IN HDMI Wi Fi BT When you plug in the AC cord the power button will begin working in 4 to 6 seconds When you turn on this unit there wi...

Страница 8: ...C ARC HDMI SERVICE DIGITAL AUDIO IN OPTICAL HDMI TO TV eARC ARC HDMI 3 5 4 1 POWER Connect the Soundbar s AC power cable See page 14 2 SERVICE Connect a USB storage device to upgrade the product s software 3 DIGITALAUDIO IN OPTICAL Connect to the digital optical output of an external device See page 27 4 HDMI Inputs digital video and audio signals simultaneously using an HDMI cable Connect to the ...

Страница 9: ...on to mute the sound Press it again to unmute the sound 5 SOUND MODE By pressing the button you can select the desired audio mode such as Surround Game Standard Adaptive sound Standard Outputs the original sound Surround Provides a wider sound field than standard Game Provides stereoscopic sound to immerse you in the action while gaming Adaptive sound Analyzes the content in real time and automati...

Страница 10: ...music by pressing the button 9 Up Down Left Right Press the indicated areas to select Up Down Left Right Press Up Down Left Right on the button to select or set functions Music Skip Press the Right button to select the next music file Press the Left button to select the previous music file ID SET Use this option when the Subwoofer or Surround Speakers are not connected or need reconnection While p...

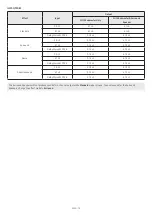
Страница 11: ... Up TV remote control On Off Standby page 13 Up ID SET page 15 Sound Control 7 Band EQ page 10 Output specifications forthe different sound effect modes HW Q910B Effect Input Output With Subwoofer Surround Speaker Standard 2 0 ch 2 1 ch 5 1 ch 5 1 ch 7 1 ch DTS 7 1 ch 7 1 ch Dolby Atmos DTS X 7 1 2 ch Surround 2 0 ch 9 1 2 ch 5 1 ch 9 1 2 ch 7 1 ch 9 1 2 ch Dolby Atmos DTS X 9 1 2 ch Game 2 0 ch 9...

Страница 12: ... 1 2 ch 5 1 2 ch Dolby Atmos DTS X 3 1 2 ch 5 1 2 ch Game 2 0 ch 3 1 2 ch 5 1 2 ch 5 1 ch 3 1 2 ch 5 1 2 ch Dolby Atmos DTS X 3 1 2 ch 5 1 2 ch Adaptive sound 2 0 ch 3 1 2 ch 5 1 2 ch 5 1 ch 3 1 2 ch 5 1 2 ch Dolby Atmos DTS X 3 1 2 ch 5 1 2 ch The Surround Speakers will not produce sounds for 2 channel output while Standard mode is in use To enable sound for the Surround Speakers change the effec...

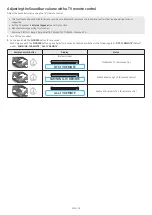
Страница 13: ...ting this function Samsung VIZIO LG Sony Sharp PHILIPS PANASONIC TOSHIBA Hisense RCA 1 Turn Off the Soundbar 2 Push up and hold the WOOFER button for 5 seconds Each time you push the WOOFER button up and hold it for 5 seconds the mode switches in the following order OFF TV REMOTE Default mode SAMSUNG TV REMOTE ALL TV REMOTE Remote Control Button Display Status Default mode OFF TV REMOTE Disable th...

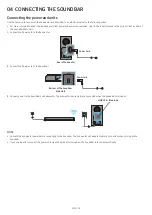
Страница 14: ... HDMI IN 1 HDMI IN 2 ID SET WOOFER REAR POWER NETWORK SERVICE DIGITAL AUDIO IN OPTICAL HDMI TO TV eARC ARC HDMI 1 HDMI 2 ID SET HDMI IN 1 HDMI IN 2 SERVICE DIGITAL AUDIO IN OPTICAL HDMI TO TV eARC ARC HDMI 1 Bottom of the Soundbar Main Unit PowerCord 3 Connect power to the Soundbar and Subwoofer The Subwoofer is automatically connected when the Soundbar is turned on LINK LED Blue is On NOTE Connec...

Страница 15: ...woofer turns off and the blue indicator blinks 5 Sec Blinking blue fast Rearof Subwoofer Rearof Subwoofer 3 Press the Up button on the remote control for 5 seconds The ID SET message appears on the display of the Soundbar for a moment and then it disappears The Soundbarwill automatically power on when ID SET is complete SOUND MODE PAIR 5 Sec ID SET 4 Check if the LINK LED is solid blue connection ...

Страница 16: ...red off the wireless subwooferwill go into stand by mode and the STANDBY LED on the rear of the sub wooferwill turn red after blinking in blue several times If you use a device that uses the same frequency as the Soundbar near the Soundbar interference may cause some sound interruption The maximum transmission distance of the main unit s wireless signal is about 32 8 ft 10 m but may vary depending...

Страница 17: ...to the blue jack to the speakerwith the blue label 3 Insert the red and black colored ends of each speaker cable into the red and black jacks of the appropriate speaker The labels are on the backs of the speakers 2 Check the standby status afterplugging into an electrical outlet The LINK LED indicator blue LED on the Wireless Receiver Module blinks If the LED does not blink press the ID SET button...

Страница 18: ...D status Action LINK Blue On Connected with the Soundbar Blinking Connection standby status Check if the Soundbar is turned on Repeat steps 3 through 4 STANDBY Red On Connection failure Check if the Soundbar is turned on 1 Press the ID SET button on the back of the Wireless Receiver Module with a pen tip for 5 6 seconds until the LINK LED indicator blinks in Blue IDSET L R SURROUNDSPEAKERSOUT SPEA...

Страница 19: ...appears on the display and the sound is heard To connect with eARC the eARC function in the TV menu should be set to On Refer to the TV user manual for details on setting e g Samsung TV Home Menu Settings All Settings Sound Expert Settings HDMI eARC Mode Auto If TVARC does not appear in the display window of the Soundbar main unit confirm that the HDMI cable is connected to the correct port Use th...

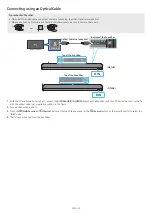
Страница 20: ...not supplied Bottom of the Soundbar D IN Top of the Soundbar Q910B Top of the Soundbar D IN Q750B 1 With the TV and Soundbar turned off connect the DIGITALAUDIO IN OPTICAL port on the Soundbar and the OPTICAL output port on the TV with the optical cable not supplied as shown in the figure 2 Turn on the Soundbar and TV 3 Press the Multi Function Source button at the top of the Soundbar or the Sourc...

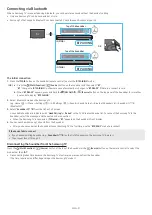
Страница 21: ...ngs All Settings Sound Sound Output Bluetooth Speaker List Soundbar Q B Bluetooth 3 Select SoundbarQ B from the list on TV s screen An available Soundbar is indicated with Need Pairing or Paired on the TV s Bluetooth device list To connect the Samsung TV to the Soundbar select the message and then establish a connection When the Samsung TV is connected TV Name BT appears on the Soundbar s front di...

Страница 22: ...3 28 ft 1 m to connect via Bluetooth communication If asked for a PIN code when connecting a Bluetooth device enter 0000 The Soundbar automatically turns off after18 minutes in the Ready state The Soundbar may not perform Bluetooth search or connection correctly under the following circumstances If there is a strong electrical field around the Soundbar If several Bluetooth devices are simultaneous...

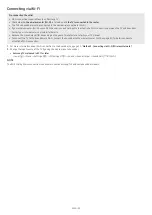
Страница 23: ...ls Because the menus may differ depending on the year of manufacture refer to your TV manual To connect the TV to the Soundbarvia Wi Fi connect the Soundbar to the wireless router first See page 30 for details on how to establish a Wi Fi connection 1 For more information about Wi Fi connection to the Soundbar see page 30 Method 2 Connecting via Wi Fi Wireless Network 2 Change the input source of t...

Страница 24: ...al Cable not supplied D IN TV menu example TV AV Soundbarseries name HDMI Wi Fi TV menu Wi Fi TV menu example TV AV Soundbarseries name Wi Fi NOTE It can operate according to the Codec supported by TV This function is supported only when the HDMI Cable or Optical Cable not supplied orWi Fi is connected The message displayed may differwith the TV model Ensure that your TV and Soundbar are connected...

Страница 25: ...his is available in all Sound modes Method 2 Connecting via TV To enable this function turn on the Adaptive Sound mode on your Samsung TV menu Home Menu Settings All Settings General Intelligent Mode Settings Adaptive Sound The sound mode on your Soundbarwill automatically change to Adaptive Sound if you enable the Adaptive Sound mode on your TV NOTE This function works when the Soundbar connects ...

Страница 26: ...oundbar or the Source button on the remote control to select HDMI mode 5 The Soundbar display indicates that HDMI mode is currently selected and the Soundbarwill start playing sounds NOTE When you use DolbyAtmos DTS X If the input source is Dolby Atmos DTS X refer to Output specifications forthe different sound effect modes on page 11 When Dolby Atmos is activated DOLBY ATMOS appears in the front ...

Страница 27: ...B Top of the Soundbar D IN Q750B 1 Use an optical cable not supplied to connect the DIGITALAUDIO IN OPTICAL on the Soundbar main and the OPTICAL OUT port on the external device 2 Turn on the Soundbar and external device 3 To select D IN mode press the Multi Function Source button on the top of the Soundbar or the Source button on the remote control 4 Your Soundbarwill play sounds from the external...

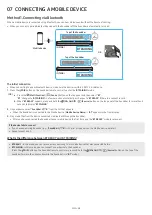
Страница 28: ...ic On Off Source button on the top panel of the Soundbar for more than 5 seconds to display BT PAIRING 2 On your device select SoundbarQ B from the list that appears When the Soundbar is connected to the Mobile device Mobile Device Name BT appears in the front display 3 Play music files from the device connected via Bluetooth through the Soundbar Afteryou have connected the Soundbar to your mobile...

Страница 29: ...th device may experience noise or malfunction under in the following conditions When the body is in contact with the signal transceiver on the Bluetooth device or Soundbar In corners orwhen there is an obstacle in proximity such as a wall or partition where electrical changes may occur When exposed to radio interferences by other products operating on the same frequency ranges such as medical equi...

Страница 30: ...artThings app from your mobile device smartphone or tablet 2 On the app follow the screen instructions to add the Soundbar The automatic pop up the second screenshot below may not show on some devices If the pop up window does not appear press on the Home screen The Soundbar is added to the app The illustration below may differ according to the app version Launch App Auto pop up Add device SmartTh...

Страница 31: ...e device does not tap a sharp corner of the Soundbar The Soundbar or mobile device may become scratched or damaged It is recommended that the mobile device be covered with a case Lightly tap the wide area in the upper portion of the Soundbar without using excessive force To use this function update the SmartThings app to the latest version The function may not be supported depending on the app ver...

Страница 32: ...th AirPlay 2 you can stream music podcasts and other audio from yourApple devices to the Samsung Soundbar Make sure the Soundbar is powered on and connected to the same Wi Fi network as yourApple device Select from an AirPlay supported app or Control Center on your iPhone iPad or Mac Select the Soundbar from the list of available devices to play the current audio to ...

Страница 33: ... the Soundbar at least 2 inches 5 cm below the TV 2 inches 5 cm ormore 2 Align the Wall Mount Guide s CenterLine with the center of your TV if you are mounting the Soundbar below your TV and then fix the Wall Mount Guide to the wall using tape If you are not mounting below a TV place the CenterLine in the center of the installation area CenterLine 3 Push a pen tip or sharpened pencil tip through t...

Страница 34: ...acket Wall Mounts and then slide the Bracket Wall Mounts down so that the Bracket Wall Mounts rest securely on the Holder Screws 10 INSTALLING THE SOUNDBAR IN FRONT OF TV Component x 4 Rubber Foot To install attach the Rubber Feet to the bottom of the Soundbar before placing it in position above the TV stand Make sure you attach the Rubber Feet so they do not lie outside the edges of the TV stand ...

Страница 35: ... Soundbar and then reconnect it to the Internet USB Update Bottom of the Soundbar HDMI IN 1 HDMI IN 2 ID SET WOOFER REAR POWER NETWORK SERVICE DIGITAL AUDIO IN OPTICAL HDMI TO TV eARC ARC HDMI 1 HDMI 2 ID SET HDMI IN 1 HDMI IN 2 SERVICE SERVICE Samsung may offerupdates forthe Soundbar s system firmware in the future When an update is available you can update the Soundbar by connecting the USB driv...

Страница 36: ...one See page 7 Sound is not output from the soundbar The volume of the Soundbar is too low or muted Adjust the volume When any external device STB Bluetooth device mobile device etc is connected adjust the volume of the external device For sound output of the TV select Soundbar Samsung TV Home Menu Settings All Settings Sound Sound Output Select Soundbar The cable connection to the Soundbar may no...

Страница 37: ... speaker list on the device to connect Samsung TV Home Menu Settings All Settings Sound Sound Output Bluetooth Speaker List The automatic TV connection may be disabled While the Soundbar is in BT READY press and hold the Left button on the Soundbar remote control for 5 seconds to select ON TV CONNECT If you see OFF TV CONNECT press and hold Left button again for 5 seconds to switch the selection R...

Страница 38: ...demarks of HDMI Licensing Administrator Inc in the United States and other countries Use your phone tablet or computer as a remote control for Spotify Go to spotify com connect to learn how The Spotify Software is subject to third party licenses found here https www spotify com connect third party licenses Apple Airplay iPhone iPad and Mac are trademarks of Apple Inc registered in the U S and othe...

Страница 39: ...ight 10 6 lbs 4 8 kg Dimensions W x H x D 43 7 x 2 38 x 4 7 inches 1110 7 x 60 4 x 120 0 mm Operating Temperature Range 41 F to 95 F 5 C to 35 C Operating Humidity Range 10 75 AMPLIFIER Rated Output power 30 W x 3 20 W x 2 10 W x 3 Supported play formats Dolby 5 1ch Dolby Digital Plus Dolby TRUE HD Dolby ATMOS DTS 5 1ch DTS HD DTS HD MasterAudio DTS X LPCM 8Ch Subwoofer Subwoofer Name PS WB95B Wei...

Страница 40: ... 95 F 5 C to 35 C Operating Humidity Range 10 75 Frequency range 20Hz 20kHz NOTE Samsung Electronics Co Ltd reserves the right to change the specifications without notice Weight and dimensions are approximate Precaution The Soundbarwill restart automatically if you turn on turn off Wi Fi Wi Fi Port deactivation method Press the CH LEVEL button on the remote control of the Soundbar for 30 seconds t...

Страница 41: ...must be retained by the customer and is the only acceptable proof of purchase It must be presented to the authorized service center at the time service is requested EXCLUSIONS WHAT IS NOT COVERED This warranty does not cover damage due to accident fire flood and or other acts of God misuse incorrect line voltage improper installation improper or unauthorized repairs commercial use or damage that o...

Страница 42: ...QUARTERS Samsung Electronics Canada Inc 2050 Derry Road West Mississauga Ontario L5N 0B9 Canada TEL 1 800 SAMSUNG 1 800 726 7864 www samsung com ca support Country Samsung Service Center Web Site CANADA 1 800 SAMSUNG 726 7864 1 844 SAM PAYS 726 7297 www samsung com ca support English www samsung com ca_fr support French U S A 1 800 SAMSUNG 726 7864 1 844 SAM PAYS 726 7297 www samsung com us suppor...

Страница 43: ... Q910B HW Q750B Imaginez les possibilités Nous vous remercions d avoirfait l acquisition de ce produit Samsung Pourbénéficierd un service plus complet veuillez inscrire votre produit surle site www samsung com register ...

Страница 44: ... solidement fixé au plancher au murconformément aux directives d installation MISE EN GARDE Veillez à évitertoute projection surl appareil Ne placez jamais de récipients contenant un liquide ex vase dessus La prise d alimentation fait office de système de déconnexion Elle doit donc resterdisponible en permanence ATTENTION Pourle Canada L émetteur récepteurexempt de licence contenu dans le présent ...

Страница 45: ... que ce soit détérioration du cordon ou de la fiche d alimentation projection de liquide surl appareil chute d objets à l intérieurde l appareil exposition à la pluie ou à l humidité dysfonctionnement chute PRÉCAUTIONS 1 Assurez vous que le bloc d alimentation CA chez vous est conforme aux exigences de puissance figurant surla plaque d identification située sur le dessous de votre produit Installe...

Страница 46: ...son de basses 16 Connexion d un SWA 9100 à votre Soundbar 17 05 Connexion à un téléviseur 19 Connexion du téléviseurprenant en charge HDMI ARC canal de retouraudio 19 Connexion à l aide d un câble optique 20 Connexion parBluetooth 21 Connexion en Wi Fi 23 Utilisation de la fonction Q Symphony 24 Utilisation du son Spacefit 25 06 Connexion d un appareil externe 26 Méthode 1 Connexion à l aide d un ...

Страница 47: ...e à jourautomatique 35 Mise à jourUSB 35 Initialisation 36 12 Dépannage 36 13 Licence 38 14 Avis concernant les licences libres 38 15 Remarque Importante Concernant le Service 38 16 Spécifications et guide 39 Caractéristiques techniques 39 ...

Страница 48: ...récepteursans fil Câble du haut parleur Pourplus d informations surl alimentation et la consommation électriques reportez vous à l étiquette apposée surle produit Étiquette Arrière de l unité principale du Soundbar Pouracheterdes composants supplémentaires ou des câbles en option contactez un centre de service Samsung ou le service clientèle Samsung Pourplus d informations surle support mural ou l...

Страница 49: ...microphone Lorsque le microphone est éteint le voyant DEL passe au rouge Voyant rouge allumé Arrêt microphone Voyant rouge éteint Marche microphone 3 Bouton Source modèle Q750B Appuyez surle bouton Source pourchangerla source d entrée 4 Écran Affiche l état du produit et le mode actuel D IN HDMI Wi Fi BT Lorsque vous branchez le câble d alimentation CA le bouton d alimentation se met à fonctionner...

Страница 50: ... ARC HDMI 3 5 4 1 POWER Branchez le cordon d alimentation CA du Soundbar Voirla page 14 2 SERVICE Connectez un dispositif de stockage USB pourmettre à niveau le logiciel du produit 3 DIGITALAUDIO IN OPTICAL Permet de connecterla sortie numérique optique d un appareil externe Voirla page 27 4 HDMI Entrées simultanées de signaux vidéo et audio numériques à l aide d un câble HDMI Permet de connecterl...

Страница 51: ...surle bouton Silence pourcouperle son Appuyez de nouveau surce bouton pouractiverle son 5 SOUND MODE En appuyant surle bouton vous pouvez sélectionnerle mode de son Surround Game Standard ou Adaptive sound Standard Émet le son d origine Surround Fournit un champ sonore plus étendu que la norme Game Émet un son stéréoscopique afin de vous plongerdans le feu de l action lorsque vous jouez Adaptive s...

Страница 52: ... surce bouton 9 Haut Bas Gauche Droite Appuyez aux endroits indiqués poursélectionnerhaut bas gauche droite Appuyez en haut en bas à gauche et à droite du bouton poursélectionnerou définirdes fonctions Saut de musique Appuyez surle bouton de Droite pourpasserau fichierde musique suivant Appuyez surle bouton de Gauche pourpasserau fichierde musique précédent ID SET Utilisez cette option lorsque le ...

Страница 53: ...ille page 13 Haut ID SET page 15 Commande du son Égaliseur7 bandes page 10 Spécifications de sortie pourles différents modes d effets sonores HW Q910B Effet Entrée Sortie Avec caisson de basse et haut parleurambiophonique Standard 2 0 canaux 2 1 canaux 5 1 canaux 5 1 canaux 7 1 canaux DTS 7 1 canaux 7 1 canaux DolbyAtmos DTS X 7 1 2 canaux Surround 2 0 canaux 9 1 2 canaux 5 1 canaux 9 1 2 canaux 7...

Страница 54: ... 5 1 2 canaux DolbyAtmos DTS X 3 1 2 canaux 5 1 2 canaux Game 2 0 canaux 3 1 2 canaux 5 1 2 canaux 5 1 canaux 3 1 2 canaux 5 1 2 canaux DolbyAtmos DTS X 3 1 2 canaux 5 1 2 canaux Adaptive sound 2 0 canaux 3 1 2 canaux 5 1 2 canaux 5 1 canaux 3 1 2 canaux 5 1 2 canaux DolbyAtmos DTS X 3 1 2 canaux 5 1 2 canaux Les haut parleurs ambiophoniques ne produisent aucun son parla sortie du canal 2 lorsque ...

Страница 55: ...t cette fonction Samsung VIZIO LG Sony Sharp PHILIPS PANASONIC TOSHIBA Hisense RCA 1 Éteignez le Soundbar 2 Appuyez vers le haut surle bouton WOOFER et maintenez le enfoncé pendant 5 secondes Chaque fois que vous appuyez surle bouton WOOFER vers le haut et le maintenez enfoncé pendant 5 secondes le mode change dans l ordre suivant OFF TV REMOTE mode pardéfaut SAMSUNG TVREMOTE ALL TVREMOTE Bouton d...

Страница 56: ...ation à la Soundbar HDMI IN 1 HDMI IN 2 ID SET WOOFER REAR POWER NETWORK SERVICE DIGITAL AUDIO IN OPTICAL HDMI TO TV eARC ARC HDMI 1 HDMI 2 ID SET HDMI IN 1 HDMI IN 2 SERVICE DIGITAL AUDIO IN OPTICAL HDMI TO TV eARC ARC HDMI 1 Dessous de l unité principale du Soundbar Cordond alimentation 3 Connectez l alimentation au Soundbaret au caisson de basses Le caisson de basses est automatiquement connect...

Страница 57: ...t le voyant bleu clignote 5 Sec Voyant bleu clignotant rapidement Arrière du caisson de basses Arrière du caisson de basses 3 Appuyez surle bouton Haut de la télécommande et maintenez le enfoncé pendant 5 secondes Le message ID SET apparaît surl écran du Soundbarpendant un moment puis disparaît Le Soundbarse met automatiquement sous tension lorsque l étape ID SET est terminée SOUND MODE PAIR 5 Sec...

Страница 58: ... basses passe en mode veille et la DEL STANDBY située à l arrière du caisson devient rouge après avoirclignoté en bleu Si vous utilisez un appareil qui utilise la même fréquence que le Soundbarà proximité du Soundbar des interférences peuvent donnerlieu à des interruptions du son La distance maximale de transmission du signal sans fil à partirde l unité principale est d environ10 m 32 8 pieds mais...

Страница 59: ...onnecté à la prise bleue avec le haut parleurportant l étiquette bleue 3 Insérez les extrémités de couleurrouge et noire de chaque câble dans les prises rouge et noire du haut parleurapproprié Les étiquettes se trouvent au dos des haut parleurs 2 Vérifiez l état deveille après le branchement surune prise électrique Le voyant LINK bleu du module récepteursans fil clignote S il ne clignote pas prene...

Страница 60: ...SON bleu Allumé Connecté au Soundbar Clignotant Connexion en état de veille Vérifiez si le Soundbarest allumé Répétez les étapes 3 et 4 VEILLE rouge Allumé Échec de connexion Vérifiez si le Soundbarest allumé 1 Appuyez surle bouton ID SET à l arrière du module récepteursans fil à l aide d une pointe de stylo pendant 5 à 6 secondes jusqu à ce que le voyant LINK clignote en bleu IDSET L R SURROUNDSP...

Страница 61: ...urla connexion à eARC la fonction eARC dans le menu du téléviseurdevrait être activée Reportez vous au manuel de l utilisateurdu téléviseurpourde plus amples renseignements surce réglage p ex Samsung TV Accueil Menu Paramètres Tous les paramètres Son Expert Settings HDMI eARC Mode Auto Si l option TVARC ne s affiche pas surl écran de l unité principale du Soundbar vérifiez que le câble HDMI est co...

Страница 62: ... Câble optique non fourni Dessous du Soundbar D IN Dessus du Soundbar Q910B Dessus du Soundbar D IN Q750B 1 Le téléviseuret le Soundbarétant éteints connectez le port DIGITALAUDIO IN OPTICAL du Soundbaret le port de sortie OPTICAL du téléviseurà l aide du câble optique non fourni comme indiqué surla figure 2 Allumez le Soundbaret le téléviseur 3 Appuyez surle bouton Multifonction Source situé dans...

Страница 63: ...tres Son Sortie audio Liste des haut parleurs Bluetooth SoundbarQ B Bluetooth 3 Sélectionnez SoundbarQ B dans la liste surl écran du téléviseur Un Soundbardisponible est indiqué par Association requise ou Associé surla liste des appareils Bluetooth du téléviseur Pourconnecterle téléviseur Samsung au Soundbar sélectionnez le message puis établissez une connexion Lorsque le téléviseurSamsung est con...

Страница 64: ...pareil à moins de1 m 3 28 pi pourvous connecterparBluetooth Si un code PIN vous est demandé lors de la connexion d un appareil Bluetooth entrez 0000 Le Soundbars éteint automatiquement au bout de18 minutes à l état Ready Prêt Le Soundbarpeut ne pas effectuercorrectement la recherche ou la connexion Bluetooth dans les circonstances suivantes S il y a un fort champ électrique autourdu Soundbar Si pl...

Страница 65: ...que les menus peuvent varierselon l année de fabrication consultez le manuel de votre téléviseur Pourbrancherle téléviseurau SoundbarparWi Fi branchez d abord le Soundbarau routeursans fil Reportez vous à la page 30 poursavoircomment établir une connexion Wi Fi 1 Pourplus de détails surla connexion Wi Fi du Soundbar reportez vous à la page 30 Méthode 2 Connexion parWi Fi réseau sans fil 2 Modifiez...

Страница 66: ...xemple de menu du téléviseur TV AV Numéro de série du Soundbar HDMI Wi Fi Menu du téléviseur Wi Fi Exemple de menu du téléviseur TV AV Soundbarseries name Wi Fi REMARQUE Le fonctionnement dépend du codec pris en charge parle téléviseur Cette fonction est prise en charge uniquement lorsque le câble HDMI ou le câble optique non fourni ou le Wi Fi est connecté Le message qui s affiche peut varierselo...

Страница 67: ...dio Méthode 2 Connexion parun téléviseur Pouractivercette fonction activez le mode Son adaptatif surle menu de votre téléviseurSamsung Accueil Menu Paramètres Tous les paramètres Général Paramètres du mode intelligent Son adaptatif Le mode son de votre Soundbarpassera automatiquement à Son adaptatif si vous activez le mode Son adaptatif survotre téléviseur REMARQUE Cette fonction est active lorsqu...

Страница 68: ...le mode HDMI 5 L écran du Soundbarindique que le mode HDMI est actuellement sélectionné et le Soundbarcommence à émettre des sons REMARQUE Lorsquevous utilisez DolbyAtmos DTS X Si la source d entrée est Dolby Atmos DTS X consultez Spécifications de sortie pourles différents modes d effets sonores à la page 11 Lorsque Dolby Atmos est activé DOLBY ATMOS apparaît surl écran avant Lorsque DTS X est ac...

Страница 69: ...s du Soundbar D IN Q750B 1 Utilisez un câble optique non fourni pourconnecterle port DIGITALAUDIO IN OPTICAL au Soundbarprincipal et le port OPTICAL OUTà l appareil externe 2 Allumez le Soundbaret l appareil externe 3 Poursélectionnerle mode D IN appuyez surle bouton Multifonction Source situé dans le haut du Soundbarou surle bouton Source de la télécommande 4 Votre Soundbarlit les sons de l appar...

Страница 70: ...aintenez le enfoncé pendant plus de 5 secondes jusqu à ce que BTPAIRING apparaisse 2 Survotre appareil sélectionnez SoundbarQ B dans la liste qui apparaît Lorsque le Soundbarest connecté à l appareil mobile Nom de l appareil mobile BT apparaît surl écran avant 3 Lisez les fichiers musicaux de l appareil connecté parBluetooth via le Soundbar Après avoirconnecté le Soundbarà votre appareil mobile po...

Страница 71: ... où la réception est mauvaise Un appareil Bluetooth peut émettre du bruit ou devenirdéfaillant dans les conditions suivantes Lorsque le corps est en contact avec l émetteur récepteurde signal surl appareil Bluetooth ou le Soundbar Dans les coins ou lorsqu il y a un obstacle à proximité tel qu un murou une cloison où des changements électriques peuvent se produire Lorsqu il est exposé à des interfé...

Страница 72: ... tablette 2 Dans l application suivez les instructions à l écran pourajouterle Soundbar La fenêtre contextuelle automatique deuxième illustration ci dessous peut ne pas s affichersurcertains appareils Si la fenêtre contextuelle ne s affiche pas appuyez surle bouton surl écran Accueil Le Soundbara été ajouté à l application L illustration ci dessous peut varierselon la version de l application Lanc...

Страница 73: ...n pointu du Soundbar Cela pourrait rayerou endommagerle Soundbarou l appareil mobile Il est recommandé de placerl appareil mobile dans un étui Appuyez légèrement surla zone large de la partie supérieure du Soundbar sans exercerde force excessive Pourutilisercette fonction mettez à jourl application SmartThings vers la dernière version Cette fonction peut ne pas être prise en charge en fonction de ...

Страница 74: ...eren flux de la musique des balados et d autres sons à partirde votre appareil Apple surle SoundbarSamsung Assurez vous que le Soundbarest sous tension et qu il est connecté au même réseau Wi Fi que votre appareil Apple Sélectionnez à partird une application prise en charge parAirPlay ou du centre de contrôle survotre iPhone iPad ou Mac Dans la liste d appareils disponibles sélectionnez le Soundba...

Страница 75: ... le Soundbarà au moins 5 cm 2 po sous le téléviseur 5 cm 2 po ou plus 2 Alignez la ligne centrale du guide de montage mural du gabarit papiersur le centre de votre téléviseur si vous montez le Soundbarsous ce dernier puis fixez le guide de montage mural au muravec du ruban adhésif Si vous ne faites pas l installation sous un téléviseur placez la ligne centrale au centre de la zone d installation L...

Страница 76: ...x vers le bas de sorte que les supports muraux reposent solidement surles vis de maintien 10 INSTALLATION DU SOUNDBAR DEVANTLE TÉLÉVISEUR Composant x 4 Pied en caoutchouc Pourprocéderà cette installation fixez les pieds en caoutchouc en dessous du Soundbaravant de placerce dernierau dessus du support du téléviseur Veillez à fixerles pieds en caoutchouc de manière à ce qu ils ne dépassent pas des b...

Страница 77: ...econnectez le à Internet Mise à jourUSB Dessous du Soundbar HDMI IN 1 HDMI IN 2 ID SET WOOFER REAR POWER NETWORK SERVICE DIGITAL AUDIO IN OPTICAL HDMI TO TV eARC ARC HDMI 1 HDMI 2 ID SET HDMI IN 1 HDMI IN 2 SERVICE SERVICE Il se peut que Samsung propose des mises à jourdu micrologiciel du système Soundbarà l avenir Lorsqu une mise à jourest disponible vous pouvez mettre à jourle Soundbaren connect...

Страница 78: ...Le volume du Soundbarest trop faible ou coupé Réglez le volume Lorsqu un appareil externe STB appareil Bluetooth appareil mobile etc est connecté réglez le volume de l appareil externe Pourla sortie audio du téléviseur sélectionnez Soundbar Téléviseur Samsung Accueil Menu Paramètres Tous les paramètres Son Sortie audio Sélectionnez Soundbar La connexion du câble au Soundbarne doit pas être lâche D...

Страница 79: ...t parleurs Bluetooth surl appareil à connecter TéléviseurSamsung Accueil Menu Paramètres Tous les paramètres Son Sortie audio Liste des haut parleurs Bluetooth La connexion automatique au téléviseurpeut être désactivée Pendant que le Soundbarest en mode BTREADY appuyez surla touche Gauche de la télécommande du Soundbaret maintenez la enfoncée pendant 5 secondes poursélectionnerON TVCONNECT Si OFF ...

Страница 80: ...s d autres pays Utilisez votre téléphone tablette ou ordinateurcomme une télécommande pourSpotify Accédez à spotify com connect poursavoir comment faire Le logiciel Spotify est soumis à des licences tierces disponibles ici https www spotify com connect third party licenses Apple AirPlay iPhone iPad et Mac sont des marques commerciales d Apple Inc enregistrées aux États Unis et dans d autres pays L...

Страница 81: ...s 10 6 lb 4 8 kg Dimensions L H P 43 7 x 2 38 x 4 7 po 1110 7 x 60 4 x120 0 mm Plage de températures de fonctionnement 41 F à 95 F 5 C à 35 C Plage d humidité de fonctionnement 10 à 75 AMPLIFICATEUR Puissance de sortie nominale 30 W x 3 20 W x 2 10 W x 3 Formats de lecture pris en charge Dolby 5 1ch Dolby Digital Plus Dolby TRUE HD DolbyATMOS DTS 5 1ch DTS HD DTS HD MasterAudio DTS X LPCM 8Ch Cais...

Страница 82: ... 35 C Plage d humidité de fonctionnement 10 à 75 Plage de fréquences 20 Hz à 20kHz REMARQUE Samsung Electronics Co Ltd se réserve le droit de modifierles spécifications sans préavis Le poids et les dimensions sont approximatifs Précautions Le Soundbarredémarrera automatiquement sivous activez désactivez leWi Fi Wi Fi Méthode de désactivation du port Appuyez surle bouton CH LEVEL de la télécommande...

Страница 83: ... doit le présenterau Centre de service agréé au moment où il fait la demande d une réparation sous garantie EXCLUSIONS CE QUI N ESTPAS COUVERT Cette garantie ne couvre pas les dommages causés parun accident un incendie une inondation un cas de force majeure un mauvais usage ou une tension incorrecte La garantie ne couvre pas une mauvaise installation une mauvaise réparation une réparation non auto...

Страница 84: ...Samsung SIÈGE SOCIAL Samsung Electronics Canada Inc 2050 Derry Road West Mississauga Ontario L5N 0B9 Canada TEL 1 800 SAMSUNG 1 800 726 7864 www samsung com ca support Pays Centre de service de Samsung Site Web CANADA 1 800 SAMSUNG 726 7864 1 844 SAM PAYS 726 7297 www samsung com ca support English www samsung com ca_fr support French U S A 1 800 SAMSUNG 726 7864 1 844 SAM PAYS 726 7297 www samsun...

Отзывы: