background image

POR - iv

POR - v

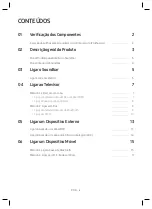
conTeÚdos

01 

Verificação dos Componentes 

2

Inserção das pilhas antes de utilizar o controlo remoto (2 pilhas AA)


 ------------------------- 

2

02 

Descrição geral do Produto 

3

Painel frontal/painel direito do Soundbar


 ------------------------- 

3

Painel inferior do Soundbar


 ------------------------- 

4

03 

Ligar o Soundbar 

5

Ligar à corrente elétrica


 ------------------------- 

5

04 

Ligar ao Televisor 

7

Método 1. Ligar com um cabo


 ------------------------- 

7


Ligar um televisor através de um cabo HDMI


 ------------------------- 

7


Ligar através de um cabo ótico


 ------------------------- 

8

Método 2. Ligar sem fios


 ------------------------- 

9


Ligar um televisor através de Bluetooth


 ------------------------- 

9


Ligar por Wi-Fi


 ------------------------- 

10

05 

Ligar um Dispositivo Externo 

13

Ligar através de um cabo HDMI


 ------------------------- 

13

Ligar através de um cabo áudio ótico ou analógico (AUX)


 ------------------------- 

14

06 

Ligar um Dispositivo Móvel 

15

Método 1. Ligar através de Bluetooth


 ------------------------- 

15

Método 2. Ligar por Wi-Fi (rede sem fios)


 ------------------------- 

17

07 

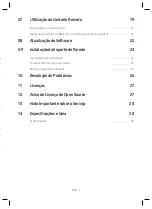
Utilização do Controlo Remoto 

19

Como utilizar o controlo remoto


 ------------------------- 

19

Ajuste do volume do Soundbar com o controlo remoto de um televisor

   ------------------------- 

22

08 

Atualização do Software 

22

09 

Instalação do Suporte de Parede 

23

Precauções para a instalação


 ------------------------- 

23

Componentes do suporte de parede


 ------------------------- 

23

Montar o organizador de cabos


 ------------------------- 

25

10 

Resolução de Problemas 

26

11 

Licenças 

27

12 

Aviso de Licença de Open Source 

27

13 

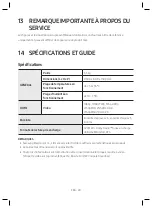
Nota Importante sobre o Serviço 

28

14 

Especificações e Guia 

28

Especificações


 ------------------------- 

28

Содержание HW-MS750

Страница 1: ...HW MS750 HW MS751 USER MANUAL ...

Страница 2: ...indicates that the rated voltage marked with the symbol is DC voltage Caution Consult instructions for use This symbol instructs the user to consult the user manual for further safety related information WARNING To reduce the risk of fire or electric shock do not expose this appliance to rain or moisture CAUTION TO PREVENT ELECTRIC SHOCK MATCH WIDE BLADE OF PLUG TO WIDE SLOT FULLY INSERT This appa...

Страница 3: ...he unit malfunctions Your product is not intended for industrial use It is for personal use only Condensation may occur if your product has been stored in cold temperatures If transporting the unit during the winter wait approximately 2 hours until the unit has reached room temperature before using 5 The battery used with this product contains chemicals that are harmful to the environment Do not d...

Страница 4: ... 5 04 ConnectingtoyourTV 7 Method 1 Connecting with a Cable 7 Connecting a TV using an HDMI Cable 7 Connecting using an Optical Cable 8 Method 2 Connecting Wirelessly 9 Connecting a TV via Bluetooth 9 Connecting via Wi Fi 10 05 ConnectinganExternalDevice 13 Connecting using an HDMI Cable 13 Connecting using an Optical or Analogue Audio AUX Cable 14 06 ConnectingaMobileDevice 15 Method 1 Connecting...

Страница 5: ...volume with a TV remote control 22 08 SoftwareUpdate 22 09 InstallingtheWallMount 23 Installation Precautions 23 Wallmount Components 23 Assembling the Holder Cable 25 10 Troubleshooting 26 11 Licence 27 12 OpenSourceLicenceNotice 27 13 ImportantNotesAboutService 28 14 SpecificationsandGuide 28 Specifications 28 ...

Страница 6: ... 25 for instructions on how to use the Holder Cable To purchase additional components or optional cables contact a Samsung Service Centre or Samsung Customer Care InsertingBatteriesbeforeusingtheRemoteControl AAbatteriesX2 Slide the battery cover in the direction of the arrow until it is completely removed Insert 2 AA batteries 1 5V oriented so that their polarity is correct Slide the battery cove...

Страница 7: ...e When adjusted the volume level appears on the Soundbar s front display Source Button Selects the source input mode Inputmode Display Optical Digital input D IN ARC HDMI OUT input D IN TV ARC Auto conversion AUX input AUX HDMI input HDMI 1 HDMI 2 Wi Fi mode WIFI BLUETOOTH mode BT To turn on BTPAIRING mode change the source to BT mode and then press and hold the Source button for more than 5 secon...

Страница 8: ...ed to the Soundbar and mounted on the wall using a Wall Mount Kit WMN300SB not supplied POWERIN Connect the Soundbar s AC power cable DIGITALAUDIOIN OPTICAL Connect to the digital optical output of an external device WIRELESS Attach the wireless dongle that connects the Soundbar to surround speakers and a subwoofer wirelessly The surround speaker subwoofer and wireless dongle are sold separately T...

Страница 9: ...eless network Wi Fi via the SamsungMultiroom app 03 ConnectingtheSoundbar ConnectingElectricalPower For more information about the required electrical power and power consumption refer to the label attached to the product Label Bottom of the Soundbar Main Unit HDMI IN 2 HDMI IN 1 HDMI OUT TV ARC POWER IN POWER OUT For TV WIRELESS AUX IN DIGITAL AUDIO IN OPTICAL POWER IN BottomoftheSoundbar MainUni...

Страница 10: ...nt Kit WMN300SB not supplied The POWEROUT jack can connect only to Samsung TVs that use a 2 pin power cord and consume 400 W or less Connecting the jack to a device that consumes more than 400 W may damage the Soundbar or cause a malfunction For a list of Samsung TVs that are compatible with the WMN300SB Wall Mount Kit and the POWEROUT jack see the WMN300SB Wall Mount Kit user manual You can view ...

Страница 11: ...me and mute Method1 ConnectingwithaCable ConnectingaTVusinganHDMICable HDMI IN 1 HDMI OUT TV ARC HDMI IN ARC HDMICable BottomoftheSoundbar ConnecttotheHDMIIN ARC portofyourTV ConnecttotheHDMIOUT TV ARC portoftheSoundbarmainunit RightSideofthe Soundbar TV ARC 1 With the Soundbar and TV turned on connect the HDMI cable as shown in the figure 2 TVARC appears in the display window of the Soundbar main...

Страница 12: ... cable not supplied 2 Press the Source button on the right side panel or remote control and then select the D IN mode AutoPowerLink Auto Power Link automatically turns on the Soundbar when the TV is turned on 1 Connect the Soundbar and a TV with a digital optical cable not supplied 2 Press the Source button on the right side panel or on the remote control and then select D IN 3 Press the Left butt...

Страница 13: ...dPairing or Paired on the TV Bluetooth device list To connect to the Soundbar select the message and establish a connection When the TV is connected TVName BT appears on the Soundbar s front display 5 You can now hear TV sound from the Soundbar Ifthedevicefailstoconnect If the previously connected Soundbar listing e g AV SamsungSoundbarMSxxx appears in the list delete it In BT mode press and hold ...

Страница 14: ...enerate electromagnetic waves must be kept away from the Soundbar main unit e g microwaves wireless LAN devices etc DisconnectingtheSoundbarfromtheTV Press the Source button on the right side panel or on the remote control and switch to any mode but BT Disconnecting takes time because the TV must receive a response from the Soundbar The time required may differ depending on the TV model To cancel ...

Страница 15: ...to the Wi Fi network the TV is connected to 3 Install and launch the SamsungMultiroom app on your mobile device smartphone tablet etc iOS Android Samsung Multiroom app 4 Follow the instructions in the app screen on the mobile device to connect the Soundbar to your Wi Fi network Step2 ConfiguringSettingsontheTV If the TV disconnects from your wireless network after you change the input source to th...

Страница 16: ... List Add New Device On Multiroom Link Settings Soundbar Surround Bluetooth Headphone Bluetooth Headphone List SpeakerSettings TV Sound Output Multiroom Link OK MultiroomLink OK VolumeLevel SpeakerTest Soundbar AV SamsungSoundbarMS750 Soundbar Surround c AV SamsungSoundbarMS750 Don tUse EditNa 1 3 2 4 The Soundbar outputs TV sound NOTES The TV and Soundbar must be connected to the same wireless ne...

Страница 17: ...dbar ExternalDevice HDMI 1 RightSideofthe Soundbar HDMI 2 1 Connect an HDMI cable from the HDMIIN1orHDMIIN2 jack on the back of the product to the HDMI OUT jack on your digital device 2 Connect an HDMI cable from the HDMIOUT TV ARC jack on the back of the product to the HDMI IN jack on your TV 3 Press the Source button on the right side panel or on the remote control and then select HDMI1 or HDMI2...

Страница 18: ...Cable X X Connect DIGITALAUDIOIN OPTICAL on the main unit to the OPTICAL OUT jack of the Source Device using a digital optical cable not supplied Y Y Select D IN mode by pressing the Source button on the right side panel or on the remote control OR Audio AUX Cable X X Connect AUXIN Audio on the main unit to the AUDIO OUT jack of the Source Device using an audio cable Y Y Select AUX mode by pressin...

Страница 19: ...re than 5 seconds to display BTPAIRING When BTPAIRING mode the blue LED on the right edge of the Soundbar will blink 3 Select AV SamsungSoundbarMSxxx from the list When a Soundbar is connected to the Bluetooth device BluetoothDeviceName BT appears in the front display 4 Play music files from the device connected via Bluetooth through the Soundbar Ifthedevicefailstoconnect If the previously connect...

Страница 20: ... Bluetooth search or connection correctly under the following circumstances If there is a strong electrical field around the Soundbar If several Bluetooth devices are simultaneously paired with the Soundbar If the Bluetooth device is turned off not in place or malfunctions Electronic devices may cause radio interference Devices that generate electromagnetic waves must be kept away from the Soundba...

Страница 21: ...r to a mobile device via a wireless network Wi Fi the SamsungMultiroom app is required Mobiledevice Theinitialconnection 1 Press the Source button on the right side of the Soundbar or on the remote control to select WIFI mode WIFI 2 Install and launch the SamsungMultiroom app on your mobile device e g smartphone or tablet iOS Android Samsung Multiroom app 3 Follow the instructions in the app scree...

Страница 22: ...ne audio device and one Soundbar X X Touch to go to the list of all speakers Y Y Touch on the right of the Soundbar model name Z Z Touch SurroundSetup Select Done after dragging the speaker to the desired location The Surround connection is complete Soundbar NOTE To connect an additional SWA 9000S not supplied disconnect the Samsung wireless speakers from the Soundbar to disable the surround sound...

Страница 23: ... the TV and your Soundbar are not synchronised select SYNC in Sound Control and then set audio delay between 0 300 milliseconds by using the Up Down buttons If surround speakers not supplied are connected select REARLEVEL and use the Up Down buttons to adjust the volume within the 6 to 6 range The REARSPEAKER function can be turned ON OFF by using the Up Down buttons SYNC is only supported in some...

Страница 24: ...own Left Right PresstheindicatedareastoselectUp Down Left Right Press Up Down Left Right on the button to select or set functions Repeat To use the repeat function press the Up button MusicSkip Press the Right button to select the next music file Press the Left button to select the previous music file Anynet AutoPowerLink You can turn Anynet and Auto Power Link on or off Anynet and Auto Power Link...

Страница 25: ...he 6 to 6 range To set the BASS volume level to 0 press the button When a Subwoofer not supplied is connected the BASS button switches to the Subwoofer Key Push the button up or down to adjust the subwoofer volume either to 12 or within the 6 to 6 range To set the subwoofer volume level to 0 press the button Surround VOL BASS SOUND MODE SMART MODE VOL S u r r o u n d S O U N D M O D E S M A R T M ...

Страница 26: ...hat came with a TV made by a third party manufacturer turn the Soundbar on press and hold the Surround button for 5 seconds OFF TVREMOTE appears on the Soundbar s display release the Surround button and then press and hold the Surround button again for more than 5 seconds ALL TVREMOTE appears on the Soundbar s display This function may not be available depending on the remote control For manufactu...

Страница 27: ...into wall studs Purchase wall mounting screws according to the type and thickness of the wall you want to mount the Soundbar on Diameter M5 Length 35 mm or longer recommended Connect cables from the unit to external devices before you install the Soundbar on the wall Make sure the unit is turned off and unplugged before you install it Otherwise it may cause an electric shock WallmountComponents 45...

Страница 28: ...in the wall at each marking If the markings do not correspond to the positions of studs make sure you insert appropriate anchors or mollies into the holes before you insert the support screws If you use anchors or mollies make sure the holes you drill are large enough for the anchors or mollies you use 5 Push a screw not supplied through each Holder Screw and then screw each screw firmly into a su...

Страница 29: ...ll Mounts down so that Bracket Wall Mounts rest securely on the Holder Screws AssemblingtheHolder Cable As shown in the image use the supplied Screw to fix the Holder Cable to the Soundbar and then use the Holder Cable to organise any cables WIRELESS AUX IN DIGITAL AUDIO IN OPTICAL POWER IN POWER OUT For TV Holder Cable WIRELE SS AUX IN DIGITAL AUDIO IN OPTICA L HDMI IN 1 HDMI IN 2 HDMI OUT TV AR ...

Страница 30: ...ttoofar Move the remote control closer to the Soundbar main unit CannotconnecttotheTV Ifconnectedviaawirednetwork Check if the cable is connected correctly Check the port name to make sure that the cable is connected to the correct port See the corresponding page regarding each connection method Press the Source button on the right side of the Soundbar or on the remote control to check if the mode...

Страница 31: ...udio Pro Logic and the double D symbol are trademarks of Dolby Laboratories For DTS patents see http patents dts com Manufactured under license from DTS Licensing Limited DTS the Symbol DTS in combination with the Symbol and DTS Digital Surround are registered trademarks or trademarks of DTS Inc in the United States and or other countries DTS Inc All Rights Reserved The terms HDMI and HDMI High De...

Страница 32: ...5 C OperatingHumidityRange 10 75 HDMI Video 1080p 1080i 720p 576p 480p 2160p 24 25 30Hz 4 4 4 2160p 60 50Hz 4 2 0 Speaker Woofer x 6 Tweeter x 5 4ohm Supportedplayformats LPCM 2ch Dolby Audio supporting Dolby Digital DTS NOTES Samsung Electronics Co Ltd reserves the right to change the specifications without notice Weight and dimensions are approximate For more information about the power supply a...

Страница 33: ...ominale indiquée par le symbole est une tension CC Mise en garde Consulter le mode d emploi ce symbole avertit l utilisateur qu il doit consulter le manuel d utilisation pour en savoir plus sur les informations relatives à la sécurité AVERTISSEMENT Afin de diminuer les risques d incendie ou de choc électrique n exposez pas cet appareil à la pluie ou à l humidité ATTENTION POUR PRÉVENIR LES CHOCS É...

Страница 34: ...t n est pas prévu pour un usage industriel Ce produit ne peut être utilisé qu à des fins personnelles Une condensation peut se former si le produit ou un disque a été stocké à basse température Si vous devez transporter l ensemble pendant l hiver attendez environ 2 heures que l appareil ait atteint la température de la pièce avant de l utiliser 5 Les piles utilisées dans ce produit peuvent conteni...

Страница 35: ...nexionàvotreTéléviseur 7 Méthode 1 Connexion avec un câble 7 Connexion d un téléviseur à l aide d un câble HDMI 7 Connexion à l aide d un câble optique 8 Méthode 2 Connexion sans fil 9 Connexion à un téléviseur via Bluetooth 9 Connexion via Wi Fi 10 05 ConnexionàunAppareilExterne 13 Connexion à l aide d un câble HDMI 13 Connexion à l aide d un câble audio Optique ou Analogique AUX 14 06 Connexionà...

Страница 36: ...avec une télécommande de téléviseur 22 08 MiseàjourduLogiciel 22 09 InstallationduSupportMural 23 Précautions d installation 23 Composants de fixation au mur 23 Montage du porte câble 25 10 Dépannage 26 11 Licence 27 12 AvisdeLicenceLibre 27 13 RemarqueImportanteàProposduService 28 14 SpécificationsetGuide 28 Spécifications 28 ...

Страница 37: ...ructions sur l utilisation du Porte câble Pour l achat de composants supplémentaires ou de câbles optionnels contactez un Centre de service Samsung ou le Service client de Samsung Insertiondespilesavantl utilisationdelatélécommande PilesAAX2 Faites glisser le couvercle des piles dans la direction de la flèche jusqu à ce qu il soit complètement retiré Insérez 2 piles AA 1 5 V orientées de sorte que...

Страница 38: ...olume apparaît sur l affichage avant de la Soundbar Touche Source Sélectionne le mode d entrée de la source Moded entrée Affichage Entrée numérique optique D IN Entrée ARC HDMI OUT D IN TV ARC Conversion automatique Entrée AUX AUX Entrée HDMI HDMI 1 HDMI 2 Mode Wi Fi WIFI Mode BLUETOOTH BT Pour activer le mode BTPAIRING changez la source sur le mode BT puis appuyez et maintenez enfoncée la touche ...

Страница 39: ... fixé au mur à l aide du kit de fixation murale WMN300SB non fourni POWERIN Connectez le câble d alimentation CA de la Soundbar DIGITALAUDIOIN OPTICAL Permet de connecter la sortie numérique optique d un appareil externe WIRELESS Fixez la clé électronique qui connecte sans fil la Soundbar aux enceintes surround et à un subwoofer L enceinte surround le subwoofer et la clé électronique sont vendus s...

Страница 40: ...Wi Fi via l application SamsungMultiroom 03 ConnexiondelaSoundbar Connexiondel alimentationélectrique Pour plus d informations sur l alimentation et la consommation électriques requises reportez vous à l étiquette collée sur le produit Étiquette Partie inférieure de l unité principale Soundbar HDMI IN 2 HDMI IN 1 HDMI OUT TV ARC POWER IN POWER OUT For TV WIRELESS AUX IN DIGITAL AUDIO IN OPTICAL PO...

Страница 41: ...WEROUT peut être connectée uniquement aux téléviseurs Samsung qui utilisent un cordon d alimentation 2 broches et consomment 400W ou moins Connecter la prise jack à un appareil qui consomme plus de 400 W peut endommager la Soundbar ou entraîner un dysfonctionnement Pour une liste des téléviseurs Samsung compatibles avec le kit de fixation murale WMN300SB et la prise jack POWEROUT reportez vous au ...

Страница 42: ... le volume et la coupure du son Méthode1 Connexionavecuncâble Connexiond untéléviseuràl aided uncâbleHDMI HDMI IN 1 HDMI OUT TV ARC HDMI IN ARC CâbleHDMI Partieinférieuredela Soundbar Àbranchersurleport HDMIIN ARC devotretéléviseur ÀbranchersurleportHDMIOUT TV ARC del unité principaleSoundbar Côtédroitdela Soundbar TV ARC 1 Avec la Soundbar et le téléviseur allumés connectez le câble HDMI tel qu i...

Страница 43: ...ur la touche Source sur le panneau côté droit ou la télécommande puis sélectionnez le mode D IN AutoPowerLink Le Auto Power Link active la Soundbar lorsque le téléviseur est mis sous tension 1 Raccordez la Soundbar au téléviseur à l aide d un câble optique non fourni numérique 2 Appuyez sur la touche Source sur le panneau côté droit ou la télécommande puis sélectionnez D IN 3 Appuyez sur la touche...

Страница 44: ...tooth sur le téléviseur Pour connecter la Soundbar sélectionnez le message et établissez la connexion Lorsque le téléviseur est connecté Nomdutéléviseur BT apparaît sur l affichage avant de la Soundbar 5 Vous pouvez maintenant entendre le son du téléviseur depuis la Soundbar Silaconnexiondel appareil échoue Si la liste de Soundbar connectées précédemment par ex AV SamsungSoundbarMSxxx apparaît dan...

Страница 45: ...ce de l unité principale Soundbar par ex des micro ondes des appareils LAN sans fil etc DéconnexiondelaSoundbaràpartirdutéléviseur Appuyez sur la touche Source sur le panneau côté droit ou la télécommande puis passez à n importe quel mode sauf BT La déconnexion prend du temps parce que le téléviseur doit recevoir une réponse de la Soundbar Le temps requis peut varier selon le modèle de téléviseur ...

Страница 46: ...auquel le téléviseur est connecté 3 Installez et lancez l application SamsungMultiroom sur votre appareil mobile smartphone tablette etc iOS Android Application Samsung Multiroom 4 Suivez les instructions dans l écran des applications sur l appareil mobile pour connecter la Soundbar à votre réseau Wi Fi Étape2 Configurationdesréglagessurletéléviseur Si le téléviseur est déconnecté du réseau sans f...

Страница 47: ... Samsung Ajouter nv périph Activé Multiroom Link Paramètres Soundbar Surround Casque Bluetooth Liste Casque Bluetooth Paramètreshaut parleur OK MultiroomLink OK Niveauduvolume Testhaut parleurs Soundbar AV SamsungSoundbarMS750 Soundbar Surround c AV SamsungSoundbarMS750 Nepasutiliser Modif N 1 3 2 Sortie son TV Multiroom Link 4 Le son de votre téléviseur est diffusé par la Soundbar REMARQUES Le té...

Страница 48: ...ar Appareilexterne HDMI 1 Côtédroitdela Soundbar HDMI 2 1 Raccordez un câble HDMI de la prise HDMIIN1ouHDMIIN2 au dos du produit à la prise HDMI OUT de votre appareil numérique 2 Raccordez un câble HDMI de la prise HDMIOUT TV ARC au dos du produit à la prise HDMI IN de votre téléviseur 3 Appuyez surla touche Source surle panneau côté droit ou la télécommande puis sélectionnez HDMI1 ou HDMI2 4 Le m...

Страница 49: ...ez DIGITALAUDIOIN OPTICAL de l unité principale à la prise OPTICAL OUT de l appareil source à l aide d un câble optique non fourni numérique Y Y Sélectionnez le mode D IN en appuyant sur la touche Source sur le panneau côté droit ou sur la télécommande OU Câble AUX audio X X Raccordez AUXIN Audio de l unité principale à la prise AUDIO OUT de l appareil source à l aide d un câble audio Y Y Sélectio...

Страница 50: ...pour afficher BTPAIRING En mode BTPAIRING la LED bleue du côté droit de la Soundbar clignote 3 Sélectionnez AV SamsungSoundbarMSxxx dans la liste Lorsqu une Soundbar est connectée à l appareil Bluetooth Nomdel appareilBluetooth BT apparaît sur l affichage avant 4 Lisez des fichiers musicaux à partir de l appareil connecté via Bluetooth via la Soundbar Silaconnexiondel appareiléchoue Si la liste de...

Страница 51: ...e pas effectuer correctement la recherche Bluetooth ou la connexion dans les circonstances suivantes En cas de champ électrique puissant autour de la Soundbar En cas d appariement simultané de plusieurs appareils Bluetooth avec la Soundbar Si l appareil Bluetooth est éteint non installé ou présente un dysfonctionnement Les appareils qui génèrent des ondes électromagnétiques doivent être conservés ...

Страница 52: ...l mobile via un réseau sans fil Wi Fi l application SamsungMultiroom est nécessaire Appareilmobile Connexioninitiale 1 Appuyez sur la touche Source à droite de la Soundbar ou sur la télécommande pour sélectionner le mode WIFI WIFI 2 Installez et lancez l application SamsungMultiroom sur votre appareil mobile par ex smartphone ou tablette iOS Android Application Samsung Multiroom 3 Suivez les instr...

Страница 53: ...n utilisant un appareil audio et une Soundbar X X Touchez pour vous rendre sur la liste de toutes les enceintes Y Y Touchez à droite du nom de modèle de la Soundbar Z Z Touchez SurroundSetup Sélectionnez Done après avoir déplacé les enceintes à l endroit souhaité La connexion surround est terminée Soundbar REMARQUE Pour connecter un SWA 9000S supplémentaire non fourni déconnectez les enceintes san...

Страница 54: ...viseur et la Soundbar sélectionnez SYNC dans la commande audio puis réglez le décalage audio de 0 à 300 millisecondes à l aide des touches Haut Bas Si les enceintes non fournies sont connectées sélectionnez REARLEVEL et utilisez les touches Haut Bas pour ajuster le volume dans la plage de 6 à 6 La fonction REARSPEAKER peut être ON OFF en utilisant les touches Haut Bas SYNC n est pris en charge que...

Страница 55: ...ctionnerHaut Bas Gauche Droite Appuyez sur Haut Bas Gauche Droite sur la touche pour sélectionner ou paramétrer les fonctions Répétition Pour utiliser la fonction de répétition appuyez sur la touche Haut Sautdefichiermusical Appuyez sur la touche Droite pour sélectionner le fichier musical suivant Appuyez sur la touche Gauche pour sélectionner le fichier musical précédent Anynet AutoPowerLink Vous...

Страница 56: ...r régler le niveau de volume BASS sur 0 appuyez sur la touche Lorsqu un subwoofer non fourni est connecté la touche BASS passe à la touche du subwoofer Appuyez sur les touches haut ou bas pour régler le volume du subwoofer soit sur 12 soit de 6 à 6 Pour régler le niveau de volume du subwoofer sur 0 appuyez sur la touche Surround VOL BASS SOUND MODE SMART MODE VOL S u r r o u n d S O U N D M O D E ...

Страница 57: ...mmande fournie avec un téléviseur d un fabricant tiers allumez la Soundbar appuyez et maintenez enfoncée la touche Surround pendant 5 secondes OFF TVREMOTE apparaît sur l écran de la Soundbar relâchez la touche Surround puis appuyez et maintenez à nouveau enfoncée la touche Surround pendant plus de 5 secondes Le message ALL TVREMOTE s affiche sur l écran de la Soundbar La disponibilité de cette fo...

Страница 58: ...poteaux Achetez les vis de support mural selon le type et l épaisseur du mur sur lequel vous souhaitez monter la Soundbar Diamètre M5 Longueur 35 mm ou plus recommandés Connectez les câbles depuis l unité aux appareils externes avant d installer la Soundbar sur le mur Assurez vous que l unité est éteinte et débranchée avant de l installer Sinon cela pourrait provoquer un choc électrique Composants...

Страница 59: ...eau de chaque marque Si les marques ne correspondent pas aux positions des poteaux muraux veillez à insérerles ancrages ou les chevilles Molly appropriées dans les trous avant d insérer lesvis portantes Sivous utilisez des ancrages ou des chevilles Molly pensez à percerdes trous suffisamment larges pour les accueillir 5 Enfoncez une vis non fournie dans chaque Visdefixation puis vissez fermement c...

Страница 60: ...s glisser les Supportde fixationmurale vers le bas afin que les Supportdefixationmurale reposent de manière sûre sur les Visdefixation Montageduporte câble Comme illustré sur l image utilisez la Vis fournie pour fixer le Porte câble à la Soundbar puis utilisez le Porte câble pour organiser les câbles WIRELESS AUX IN DIGITAL AUDIO IN OPTICAL POWER IN POWER OUT For TV Porte câble WIRELE SS AUX IN DI...

Страница 61: ...nde de l unité principale Soundbar Connexionautéléviseurimpossible Encasdeconnexionviaunréseaucâblé Vérifiez que le câble est connecté correctement Vérifiez le nom de port pour vous assurer que le câble est connecté au port correct Reportez vous à la page correspondante concernant la méthode pour chaque connexion Appuyez sur la touche Source sur le côté droit de la Soundbar ou sur la télécommande ...

Страница 62: ...ense from Dolby Laboratories Dolby Dolby Audio Pro Logic and the double D symbol are trademarks of Dolby Laboratories For DTS patents see http patents dts com Manufactured under license from DTS Licensing Limited DTS the Symbol DTS in combination with the Symbol and DTS Digital Surround are registered trademarks or trademarks of DTS Inc in the United States and or other countries DTS Inc All Right...

Страница 63: ...itéen fonctionnement de 10 75 HDMI Vidéo 1080p 1080i 720p 576p 480p 2160p 24 25 30Hz 4 4 4 2160p 60 50Hz 4 2 0 Enceinte Enceinte de graves x 6 enceinte d aigus x 5 4 ohms Formatsdelectureprisencharge LPCM 2ch Dolby Audio prise en charge de Dolby Digital DTS REMARQUES Samsung Electronics Co Ltd se réserve le droit de modifier les caractéristiques sans préavis Le poids et les dimensions sont approxi...

Страница 64: ...nsão nominal é CA Tensão CC Este símbolo indica que a tensão nominal é CC Cuidado consulte as instruções de utilização Este símbolo aconselha o utilizador a consultar o manual do utilizador quanto a informações de segurança AVISO Para reduzir o risco de fogo ou de choque elétrico não exponha este aparelho à chuva ou à humidade CUIDADO PARA EVITAR CHOQUES ELÉCTRICOS INSIRA TOTALMENTE A PARTE LARGA ...

Страница 65: ...destina a utilização industrial Utilize este produto apenas para fins pessoais Pode ocorrer condensação se o produto ou o disco tiverem sido arm zenados em temperaturas baixas Se transportar a unidade no Inverno aguarde aproximadamente 2 horas para que a unidade fique à temper tura ambiente antes de utilizar 5 As pilhas utilizadas neste produto contêm químicos nocivos para o ambiente Não deite as ...

Страница 66: ...elétrica 5 04 LigaraoTelevisor 7 Método 1 Ligar com um cabo 7 Ligar um televisor através de um cabo HDMI 7 Ligar através de um cabo ótico 8 Método 2 Ligar sem fios 9 Ligar um televisor através de Bluetooth 9 Ligar por Wi Fi 10 05 LigarumDispositivoExterno 13 Ligar através de um cabo HDMI 13 Ligar através de um cabo áudio ótico ou analógico AUX 14 06 LigarumDispositivoMóvel 15 Método 1 Ligar atravé...

Страница 67: ...to de um televisor 22 08 AtualizaçãodoSoftware 22 09 InstalaçãodoSuportedeParede 23 Precauções para a instalação 23 Componentes do suporte de parede 23 Montar o organizador de cabos 25 10 ResoluçãodeProblemas 26 11 Licenças 27 12 AvisodeLicençadeOpenSource 27 13 NotaImportantesobreoServiço 28 14 EspecificaçõeseGuia 28 Especificações 28 ...

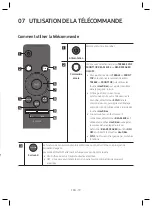
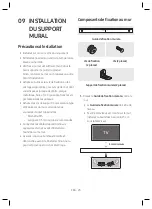
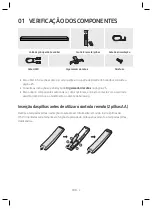
Страница 68: ...na 23 Consulte as instruções de utilização do Organizadordecabos na página 25 Para adquirir componentes adicionais ou cabos opcionais entre em contacto com o centro de assistência técnica ou o atendimento ao cliente da Samsung Inserçãodaspilhasantesdeutilizarocontroloremoto 2pilhasAA Deslize a tampa das pilhas na direção da seta até ser totalmente removida Insira 2 pilhas AA 1 5 V orientadas corre...

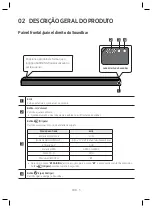
Страница 69: ... o nível do volume é exibido no ecrã frontal do Soundbar Botão Origem Permite selecionar o modo de entrada da origem Mododeentrada Ecrã Entrada digital ótica D IN Entrada ARC HDMI OUT D IN TV ARC Conversão Automática Entrada AUX AUX Entrada HDMI HDMI 1 HDMI 2 Modo Wi Fi WIFI Modo BLUETOOTH BT Para ligar o modo BTPAIRING altere a origem para o modo BT e em seguida mantenha premido o botão Origem du...

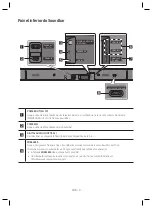
Страница 70: ...g montado na parede num suporte de parede WMN300SB não fornecido ao Soundbar POWERIN Ligue o cabo de alimentação CA do Soundbar DIGITALAUDIOIN OPTICAL Permite ligar a uma saída ótica digital de um dispositivo externo WIRELESS Ligue o dongle sem fios para liga o Soundbar às colunas surround e a um subwoofer sem fios A coluna surround o subwoofer e o dongle sem fios são vendidos em separado A tomada...

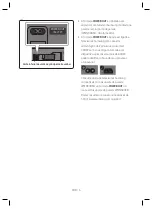
Страница 71: ... uma rede sem fios Wi Fi através da aplicação Samsung Multiroom 03 LigaroSoundbar Ligaràcorrenteelétrica Para obter mais informações sobre a potência elétrica necessária e o consumo de energia consulte a etiqueta no produto Etiqueta parte inferior da unidade principal do Soundbar HDMI IN 2 HDMI IN 1 HDMI OUT TV ARC POWER IN POWER OUT For TV WIRELESS AUX IN DIGITAL AUDIO IN OPTICAL POWER IN Partein...

Страница 72: ...de WMN300SB não fornecido A tomada POWEROUT só pode ser ligada a televisores Samsung com cabos de alimentação de 2 pinos que consumam 400 W ou menos Ligar a tomada a um dispositivo que consuma mais de 400 W poderá danificar o Soundbar ou provocar uma avaria Consulte a lista de televisores Samsung compatíveis com o suporte de parede WMN300SB e a tomada POWEROUT no manual do suporte de parede WMN300...

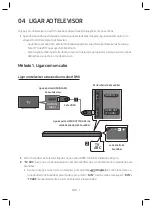
Страница 73: ...o modo sem som Método1 Ligarcomumcabo LigarumtelevisoratravésdeumcaboHDMI HDMI IN 1 HDMI OUT TV ARC HDMI IN ARC CaboHDMI ParteinferiordoSoundbar LigueàportaHDMIIN ARC doseutelevisor LigueàportaHDMIOUT TV ARC na unidadeprincipaldoSoundbar Ladodireitodo Soundbar TV ARC 1 Com o Soundbar e o televisor ligados ligue o cabo HDMI conforme indicado na figura 2 TVARC surge no ecrã da unidade principal do S...

Страница 74: ...tão Origem no painel direito ou no controlo remoto e em seguida selecione o modo D IN AutoPowerLink A função Auto Power Link liga automaticamente o Soundbar quando o televisor é ligado 1 Ligue o Soundbar e um televisor com um cabo ótico não fornecido digital 2 Prima o botão Origem no painel direito ou no controlo remoto e em seguida selecione D IN 3 Prima o botão Esquerda no controlo remoto durant...

Страница 75: ...ing ou Paired na lista de dispositivos Bluetooth do televisor Para ligar ao Soundbar selecione a mensagem e estabeleça uma ligação Quando o televisor estiver ligado a mensagem Nomedotelevisor BT surgirá no ecrã frontal do Soundbar 5 Poderá então ouvir o som do televisor a partir do Soundbar Seocorrerumafalhaaoligarodispositivo Se um Soundbar anteriormente ligado por exemplo AV SamsungSoundbarMSxxx...

Страница 76: ...omagnéticas devem ser mantidos afastados da unidade principal do Soundbar por exemplo micro ondas dispositivos LAN sem fios etc DesligaroSoundbardotelevisor Prima o botão Origem no painel direito ou no controlo remoto e mude para qualquer modo exceto BT Desligar o Soundbar do televisor demora algum tempo porque o televisor tem de receber uma resposta do Soundbar O tempo necessário para tal poderá ...

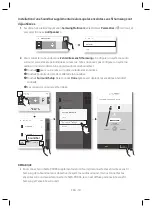
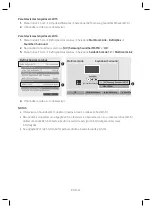
Страница 77: ...e Wi Fi a que ligou o televisor 3 Instale e inicie a aplicação SamsungMultiroom no seu dispositivo móvel smartphone tablet etc iOS Android Aplicação Samsung Multiroom 4 Siga as instruções na janela da aplicação no dispositivo móvel para ligar o Soundbar à sua rede Wi Fi Passo2 configurarasdefiniçõesnotelevisor Se o televisor se desligar da rede sem fios depois de mudar a fonte de entrada para o So...

Страница 78: ...MS750 Soundbar Surround c AV SamsungSoundbarMS750 NãoUtilizar EditarNo 1 3 2 Saída de Som da TV Multiroom Link Altifalante da TV Tipo de Instalação de TV Suporte TV SoundConnect Lista Dispositivos Áudio Samsung Adic Novo Dispos Ligado Multiroom Link Definições Soundbar Surround Auscultadores Bluetooth Lista de Auscultadores Bluetooth 4 O Soundbar emite o som do televisor NOTAS O televisor e o Soun...

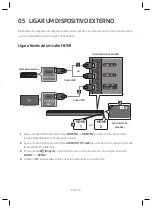
Страница 79: ...arteinferiordoSoundbar Dispositivoexterno HDMI 1 Ladodireitodo Soundbar HDMI 2 1 Ligue um cabo HDMI da tomada fêmea HDMIIN 1ouHDMIIN2 na parte de trás do produto à tomada fêmea HDMI OUT no dispositivo digital 2 Ligue um cabo HDMI da tomada fêmea HDMIOUT TV ARC na parte de trás do produto à tomada fêmea HDMI IN no televisor 3 Prima o botão Origem no painel direito ou no controlo remoto e em seguida...

Страница 80: ...aboótico X X Ligue a DIGITALAUDIOIN OPTICAL na unidade principal à tomada fêmea OPTICAL OUT do dispositivo de origem com um cabo ótico não fornecido digital Y Y Selecione o modo D IN premindo o botão Origem no painel direito ou no controlo remoto OU Caboáudio AUX X X Ligue a AUXIN Áudio na unidade principal à tomada fêmea de AUDIO OUT do dispositivo de origem com um cabo áudio Y Y Selecione o modo...

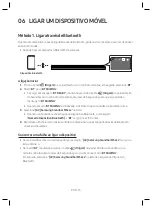
Страница 81: ... BTPAIRING Quando o modo BTPAIRING está ativado o LED azul na ponta direita do Soundbar pisca 3 Selecione AV SamsungSoundbarMSxxx na lista Quando um Soundbar estiver ligado ao dispositivo Bluetooth a mensagem NomedoDispositivoBluetooth BT surgirá no ecrã frontal 4 Reproduza os ficheiros de música contidos no dispositivo que está ligado através de Bluetooth através do Soundbar Seocorrerumafalhaaoli...

Страница 82: ...esquisa ou a ligação Bluetooth nas seguintes circunstâncias Se existir um campo elétrico forte em redor do Soundbar Se forem emparelhados vários dispositivos Bluetooth em simultâneo com o Soundbar Se o dispositivo Bluetooth estiver desligado não estiver no devido lugar ou não funcionar corretamente Os dispositivos eletrónicos podem provocar interferências rádio Os dispositivos que geram ondas elet...

Страница 83: ...r a um dispositivo móvel através da rede sem fios Wi Fi precisa da aplicação SamsungMultiroom Dispositivomóvel Aligaçãoinicial 1 Prima o botão Origem no lado direito do Soundbar ou no controlo remoto para selecionar o modo WIFI WIFI 2 Instale e inicie a aplicação SamsungMultiroom no seu dispositivo móvel por exemplo smartphone ou tablet iOS Android Aplicação Samsung Multiroom 3 Siga as instruções ...

Страница 84: ...s um dispositivo áudio e um Soundbar X X Toque em para ir para a lista de todas as colunas Y Y Toque em no lado direito do nome do modelo do Soundbar Z Z Toque em Surround Setup Selecione Done depois de colocar a coluna no local pretendido A ligação em surround está concluída Soundbar NOTA Para ligar um SWA 9000S adicional não fornecido desligue as colunas sem fios Samsung do Soundbar para desativ...

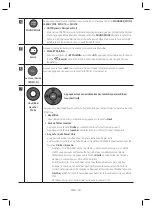
Страница 85: ...o entre o televisor e o Soundbar não estiverem sincronizados selecione SYNC em Controlo de Som e defina o atraso de áudio para um valor entre 0 e 300 milissegundos com os botões Cima Baixo Se tiver ligado colunas surround não fornecidas selecione REAR LEVEL e utilize os botões Cima Baixo para ajustar o volume dentro do intervalo 6 a 6 Pode ON OFF a função REARSPEAKER utilizando os botões Cima Baix...

Страница 86: ...ta PrimaasáreasindicadasparaselecionarCima Baixo Esquerda Direita Prima Cima Baixo Esquerda Direita no botão para selecionar ou definir funções Repetir Para utilizar a função repetir prima o botão Cima SaltarMúsica Prima o botão Direitapara selecionar o próximo ficheiro de música Prima o botão Esquerda para selecionar o ficheiro de música anterior Anynet AutoPowerLink Pode ligar ou desligar as fun...

Страница 87: ...rvalo 6 a 6 Para colocar o volume de BASS a 0 prima o botão Quando um subwoofer não fornecido é ligado o botão BASS transforma se no botão do subwoofer Prima o botão para cima ou para baixo para ajustar o volume do subwoofer para 12 ou dentro do intervalo 6 a 6 Para definir o volume do subwoofer para 0 prima o botão Surround VOL BASS SOUND MODE SMART MODE VOL S u r r o u n d S O U N D M O D E S M ...

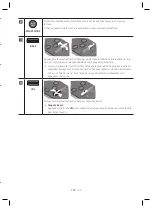
Страница 88: ...or fabricado por terceiros ligue o Soundbar mantenha premido o botão Surround durante 5 segundos a mensagem OFF TVREMOTE surge no ecrã do Soundbar solte o botão Surround e em seguida mantenha novamente premido o botão Surround durante 5 segundos A mensagem ALL TVREMOTE surge no ecrã do Soundbar Consoante o controlo remoto utilizado esta função poderá não estar disponível Consulte os fabricantes qu...

Страница 89: ...s para montagem em parede de acordo com o tipo e com a espessura da parede onde se pretende instalar o Soundbar Diâmetro M5 Comprimento recomenda se comprar parafusos com um comprimento igual ou superior a 35 mm Ligue os cabos da unidade aos dispositivos externos antes de instalar o Soundbar na parede Antes da instalação deve garantir que a unidade está desligada e que a respetiva ficha está desli...

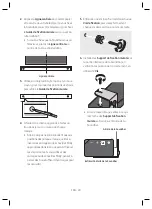
Страница 90: ...enta de perfuração de dimensão apropriada Se a parede não tiverqualquersuporte adicional no local das marcas certifique se de que insere as buchas e os parafusos Mollynos orifícios antes de inseriros parafusos de suporte Certifique se de que a dimensão dos orifícios perfurados corresponde às buchas e parafusos Mollya utilizar 5 Coloque um parafuso não fornecido em cada Parafusodefixação e aperte c...

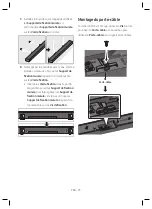
Страница 91: ...ma a fixar os Suportede parede firmemente nos Parafusode fixação Montaroorganizadordecabos Utilize o Parafuso fornecido para fixar o Organizadordecabos ao Soundbar como se mostra na imagem e em seguida utilize o Organizadordecabos para organizar todos os cabos WIRELESS AUX IN DIGITAL AUDIO IN OPTICAL POWER IN POWER OUT For TV Organizadordecabos WIRELE SS AUX IN DIGITAL AUDIO IN OPTICA L HDMI IN 1 ...

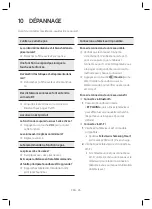
Страница 92: ...oundbar Nãoseligaaotelevisor Seestiverligadoatravésdeumaredecomfios Verifique se o cabo está corretamente ligado Verifique o nome da porta para se certificar de que o cabo está ligado à porta correta Consulte a página relativa a cada um dos métodos de instalação Prima o botão Origem no lado direito do Soundbar ou no controlo remoto para verificar se selecionou a fonte certa Seestiverligadoatravésd...

Страница 93: ...ense from Dolby Laboratories Dolby Dolby Audio Pro Logic and the double D symbol are trademarks of Dolby Laboratories For DTS patents see http patents dts com Manufactured under license from DTS Licensing Limited DTS the Symbol DTS in combination with the Symbol and DTS Digital Surround are registered trademarks or trademarks of DTS Inc in the United States and or other countries DTS Inc All Right...

Страница 94: ...defuncionamento 10 75 HDMI Vídeo 1080p 1080i 720p 576p 480p 2160p 24 25 30Hz 4 4 4 2160p 60 50Hz 4 2 0 Coluna 6 woofer 5 tweeter 4 ohm Formatosdereproduçãosuportados LPCM 2ch Dolby Audio suporta Dolby Digital DTS NOTAS A Samsung Electronics Co Ltd reserva se ao direito de alterar as especificações sem aviso prévio O peso e as dimensões indicados são aproximados Para obter mais informação sobre a f...

Страница 95: ...مز الموسوم المحدد الجهد مقدار مستمر تيار جهد هذا يرشد االستخدام إرشادات راجع تنبيه االستخدام دليل إىل للرجوع المستخدم الرمز بالسالمة المتعلقة العلومات من لمزيد تحذير لصدمة التعرض أو الحريق نشوب خطر من للحد الرطوبة أو لألمطار الجهاز هذا تعرض ال كهربية تنبيه قم الكهربية الصدمات وقوع دون للحيلولة الفتحة مع للقابس العريضة الشفرة بمطابقة إدخالها أحكم ثم العريضة التيار بمأخذ ا ً دوم ً ال متص الجهاز هذا ...

Страница 96: ... مصدر من الكهربي التيار الجهاز تعطل لالستخدام مصمم غير بك الخاص المنتج لألغراض المنتج هذا استخدام يتم الصناعي في تكاثف يحدث أن الممكن من فقط الشخصية في منخفضة حرارة درجات في المنتج تخزين حالة لمدة انتظر الشتاء فصل خالل الوحدة نقل حالة إىل الوحدة حرارة درجة تصل حتى ا ً تقريب ساعتين االستخدام قبل الغرفة حرارة درجة 5 5 عىل المنتج هذا مع المستخدمة البطاريات تحتوي من تتخلص ال بالبيئة مضرة كيميائية مواد...

Страница 97: ...طاقة توصيل 7 بك الخاص بالتلفزيون التوصيل 04 7 كبل باستخدام التوصيل 1 الطريقة 7 HDMI كبل باستخدام التلفزيون توصيل 8 بصري كبل باستخدام التوصيل 9 ا ً السلكي االتصال اآلن يتم 2 الطريقة 9 Bluetooth عبر بالتلفزيون االتصال 10 Wi Fi عبر التوصيل 13 خارجي بجهاز التوصيل 05 13 HDMI كبل باستخدام التوصيل 14 تناظري أو AUX صوتي كبل باستخدام التوصيل 15 محمول بجهاز التوصيل 06 15 Bluetooth تقنية عبر التوصيل 1 الطريق...

Страница 98: ...باستخدام Soundbar بوحدة الصوت مستوى تعديل 22 البرنامج تحديث 08 23 بالحائط التثبيت حامل تركيب 09 23 التركيب احتياطات 23 جدار عىل التعليق مكونات 25 الكبالت حامل تركيب 26 وإصالحها المشاكل استكشاف 10 27 اخيص ر الت 11 27 المفتوح المصدر ترخيص إشعار 12 28 الخدمة عن هامة مالحظة 13 28 والدليل المواصفات 14 28 المواصفات ...

Страница 99: ...ت عىل للتعرف الكبالت حامل استخدام كيفية إرشادات عىل للحصول 25 رقم صفحة راجع Samsung عمالء خدمة أو Samsung خدمة بمركز اتصل اختيارية كبالت أو إضافية مكونات لشراء AA بحجم بطاريتان عد ُ ب عن التحكم وحدة استخدام قبل البطاريات إدخال من وتأكد فولت 1 5 AA بحجم البطاريتين أدخل ا ً تمام إزالته يتم حتى السهم باتجاه ينزلق البطارية غالف اجعل مكانه في يصبح حتى للوراء ينزلق البطارية غالف اجعل ثم ومن الصحيح االتج...

Страница 100: ...وت مستوى زر الصوت مستوى تعديل Soundbar في األمامية الشاشة عىل الصوت مستوى سيظهر تعديله بعد المصدر زر المصدر مدخل وضع اختيار المدخل وضع الشاشة بصري رقمي إدخال D IN HDMIOUT ARC مدخل التلقائي التحويل TVARC D IN AUX مدخل AUX HDMI مدخل HDMI 2 HDMI 1 Wi Fi وضع WIFI BLUETOOTH وضع BT لمدة المصدر زر عىل باستمرار اضغط ثم BT وضع إىل المصدر بتغيير قم BTPAIRING وضع إىل للتحويل ٍ ثوان 5 الطاقة زر التشغيل إيقاف ...

Страница 101: ...ar بالسماعات المتصل Samsung تلفزيون طاقة سلك بتوصيل قم مرفق غير WMN300SB الحائط عىل التثبيت POWERIN Soundbar لسماعة المتردد التيار طاقة سلك كبل بتوصيل قم DIGITAL AUDIO IN OPTICAL الخارجي الجهاز من الرقمي البصري بالمخرج التوصيل WIRELESS ا ً السلكي الصوت ومكبر السماعات لتوصيل Soundbar بسماعات المتصل الالسلكي الدونغل بتوصيل قم منفصل بشكل الالسلكي والدونغل الصوت ومكبر المجسم الصوت سماعة باع ُ ت USB مع...

Страница 102: ... تطبيق استخدام عبر Wi Fi الالسلكية بالشبكة االتصال 03 0 Soundbar توصيل الكهربائية الطاقة توصيل المنتج مع المرفق الملصق راجع الطاقة واستهالك المطلوب الطاقة مصدر عن المعلومات من لمزيد األساسية Soundbar وحدة من السفلي الجزء الملصق HDMI IN 2 HDMI IN 1 HDMI OUT TV ARC POWER IN POWER OUT For TV WIRELESS AUX IN DIGITAL AUDIO IN OPTICAL POWER IN وحدة من السفلي الجزء الرئيسية Soundbar الطاقة كبل بالطاقة ال...

Страница 103: ...0SB الحائط عىل التثبيت طقم مرفق بأجهزة POWEROUT مقبس توصيل يمكن طاقة سلك تستخدم التي فقط Samsung تلفزيون قد أقل أو وات 400 ويستهلك سنين يتضمن من أكثر يستهلك بجهاز المقبس توصيل يتسبب إىل يؤدي أو Soundbar سماعة تلف في وات 400 عطل حدوث Samsung تلفزيون أجهزة قائمة عىل للتعرف الحائط عىل التثبيت طقم مع المتوافقة دليل راجع POWEROUT ومقبس WMN300SB WMN300SB الحائط عىل التثبيت طقم مستخدم الموقع عىل اإلنترنت...

Страница 104: ... وكتم الصوت كبل باستخدام التوصيل 1 الطريقة HDMI كبل باستخدام التلفزيون توصيل HDMI IN 1 HDMI OUT TV ARC HDMI IN ARC HDMI كبل Soundbar من السفلي الجزء HDMIIN بمنفذ بالتوصيل قم بتلفزيونك ARC بوحدة HDMIOUT TV ARC بمنفذ بالتوصيل قم األساسية Soundbar من األيمن الجانب Soundbar TV ARC 1 1 الشكل في موضح هو كما HDMI كبل بتوصيل قم والتلفزيون Soundbar تشغيل عند 2 2 صوت بتشغيل Soundbar وسيقوم الرئيسية Soundbar...

Страница 105: ...يون 2 2 وضع حدد ثم عد ُ ب عن التحكم جهاز أو الجانبي األيمن اللوح يمين عىل الموجود المصدر زر عىل اضغط D IN Auto Power Link التلفزيون تشغيل عند Soundbar في التلقائي الطاقة ارتباط بتشغيل قم 1 1 متوفر غير بصري رقمي بكبل Soundbar و التلفزيون بتوصيل قم 2 2 وضع حدد ثم عد ُ ب عن التحكم جهاز أو الجانبي األيمن اللوح يمين عىل الموجود المصدر زر عىل اضغط D IN 3 3 أو AutoPowerLink لتشغيل ثوان 5 لمدة عد ُ ب عن ا...

Страница 106: ...ن AV SamsungSoundbarMSxxx حدد لتوصيل Bluetooth تقنية تدعم التي التلفزيون أجهزة قائمة عىل Paired أو NeedPairing بالجهاز المتاح التوصيل بإجراء وابدأ الرسالة حدد Soundbar جهاز Soundbar لوحدة الرئيسية الشاشة عىل BT التلفزيون اسم سيظهر ً ال متص التلفزيون يكون عندما 5 5 Soundbar من التلفزيون صوت سماع اآلن يمكنك االتصال في الجهاز فشل إذا فقم القائمة في AV SamsungSoundbarMSxxx مثل قبل من المتصلة Soundbar ...

Страница 107: ...تسبب قد ذلك إىل وما الالسلكية LAN وأجهزة المايكرويف أجهزة مثال األساسية Soundbar وحدة عن التلفزيون من Soundbar فصل BT بخالف وضع أي إىل واالنتقال عد ُ ب عن التحكم جهاز عىل أو الجانبي األيمن اللوح عىل المصدر زر عىل اضغط حسب المطلوب الوقت يختلف قد Soundbar من استجابة يستقبل أن يجب التلفزيون ألن ا ً ت وق الفصل يستغرق التلفزيون طراز التشغيل إيقاف تشغيل p الزر عىل اضغط والتلفزيون Soundbar بين التلقائي B...

Страница 108: ... هاتف المحمول جهازك بتوصيل قم 3 3 ذلك إىل ما أو لوحي جهاز أو ذكي هاتف المحمول جهازك عىل وشغله SamsungMultiroom تطبيق ثبت iOS SamsungMultiroom تطبيق Android 4 4 لديك Wi Fi بشبكة Soundbar لتوصيل المحمول جهاز عىل التطبيق شاشة في المعروضة اإلرشادات اتبع التلفزيون عىل اإلعدادات تكوين 2 خطوة قائمة استخدم Soundbar عىل اإلدخال مصدر تغيير بعد الالسلكية بشبكتك التلفزيون اتصال قطع حالة في أخرى مرة بالشبكة ال...

Страница 109: ...أجهزة قائمة جديد جهاز إضافة تشغيل Multiroom Link اإلعدادات Soundbar Surround Bluetooth رأس سماعة Bluetooth رأس سماعة قائمة السماعة إعدادات Multiroom Link التلفاز صوت خرج موافق 1 3 Multiroom Link االسم تحرير السماعة اختبار صوت ال مستوى Soundbar AV SamsungSoundbarMS750 Soundbar Surround c AV SamsungSoundbarMS750 االستخدام ممنوع موافق 2 4 4 التلفزيون صوت Soundbar سماعة ُصدر ت مالحظات Wi Fi نفسها الال...

Страница 110: ...الجهاز HDMI 1 من األيمن الجانب Soundbar HDMI 2 1 1 HDMIOUT بالمقبس المنتج أسفل في الموجود HDMIIN2 أو HDMIIN1 مقبس من HDMI كبل بتوصيل قم لديك الرقمي بالجهاز الموجود 2 2 بمقبس المنتج من السفلي الجانب عىل الموجود HDMIOUT TV ARC مقبس من HDMI كبل بتوصيل قم جهازك في الموجود HDMIIN 3 3 وضع حدد ثم عد ُ ب عن التحكم جهاز أو الجانبي األيمن اللوح يمين عىل الموجود المصدر زر عىل اضغط HDMI 2 أو HDMI1 4 4 الصوت ت...

Страница 111: ...ن الجانب أو بصري كبل X X المصدر بجهاز OPTICALOUT لمقبس الرئيسية الوحدة في DIGITALAUDIOIN OPTICAL كبل بتوصيل قم رقمي متوفر غير بصري كبل باستخدام Y Y عد ُ ب عن التحكم جهاز أو الجانبي األيمن اللوح عىل الموجود المصدر زر عىل بالضغط D IN وضع حدد أو صوتي AUX كبل X X كبل باستخدام المصدر جهاز في AUDIOOUT بمقبس الرئيسية الوحدة في صوتي AUXIN كبل بتوصيل قم صوتي Y Y عد ُ ب عن التحكم جهاز أو الجاني األيمن اللوح...

Страница 112: ...5 من ألكثر عد ُ ب عن التحكم جهاز أو Soundbar لوحدة الجانبي األيمن اللوح Soundbar لجهاز اليمني الحافة في الموجود األزرق LED ضوء سيومض BTPAIRING وضع في 3 3 القائمة من AV SamsungSoundbarMSxxx حدد BT البلوتوث جهاز اسم األمامية الشاشة عىل سيظهر Bluetooth بجهاز Soundbar توصيل عند 4 4 Soundbar طريق عن Bluetooth تقنية عبر متصبل الجهاز من الموسيقى ملفات تشغيل االتصال في الجهاز فشل إذا فقم القائمة في AV Sam...

Страница 113: ...تالية الحاالت في صحيح بشكل التوصيل عدم أو Bluetooth عبر البحث وظيفة تعمل ال قد Soundbar حول قوي كهربائي حقل وجود حالة في Soundbar مع واحد آن في Bluetooth تقنية يدعم جهاز من أكثر اقتران حالة في أعطال به أو يوجد ال أو Bluetooth تقنية تشغيل إيقاف حالة في كهرومغناطيسية موجات د ّ ل تو التي األجهزة إبعاد يتعين الراديو موجات تداخل في اإللكترونية األجهزة تتسبب قد ذلك إىل وما الالسلكية LAN وأجهزة المايكروي...

Страница 114: ...يكون Wi Fi الالسلكية الشبكة استخدام عبر محمول بجهاز Soundbar سماعة لتوصيل ا ً مطلوب SamsungMultiroom المحمول جهاز األولي التوصيل 1 1 لتحديد عد ُ ب عن التحكم وحدة عىل أو Soundbar من األيمن الجانب في الموجود المصدر الزر عىل اضغط WIFI الوضع WIFI 2 2 لوحي جهاز أو ذكي هاتف المثال سبيل عىل المحمول جهازك عىل وشغله SamsungMultiroom تطبيق ثبت iOS SamsungMultiroom تطبيق Android 3 3 Wi Fi بشبكة Soundbar لتوص...

Страница 115: ...حد صوت جهاز باستخدام المجسم الصوت نظام إعداد يمكنك ال أدناه الموضحة الخطوات واحدة Soundbar X X السماعات جميع قائمة إىل لالنتقال بلمس قم Y Y Soundbar طراز اسم يمين عىل بلمس قم Z Z المطلوب الموقع إىل السماعة سحب بعد Done حدد SurroundSetup بلمس قم المجسم الصوت سماعة توصيل اكتمل Soundbar مالحظة نظام لتعطيل Soundbar من الالسلكية Samsung سماعات افصل مرفق غير إضافي SWA 9000S لتوصيل عبر الصوت تشغيل سيتم S...

Страница 116: ...بين والصوت الفيديو كان إذا في SYNC حدد متزامنين غير Soundbar الصوت تأخير اضبط ثم ومن الصوت في التحكم ألعىل الزرين باستخدام ثانية مللي 300 إىل 0 بين ألسفل مرفقة غير جسم ُ الم الصوت سماعات كانت إذا الزرين واستخدم REARLEVEL حدد متصلة النطاق بين الصوت مستوى لضبط ألسفل ألعىل 6 إىل 6 عىل REARSPEAKER الوظيفة تحويل يمكن ألعىل الزرين استخدام خالل من OFF ON الوضع ألسفل الوظائف بعض في فقط مدعومة SYNC خاصية S...

Страница 117: ...ر يمين يسار أسفل أعىل االتجاه لتحديد إليها شار ُ الم المناطق عىل اضغط ضبطها أو الوظائف لتحديد الزر في يمين يسار أسفل أعىل باتجاه اضغط تكرار ألعىل الزر عىل اضغط التكرار وظيفة الستخدام الموسيقى تخطي الموسيقى ملف لتحديد يسار زر عىل اضغط التالي الموسيقى ملف لتحديد يمين زر عىل اضغط السابق Auto Power Link Anynet AutoPowerLink و Anynet تشغيل إيقاف أو تشغيل يمكنك التوالي عىل يسار أو اليمين أزرار عىل بالضغ...

Страница 118: ... إىل 6 النطاق بين BASS مستوى لضبط ألسفل أو ألعىل الزر عىل اضغط الزر عىل اضغط 0 القيمة عىل عىل اضغط صوت مكبر مفتاح إىل BASS الزر يتحول ً ال متص مرفق غير صوت مكبر يكون عندما 6 إىل 6 النطاق بين أو 12 عىل إما الصوت مكبر الصوت مستوى لضبط لألسفل أو لألعىل الزر الزر عىل اضغط 0 القيمة عىل الصوت مكبر صوت مستوى لتعيين Surround VOL WOOFER SOUND MODE Bluetooth POWER VOL S u r r o u n d S O U N D M O D E S M A...

Страница 119: ...ريق عن Soundbar في الصوت مستوى لتعديل OFF TVREMOTE سيظهر ثواني 5 لمدة Surround زر عىل باستمرار فاضغط Soundbar بتشغيل قم أخرى أخرى مرة Surround زر عىل باستمرار اضغط ثم Surround زر حرر التلفزيون في عد ُ ب عن التحكم تشغيل إيقاف Soundbar شاشة عىل ALL TVREMOTE سيظهر ثواني 5 من ألكثر عد ُ ب عن التحكم عىل ً بناء متوفرة الوظيفة هذه تكون ال قد عىل Soundbar لسماعة الكامل الدليل إىل الرجوع يرجى الميزة هذه تد...

Страница 120: ...ذي بالحائط التثبيت براغي شراء يتم مكه ُ وس الحائط لنوع ا ً وفق عليه Soundbar م 5 القطر التوصيات حسب أطول أو مم 35 الطول الخارجية األجهزة إىل الوحدة من الكبالت بتوصيل قم الحائط عىل Soundbar تثبيت قبل التيار عن وفصلها الوحدة تشغيل إيقاف من تأكد في ذلك يتسبب قد وإال تثبيتها قبل الكهربائي كهربائية صدمة جدار عىل التعليق مكونات 450mm بالحائط التثبيت دعامة البراغي حامل وحدة لكل 2 براغي وحدة لكل 2 وحدة لك...

Страница 121: ...ة كل عند الحائط في البراغي تثبيت مواضع مع متوافقة غير العالمات كانت إذا تثبيت أدوات أو خطاطيف إدخال من فتأكد اغي ر الب وإذا الدعم اغي ر ب إدخال قبل الثقوب داخل مناسبة أن فتأكد تثبيت أدوات أو خطاطيف تستخدم كنت تسمح كافية بدرجة كبيرة حفرتها التي الثقوب التثبيت أدوات أو الخطاطيف باستخدام 5 5 ثم البراغي حامل كل في دة َّ و المز غير البراغي ضع البراغي فتحة في بإحكام البراغي بربط قم 6 6 االتجاه في الحائط...

Страница 122: ...ن الحائط حوامل تستقر حتى ألسفل تنزلق الحائط الحامل براغي عىل الحائط عىل التركيب الكبالت حامل تركيب لتثبيت البراغي استخدم الصورة في موضح هو كما حامل استخدام ثم ومن Soundbar عىل الكبالت حامل كبالت أي لتنظيم الكبالت WIRELESS AUX IN DIGITAL AUDIO IN OPTICAL POWER IN POWER OUT For TV الكبالت حامل WIRELE SS AUX IN DIGITAL AUDIO IN OPTICA L HDMI IN 1 HDMI IN 2 HDMI OUT TV AR C POWER IN POWER OUT For TV W...

Страница 123: ...سافة عىل عد ُ ب عن التحكم وحدة ضع الرئيسية Soundbar وحدة من بالتلفزيون االتصال يمكن ال سلكية بشبكة ً ال متص كان إذا صحيح بشكل ً ال متص الكبل كان إذا ما تحقق الكبل أن من للتأكد المنفذ اسم من تحقق الصفحة راجع الصحيح بالمنفذ متصل اتصال كل بطريقة المتعلقة المتوافقة في الموجود المصدر الزر عىل اضغط وحدة عىل أو Soundbar من األيمن الجانب الوضع كان إذا ما للتحقق عد ُ ب عن التحكم ا ً صحيح السلكية بشبكة ً ال...

Страница 124: ...Audio Pro Logic and the double D symbol are trademarks of Dolby Laboratories For DTS patents see http patents dts com Manufactured under license from DTS Licensing Limited DTS the Symbol DTS in combination with the Symbol and DTS Digital Surround are registered trademarks or trademarks of DTS Inc in the United States and or other countries DTS Inc All Rights Reserved The terms HDMI and HDMI High D...

Страница 125: ...ة درجة 35 إىل مئوية درجات 5 من للتشغيل المناسبة الرطوبة درجة 75 إىل 10 HDMI الفيديو 480p 576p 720p 1080i 1080p 2160p 24 25 30Hz 4 4 4 2160p 60 50Hz 4 2 0 الصوت مكبر أوم 4 5x تويتر سماعة 6 x مضخم المدعومة التشغيل صيغ نظام يدعم DolbyAudio LPCM2ch DTS Dolby Digital مالحظات إخطار دون المواصفات تعديل في بالحق المحدودة إلكترونيكس سامسونج شركة تحتفظ تقريبية واألبعاد الوزن قيم المنتج مع المرفق الملصق راجع...

Страница 126: ...G 800 7267864 www samsung com ae support English www samsung com ae_ar support Arabic OMAN 800 SAMCS 800 72627 KUWAIT 183 CALL 183 2255 BAHRAIN 8000 GSAM 8000 4726 QATAR 800 CALL 800 2255 TURKEY 4447711 www samsung com tr support JORDAN 0800 22273 065777444 www samsung com levant SYRIA 9625777444 Lebanon 961 1484999 Iraq 80010080 MOROCCO 0801002255 www samsung com n_africa support Country Contact ...

Отзывы: