background image

8 - ARA


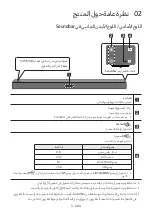
 رشؤملا لوحتيو دادعتسلاا عضو لىإ يكلسلالا توصلا مخضم لقتنيس ،ةيساسلأا ةدحولا ليغشت فاقيإ مت اذإ

.قرزأ نولب تارم ةدع ضيمولا دعب رمحلأا ءوضلا لىإ لىعلأا يف دوجوملاو 

STANDBY

 عضول يئوضلا


 ببستي دقف ،Soundbarـلا راوجب Soundbar )زترهاجيج 

5.8

( ـلا ددرت سفن مدختسي اًزاهج مدختست تنك اذإ

.ام دح لىإ توصلا ةقاعإ يف لخادتلا


 لىع ًءانب فلتخت دق اهنأ لاإ ،اًبيرقت رتم 

10

 يه ةيساسلأا ةدحولا نم ةرداصلا ةيكلسلالا ةراشلإل لاسرإ ةفاسم ىصقأ

 توصلا مخضمو ةيساسلأا ةدحولا نيب يندعم طئاح وأ ةحلسم ةناسرخ كانه ناك اذإ .كب ةصاخلا ليغشتلا ةئيب

.ندعملا قارتخا ةيكلسلالا ةراشلإل نكمي لا هنلأ ،قلاطلإا لىع ماظنلا لمعي لا دقف ،يكلسلالا

تاطايتحلاا


.ةبوطرلاو ءاملا نع تادحولا دعبأ .يكلسلالا توصلا مخضم يف ةجمدم ةيكلسلالا لابقتسلاا تايئاوه


 ةدحوو يكلسلالا توصلا م ِّخضم عقومب ةطيحملا ةقطنملا نأ نم دكأت ،عامتسلاا ءانثأ ءادأ لضفأ لىع لوصحلل

.قئاوعلا نم ةيلاخ )ةلصفنم عابُت( ةيكلسلالا لابقتسلاا

 ةيفلخلا 

Samsung

 توص تاربكم مقطب ليصوتلا قيرط نع يكلسلالا يطيحملا توصلاب عتمتسا

 ليلد رظنا ،تامولعملا نم ديزمل .)لصفنم لكشب عابُت( 

Soundbar

 ةدحوب )SWA-8500S( ةيكلسلالا

.ةيكلسلالا ةيفلخلا 

Samsung

 توص تاربكم مقط

Содержание HW-M360

Страница 1: ...HW M360 FULL MANUAL Imagine the possibilities Thank you for purchasing this Samsung product To receive more complete service please register your product at www samsung com register ...

Страница 2: ...indicates that the rated voltage marked with the symbol is DC voltage Caution Consult instructions for use This symbol instructs the user to consult the user manual for further safety related information WARNING To reduce the risk of fire or electric shock do not expose this appliance to rain or moisture CAUTION TO PREVENT ELECTRIC SHOCK MATCH WIDE BLADE OF PLUG TO WIDE SLOT FULLY INSERT This appa...

Страница 3: ...he AC wall socket if the unit malfunctions Your product is not intended for industrial use It is for personal use only Condensation may occur if your product has been stored in cold temperatures If transporting the unit during the winter wait approximately 2 hours until the unit has reached room temperature before using 5 The battery used with this product contains chemicals that are harmful to th...

Страница 4: ...ical Power 5 Connecting the Soundbar to the Subwoofer 6 Automatic connection between the subwoofer and the Soundbar 6 Manually connecting the subwoofer if automatic connection fails 7 04 ConnectingtoyourTV 9 Method 1 Connecting with a Cable 9 Connecting using an Optical Cable 9 Method 2 Connecting Wirelessly 10 Connecting a TV via Bluetooth 10 05 ConnectinganExternalDevice 12 Connecting using an O...

Страница 5: ...bar volume with a TV remote control 22 Using the Hidden Buttons 23 Output specifications for the different sound effect modes 23 09 InstallingtheWallMount 24 Installation Precautions 24 Wallmount Components 24 Detaching the Soundbar from the Wall 27 10 SoftwareUpdate 27 Updating Procedure 28 If UPDATE is not displayed 28 11 Troubleshooting 29 12 Licence 30 13 OpenSourceLicenceNotice 30 14 Importan...

Страница 6: ...ed once it has been attached The power connection steps are labelled 1 2 3 For more information about power connections see page 5 For Soundbar wall mounting components see page 24 Depending on the region the AC plug may vary in appearance or it may be supplied integrated with the AC DC adapter The appearance of the accessories may differ slightly from the illustrations above InsertingBatteriesbef...

Страница 7: ...s the source input mode Inputmode Display Optical Digital input D IN AUX input AUX BLUETOOTH mode BT USB mode USB To turn on BTPAIRING mode change the source to BT mode and then press and hold the Source button for more than 5 seconds When you plug in the AC cord the power button will begin working in 4 to 6 seconds When you turn on this unit there will be a 4 to 5 second delay before it produces ...

Страница 8: ... Connect a USB device here to play music files on the USB device through the Soundbar AUXIN Connect to the Analogue output of an external device DC19V PowerSupplyIn Connect the AC DC power adapter When disconnecting the power cable of the AC DC power adaptor from a wall outlet pull the plug Do not pull the cable Do not connect this unit or other components to an AC outlet until all connections bet...

Страница 9: ...r 2 SoundbarMainUnit See the illustrations below For more information about the required electrical power and power consumption refer to the label attached to the product Label Bottom of the Soundbar Main Unit IDSET POWER POWER RearofSubwoofer 1 PowerCord Connecting ElectricalPower DC 19V DC 19V Bottomofthe SoundbarMainUnit DC19V PowerJack 3 AC DCAdapter 2 ACPlug ...

Страница 10: ...eTopofSubwoofer LED Status Description Resolution Blue On Successfully connected normal operation Blinking Recovering the connection Check if the power cable to the main Soundbar unit is connected properly or wait for a while If blinking persists try manually connecting the subwoofer See page 7 Red On Standby with the Soundbar main unit turned off Check if the power cable to the main Soundbar unit...

Страница 11: ... on the display of the Soundbar for 1 3 seconds and then disappear S u r r o u n d S O U N D M O D E B l u e t o o t h P O W E R V O L W O O F E R S O U N D B A R 5 Sec IDSET 5 When the blue indicator on the subwoofer blinks turn on the Soundbar s power by pressing Power button on the right side of the main unit or on the remote control 6 When the connection is successfully established the blue in...

Страница 12: ... If a steel concrete or metallic wall is between the main unit and the wireless subwoofer the system may not operate at all because the wireless signal cannot penetrate metal PRECAUTIONS Wireless receiving antennas are built into the wireless subwoofer Keep the units away from water and moisture For optimal listening performance make sure that the area around the wireless subwoofer and Wireless Re...

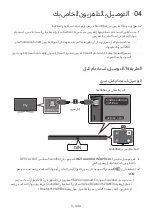
Страница 13: ...and mute Method1 ConnectingwithaCable ConnectingusinganOpticalCable DIGITAL AUDIO IN OPTICAL USB 5V 0 5A AUX IN OPTICAL OUT OpticalCable BottomoftheSoundbar D IN RightSideoftheSoundbar 1 Connect the DIGITALAUDIOIN OPTICAL jack on the Soundbar to the OPTICAL OUT jack of the TV with a digital optical cable 2 Press the Source button on the right side panel or remote control and then select mode D IN ...

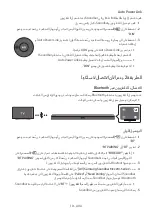
Страница 14: ...ed using Bluetooth you can hear stereo sound without the hassle of cabling Only one TV can be connected at a time Theinitialconnection 1 Press the Source button on the right side panel or on the remote control and then select BT 2 Change BT to BTPAIRING If BTREADY appears press and hold the Source button on the right side panel of the Soundbar or on the remote control for more than 5 seconds to di...

Страница 15: ...st if the distance between the Soundbar and the Bluetooth device exceeds 10 meters The Soundbar automatically turns off after 5 minutes in the Ready state The Soundbar may not perform Bluetooth search or connection correctly under the following circumstances If there is a strong electrical field around the Soundbar If several Bluetooth devices are simultaneously paired with the Soundbar If the Blu...

Страница 16: ...oundbar BD DVDplayer Set topbox Gameconsole RightSideoftheSoundbar 1 OpticalCable X X Connect DIGITALAUDIOIN OPTICAL on the main unit to the OPTICAL OUT jack of the Source Device using a digital optical cable Y Y Select D IN mode by pressing the Source button on the right side panel or on the remote control 2 Audio AUX Cable X X Connect AUXIN Audio on the main unit to the AUDIO OUT jack of the Sou...

Страница 17: ...Type B on one end and a standard female 2 0 USB jack Type A on the other end to the micro USB jack on your Soundbar 2 Connect your USB device to the female end of the adapter cable 3 Press the Source button on the right side panel or on the remote control and then select USB 4 USB appears in the display screen 5 Play music files from the USB storage device through the Soundbar The Soundbar automat...

Страница 18: ...SAudio1 16KHz 48KHz 56kbps 128kbps Wave_Format_MSAudio2 16KHz 48KHz 56kbps 128kbps aac AAC 16KHz 96KHz 48kbps 320kbps AAC LC 16KHz 96KHz 128kbps 192kbps 5 1ch 320kbps HE AAC 24KHz 96KHz 48kbps 64kbps 5 1ch 160kbps wav 16KHz 48KHz up to 3000kbps ogg OGG 1 1 0 16KHz 48KHz 50kbps 500kbps flac FLAC 1 1 0 FLAC 1 2 1 16KHz 96KHz up to 3000kbps If there are too many folders and files stored on the USB de...

Страница 19: ...he remote control for more than 5 seconds to display BTPAIRING 3 Select AV SamsungSoundbarMxxxM Series from the list When a Soundbar is connected to the Bluetooth device BluetoothDeviceName BT appears in the front display 4 Play music files from the device connected via Bluetooth through the Soundbar Ifthedevicefailstoconnect If the previously connected Soundbar listing e g AV SamsungSoundbarMxxxM...

Страница 20: ... electromagnetic waves must be kept away from the Soundbar main unit e g microwaves wireless LAN devices etc The Soundbar supports SBC data 44 1kHz 48kHz Connect only to a Bluetooth device that supports the A2DP AV function You cannot connect the Soundbar to a Bluetooth device that supports only the HF Hands Free function Once you have paired the Soundbar to a Bluetooth device selecting AV Samsung...

Страница 21: ...luetooth Bluetooth is a technology that enables Bluetooth compliant devices to interconnect easily with each other using a short wireless connection A Bluetooth device may cause noise or malfunction depending on usage if A part of your body is in contact with the receiving transmitting system of the Bluetooth device or the Soundbar It is subject to electrical variation from obstructions caused by ...

Страница 22: ...emote app from the Google Play store Marketsearch SamsungAudioRemote LaunchingtheSamsungAudioRemoteApp To launch and use the Samsung Audio Remote app touch the Audio Remote icon on your smart device and then follow the directions on the screen AudioRemote The Samsung Audio Remote app is only compatible with Android mobile phones and mobile devices running Android OS 3 0 or later ...

Страница 23: ... adjust the sound for each frequency band 150Hz 300Hz 600Hz 1 2KHz 2 5KHz 5KHz and 10KHz are selectable Left Right and each can be adjusted to a setting between 6 6 Up Down If the video and audio between the TV and your Soundbar are not synchronised select AUDIOSYNC in Sound Settings and then set audio delay between 0 300 milliseconds by using the Up Down buttons Except USB mode Audio Sync is only...

Страница 24: ...r BTPAIRINGmode To turn on BTPAIRING mode in BT mode press and hold the Source button for more than 5 seconds See page 15 for details AutoPowerDownFunction The unit turns off automatically in the following situations D IN BT USB Mode If there is no audio signal for 5 minutes AUX Mode If the Audio AUX Cable is disconnected for 5 minutes If there is no KEY input for 8 hours when the Audio AUX Cable ...

Страница 25: ...POWERfunction If the Soundbar is in standby mode and the Bluetooth POWER function is On when you turn on a previously connected Bluetooth device the Soundbar automatically turns on and connects via Bluetooth to the device When the Bluetooth POWER function is on ON BLUETOOTHPOWER appears on the Soundbar display To turn off the Bluetooth POWER function press the BluetoothPOWER button once Then OFF B...

Страница 26: ...ungTVtoexternalspeakers Formoreinformation seetheTV susermanual After installing the Soundbar you can adjust the Soundbar s volume using the IR remote control that came with a Samsung TV If you do not want to use this function when the Soundbar is on press and hold the Surround button for 5 seconds OFF TVREMOTE appears in the Soundbar s display and the function turns off To adjust the volume using...

Страница 27: ...fferentsoundeffectmodes Effect Input Output ExceptWirelessRear SpeakerKit IncludeWirelessRear SpeakerKit Surround Surround VOL WOOFER SOUND MODE Bluetooth POWER ON 2 0 ch 2 1 ch 4 1 ch 5 1 ch 2 1 ch 4 1 ch SOUNDMODE Surround VOL WOOFER SOUND MODE Bluetooth POWER STANDARD 2 0 ch 2 1 ch 4 1 ch 5 1 ch 2 1 ch 4 1 ch MUSIC 2 0 ch 2 1 ch 4 1 ch 5 1 ch 2 1 ch 4 1 ch CLEAR VOICE 2 0 ch 2 1 ch 4 1 ch 5 1 c...

Страница 28: ...oard iron board wood etc If possible fix the support screws into wall studs Purchase wall mounting screws according to the type and thickness of the wall you want to mount the Soundbar on Diameter M5 Length 35 mm or longer recommended Connect cables from the unit to external devices before you install the Soundbar on the wall Make sure the unit is turned off and unplugged before you install it Oth...

Страница 29: ...sh a pen tip or sharpened pencil tip through the centre of the B TYPE images on each end of the Guide to mark the holes for the supporting screws and then remove the WallMountGuide CENTER LINE A B B A A TYPE 616mm B TYPE 360mm B CENTER LINE 4 Using an appropriately sized drill bit drill a hole in the wall at each marking If the markings do not correspond to the positions of studs make sure you ins...

Страница 30: ...hind the rear of the Soundbar RearofSoundbar RightendofSoundbar The left and right mounts are different shapes Make sure to position them correctly WallMountR WallMountL 7 Install the Soundbar with the attached Bracket WallMounts by hanging the Bracket WallMounts on the Holder Screws on the wall Slightly tilt the Soundbar to insert both Holder Screw heads into Bracket Wall Mount holes Push the Sou...

Страница 31: ...llation install the speaker system at least 5 cm below the TV if the TV is mounted on the wall For your safety if you do not mount the unit on the wall install it on a secure flat surface where it is unlikely to fall 10 SOFTWARE UPDATE SamsungmayofferupdatesfortheSoundbar s systemfirmwareinthefuture USBport USB 5V 0 5A AUX IN DIGITAL AUDIO IN OPTICAL DC 19V USB 5V 0 5A MicroUSBto USBadapterCable I...

Страница 32: ...is product has a DUAL BOOT function If the firmware fails to update you can update the firmware again IfUPDATEisnotdisplayed 1 Turn off the Soundbar disconnect and then reconnect the USB storage device that contains the update files to the Soundbar s USB port 2 Disconnect the Soundbar s power cord reconnect it and then turn on the Soundbar Updating firmware may not work properly if audio files sup...

Страница 33: ...utton to cancel the function Isthevolumesettominimum Adjust the Volume Theremotecontroldoesnotwork Arethebatteriesdrained Replace with new batteries IsthedistancebetweentheremotecontrolandSoundbarmainunittoofar Move the remote control closer to the Soundbar main unit TheredLEDonthesubwooferblinksandthesubwooferisnotproducingsound ThisissuecanoccurifthesubwooferisnotconnectedtotheSoundbarmainunit T...

Страница 34: ...l DTS in combination with the Symbol and DTS 2 0 Channel are registered trademarks or trademarks of DTS Inc in the United States and or other countries DTS Inc All Rights Reserved 13 OPENSOURCE LICENCENOTICE To send inquiries and requests regarding open sources contact Samsung via Email oss request samsung com 14 IMPORTANT NOTESABOUT SERVICE Figures and illustrations in this User Manual are provid...

Страница 35: ...efer to the label attached to the product Label Bottom of the Soundbar Main Unit WirelessModels includingthefrequencyof5 15GHz 5 35GHz Hereby Samsung Electronics declares that this equipment is in compliance with the essential requirements and otherrelevant provisions of Directive 1999 5 EC The original Declaration of Conformitymaybe found at http www samsung com go to Support Search Product Suppo...

Страница 36: ...ominale indiquée par le symbole est une tension CC Mise en garde Consulter le mode d emploi ce symbole avertit l utilisateur qu il doit consulter le manuel d utilisation pour en savoir plus sur les informations relatives à la sécurité AVERTISSEMENT Afin de diminuer les risques d incendie ou de choc électrique n exposez pas cet appareil à la pluie ou à l humidité ATTENTION POUR PRÉVENIR LES CHOCS É...

Страница 37: ...ctionnement Votre produit n est pas prévu pour un usage industriel Ce produit ne peut être utilisé qu à des fins personnelles Une condensation peut se former si le produit ou un disque a été stocké à basse température Si vous devez transporter l ensemble pendant l hiver attendez environ 2 heures que l appareil ait atteint la température de la pièce avant de l utiliser 5 Les piles utilisées dans ce...

Страница 38: ...nnexion de la Soundbar au Caisson de basse 6 Connexion automatique entre le Caisson de basse et la Soundbar 6 Connexion manuelle du Caisson de basse si la connexion automatique échoue 7 04 ConnexionàvotreTéléviseur 9 Méthode 1 Connexion avec un câble 9 Connexion à l aide d un câble optique 9 Méthode 2 Connexion sans fil 10 Connexion à un téléviseur via Bluetooth 10 05 ConnexionàunAppareilExterne 1...

Страница 39: ... la Soundbar avec une télécommande de téléviseur 22 Utilisation des touches dissimulées 23 Spécifications de sortie pour les différents modes d effets sonores 23 09 InstallationduSupportMural 24 Précautions d installation 24 Composants de fixation au mur 24 Retrait de la Soundbar du mur 27 10 MiseàjourduLogiciel 27 Procédure de mise à jour 28 Si UPDATE ne s affiche pas 28 11 Dépannage 29 12 Licenc...

Страница 40: ...pes de connexion de l alimentation sont étiquetées 1 2 3 Pour plus d informations sur les connexions de l alimentation consultez la page 5 Pour les composants de fixation murale de la Soundbar consultez la page 24 En fonction de la région l apparence de la fiche CA peut varier ou elle peut être fournie intégrée à l adaptateur CA CC L aspect des accessoires peut légèrement différer des illustration...

Страница 41: ...trée Affichage Entrée numérique optique D IN Entrée AUX AUX Mode BLUETOOTH BT Mode USB USB Pour activer le mode BTPAIRING changez la source sur le mode BT puis appuyez et maintenez enfoncée la touche Source pendant plus de 5 secondes Lorsque vous branchez le cordon CA la touche Marche Arrêt fonctionne pendant 4 à 6 secondes Lorsque vous mettez l unité sous tension il faut compter 4 ou 5 secondes d...

Страница 42: ...ers musicaux sur le périphérique USB via la Soundbar AUXIN Permet de connecter la sortie numérique analogique d un appareil externe DC19V Entréed alimentationélectrique Permet de connecter l adaptateur CA CC Lorsque vous débranchez le câble d alimentation de l adaptateur d alimentation CA CC d une prise de courant murale retirez la fiche Ne tirez pas le câble Ne branchez pas cette unité ou d autre...

Страница 43: ...aux illustrations ci dessous Pour plus d informations sur l alimentation et la consommation électriques requises reportez vous à l étiquette collée sur le produit Étiquette Partie inférieure de l unité principale Soundbar IDSET POWER POWER DC 19V DC 19V DC19V Prise d alimentation 3 AdaptateurCA CC 2 FicheCA ArrièreduCaisson debasse 1 Cordon d alimentation Connexionde l alimentation électrique Part...

Страница 44: ...ondebasse LED État Description Résolution Bleu Activé Connexion réussie fonctionnement normal Clignotement Récupération de la connexion Vérifiez si le câble d alimentation sur l unité principale Soundbar est connecté correctement ou attendez un moment Si le clignotement continue essayez de connecter manuellement le Caisson de basse Voir page 7 Rouge Activé En veille avec l unité principale de la S...

Страница 45: ...sur l écran de la Soundbar pendant 1 3 secondes puis disparaît S u r r o u n d S O U N D M O D E B l u e t o o t h P O W E R V O L W O O F E R S O U N D B A R 5 Sec IDSET 5 Quand l indicateur bleu sur le Caisson de basse clignote mettez la Soundbar sous tension en appuyant sur la touche Alimentation sur le côté droit de l unité principale ou sur la télécommande 6 Lorsque la connexion est établie a...

Страница 46: ...r en béton armé ou métallique se trouve entre l unité principale et le subwoofer sans fil le système risque de ne pas fonctionner du tout car le signal sans fil ne peut pas passer à travers le métal PRÉCAUTIONS Les antennes de réception sans fil sont intégrées au subwoofer sans fil Gardez les unités à l abri de l eau et de l humidité Pour des performances d écoute optimales assurez vous que la zon...

Страница 47: ... ainsi que le volume et la coupure du son Méthode1 Connexionavecuncâble Connexionàl aided uncâbleoptique DIGITAL AUDIO IN OPTICAL USB 5V 0 5A AUX IN OPTICAL OUT Câbleoptique PartieinférieuredelaSoundbar D IN CôtédroitdelaSoundbar 1 Raccordez la prise DIGITALAUDIOIN OPTICAL de la Soundbar à la prise OPTICAL OUT du téléviseur à l aide d un câble optique numérique 2 Appuyez sur la touche Source sur l...

Страница 48: ...ouvez écouter le son stéréo sans tracas de câblage Seul un téléviseur à la fois peut être connecté Connexioninitiale 1 Appuyez sur la touche Source sur le panneau côté droit ou la télécommande puis sélectionnez BT 2 Changez BT sur BTPAIRING Si BTREADY apparaît appuyez et maintenez enfoncée la touche Source sur le panneau côté droit de la Soundbar ou sur la télécommande pendant plus de 5 secondes p...

Страница 49: ...etooth sera perdue si la distance entre la Soundbar et l appareil Bluetooth dépasse 10 m La Soundbar s éteint automatiquement après 5 minutes en état Prêt Il se peut que la Soundbar ne puisse pas effectuer correctement la recherche Bluetooth ou la connexion dans les circonstances suivantes En cas de champ électrique puissant autour de la Soundbar En cas d appariement simultané de plusieurs apparei...

Страница 50: ... Boîtierdécodeur Consoledejeu CôtédroitdelaSoundbar 1 Câbleoptique X X Raccordez DIGITALAUDIOIN OPTICAL de l unité principale à la prise OPTICAL OUT de l appareil source à l aide d un câble optique numérique Y Y Sélectionnez le mode D IN en appuyant sur la touche Source sur le panneau côté droit ou sur la télécommande 2 Câble AUX audio X X Raccordez AUXIN Audio de l unité principale à la prise AUD...

Страница 51: ...B à une extrémité et avec une prise USB 2 0 femelle standard Type A à l autre extrémité à la prise Micro USB de la Soundbar 2 Raccordez votre périphérique USB à l extrémité femelle du câble adaptateur 3 Appuyez sur la touche Source sur le panneau côté droit ou la télécommande puis sélectionnez USB 4 USB apparaît sur l écran d affichage 5 Lisez des fichiers musicaux depuis le périphérique de stocka...

Страница 52: ... 48 KHz 56 128 kbps Wave_Format_ MSAudio2 16 48 KHz 56 128 kbps aac AAC 16 96 KHz 48 320 kbps AAC LC 16 96 KHz 128 192 kbps 5 1 canaux 320 kbps HE AAC 24 96 KHz 48 64 kbps 5 1 canaux 160 kbps wav 16 48 KHz jusqu à 3000 kbps ogg OGG 1 1 0 16 48 KHz 50 500 kbps flac FLAC 1 1 0 FLAC 1 2 1 16 96 KHz jusqu à 3000 kbps Si votre périphérique USB contient trop de dossiers et de fichiers la Soundbar mettra...

Страница 53: ...plus de 5 secondes pour afficher BTPAIRING 3 Sélectionnez AV SamsungSoundbarMxxxM Series dans la liste Lorsqu une Soundbar est connectée à l appareil Bluetooth Nomdel appareilBluetooth BT apparaît sur l affichage avant 4 Lisez des fichiers musicaux à partir de l appareil connecté via Bluetooth via la Soundbar Silaconnexiondel appareiléchoue Si la liste de Soundbar connectées précédemment par ex AV...

Страница 54: ...s micro ondes des appareils LAN sans fil etc Le Soundbar prend en charge les données SBC 44 1 kHz 48 kHz Effectuez uniquement la connexion à un périphérique Bluetooth qui prend en charge la fonction A2DP AV Vous ne pouvez pas connecter le Soundbar à un périphérique Bluetooth qui prend en charge uniquement la fonction HF Mains libres Lorsque vous avez apparié la barre audio à un périphérique Blueto...

Страница 55: ...on sans fil courte distance Ce périphérique Bluetooth peut générer du bruit ou créer des dysfonctionnements en fonction des conditions d utilisation lorsque Une partie du corps de l appareil est en contact avec le système de réception transmission du périphérique Bluetooth ou du système Soundbar Il est soumis à des variations électriques provenant d obstructions provoquées par un mur un coin ou de...

Страница 56: ...sur Google Play Recherchez SamsungAudioRemote Lancementdel applicationSamsungAudioRemote Pour lancer et utiliser l application Samsung Audio Remote appuyez sur l icône Audio Remote sur votre téléphone puis suivez les instructions affichées à l écran AudioRemote L application Samsung Audio Remote n est compatible qu avec les téléphones portables Android qui exécutent la version 3 0 d Android ou une...

Страница 57: ...us pouvez sélectionner parmi 150 Hz 300 Hz 600 Hz 1 2 KHz 2 5 KHz 5 KHz et 10 KHz Gauche Droite et chaque réglage peut être défini entre 6 6 Haut Bas Si l image et le son ne sont pas synchronisés entre votre téléviseur et la Soundbar sélectionnez AUDIOSYNC dans les paramètres audio puis réglez le décalage audio de 0 à 300 millisecondes à l aide des touches Haut Bas Sauf le mode USB La synchronisat...

Страница 58: ...IRING en mode BT appuyez et maintenez enfoncée la touche Source pendant plus de 5 secondes Reportez vous à la page 15 pour les détails FonctionAutoPowerDown L appareil s éteint automatiquement dans les situations suivantes Mode D IN BT USB S il n y a pas de signal audio pendant 5 minutes Mode AUX Si le câble audio AUX est déconnecté pendant 5 minutes Si aucune TOUCHE n est activée pendant 8 heures...

Страница 59: ...on de restriction du volume FonctionBluetoothPOWER Si la Soundbar est en mode de veille et la fonction Bluetooth POWER est activée lorsque vous allumez un appareil Bluetooth connecté précédemment la Soundbar s allume automatiquement et se connecte à l appareil via Bluetooth Lorsque la fonction Bluetooth POWER est activée l indication ON BLUETOOTHPOWER s affiche sur l écran de la barre de son Pour ...

Страница 60: ...externes Pourplusd informations reportez vousaumanueld utilisateurdu téléviseur Après avoir installé la Soundbar vous pouvez régler le volume de la Soundbar à l aide de la télécommande IR fournie avec le téléviseur Samsung Si vous ne voulez pas utiliser cette fonction une fois la Soundbar activée appuyez et maintenez enfoncée la touche Surround pendant 5 secondes OFF TVREMOTE apparaît sur l affich...

Страница 61: ...tie Sanskitd enceintesarrière sansfil Aveckitd enceintesarrière sansfil Surround Surround VOL WOOFER SOUND MODE Bluetooth POWER ON 2 0 canaux 2 1 canaux 4 1 canaux 5 1 canaux 2 1 canaux 4 1 canaux SOUNDMODE Surround VOL WOOFER SOUND MODE Bluetooth POWER STANDARD 2 0 canaux 2 1 canaux 4 1 canaux 5 1 canaux 2 1 canaux 4 1 canaux MUSIC 2 0 canaux 2 1 canaux 4 1 canaux 5 1 canaux 2 1 canaux 4 1 canaux...

Страница 62: ...aque métallique bois etc Si possible fixez les vis portantes dans les poteaux Achetez les vis de support mural selon le type et l épaisseur du mur sur lequel vous souhaitez monter la Soundbar Diamètre M5 Longueur 35 mm ou plus recommandés Connectez les câbles depuis l unité aux appareils externes avant d installer la Soundbar sur le mur Assurez vous que l unité est éteinte et débranchée avant de l...

Страница 63: ...0mm 3 Appuyez avec la pointe d un stylo ou d un crayon bien taillé au centre des images B TYPE à chaque extrémité du guide pour marquer les trous des vis portantes puis retirez le Guidedefixationmurale CENTER LINE A B B A A TYPE 616mm B TYPE 360mm B CENTER LINE 4 À l aide d une mèche appropriée faites un trou dans le mur au niveau de chaque marque Si les marques ne correspondent pas aux positions ...

Страница 64: ...bar ArrièredelaSoundbar ExtrémitédroitedelaSoundbar Les fixations droite et gauche ont des formes différentes Veillez à bien les positionner FixationmuraleD FixationmuraleG 7 Installez la Soundbar sur laquelle sont fixés les Supportsdefixationmurale en accrochant les Supportsdefixationmurale sur les Visdefixation sur le mur Inclinez légèrement la Soundbar pour insérer les deux têtes de Visdefixati...

Страница 65: ...le téléviseur si le téléviseur est monté sur un mur Pour votre sécurité si vous ne montez pas l unité sur un mur installez la sur une surface plate et solide où elle ne risque pas de tomber 10 MISEÀJOURDU LOGICIEL Samsungpeutproposerdesmisesàjourpourle microprogrammedusystèmedelaSoundbar prochainement PortUSB USB 5V 0 5A AUX IN DIGITAL AUDIO IN OPTICAL DC 19V USB 5V 0 5A Câbleadaptateur MicroUSBàU...

Страница 66: ...houe vous pouvez exécuter à nouveau la mise à jour SiUPDATEnes affichepas 1 Éteignez la Soundbar déconnectez et ensuite reconnectez le périphérique de stockage qui contient le fichier de mise à jour au port USB de la Soundbar 2 Débranchez le cordon d alimentation de la Soundbar rebranchez le puis allumez la Soundbar La mise à jour du micrologiciel peut ne pas se faire correctement si les fichiers ...

Страница 67: ...pour annuler cette fonction Levolumeest ilrégléàsonminimum Réglez le volume Latélécommandenefonctionnepas Lespilessont elleusées Remplacez avec des piles neuves Est cequeladistanceentrelatélécommandeetl unitéprincipaleSoundbaresttropgrande Rapprochez la télécommande de l unité principale Soundbar LaLEDrougesurlecaissondebasseclignoteetlecaissondebasseneproduitaucunson Ceproblèmepeutseproduiresilec...

Страница 68: ...mbol and DTS 2 0 Channel are registered trademarks or trademarks of DTS Inc in the United States and or other countries DTS Inc All Rights Reserved 13 AVISDELICENCE LIBRE Pour toute requête et demande concernant les sources ouvertes contactez Samsung via e mail à l adresse oss request samsung com 14 REMARQUE IMPORTANTEÀ PROPOSDU SERVICE Les figures et les illustrations du présent Manuel d utilisat...

Страница 69: ...triques reportez vous à l étiquette collée sur le produit Étiquette Bas de l Unité Principale Soundbar Modèlessansfil avecplagedefréquencede5 15GHzà5 35GHz Par la présente Samsung Electronics déclare que cet équipement est conforme aux exigences principales et autres dispositions relatives à la Directive 1999 5 EC La déclaration de conformité originale se trouve sur le site http www samsung com al...

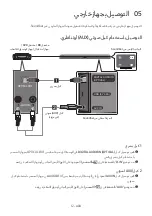
Страница 70: ...ز الموسوم المحدد الجهد مقدار مستمر تيار جهد هذا يرشد االستخدام إرشادات راجع تنبيه االستخدام دليل إىل للرجوع المستخدم الرمز بالسالمة المتعلقة العلومات من لمزيد تحذير لصدمة التعرض أو الحريق نشوب خطر من للحد الرطوبة أو لألمطار الجهاز هذا تعرض ال كهربية تنبيه قم الكهربية الصدمات وقوع دون للحيلولة الفتحة مع للقابس العريضة الشفرة بمطابقة إدخالها أحكم ثم العريضة التيار بمأخذ ا ً دوم ً ال متص الجهاز هذا ي...

Страница 71: ...حالة في المتردد التيار مصدر من الكهربي التيار الجهاز تعطل لالستخدام مصمم غير بك الخاص المنتج لألغراض المنتج هذا استخدام يتم الصناعي في تكاثف يحدث أن الممكن من فقط الشخصية في منخفضة حرارة درجات في المنتج تخزين حالة لمدة انتظر الشتاء فصل خالل الوحدة نقل حالة إىل الوحدة حرارة درجة تصل حتى ا ً تقريب ساعتين االستخدام قبل الغرفة حرارة درجة 5 5 عىل المنتج هذا مع المستخدمة البطاريات تحتوي من تتخلص ال بالب...

Страница 72: ... توصيل 03 5 الكهربائية الطاقة توصيل 6 صوت مضخم بوحدة Soundbar توصيل 6 الصوت ومضخم Soundbar بين التلقائي التوصيل 7 التلقائي التوصيل فشل حالة في ا ً يدوي الصوت مضخم توصيل 9 بك الخاص بالتلفزيون التوصيل 04 9 كبل باستخدام التوصيل 1 الطريقة 9 بصري كبل باستخدام التوصيل 10 ا ً السلكي االتصال اآلن يتم 2 الطريقة 10 Bluetooth عبر بالتلفزيون االتصال 12 خارجي بجهاز التوصيل 05 12 تناظري أو AUX صوتي كبل باستخدام...

Страница 73: ...عن التحكم جهاز باستخدام Soundbar بوحدة الصوت مستوى تعديل 23 المخفية األزرار استخدام 23 المختلفة الصوتية المؤثرات ألوضاع الخرج مواصفات 24 بالحائط التثبيت حامل تركيب 09 24 التركيب احتياطات 24 جدار عىل التعليق مكونات 27 الحائط من Soundbar فك 27 البرنامج تحديث 10 28 التحديث إجراء 28 UPDATE عرض عدم حال في 29 وإصالحها المشاكل استكشاف 11 30 اخيص ر الت 12 30 المفتوح المصدر ترخيص إشعار 13 30 الخدمة عن هامة...

Страница 74: ...تيار مقبس تفصل ال تثبيته تم أن بعد فصله يتم لن انظر الطاقة توصيالت حول المعلومات من لمزيد 3 2 1 التالية باألرقام الطاقة توصيالت خطوات إىل شار ُ ي 5 صفحة 24 صفحة انظر بالحائط Soundbar تثبيت حامل مكونات عىل للتعرف AC DC محول مع ا ً مدمج تزويده يتم قد أو للمنطقة ا ً وفق المتردد التيار مقبس شكل يختلف قد أعاله الموضحة الصور عن ً ال قلي الملحقات شكل يختلف ربما AA بحجم بطاريتان عد ُ ب عن التحكم وحدة استخ...

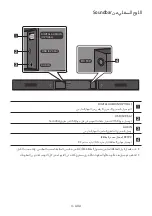
Страница 75: ...در مدخل وضع اختيار المدخل وضع الشاشة بصري رقمي إدخال D IN AUX مدخل AUX BLUETOOTH وضع BT USB وضع USB لمدة المصدر زر عىل باستمرار اضغط ثم BT وضع إىل المصدر بتغيير قم BTPAIRING وضع إىل للتحويل ٍ ثوان 5 ٍ ثوان 6 إىل 4 غضون في التشغيل مفتاح سيعمل المتردد التيار سلك بتوصيل تقوم عندما الصوت صدور قبل ثوان 5 إىل 4 لمدة تأخير فترة هناك سيكون الوحدة هذه بتشغيل تقوم عندما التلفزيون صوت مكبرات تشغيل إيقاف عليك...

Страница 76: ...لمخرج التوصيل USB 5V 0 5A Soundbar طريق عن USB جهاز عىل الموسيقى ملفات لتشغيل USB جهاز توصيل AUX IN الخارجي بالجهاز الخاص التناظري بالمخرج وصل الطاقة مصدر مدخل DC19V DC مستمر تيار AC متردد لتيار الطاقة مهايئ توصيل الكبل تسحب وال المقبس اسحب الحائط مقبس من AC DC الطاقة بمحول الخاص الطاقة كبل فصل عند المكونات بين التوصيالت كل من االنتهاء حتى AC بمخرج األخرى المكونات أو الوحدة هذه بتوصيل تقم ال ...

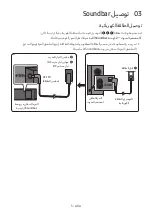
Страница 77: ...dbar وحدة 2 الصوت مضخم 1 المنتج مع المرفق الملصق راجع الطاقة واستهالك المطلوب الطاقة مصدر عن المعلومات من لمزيد األساسية Soundbar وحدة من السفلي الجزء الملصق IDSET POWER POWER الخلفي الجزء الصوت لمضخم الطاقة كبل 1 بالطاقة التوصيل الكهربائية DC 19V DC 19V وحدة من السفلي الجزء الرئيسية Soundbar DC 19V الطاقة مقبس AC متردد تيار مهايئ 3 DC مستمر تيار المتردد التيار مقبس 2 ...

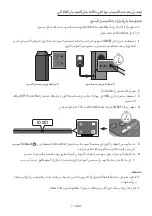
Страница 78: ...D مؤشر أضواء LED ضوء الحالة الوصف الدقة األزرق تشغيل التشغيل بنجاح التوصيل تم طبيعي بشكل الوميض االتصال استرداد بوحدة ً لا متص الطاقة كبل كان إذا ما تحقق لفترة انتظر أو سليم بشكل الرئيسية Soundbar مضخم توصيل حاول الوميض استمرار حالة في 7 صفحة انظر ا ً يدوي الصوت األحمر تشغيل تشغيل إيقاف حالة في استعداد الرئيسية Soundbar وحدة سليم نحو عىل ً لا متص الطاقة كبل إذا ما افحص الرئيسية Soundbar بوحدة التو...

Страница 79: ...م جهاز في VOL زر عىل باستمرار اضغط التشغيل 4 4 تختفي ثم ثانية 1 3 لمدة Soundbar شاشة عىل IDSET رسالة تظهر S u r r o u n d S O U N D M O D E B l u e t o o t h P O W E R V O L W O O F E R S O U N D B A R 5 Sec ID SET 5 5 الموجود الطاقة زر عىل بالضغط Soundbar بتشغيل قم الصوت مضخم في األزرق المؤشر يومض عندما عد ُ ب عن التحكم وحدة أو الرئيسية الوحدة يمين عىل 6 6 باستمرار الصوت مضخم بوحدة العلوي الجزء ف...

Страница 80: ...وت ومضخم األساسية الوحدة بين معدني حائط أو مسلحة خرسانة هناك كان إذا بك الخاصة التشغيل بيئة المعدن اختراق الالسلكية لإلشارة يمكن ال ألنه اإلطالق عىل النظام يعمل ال فقد الالسلكي االحتياطات والرطوبة الماء عن الوحدات أبعد الالسلكي الصوت مضخم في مدمجة الالسلكية االستقبال هوائيات ووحدة الالسلكي الصوت م ِّ مضخ بموقع المحيطة المنطقة أن من تأكد االستماع أثناء أداء أفضل عىل للحصول العوائق من خالية منفصلة ب...

Страница 81: ...وت وكتم الصوت كبل باستخدام التوصيل 1 الطريقة بصري كبل باستخدام التوصيل DIGITAL AUDIO IN OPTICAL USB 5V 0 5A AUX IN OPTICAL OUT بصري كبل Soundbar من السفلي الجزء D IN Soundbar من األيمن الجانب 1 1 OPTICALOUT بمقبس Soundbar في الموجود DIGITALAUDIOIN OPTICAL مقبس بتوصيل قم رقمي بصري كبل باستخدام بالتلفزيون 2 2 وضع حدد ثم عد ُ ب عن التحكم جهاز أو الجانبي األيمن اللوح يمين عىل الموجود المصدر زر عىل اضغ...

Страница 82: ...يمكنك Bluetooth باستخدام التلفزيون توصيل عند الوقت نفس في واحد تلفزيون سوى توصيل يمكن ال األولي التوصيل 1 1 وضع حدد ثم عد ُ ب عن التحكم جهاز أو الجانبي األيمن اللوح يمين عىل الموجود المصدر زر عىل اضغط BT 2 2 BTPAIRING إىل BT تغيير عىل المصدر زر عىل باستمرار فاضغط البلوتوث بتقنية بالفعل االقتران تم BTREADY ظهر إذا BTPAIRING لعرض ثوان 5 من ألكثر عد ُ ب عن التحكم جهاز أو Soundbar لوحدة الجانبي األيمن...

Страница 83: ...bar بين المسافة تجاوزت إذا فقدها سيتم Bluetooth عبر التوصيل وضع في االستعداد حالة في دقائق 5 مرور بعد ا ً تلقائي Soundbar تشغيل إيقاف يجب التالية الحاالت في صحيح بشكل التوصيل عدم أو Bluetooth عبر البحث وظيفة تعمل ال قد Soundbar حول قوي كهربائي حقل وجود حالة في Soundbar مع واحد آن في Bluetooth تقنية يدعم جهاز من أكثر اقتران حالة في أعطال به أو يوجد ال أو Bluetooth تقنية تشغيل إيقاف حالة في كهرومغنا...

Страница 84: ... مشغل BD مشغل لأللعاب كونسول جهاز استقبال جهاز Soundbar من األيمن الجانب بصري كبل 1 X X المصدر بجهاز OPTICALOUT لمقبس الرئيسية الوحدة في DIGITALAUDIOIN OPTICAL كبل بتوصيل قم رقمي بصري كبل باستخدام Y Y عد ُ ب عن التحكم جهاز أو الجانبي األيمن اللوح عىل الموجود المصدر زر عىل بالضغط D IN وضع حدد صوتي AUX كبل 2 X X كبل باستخدام المصدر جهاز في AUDIOOUT بمقبس الرئيسية الوحدة في صوتي AUXIN كبل بتوصيل قم ص...

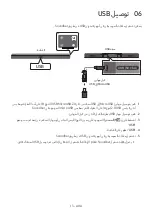
Страница 85: ... بمقبس USB إىل MicroUSB مهايئ بتوصيل قم Soundbar في الموجود microUSB بمقبس اآلخر الطرف عىل A نوع 2 0USB قياسي أنثى 2 2 المهايئ كبل من األنثى الكبل بطرف USB جهاز بتوصيل قم 3 3 وضع حدد ثم عد ُ ب عن التحكم جهاز أو الجانبي األيمن اللوح يمين عىل الموجود المصدر زر عىل اضغط USB 4 4 الشاشة عىل تظهر USB 5 5 Soundbar طريق عن USB تخزين أجهزة في الموسيقى ملفات تشغيل دقائق 5 لمدة USB توصيل يتم لم إذا التلقائي ...

Страница 86: ...ve_Format_MSAudio2 48KHz 16KHz الثانية في بايت كيلو 128 56 aac AAC 96KHz 16KHz الثانية في بايت كيلو 320 48 AAC LC 96KHz 16KHz الثانية في بايت كيلو 192 128 الثانية في بايت كيلو 320 بقناة 5 1 HE AAC 96KHz 24KHz الثانية في بايت كيلو 64 48 الثانية في بايت كيلو 160 بقناة 5 1 wav 48KHz 16KHz الثانية في كيلوبت 3000 إىل يصل ما ogg OGG 1 1 0 48KHz 16KHz الثانية في بايت كيلو 500 50 flac FLAC 1 1 0 FLAC 1 2 ...

Страница 87: ...إذا BTPAIRING لعرض ثوان 5 من ألكثر عد ُ ب عن التحكم جهاز أو Soundbar لوحدة الجانبي األيمن اللوح 3 3 القائمة من AV SamsungSoundbarMxxxM Series حدد BT البلوتوث جهاز اسم األمامية الشاشة عىل سيظهر Bluetooth بجهاز Soundbar توصيل عند 4 4 Soundbar طريق عن Bluetooth تقنية عبر متصبل الجهاز من الموسيقى ملفات تشغيل االتصال في الجهاز فشل إذا القائمة في AV SamsungSoundbarMxxxM Series مثل قبل من المتصلة Soundba...

Страница 88: ...في اإللكترونية األجهزة تتسبب قد ذلك إىل وما الالسلكية LAN وأجهزة المايكرويف أجهزة مثال األساسية Soundbar وحدة عن هرتز كيلو 48 هرتز كيلو 44 1 SBC بيانات Soundbar نظام يدعم والصورة الصوت A2DP وظيفة يدعم بلوتوث بجهاز فقط بالتوصيل قم HandsFree HF وظيفة فقط يدعم Bluetooth بجهاز Soundbar جهاز توصيل يمكنك ال من AV SamsungSoundbarMxxxM Series تحديد يؤدي Bluetooth بجهاز Soundbar جهاز إقران بمجرد BT وضع إىل...

Страница 89: ...زيد اتصال خالل من البعض بعضها مع بسهولة البلوتوث مع المتوافقة األجهزة ربط إمكانية تتيح تقنية البلوتوث يعتبر المدى قصير السلكي حالة في لالستخدام ا ً وفق عطل أو تشويش إحداث في البلوتوث جهاز يتسبب ربما Soundbar نظام أو البلوتوث بجهاز الخاص اإلرسال االستقبال لنظام ا ً مالمس جسدك من جزء مكتبية فواصل أو زاوية حائط وجود عن الناتجة العوائق من الكهربي للتردد األمر يخضع أفران الطبية األجهزة ذلك في بما النطا...

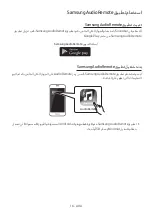
Страница 90: ...glePlay متجر من SamsungAudioRemote SamsungAudioRemote السوق أبحاث SamsungAudioRemote تطبيق تشغيل بدء اتبع ثم بك الخاص الذكي الجهاز عىل AudioRemote رمز المس SamsungAudioRemote تطبيق واستخدام لبدء الشاشة عىل تظهر التي التعليمات Audio Remote تعمل التي المحمولة واألجهزة المحمولة Android هواتف مع فقط متوافق SamsungAudioRemote تطبيق أحدث أو 3 0 اإلصدار Android تشغيل بنظام ...

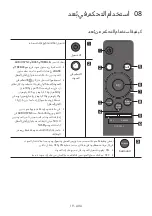
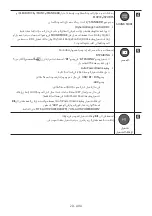
Страница 91: ...وت هرتز 300 و هرتز 150 تحديد يمكن ترددي هرتز كيلو 2 5 و هرتز كيلو 1 2 و هرتز 600 و ويمكن يمين يسار هرتز كيلو 10 و هرتز كيلو 5 و 6 إىل 6 بين ما إعداد إىل منها واحدة كل ضبط أسفل أعىل بين والصوت الفيديو مزامنة عدم حالة في في AUDIOSYNC حدد Soundbar و التلفزيون بين الصوت تأخير بتعيين قم ثم الصوت إعدادات أسفل أعىل أزرار باستخدام ثانية ميلي 300 0 USB وضع باستثناء بعض في فقط مدعومة AudioSync خاصية الوظائف...

Страница 92: ...توصيله المراد المصدر لتحديد اضغط BT PAIRING 5 من ألكثر المصدر زر عىل باستمرار اضغط BT وضع في BTPAIRING وضع لتشغيل للتفاصيل 15 صفحة انظر ثوان AutoPowerDown وظيفة التالية الحاالت في ا ً تلقائي الوحدة تشغيل إيقاف يتم دقائق 5 لمدة صوت إشارة وجود عدم حال في USB BT D IN وضع AUX وضع دقائق 5 لمدة AUX الصوت كبل فصل حال في إيقاف يمكن AUX الصوت كبل اتصال عند ساعات 8 لمدة KEY إدخال عدم حال في فقط الحالة هذه ف...

Страница 93: ... قيد BluetoothPOWER ووظيفة االستعداد وضع في Soundbar كان إذا BluetoothPOWER ا ً قائي تل Soundbar تشغيل سيتم قبل من متصل Bluetooth جهاز بتشغيل كنت إذا التشغيل Bluetooth تقنية عبر بالجهاز التوصيل وسيتم شاشة عىل ON BLUETOOTHPOWER يظهر BluetoothPOWER وظيفة تشغيل أثناء Bluetooth الزر عىل اضغط BluetoothPOWER وظيفة تشغيل وإليقاف Soundbar األمامية الشاشة عىل OFF BLUETOOTHPOWER الرسالة تظهر واحدة مرة POWER...

Страница 94: ...مستوى تعديل خارجية صوت مكبرات إىل SamsungTV بجهاز التلفزيون صوت مكبر لتعيين التلفزيون قائمة استخدم التلفزيون مستخدم دليل انظر الملعومات من لمزيد سريع عد ُ ب عن التحكم جهاز باستخدام Soundbar صوت مستوى تعديل يمكنك Soundbar تركيب بعد Soundbar يكون عندما الوظيفة هذه استخدام في ترغب ال كنت إذا SamsungTV جهاز مع يأتي الذي االستجابة شاشة في OFF TVREMOTE سيظهر ثوان 5 لمدة Surround زر عىل باستمرار فاضغط ال...

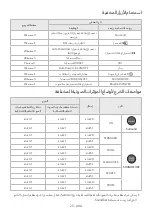
Страница 95: ...ات ألوضاع الخرج مواصفات تأثير إدخال الخرج الصوت مكبرات طقم باستثناء الالسلكية الخلفية مكبرات طقم ذلك في بما الالسلكية الخلفية الصوت Surround Surround VOL WOOFE SOUND MODE Bluet POW ON قناة 2 0 قناة 2 1 قناة 4 1 قناة 5 1 قناة 2 1 قناة 4 1 SOUND MODE Surround VOL WOOFER SOUND MODE Bluetooth POWER STANDARD قناة 2 0 قناة 2 1 قناة 4 1 قناة 5 1 قناة 2 1 قناة 4 1 MUSIC قناة 2 0 قناة 2 1 قناة 4 1 قناة 5 1...

Страница 96: ...اغي شراء الحائط دعامات في دعم براغي استخدام أمكن مكه ُ وس الحائط لنوع ا ً وفق عليه Soundbar تثبيت ترغب الذي بالحائط التثبيت براغي شراء يتم م 5 القطر التوصيات حسب أطول أو مم 35 الطول الحائط عىل Soundbar تثبيت قبل الخارجية األجهزة إىل الوحدة من الكبالت بتوصيل قم كهربائية صدمة في ذلك يتسبب قد وإال تثبيتها قبل الكهربائي التيار عن وفصلها الوحدة تشغيل إيقاف من تأكد جدار عىل التعليق مكونات CENTER LINE A ...

Страница 97: ...E 616mm B TYPE 360mm 3 3 منتصف عىل الحاد القلم طرف أو القلم طرف ضع لتحديد للدعامة طرف كل عىل B TYPE صور التثبيت دعامة بإزالة قم ثم البراغي لدعم الفتحات بالحائط CENTER LINE A B B A A TYPE 616mm B TYPE 360mm B CENTER LINE 4 4 ا ً ثقب احفر مناسب بحجم مثقاب ريشة باستخدام تثبيت عالمات من عالمة كل عند الحائط في البراغي تثبيت مواضع مع متوافقة غير العالمات كانت إذا تثبيت أدوات أو خطاطيف إدخال من فتأكد اغي...

Страница 98: ... حوامل بـ Soundbar لـ الخلفي Soundbar من الخلفي الجزء Soundbar من األيمن الطرف اليمنى الحائط عىل التثبيت وحدة شكل يختلف وضع من تأكد اليسرى التثبيت وحدة شكل عن صحيح بشكل التثبيت وحدتي عىل التثبيت وحدة اليمنى الحائط عىل التثبيت وحدة اليسرى الحائط 7 7 عىل التثبيت دعامة بـ Soundbar بتركيب قم التثبيت دعامة تعليق طريق عن المرفقة الحائط الحائط الحاملعىل براغي عىل الحائط عىل حامل رأسي إلدخال ً لا قلي Soun...

Страница 99: ... إذا التلفزيون أسفل األقل عىل سم 5 مسافة الحائط عىل مثبت التلفزيون عىل مثبتة غير الوحدة كانت إذا سالمتك لضمان حيث وآمن مستوي سطح عىل بتركيبه قم الحائط سقوطه المحتمل من ليس 10 1 البرنامج تحديث لنظام الثابتة البرامج تحديثات Samsung شركة تقدم قد المستقبل في Soundbar USB منفذ USB 5V 0 5A AUX IN DIGITAL AUDIO IN OPTICAL DC 19V USB 5V 0 5A مهايئ كبل USB إىل Micro USB عن الثابت البرنامج تحديث يمكنك تحديث...

Страница 100: ...ىل المنتج هذا يحتوي فيمكنك الثابتة البرامج تحديث فشل إذا أخرى ً ة مر الثابتة البرامج تحديث UPDATE عرض عدم حال في 1 1 USB جهاز وافصل Soundbar تشغيل بإيقاف قم بـ USB منفذ من التحديث ملفات عىل المحتوي به توصيله أعد ثم Soundbar 2 2 Soundbar بـ الخاص الكهربائي التيار سلك افصل Soundbar بتشغيل قم ثم توصيله وأعد صحيح بشكل الثابتة البرامج تحديث يعمل ال قد يدعمها التي الصوت ملفات كانت إذا USB جهاز في مخزنة ...

Страница 101: ...ل اضغط مستوياته أدنى إىل الصوت مستوى تعيين تم هل الصوت مستوى تعديل يعمل ال عد ُ ب عن التحكم جعهاز فارغة البطاريات هل جديدة ببطارية استبدالها ا ً جد بعيدة الرئيسية Soundbar ووحدة عد ُ ب عن التحكم جهاز بين المسافة هل الرئيسية Soundbar وحدة من قريبة مسافة عىل عد ُ ب عن التحكم وحدة ضع صوت إصدار دون الصوت مضخم في الموجود األحمر LED مؤشر يومض الرئيسية Soundbar بوحدة متصل غير الصوت مضخم كان إذا المشكلة ه...

Страница 102: ...TS in combination with the Symbol and DTS 2 0 Channel are registered trademarks or trademarks of DTS Inc in the United States and or other countries DTS Inc All Rights Reserved 13 1 ترخيص إشعار المفتوح المصدر بالمصادر المتعلقة والطلبات االستفسارات إلرسال البريد عبر Samsung بشركة االتصال يرجى المفتوحة oss request samsung com اإللكتروني 14 1 عن هامة مالحظة الخدمة دليل في التوضيحية والرسومات األشكال ...

Страница 103: ...فق الملصق راجع الطاقة واستهالك الطاقة مصدر عىل لالطالع األساسية Soundbar وحدة من السفلي الجزء الملصق هرتز جيجا 5 35 إىل 5 15 من التردد ذلك في بما الالسلكية رز ُ الط المتطلبات مع متوافق الجهاز هذا أن SamsungElectronics شركة تعلن الوثيقة هذه بموجب EC 1999 5 بتوجيهات الصلة ذات األخرى واألحكام األساسية http www samsung com الموقع عىل األصلي المطابقة إعالن عىل االطالع ويمكن از ر الط اسم أدخل ثم المنتج ...

Страница 104: ... samsung com ae support English www samsung com ae_ar support Arabic OMAN 800 SAMCS 800 72627 KUWAIT 183 CALL 183 2255 BAHRAIN 8000 GSAM 8000 4726 QATAR 800 CALL 800 2255 TURKEY 4447711 www samsung com tr support JORDAN 0800 22273 065777444 www samsung com levant SYRIA 9625777444 LEBANON 1299 IRAQ 80010080 MOROCCO 0801002255 www samsung com n_africa support Country Contact Centre Web Site Africa S...

Отзывы: