background image

60

GB

MISCELLANEOU

61

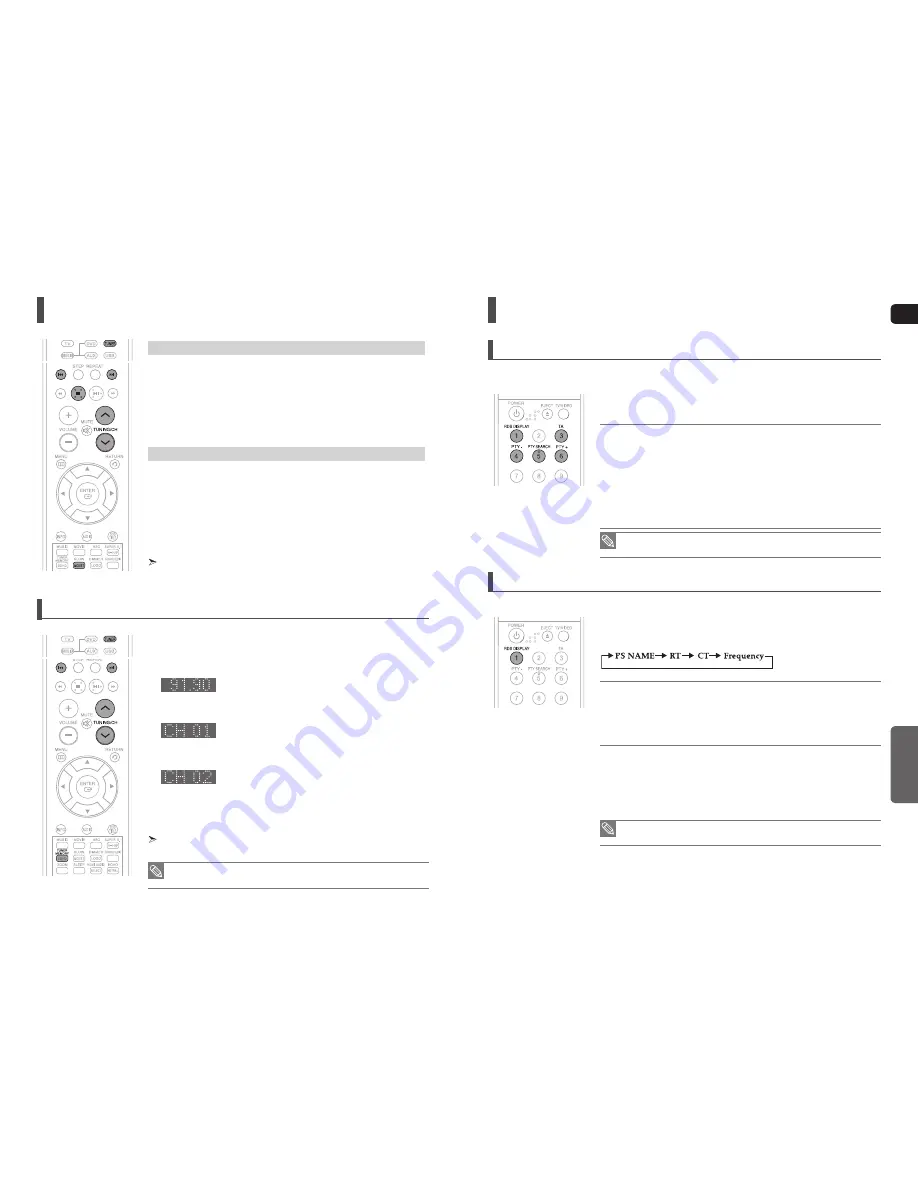
Listening to Radio

  Remote Control

Press the 

TUNER

 button to select the 

FM

 band.

Tune in to the desired station.

 Automatic Tuning 1 : When the 

#

,

button is pressed, a preset broadcast station is 

selected.
 Automatic Tuning 2 : Press and hold the 

.

,

,

 button to automatically search for active 

broadcasting stations.
 Manual Tuning : Briefly press the 

.

,

button to increase or decrease the frequency 

incrementally

  Main Unit

Press the 

FUNCTION

 button to select the 

FM

 band.

Select a broadcast station.

 Automatic Tuning 1 : Press the 

STOP

 (

) button to select 

<PRESET>

 and then press 

the 

#

,

button to select the preset station.

 Automatic Tuning 2 : Press the 

STOP

 (

) button to select 

<MANUAL>

 and then press 

and hold  the 

#

,

button to automatically search the band.

 Manual Tuning : Press the 

STOP

 (

) button to select 

<MANUAL>

 and then briefly press 

the 

#

,

button to tune in to a lower or higher frequency.

  Press the 

MO/ST

 button to listen in Mono/Stereo. 

 Each time the button is pressed, the sound switches between 

<STEREO>

 and 

<MONO>

.

 In a poor reception area, select MONO for a clear, interference-free broadcast.

„

„

„


„

„

„

„
„

Presetting Stations

Example : Presetting FM 89.10 in the memory 

Press the 

TUNER

 button to select the 

FM

 band.

 Press the 

.

,

button to select <89.10>.

Press the 

TUNER MEMORY

 button.

“01” flashes in the display.

 Press the 

#

,

button to select preset number.

You can select between 1 and 15 presets.

Press the 

TUNER  MEMORY

 button again.

Press the TUNER MEMORY button before 

“number”

 disappears from the display.

“number”

 disappears from the display and the station is stored in memory.

To preset another station, repeat steps 2 to 5.

  To tune in to a preset station, press the 

#

,

button on the remote 

control to select a channel.

This unit does not receive AM broadcasts.

„

„

„
„

Using the RDS (Radio Data System) to receive FM stations

RDS allows FM stations to send an additional signal along with their regular program signals. For example, the stations 
send their station names, as well as information about what type of program they broadcast, such as sports or music, etc.

When tuned to an FM station which provides the RDS service,the RDS 
indicator lights up on the display.

Description on RDS function

PTY (Program Type) : Displays the type of programme currently being broadcast
PS NAME (Program Service Name) :  Indicates the name of broadcasting station and is com-

posed of 8 characters. 

RT (Radio Text) :  Decodes the text broadcast by a station (if any) and is composed of maxi-

mum 64 characters.   


CT (Clock Time) :  Decodes the real time clock from the FM frequency. 


Some stations may not transmit PTY, RT or CT information therefore this 
may not be displayed in all cases.

TA (Traffic Announcement) :  When this symbol flashes it shows that the traffic announcement 

is in progress.


 RDS may not operate correctly if the station tuned is not transmitting RDS signal 
properly or if the signal strength is weak.

TO show the RDS signals

You can see the RDS signals the station sends on the display.

 Press the 

RDS DISPLAY

 button while listening to an FM station.

 Each time you press the button, the display change to show you the following information:

PS (Program Service) :  While searching, "PS" appears and then the station names will be 

displayed. "NO PS" appears if no signal is sent.

RT(RadioText) :  while searching, "RT" appears and then text messages the station sends will 

be displayed. "NO RT" appears if no signal is sent.

Frequency : station frequency (non-RDS service)

About characters shown in the display

When the display shows PS,or RT signals,the following characters are used.

 The display window cannot differentiate upper case and lower case letters and always uses 
upper case letters.
 The display window cannot show accented letters, “A,” for instance, may stands for accented 
“A’s” like “À, Â, Ä, Á, Å and Ã.”

 If searching finishes at once, “PS”, and “RT” will not appear on the display. 

„

„

„

About RDS broadcasting

Содержание HT-TXQ120K

Страница 1: ...DIGITAL HOME CINEMA SYSTEM HT TXQ120K GB Instruction Manual COMPACT DIGITAL AUDIO ...

Страница 2: ...iler where they purchased this product or their local government office for details of where and how they can take this item for environmentally safe recycling Business users should contact their supplier and check the terms and conditions of the pur chase contract This product should not be mixed with other commercial wastes for disposal Ensure that the AC power supply in your house complies with...

Страница 3: ...ures 4 Notes on Discs 6 Description 8 CONNECTIONS Speaker Installation 12 Installing the DVD player 13 Connecting the Speakers 14 Connecting the Wireless Receiving Amplifier 17 Connecting the Video Out to TV 19 Connecting the HDMI IN OUT 20 HDMI Function 21 Connecting Audio from External Components 22 Connecting the FM Antenna 23 Connecting Microphone 23 OPERATION Before Reading the User s Manual ...

Страница 4: ...of the disc Use a 650MB 74 minute CD R disc Do not use CD R discs over 700MB 80 minute as they may not be playback Some CD RW Rewritable media may not be playable Only CD Rs that are properly closed can be fully played If the session is closed but the disc is left open you may not be able to fully play the disc CD R MP3 Discs Only CD R discs with MP3 files in ISO 9660 or Joliet format can be playe...

Страница 5: ...NT KARAOKE MIC MIC 1 MIC 2 SYSTEM CONNECTOR COMPONENT OUT AUX IN VIDEO OUT WIRELESS FRONT R CENTER FRONT L REAR L REAR R L R SPEAKERS OUT FRONT REAR Standby indicator Power on indicator Auto Sound Calibration Input Connector 5 1 Channel Speaker Output Connector Cooling Fan MIC1 MIC2 1 2 3 4 5 6 FM 75Ω COAXIAL Jack Component Video Output Connectors Connect a TV with component video inputs to these ...

Страница 6: ... 5 1 V H P Virtual Headphone button SOUND EDIT button ECHO NT PAL button DIMMER LOGO button MIC VOL button HDMI AUDIO SELECT button 1 2 3 4 5 6 7 8 9 10 11 12 13 14 15 16 17 18 19 20 21 22 23 24 25 26 27 28 29 30 31 32 33 34 35 36 37 38 Description Con t Insert Remote Batteries Remove the battery cover in the direction of the arrow Insert two 1 5V AAA batteries paying attention to the correct pola...

Страница 7: ...he main unit with the fixing holes on the stand Tighten 2 screws in the middle of the stand Open a Toroidal Ferrite Core by pulling it upward Wrap it around the top of the system connection cable so it will be next to the DVD Player Close it back by pressing it all the way down until you hear a clicking sound Push the cable into the cable fixing hole in the stand To fix the cable insert the cable ...

Страница 8: ... Subwoofer Rear of Main unit Connecting the Speakers Before moving or installing the product be sure to turn off the power and disconnect the power cord SR SL C L SW R Position of the DVD Playerei Place it on a stand or cabinet shelf or under the TV stand Front Speakers f Place these speakers in front of your listening position facing inwards about 45 toward you Place the speakers so that their tw...

Страница 9: ...d or the card may not be removed easily Do not insert the TX card upside down or in the reverse direction If the TX Card is inserted sound is not output from the Rear Speaker connectors on the subwoofer 1 2 3 4 Front Speaker R Rear Speaker L Rear of Sub woofer Center Speaker Front Speaker L Rear Speaker R WIRELESS RECEIVER MODULE Slanted side face left TX card Connecting the Main Unit and Subwoofe...

Страница 10: ...blinks With the wireless receiver module turned on use a ball point pen or a toothpick to press the RESET button on the back of the unit The STANDBY LED on the front panel of the wireless receiver module blinks 2 Times Turn on the main unit The LINK LED of the wireless receiver module is lit and the Reset is complet ed If Power Standby mode continues repeat Steps 1 to 3 above 1 2 3 When the wirele...

Страница 11: ...ernal device and TV must support High bandwidth Digital Content Protection System HDCP This product supports HDCP A TV with an DVI D jack TV that supports HDCP Video A TV with an DVI D jack TV that does not support HDCP 1 2 3 HDMI Function HDMI Audio ON OFF function The audio signals transmitted over the HDMI Cable can be toggled ON OFF Press the HDMI AUDIO SELECT button on the remote control This...

Страница 12: ...T Connect the FM antenna supplied to the FM 75Ω COAXIAL Jack Slowly move the antenna wire around until you find a location where reception is good then fasten it to a wall or other rigid surface This unit does not receive AM broadcasts Cooling Fan The cooling fan supplies cool air to the subwoofer to prevent overheating Please observe the following cautions for your safety Make sure the unit is we...

Страница 13: ...ot be playable Before Using Your Home Theater To Operate your Samsung TV and the Home Theater with the HT TXQ120 Remote Control The DVD Home Theater s remote can be used to control Samsung TVs Plug the subwoofer s power cord into the AC power supply Before plugging your system into a main socket you must check the voltage setting OPTIONAL If the voltage of the socket does not correspond to the set...

Страница 14: ...le in the player Otherwise it violates the CSS Content Scrambling System a copy protection system recommendations You can listen to high quality multi channel sound that exceeds regular CD playback Load the SACD disc The SACD menu appears and playback will start When the play is stopped select a track using the Cursor button and press the ENTER button During the play you cannot select a track usin...

Страница 15: ...ile Icon To play music files only select the Icon Image File Icon To view image files only select the Icon Movie File Icon To view movie files only select the Icon All File Icon To view movie files only select the Icon MP3 WMA CD Playback JPEG File Playback Images captured with a digital camera or camcorder or JPEG files on a PC can be stored on a CD and then played back with this Home Theater Loa...

Страница 16: ...e default subtitle may not match the movie and you will have to select your subtitle language as follows In Stop mode press the Cursor button select the desired subtitle from the TV screen and then press the ENTER button When you select the desired DivX file from the TV screen the movie will be played normally 1 2 DivX Digital internet video eXpress DivX is a video file format developed by Microso...

Страница 17: ...DVD AUDIO DVD AUDIO display TRACK FILE display AUDIO LANGUAGE display DOLBY DIGITAL display SACD SACD display GROUP display SUBTITLE display ANGLE display Using the Playback Function Checking the Remaining Time Press the REMAIN button For checking the total and remaining time of a title or chapter being played Each time the Remain button is pressed TITLE ELAPSED TITLE REMAIN CHAPTER ELAPSED CHAPTE...

Страница 18: ... DIR REPEAT DISC REPEAT OFF Repeat Playback Options CHAPTER Repeatedly plays the selected chapter TITLE Repeatedly plays the selected title GROUP Repeatedly plays the selected group RANDOM Plays tracks in random order A track that has already been played may be played again TRACK Repeatedly plays the selected track DIR Repeatedly plays all tracks in the selected folder DISC Repeatedly plays the en...

Страница 19: ...utton is pressed during playback No sound is heard during step motion playback Using the Playback Function Con t Angle Function This function allows you to view the same scene in different angles Press the INFO button Press the Cursor button to move to ANGLE display Press the Cursor or numeric buttons to select the desired angle Each time the button is pressed the angle changes as follows 2 3 3 3 ...

Страница 20: ... able to select images Using the Playback Function Con t Audio Language Selection Function Press the INFO button twice Press the Cursor button or numeric buttons to select the desired audio language Depending on the number of languages on a DVD disc a different audio language ENGLISH SPANISH FRENCH etc is selected each time the button is pressed SP 2 3 FR 3 3 1 2 Subtitle Language Selection Functi...

Страница 21: ...o move to the Title Menu Press the ENTER button The title menu appears Press the MENU button to exit the setup screen The Title menu display may be different depending on the disc 1 2 3 Moving Directly to a Scene Song Press the INFO button Press the Cursor button or numeric buttons to select the desired title track and then press the ENTER button Press the Cursor button to move to the Chapter disp...

Страница 22: ...Player HDD and flash type MP3 players Digital camera Cameras that support USB Mass Storage v1 0 Cameras that operate as a removable disk in Windows 2000 or later without additional driver installation USB HDD and USB Flash Drive Devices that support USB2 0 or USB1 1 You may experience a difference in playback quality when you connect a USB1 1 device For a USB HDD make sure to connect an auxiliary ...

Страница 23: ...E ENTER EXIT RETURN In Stop mode press the MENU button Press the Cursor button to move to Setup and then press the ENTER button Press the Cursor button to move to TV DISPLAY and then press the ENTER button Press the Cursor button to select the desired item and then press the ENTER button Once the setup is complete you will be taken to the previous screen Press the RETURN button to return to the pr...

Страница 24: ...w password and confirm new password The setting is complete The password is set to 7890 by default 1 2 3 4 5 If you have forgotten the rating level password do the following While the player is in No DIsc mode hold the main unit s STOP button for longer than 5 seconds INITIALIZE appears on the display and all settings will return to the default values Press the POWER button Using the RESET functio...

Страница 25: ...OVE ENTER EXIT RETURN Press the EJECT button and then press the MENU button Press the Cursor button to move to Setup and then press the ENTER button Press the Cursor button to move to SACD TYPE and then press the ENTER button Press the Cursor button to move to SACD MODE and then press the ENTER button Set steps 1 4 again if you want to switch to CDDA Play mode SACD MODE Set this mode to play SACD ...

Страница 26: ...re set the mode as 0ms Otherwise change the setting according to the table Distance between Df and Dc 0 00 m 0 34 m 0 68 m 1 02 m 1 36 m 1 70 m Delay Time 0 ms 1 ms 2 ms 3 ms 4 ms 5 ms Setting REAR SURROUND SPEAKERS If the distance of Df is equal to the distance of Ds in the figure set the mode as 0ms Otherwise change the setting according to the table Distance between Df and Dc 0 00 m 1 02 m 2 04...

Страница 27: ...e loudest and quietest sounds You can use this function to enjoy Dolby Digital sound when watching movies at low volume at night MOVE ENTER EXIT CHANGE EXIT RETURN In Stop mode press the MENU button Press the Cursor button to move to Audio and then press the ENTER button Press the Cursor button to move to DRC and then press the ENTER button Press the Cursor button to adjust the DRC When the Cursor...

Страница 28: ... t Dolby Pro Logic II Effect This function works only in Dolby Pro Logic MUSIC mode Press the 2 PL II MODE button to select MUSIC mode Press the 2 PL II EFFECT button to select P Panorama then press the Cursor button to select the desired effect setting You can select either 0 or 1 This mode extends the front stereo image to include the surround speakers for an excit ing wraparound effect with sid...

Страница 29: ...e Control buttons on the main unit to make adjustments as below If the distance between the listener and the speaker is over 5 m Set the main unit s volume to over 25 If the distance between the listener and the speaker is 3 to 5 m Set the main unit s volume to 25 If the distance between the listener and the speaker is less than 3 m Set the main unit s volume to 15 Press the ASC button To create t...

Страница 30: ...ulates 9 1 channel surround sound of a movie theater When you insert a DVD recorded in 2 channel or multi channel format and press the SUPER 5 1 button the message THIS FUNCTION APPLIES ONLY 2CH SOURCE appears in the display and it will not work This function does not work with SACD or DVD AUDIO discs 5 1 channel outputs are available in VIRTUAL 9 1 or EX MOVIE mode only Virtual Headphone Function...

Страница 31: ...ons to send an additional signal along with their regular program signals For example the stations send their station names as well as information about what type of program they broadcast such as sports or music etc When tuned to an FM station which provides the RDS service the RDS indicator lights up on the display Description on RDS function PTY Program Type Displays the type of programme curre...

Страница 32: ...cial science language theater etc SCIENCE Natural science and technology VARIED Others Speech amusing program quiz game interview comedy and satirical play etc POP M Pop music ROCK M Rock music M O R M Current contemporary music considered to be easylistening Display Program Type LIGHT M Light classical music Classical music and instrumental and chorus music CLASSICS Heavy classical music Orchestr...

Страница 33: ...hilips 15 17 18 40 48 54 62 72 10 Cinema 97 53 Pioneer 63 66 80 91 11 Classic 03 54 Portland 15 18 59 12 Concerto 18 55 Proton 40 13 Contec 46 56 Quasar 06 66 67 14 Coronado 15 57 Radio Shack 17 48 56 60 61 75 15 Craig 03 05 61 82 83 84 58 RCA Proscan 18 59 67 76 77 78 92 93 94 16 Croslex 62 59 Realistic 03 19 17 Crown 03 60 Sampo 40 18 Curtis Mates 59 61 63 61 Samsung 00 15 16 17 40 43 46 47 48 4...

Страница 34: ...he remote control does not work Is the remote control being operated within its operation range of angle and distance Are the batteries exhausted Have you selected the mode TV DVD functions of the remote control TV or DVD correctly Troubleshooting Symptom Check Remedy Disc is rotating but no picture is produced Picture quality is poor and picture is shaking Is the TV power on Are the video cables ...

Страница 35: ... Maori 1508 Shona 1039 Amharic 1194 Galician 1349 Macedonian 1509 Somali 1044 Arabic 1196 Guarani 1350 Malayalam 1511 Albanian 1045 Assamese 1203 Gujarati 1352 Mongolian 1512 Serbian 1051 Aymara 1209 Hausa 1353 Moldavian 1513 Siswati 1052 Azerbaijani 1217 Hindi 1356 Marathi 1514 Sesotho 1053 Bashkir 1226 Croatian 1357 Malay 1515 Sundanese 1057 Byelorussian 1229 Hungarian 1358 Maltese 1516 Swedis 1...

Страница 36: ...pix 3700 Nikon Digital Camera Coolpix 4100 Nikon Digital Camera Coolpix 5200 Nikon Digital Camera Stylus 410 digital Olympus Digital Camera 300 digital Olympus Digital Camera U300 Olympus Digital Camera X 350 Olympus Digital Camera C 760 Olympus Digital Camera C 5060 Olympus Digital Camera X1 Olympus Digital Camera U mini Olympus Digital Camera Lumix FZ20 Panasonic Digital Camera DMC FX7GD Panason...

Страница 37: ...Contact SAMSUNG WORLD WIDE If you have any questions or comments relating to Samsung products please contact the SAMSUNG customer care centre Region Country Customer Care Center Web Site ...

Отзывы: