background image

71

3

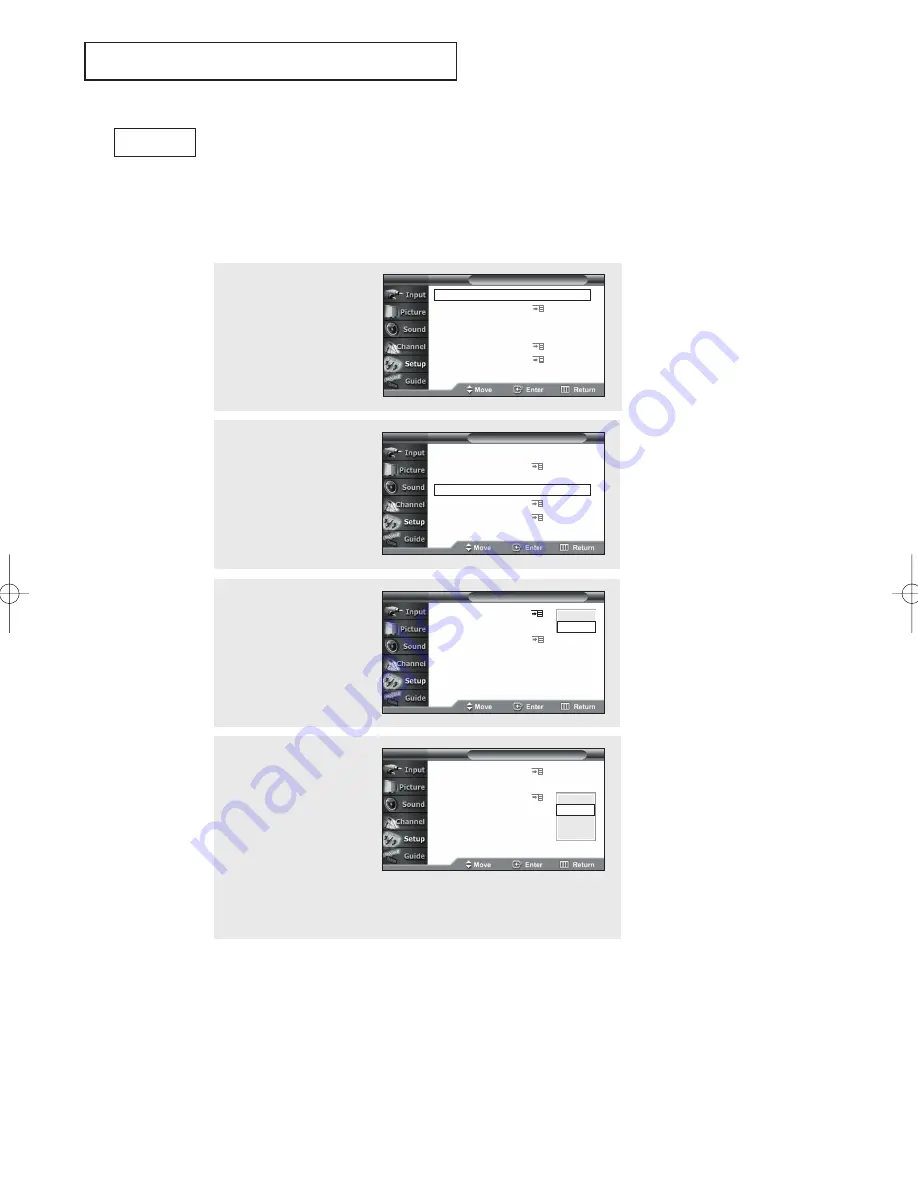
Press the

ENTER 

button.

Press the 

button to

select “On”, then press the

ENTER 

button.

4

Press the 

button to

select “Analog Caption
Mode”, then press the

ENTER 

button.

Press the 

▲ 

or 

button

to select  submenu(CC1,
CC2, CC3, CC4) you want.

Press the 

MENU

button

to exit

Viewing Closed Caption

Setting Up Analog Caption (On-Screen Text Messages)

The Analog Caption function operates in either analog RF channel mode or external 

signal mode. (Depending on the broadcasting signal, the Analog Caption function

may operate on digital channels.)

2

Press the 

button to

select “Caption”, then
press the

ENTER 

button.

Quick way to access captions

menu: Simply press the “Caption”
button on the remote control:

Notes: 
• The Caption feature doesn’t work in DVI mode.
• The availability of captions depends on the program 

being broadcast.

• You can also alternate among CC1, CC2, CC3 or CC4 

by pressing the CAPTION button on the remote 

control.

Analog

1

Press the 

MENU 

button.

Press the 

button to

select “Setup”, then press
the

ENTER 

button.

Time 

Menu Language

: English

Set Rating Controls 
Caption
Menu Translucency Level

: Normal

Function Help

: Off

T V

Setup

Time 
Menu Language

: English

Set Rating Controls 

Caption

Menu Translucency Level

: Normal

Function Help

: Off

T V

Setup

Caption

: Off

Digital Caption Options

Analog Caption Mode

: CC1

T V

Caption

Caption

: On

Digital Caption Options

Analog Caption Mode

: Off

T V

Caption

Off

On

CC1
CC2
CC3
CC4

S

P E C I A L

F

E AT U R E S

00137A-CHAPTER 4  2004/10/18  05:31 PM  Page 71

Содержание HCN5529W

Страница 1: ... TELEVISION HCN479W HCN529W HCN559W HCN5529W HCN659W SERVICE DIVISION 400 Valley Road Suite 201 Mount Arlington NJ 07856 TEL 1 800 SAMSUNG 1 800 726 7864 www samsungusa com BP68 00137A 00 00137A FRONT COVER 2004 10 18 05 39 PM Page 1 ...

Страница 2: ...hall be connected to the grounding system of the building as close to the point of cable entry as practical Caution FCC CSA regulations state that any unauthorized changes or modifica tions to this equipment may void the user s authority to operate it Caution To prevent electric shock match the wide blade of plug to the wide slot and fully insert the plug Attention pour eviter les chocs electrique...

Страница 3: ... bracket or table where it can fall A falling TV can cause serious injury to a child or adult and serious damage to the appliance Use only with a cart stand tripod bracket or table recommended by the manu facturer or sold with the TV Follow the manufacturer s instruc tions when mounting the unit and use a mounting accessory rec ommended by the manufacturer Move the TV and cart with care Quick stop...

Страница 4: ... electrode Do not attempt to service the TV yourself Refer all servicing to qualified service personnel Unplug the unit from the wall outlet and refer servicing to qualified service personnel under the following conditions when the power supply cord or plug is damaged if liquid has been spilled on the unit or if objects have fallen into the unit if the TV has been exposed to rain or water if the T...

Страница 5: ...nd images on screen such as the dark side bars on non expanded standard format television video and programming should be limited to no more than 15 of the total television viewing per week Additionally viewing other stationary images and text such as stock market reports video game displays station logos web sites or computer graphics and patterns should be limited as described above for all tele...

Страница 6: ...480i and 480 line progressive 480p video 480i programs are essentially a digital version of our current analog TV programs while the 480p format offers improved image detail over 480i Some 480p programs are broadcast in widescreen and are comparable to progressive scan DVD movies in image quality HDTV program formats include 1080 line interlaced 1080i and 720 line progressive 720p Both HDTV format...

Страница 7: ...ot as common as DTV ready TVs and monitors If you already own a DTV ready TV with component video inputs you can enjoy DTV broadcasts by simply adding a low cost DTV set top receiver and antenna 2 Using a personal computer and monitor There are plug in cards available that will receive and display DTV broadcasts on your computer monitor In addition many computer monitors will display one or more o...

Страница 8: ...t was originally encoded for broadcast This is a big advantage for DTV over analog TV there is no noise ghosting static or scratchy audio 3 How can I connect an antenna in my townhouse co operative apartment condominium or apartment The Federal Communications Commission s OTARD Rule part of the Telecommunications Act of 1996 allows residents of condominiums townhouse or members of neighborhood ass...

Страница 9: ...ce 24 Connecting a Digital Audio System 25 Connecting a Speakers Variable Audio Output 25 Installing Batteries in the Remote Control 26 Chapter 3 Operation 27 Turning the TV On and Off 27 Plug Play Feature 27 Using the Perfect Focus Feature 29 Adjusting Manual convergence 30 Adjust Red Convergence 31 Viewing the Menus and On Screen Displays 32 Viewing the Menus 32 Viewing the Display 32 Selecting ...

Страница 10: ...is received 60 When an Analog Signal is received 61 Setting the On Off Timer 62 Setting the Sleep Timer 64 Rating Control Menu 65 How to Change Your Password 65 How to Set up Restrictions Using the TV Parental Guidelines 66 How to Set up Restrictions using the Movie Ratings G PG PG 13 R NC 17 X 67 Important Notes About Parental Locks 68 Viewing Closed Caption 69 Setting Up Digital Caption On Scree...

Страница 11: ...echnology DIGITAL INPUT Digital Visual Interface jack COAXIAL OUTPUT OPTICAL OUTPUT Precautions When Moving and Installing the Unit This Projection Television is provided with casters at itsbottom so it can be moved easily Depending on the material of the floor it may get scratched when the unit is moved Care should be taken when moving the unit When you want to install the Projection Television i...

Страница 12: ...nce When the menu appears use the CH buttons to highlight a particular source and then press the ENTER button to select it ˇ MENU Press to see an on screen menu of your TV s features CH and CH Press to change channels Also press to highlight various items on the on screen menu ˆ VOL Press to increase or decrease the volume Also used to select items on the on screen menu Ø POWER Press to turn the T...

Страница 13: ...onally such as a camcorder or video game For information on connecting equipment see pages 17 25 Using the Component Shelf You can place a VCR a DVD player etc on the Component Shelf 1 Press the symbol in the center of the Component Shelf door 2 As shown in figure below hold the center of the door and lift it up 3 After placing a com ponent on the shelf hold the center of the door and pull it down...

Страница 14: ... a signal source is connected to ANT A DIGITAL INPUT Digital Visual Interface jack Receives the digital signals from a Set top Box ˇ COAXIAL OUTPUT Connect to the a Digital Audio component OPTICAL OUTPUT Connect to the a Digital Audio component ˆ SERVICE PORT For service only Ø AUDIO VIDEO MONITOR OUTPUT jacks Connect to the audio video input jacks of a recording VCR VIDEO INPUT jacks Connect to t...

Страница 15: ...t buttons Control the cursor in the menu Ô Aspect Press to change the screen size Still Main Press to stop the action during a particular scene Press again to resume normal video Ò Mode Selects a target device to be con trolled by the Samsung remote control i e TV STB VCR Cable box or DVD Ú PRE CH Tunes to the previous channel Æ CH and CH Channel Up Down Press CH or CH to change channels ı TV Vide...

Страница 16: ...ing play record rewind or fast forward If the button is pressed during Full Automatic play the function will be can celled Play Pause Press the Play Pausebutton to play back prerecorded tapes or pause the tape FF Press to fast forward the tape in your VCR SET Used during set up of this Samsung remote control so that it will work compatibly with other devices VCR cable box DVD Sleep Press to select...

Страница 17: ...tennas see Separate VHF and UHF Antennas on page 18 Antennas with 300 ohm Flat Twin Leads If you are using an off air antenna such as a roof antenna or rabbit ears that has 300 ohm twin flat leads follow the directions below Chapter Two INSTALLATION 1 Place the wires from the twin leads under the screws on the 300 75 ohm adaptor not sup plied Use a screwdriver to tighten the screws 2 Plug the adap...

Страница 18: ...inal on the rear of the TV 2 Plug the combiner into the ANT A or ANT B ter minal on the rear panel INSTALLATION Antennas with 75 ohm Round Leads Plug the antenna lead into the ANT A or ANT B terminal on the rear panel Separate VHF and UHF Antennas If you have two separate antennas for your TV one VHF and one UHF you must combine the two antenna signals before connecting the antennas to the TV This...

Страница 19: ...imply IN Connecting to a Cable Box that Descrambles Some Channels If your cable box descrambles only some channels such as premium channels follow the instructions below You will need a two way splitter an RF A B switch and four lengths of coaxial cable These items are available at most electronics stores 1 Find and disconnect the cable that is connected to the ANTENNA IN ter minal on your cable b...

Страница 20: ... the RF A B switch 6 Connect the last coaxial cable between the OUT terminal on the RF A B switch and the VHF UHF terminal on the rear of the TV After you ve made this connection set the A B switch to the A position for normal view ing Set the A B switch to the B position to view scrambled channels When you set the A B switch to B you will need to tune your TV to the cable box s output channel whi...

Страница 21: ...ually included with a VCR If not check your local electronics store 2 Connect a set of audio cables between the AUDIO OUT jacks on the VCR and the AUDIO jacks on the TV If you have a mono VCR connect L mono to VCR audio out using only one audio cable 3 Connect a video cable between the VIDEO OUT jack on the VCR and the VIDEO jack on the TV If you have a S VHS VCR use the S Video connections and re...

Страница 22: ...d the VIDEO terminal on the sidet of the TV The audio video cables shown here are usually included with a Camcorder If not check your local electronics store If your camcorder is stereo you need to connect a set of two cables Connecting a Second VCR to Record from the TV Your TV can send out signals of its picture and sound to be recorded by a second VCR To do this connect your second VCR as follo...

Страница 23: ...eo viewing connect video cables between the Y PB and PR inputs on the TV and Y PB and PR or Y CB CR outputs on the DVD player or DTV Set top Box Note For an explanation of Component video see your DVD play er s or DTV Set top Box owner s instruction Connecting to regular audio and video jacks 1 Connect a set of audio cables between the AUDIO IN jacks on the TV and the AUDIO OUT jacks on the DVD pl...

Страница 24: ... decoder DVD players and D VHS are put on the market 1 Connect a set of audio cables between the AV 2 AUDIO INPUT jacks on the TV and the AUDIO OUT jacks on the DTV Set Top Box 2 Connect a DVI cable between the DVI INPUT jack on the TV and the DVI OUT jack on the Set Top Box Note For an explanation of Component video see your DTV Set top box s owner s instruction INSTALLATION Notes The DVI INPUT j...

Страница 25: ... Be certain to remove the black cover from the optical output before inserting the cable 3 If your system has both coaxial and optical digital audio inputs SAMSUNG recommends you use the optical digital output on the TV Do not connect both optical and coaxial cables This may damage your audio system Connecting a Speakers Variable Audio Output 1 The AUDIO OUT terminals cannot be used for external s...

Страница 26: ... up to about 23 feet from the TV Assuming typical TV usage the Batteries last for about one year 2 Install two AAA size batteries Make sure to match the and ends of the batteries with the diagram inside the compartment Installing Batteries in the Remote Control 1 Slide the back cover all the way out to open the battery compartment of the remote control INSTALLATION ...

Страница 27: ...yed 2 Press the ENTER button to enter the language Press the button to select language then the ENTER button Ant input check menu is automatically displayed 3 Press the button to memorize the channels of the selected connection Press the ENTER button to select Start When selecting Cable TV Press the button to select Cable then press the ENTER button Press the button to cycle through these choices ...

Страница 28: ...ock 7 The message Completed TIme will be updated auto matically is displayed When you have finished press the ENTER button Channel Memory in Process TV Channel 15 Stop 7 channels were memorized Air ANT A 7 Return Next Select your time zone in which you live Eastern Central Mountain Pacific Hawaii Alaska 5 Press the button to select Yes or No then the ENTER button Time Zone Picture menu is automati...

Страница 29: ...r happens during Perfect Focus then perform Perfect Focus once again If you can t make adjustments after Perfect Focus then make manual adjustments If you still can t make adjustments contact a Samsung authorized Service Center The Data to be controlled with Manual adjuset won t be cared while the Perfect Focus are working Plese adjust it in 30 mins after turing on SET while the Perfect Focus are ...

Страница 30: ... press the ENTER button 2 Press the button to select Adjust Convergence then press the ENTER button continued 3 Press the ENTER button to select Red Adjust then press the ENTER button again Picture Mode Dynamic Custom Picture Color Tone Cool 1 Select Picture Size DNIe On Adjust Convergence PIP Red Adjust Blue Adjust Perfect Focus T V Picture T V Adjust Convergence Picture Mode Dynamic Custom Pictu...

Страница 31: ... line i e make a single horizontal line that is as white as possible 6 If a vertical red line is visible use the VOL and VOL buttons to move the line so that it is superim posed on the vertical center line i e make a single vertical line that is as white as possible Adjust Red Convergence 7 For Blue adjustment do the same as the above After the red convergence is correctly adjusted press EXIT to e...

Страница 32: ...und Channel Setup and Guide 1 Press the INFO button on the remote control The TV will display the Picture Mode Sound Mode MTS Time 2 Press the or button to move to items in the menu the icons blink when highlighted Press the or button to display change or use the selected items Press the ENTER button to enter items in the menu 3 Press the EXIT button to exit TV Video List Edit Name TV Video List E...

Страница 33: ...TER button Selecting the Antenna Input You can connect to two different signal sources by choosing the antenna input Antenna A or Antenna B 1 Press the ANTENNA button then press the ANTENNA button repeatedly to select the ANT A or ANT B Time Menu Language English Set Rating Controls Caption Menu Translucency Level Normal Function Help Off Time Menu Language Set Rating Controls Caption Menu Translu...

Страница 34: ...signal source that is connected to the TV i e an antenna or a cable system 1 Press the MENU button Press the button to select Channel then press the ENTER button 2 Press the ENTER button to select Select Antenna then press the ENTER button Press the button to select Air or Cable then press the ENTER button Select Antenna Air Select Favorite Channels Memorize Channels Add Delete Channels Fine Tune ...

Страница 35: ...s of cable TV systems Contact your local cable company to identify the type of cable system that exists in your particular area At this point the signal source has been selected Proceed to Storing Channels in Memory Subscription cable services require service specific equirement for viewing 4 Press the button to select antenna connection then press the ENTER button Select the antenna connection AN...

Страница 36: ...ckly tune to any channel Press the number buttons to go directly to a channel For example to select channel 27 press 2 then 7 The TV will change channels when you press the second number When you use the number buttons you can directly select channels that were either erased or not memorized To select a channel over 100 press the 100 button For channel 122 press 100 then 2 then 2 To change to sing...

Страница 37: ...n press the ENTER button Press the ENTER button again to deselect the selected channel To return to the previous step move to Return by pressing the button and then press the ENTER button Note Only memorized channels can be set as Favorite channels Select All Press to select all channels Clear All Press to clear all channels Select Antenna Air Select Favorite Channels Memorize Channels Add Delete ...

Страница 38: ... Delete Channels Fine Tune Channels Check Signal Strenght Select Antenna Air Select Favorite Channels Memorize Channels Add Delete Channels Fine Tune Channels Check Signal Strenght T V Channel 3 Repeatedly pressing ENTER will alternate between Add channel and Delete channel Press the number buttons or CH buttons to switch to the appropriate channel and then repeat step 4 Press ENTER Channel 11 0 N...

Страница 39: ...e ENTER button The items Contrast Brightness Sharpness Color and Tint will appear on the screen 3 Press the or button to select a particular item 4 Press the or button to increase or decrease the value of a particular item Press the EXIT button to exit Picture Mode Dynamic Custom Picture Color Tone Cool 1 Select Picture Size DNIe On Adjust Convergence PIP Picture Mode Dynamic Custom Picture Color ...

Страница 40: ... Movie Choose Custom if you want to adjust the settings according to personal pref erence see Customizing the Picture page 39 1 Press the MENU button Press the button to select Picture then press the ENTER button 2 Press the ENTER button to select Picture Mode Press the or button to select the Dynamic Standard Movie or Custom picture setting Alternate method Simply press the P Mode button on the r...

Страница 41: ...Warm1 Warm2 Press the EXIT button to exit OPERATION T V Picture Picture Mode Dynamic Custom Picture Color Tone Cool 1 Select Picture Size DNIe On Adjust Convergence PIP T V Picture Picture Mode Dynamic Custom Picture Color Tone Normal Select Picture Size DNIe Off Adjust Convergence PIP Picture Mode Dynamic Custom Picture Color Tone Cool 1 Select Picture Size DNIe On Adjust Convergence PIP T V Pict...

Страница 42: ...Auto Volume Off Select Multi track Options Digital Output Dolby Digital BBE On T V Sound Sound Mode Custom Custom Sound Auto Volume Off Select Multi track Options Digital Output Dolby Digital BBE On T V Sound Sound Control Adjusting the Volume Using Mute At any time you can temporarily cut off the sound using the Mute button Press the VOL or VOL buttons to increase or decrease the volume MUTE 1 Pr...

Страница 43: ... ENTER button then press the or button to select Standard Music Movie Speech or Custom sound set tings Press the EXIT button to exit 1 Press the ENTER button Press the button to select Sound then press the ENTER button OPERATION Alternate method Simply press the S MODE button on the remote con trol to select one of the standard sound settings 3 Press the or button to highlight a particular item to...

Страница 44: ... Level Normal Function Help Off T V Time T V Setup Time Setup Mode Manual Time Setup Auto Time Setup Sleep Timer On Timer Inactivated Off Timer Inactivated T V Time T V Manual Time Setup Time Setup Mode Manual Manual Time Setup Auto Time Setup Sleep Timer On Timer Inactivated Off Timer Inactivated Set current date and time Month Day Year Hour Minute am pm 02 Return Manual Auto Notes You can set th...

Страница 45: ...er On Timer Inactivated Off Timer Inactivated T V Auto Time Setup Daylight Savings Time No Time Zone Picture Eastern Manual Auto Yes No Time Menu Language English Set Rating Controls Caption Menu Translucency Level Normal Function Help Off T V Setup T V Auto Time Setup Daylight Savings Time Yes Time Zone Picture Eastern T V Auto Time Setup Select the time zone in which you live 5 Press the to sele...

Страница 46: ... signal source then press the ENTER button When you connect equipment to the TV you can choose between the following sets of jacks Video 1 Video 2 Video 3 S Video 1 S Video 2 Component 1 Component 2 or DVI on the TV s rear panel and Video 3 or S Video 2 on the TV s side panel TV Video1 Video2 Video3 S Video1 S Video2 More T V TV Video List 1 Press the MENU button Press the ENTER button to select I...

Страница 47: ...o select external device VCR DVD D VHS Cable STB HD STB Satellite STB PVR STB AV Receiver DVD Receiver Game Camcorder Combo PC VOD STB TV Set other signal sources Video2 Video3 S Video1 S Video2 Component1 Component2 DVI using the same method as listed above Press the ENTER button TV Video1 Video2 Video3 S Video1 S Video2 More T V Edit Name VCR DVD D VHS Cable STB HD STB Satellite STB PVR STB ...

Страница 48: ...nnels Fine Tune Channels Check Signal Strenght Select Antenna Air Select Favorite Channels Memorize Channels Add Delete Channels Fine Tune Channels Check Signal Strenght T V Channel T V Channel Channel 7 0 Not Fine Tuned 3 Reset Return Fine Tune Channels 3 Press the or button to adjust the fine tuning To store the fine tuning setting in the TV s memory press the ENTER button To reset the fine tuni...

Страница 49: ...ss the ENTER button Select Antenna Air Select Favorite Channel Memorize Channel Add Delete Channels Fine Tune Channels Check Signal Strenght T V Channel T V Check Signal Strenght 3 If the signal strength meter indicates that the signal is weak physically adjust your antenna to increase the signal strength Continue to adjust the antenna until you find the best position with the strongest signal Pre...

Страница 50: ...Changing the Screen Size 1 Press the MENU button Press the button to select Picture then press the ENTER button 2 Press the button to select Select Picture Size then press the ENTER button Picture Mode Custom Custom Picture Color Tone Normal Select Picture Size DNIe On Adjust Convergence PIP T V Picture T V Select Picture Size 3 Press the or button to highlight the screen format you want Press the...

Страница 51: ... 2 Press the button to select DNIe then press the ENTER button Press the button to select On Off or Demo Press the EXIT button to exit Picture Mode Custom Custom Picture Color Tone Normal Select Picture Size DNIe Adjust Convergence PIP T V Picture On Off Demo Quick way to select DNIe Simply press the DNIe button on the remote control Picture Mode Custom Custom Picture Color Tone Normal Select Pict...

Страница 52: ...cture in Picture doesn t function when the V chip is active Screen size cannot be changed in the PIP Double Size mode The PIP feature doesn t work with Component1 Component2 480p 720p 1080i and DVI modes When the cable box output is connected to ANT B it cannot be viewed in the PIP window DIGITAL Channel does not function when changing PIP channels SPECIAL FEATURES Picture Mode Custom Custom Pictu...

Страница 53: ...Picture Size DNIe On Adjust Convergence PIP T V Picture 3 Press the button to select TV VIDEO then press the ENTER button Press the or button to select the signal source The signal from these inputs will not appear if you have not connected any equipment to the input jacks Press the EXIT button to exit PIP Off TV VIDEO TV Swap Size Position PIP Channel TV 4 T V PIP TV Video1 Video2 Video3 S Video1...

Страница 54: ...button 2 Press the button to select PIP then press the ENTER button Picture Mode Custom Custom Picture Color Tone Normal Select Picture Size DNIe On Adjust Convergence PIP T V Picture PIP On TV VIDEO TV Swap Size Position PIP Channel TV 4 T V PIP 3 Press the button to select Swap then press the ENTER button The image in the PIP window will appear on the main screen and vice versa Press the EXIT bu...

Страница 55: ...t Size then press the ENTER button Press the or button to select the PIP size then press the ENTER button Press the EXIT button to exit Picture Mode Dynamic Custom Picture Color Tone Cool 1 Select Picture Size DNIe On Adjust Convergence PIP T V Picture PIP On TV VIDEO TV Swap Size Position PIP Channel TV 4 T V PIP Picture Mode Dynamic Custom Picture Color Tone Cool 1 Select Picture Size DNIe On Ad...

Страница 56: ...en press the ENTER button Press the or button to position the PIP screen where you want then press the ENTER button Press the EXIT button to exit PIP On TV VIDEO TV Swap Size Position PIP Channel TV 4 T V PIP Picture Mode Dynamic Custom Picture Color Tone Cool 1 Select Picture Size DNIe On Adjust Convergence PIP T V Picture Picture Mode Dynamic Custom Picture Color Tone Cool 1 Select Picture Size ...

Страница 57: ...to select PIP then press the ENTER button 3 Press the button to select PIP Channel then press the ENTER button Press the or button to change the channel that appears in the PIP window You can also press PIP CH buttons on the remote control Press the EXIT button to exit PIP On TV VIDEO TV Swap Size Position PIP Channel TV 5 T V PIP TV 7 Note The PIP channels are not available when RF is set to ANT ...

Страница 58: ...ime the channel is changed Auto volume lets you automatically adjust the volume of the desired channel by lowering the sound out put when the modulation signal is high or by raising the sound output when the modulation signal is low Sound Mode Custom Custom Sound Auto Volume Off Select Multi track Options Digital Output Dolby Digital BBE On T V Sound Sound Mode Custom Custom Sound Auto Volume Off ...

Страница 59: ...d dynamics to the sound Sound Mode Custom Custom Sound Auto Volume Off Select Multi track Options Digital Output Dolby Digital BBE On T V Sound Sound Mode Custom Custom Sound Auto Volume Off Select Multi track Options Digital Output Dolby Digital BBE Off T V Sound Off On SPECIAL FEATURES Quick way to select BBE Simply press the BBE button on the remote control Sound Mode Custom Custom Sound Auto V...

Страница 60: ...s of the program into foreign languages The availability of these additional multitracks depends upon the program Sound Mode Custom Custom Sound Auto Volume Off Select Multi track Options Digital Output Dolby Digital BBE On Sound Mode Custom Custom Sound Auto Volume Off Select Multi track Options Digital Output Dolby Digital BBE On T V Sound T V Sound Multi track Language English Multi track Sound...

Страница 61: ... 1 Press the MENU button Press the button to select Sound then press the ENTER button 2 Press the button to select Select Multi track Options then press the ENTER button 4 Press the or button to choose the submenu Mono Stereo SAP you want Press the ENTER button Press the EXIT button to exit Sound Mode Custom Custom Sound Auto Volume Off Select Multi track Options Digital Output Dolby Digital BBE O...

Страница 62: ...ption Menu Translucency Level Normal Function Help Off T V Time T V Setup 02 10 2003 03 43 pm Time Setup Mode Manual Manual Time Setup Auto Time Setup Sleep Timer On Timer Inactivated Off Timer Inactivated T V On Timer Set on timer Hour Minute am pm Antenna Channel Volume Activation 01 00 am Cable 02 00 No Return T V On Timer Set on timer Hour Minute am pm Antenna Channel Volume Activation 07 10 a...

Страница 63: ... timer Hour Minute am pm Antenna Channel Volume Activation 07 10 am Cable 04 05 Yes Return 10 Set the Off Timer press the button to select Off Timer then press the ENTER button 02 10 2003 03 43 pm Time Setup Mode Manual Manual Time Setup Auto Time Setup Sleep Timer On Timer 07 10 am Act Off Timer Inactivated T V Set the Clock If no function buttons including remote control buttons or front panel b...

Страница 64: ...ton to select Sleep Timer Press the ENTER button Time Menu Language English Set Rating Controls Caption Menu Translucency Level Normal Function Help Off T V Time T V Setup 02 10 2003 03 43 pm Time Setup Mode Manual Manual Time Setup Auto Time Setup Sleep Timer On Timer Inactivated Off Timer Inactivated 3 Press the or button to adjust to the minute you want Press the ENTER button T V Sleep Timer Pr...

Страница 65: ...password while blocked the master buttons cannot be operated The Rating Control feature doesn t operate with D VHS recordings The factory default password is 0000 SPECIAL FEATURES Time Menu Language English Set Rating Controls Caption Menu Translucency Level Normal Function Help Off T V Setup 2 Press the button to select Set Rating Controls then press the ENTER button Time Menu Language English Se...

Страница 66: ...ton to select TV Parental Guidelines TV Parental Guidelines Movie Ratings T V Set Rating Controls 5 You can independently lock the TV ratings The locked TV FCC ratings are indicated by the symbol Press the buttons and the ENTER button to acti vate the appropriate restrictions for TV FCC rating system T V TV Parental Guidelines ALL FV V S L D TV Y TV Y7 TV G TV PG TV 14 TV MA Return Allow All Block...

Страница 67: ...to select Movie Ratings TV Parental Guidelines Movie Ratings T V Set Rating Controls 5 You can independently lock the Movie ratings The locked Movie ratings are indicated by the sym bol Press the buttons and the ENTER button to activate the appropriate restrictions for Movie rating system T V Movie Ratings Block G PG PG 13 R NC 17 X NR Return Allow All Block All How to Set up Restrictions using th...

Страница 68: ...a very young audience including children from ages two six V Violence S Sexual content L Offensive language D Dialogue sexual innuendo FV Fantasy or cartoon violence G General audience No restriction PG Children under 13 should be accompanied by an adult PG 13 Parental guidance suggested Children under 13 should be accom panied by an adult R Restricted Viewers should be 17 or older NC 17 Not class...

Страница 69: ... ENTER button Quick way to access captions menu Simply press the Caption button on the remote control Digital 1 Press the MENU button Press the button to select Setup then press the ENTER button Time Menu Language English Set Rating Controls Caption Menu Translucency Level Normal Function Help Off T V Setup Time Menu Language English Set Rating Controls Caption Menu Translucency Level Normal Funct...

Страница 70: ...lt is Black Return to Default This option sets each of Service Size Style Foreground Background to its default T V Digital Caption Options Notes The availability of captions depends on the program being broadcast For other channels which don t operate with the Digital Captions feature each press of the CAPTION button will alternate among CC1 CC2 CC3 CC4 and OFF CC1 The Primary Synchronous Caption ...

Страница 71: ... access captions menu Simply press the Caption button on the remote control Notes The Caption feature doesn t work in DVI mode The availability of captions depends on the program being broadcast You can also alternate among CC1 CC2 CC3 or CC4 by pressing the CAPTION button on the remote control Analog 1 Press the MENU button Press the button to select Setup then press the ENTER button Time Menu La...

Страница 72: ... English Set Rating Controls Caption Menu Translucency Level Normal Function Help Off T V Setup Time Menu Language English Set Rating Controls Caption Menu Translucency Level Normal Function Help Off T V Setup SPECIAL FEATURES 3 Press the button to select level then press the ENTER button Press the EXIT button to exit Time Menu Language English Set Rating Controls Caption Menu Translucency Level N...

Страница 73: ...ng Controls Caption Menu Translucency Level Normal Function Help Off T V Setup Time Menu Language English Set Rating Controls Caption Menu Translucency Level Normal Function Help Off T V Setup SPECIAL FEATURES 3 Press the button to select On then press the ENTER button Press the EXIT button to exit Time Menu Language English Set Rating Controls Caption Menu Translucency Level Normal Function Help ...

Страница 74: ...ontrol The set default guide is Mini Guide D Scrolls backwards quickly 2 hours Press the Green button on the remote control E Displays titles and other details about upcoming programs of partic ular channels Highlight the program and press INFO to see additional and detailed information The avail ability of additional details depends on the broadcaster Use the Menu buttons to search information ab...

Страница 75: ...Reminder List Default Guide Mini Guide T V Guide Go to Mini Guide Go to Full Guide Go to Reminder List Default Guide Mini Guide T V Guide 3 Press the button to select Mini Guide or Full Guide then press the ENTER button Press the EXIT button to exit Go to Mini Guide Go to Full Guide Go to Reminder List Default Guide Full Guide T V Guide Mini Guide Full Guide Mini Guide Displays the guide for one c...

Страница 76: ... buttons and press the INFO button on the remote control MINI GUIDE MINI GUIDE ENTER button Press the ENTER button to watch the selected channel Red button Press the Red button to switch to the program guide for all channels Press the Red button again to switch to the program information for the selected channel Blue button Press the Blue button to exit Green button Press the Green button to move ...

Страница 77: ...imes in two hour segments Displays the current date and time on the top right of the screen The current time displayed on the program information is subject to the time information sent from the broadcasting station so it may differ from the actual time Press the GUIDE button on the remote control to view the program information for all channels However this function is available only when the def...

Страница 78: ...ress the MENU button Press the button to select Guide then press the ENTER button Go to Mini Guide Go to Full Guide Go to Reminder List Default Guide Full Guide T V Guide Go to Mini Guide Go to Full Guide Go to Reminder List Default Guide Full Guide T V Guide 3 Press the button to select programs you would like to see then press the ENTER button The symbol will be displayed Each press of the ENTER...

Страница 79: ...ct Guide then press the ENTER button Go to Mini Guide Go to Full Guide Go to Reminder List Default Guide Full Guide T V Guide Go to Mini Guide Go to Full Guide Go to Reminder List Default Guide Full Guide T V Guide To remove all the scheduled programs Press the button to select Cancel All then press the ENTER button All the scheduled programs are removed Press the EXIT button to exit T V Go to Rem...

Страница 80: ...sted on page 82 for your brand of VCR or Cable box or DVD Make sure you enter 3 digits of the code even if the first digit is a 0 If more than one code listed try the first one 5 Press the POWER button on the remote control Your VCR or Cable box or DVD should turn on If your VCR or Cable box or DVD turns on your remote control is now set correctly If your VCR or Cable box DVD does not turn on repe...

Страница 81: ...sted try each cable box code 000 through 077 6 Once your remote control is set up press the MODE button any time you want to use the remote to operate your cable box When your remote control is in the CABLE mode the volume buttons still control your TV s vol ume Also the VCR control buttons PLAY PAUSE etc will still operate your VCR 3 On your Samsung remote control press SET 2 Press the MODE butto...

Страница 82: ...82 SPECIAL FEATURES Cable Box Codes VCR Codes Note The remote control might not be compatible with all DVD Players VCRs and Cable boxes DVD Codes ...

Страница 83: ...ure or sound Try another channel Press the TV Video button Make sure the TV is plugged in Check the antenna connections No color wrong colors or tints Make sure the program is broadcast in color Adjust the picture settings Picture rolls vertically Adjust the antenna Check all wire connections The TV operates erratically Unplug the TV for 30 seconds then try operating it again Your remote control d...

Страница 84: ...is suddenly moved from a cold to a warm place unplug the power cord and allow at least two hours for moisture that may have formed inside the unit to dry completely Using Your TV in Another Country If you plan to take your TV with you to a foreign country please be aware of the different television systems that are in use around the world A TV designed for one system may not work properly with ano...

Страница 85: ...85 MEMO ...

Страница 86: ...86 MEMO ...

Страница 87: ...87 MEMO ...

Отзывы: