background image

English 

45

Oper

ations

Operations

Control panel

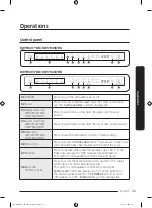
DW5*R407*BB / DW5*R406*BB

01

02

06

04

03

07

08

10

09

DW5*R405*BB / DW5*R404*BB

01

02

06

07

08

10

09

05

01 

POWER

Press to turn the dishwasher on or off.

02 

Cycle

Press to select a desired wash cycle. For more information, 
see the “

Cycle overview

” section on page 

47

.

03 

Upper rack only 

(DW5*R407*BB / 
DW5*R406*BB)

Press to wash items using only the upper rack to save 
energy.

04 

Lower rack only 

(DW5*R407*BB / 
DW5*R406*BB)

Press to wash items using only the lower rack to save energy.

05 

Half load 

(DW5*R405*BB / 
DW5*R404*BB)

Press to wash small number of items to save energy.

06 

Rinse Add

Press to select the 

Rinse Add

 option. You can use it when you 

want an additional rinse process at the end of the cycle.

07 

Sanitize

Press to increase the water temperature up to 69 °C in the 
final rinse process for high temperature sanitization.
This option is not available with Delicate and Quick.

08 

Multi tab 

(Control Lock)

Press to select the Multi tab option to use the 3 in 1 tablet 
which does not need salt and rinse aid.
This option is not available with Express and Quick.

Control Lock

: Child lock allows you to lock the buttons on 

the control panel except for the 

POWER

 button. For more 

information, see the “

Control Lock

” section on page 

51

.

DW4000RM(A5)_IB_DD81-02709B-05_EN.indd   45

2021-04-06     3:51:31

Содержание DW5 R405 BB Series

Страница 1: ...Dishwasher User manual DW5 R407 BB DW5 R406 BB DW5 R405 BB DW5 R404 BB DW4000RM A5 _IB_DD81 02709B 05_EN indd 1 2021 04 06 3 51 21 ...

Страница 2: ...ation requirements 15 Step by step installation 17 Skirting board 28 Before you start 29 Dishwasher at a glance 29 Unsuitable items for the dishwasher 31 Basic use of racks 32 Detergent compartment 37 Rinse aid reservoir 40 Salt storage 41 Touchpad responsiveness 42 Setting mode 43 Operations 45 Control panel 45 Cycle overview 47 Simple steps to start 48 Salt storage 49 Delay Start 51 Control Lock...

Страница 3: ...rt 60 Appendix 62 Transportation relocation 62 Protection against frost 62 Disposing the dishwasher and helping the environment 62 Specifications 63 For standard test 64 DW4000RM A5 _IB_DD81 02709B 05_EN indd 3 2021 04 06 3 51 21 ...

Страница 4: ...n and care when installing maintaining and operating your dishwasher Because the following operating instructions cover various models the characteristics of your dishwasher may differ slightly from those described in this manual and not all warning signs may be applicable If you have any questions or concerns contact your nearest service center or find help and information online at www samsung c...

Страница 5: ... of waste and recycle them responsibly to promote the sustainable reuse of material resources Household users should contact either the retailer where they purchased this product or their local government office for details of where and how they can take these items for environmentally safe recycling Business users should contact their supplier and check the terms and conditions of the purchase co...

Страница 6: ...8 years and above and persons with reduced physical sensory or mental capabilities or lack of experience and knowledge if they have been given supervision or instruction concerning use of the appliance in a safe way and understand the hazards involved Children shall not play with the appliance Cleaning and user maintenance shall not be made by children without supervision 3 Children should be supe...

Страница 7: ...ching device such as a timer or connected to a circuit that is regularly switched on and off by the utility 9 WARNING Knives and other utensils with sharp points must be loaded in the basket with their points down or placed in a horizontal position This appliance is intended to be used in household and similar applications such as staff kitchen areas in shops offices and other working environments...

Страница 8: ...d rinse aid formulated for domestic dishwashers Do not use washing up liquid Do not use any strong acid cleaning agent Do not fill the rinse aid reservoir with powder or liquid detergent This will cause serious damage to the reservoir Inadvertently filling the salt reservoir with powder or liquid dishwasher detergent will damage the water softener Make sure you have picked up the correct packet of...

Страница 9: ...ies or lack of experience and knowledge if they have been given supervision or instruction concerning use of the appliance in a safe way and understand the hazards involved Children shall not play with the appliance Cleaning and user maintenance shall not be made by children without supervision Older children may only use the dishwasher when its operation has been clearly explained to them and the...

Страница 10: ...not connect the dishwasher to the mains supply until it has been fully installed and any adjustment has been made to the door springs Before connecting the appliance check that the connection data on the data plate voltage and connected load match the mains electricity supply If in any doubt consult a qualified electrician The electrical safety of this appliance can only be guaranteed when continu...

Страница 11: ...st remain connected to the electricity supply A damaged appliance can be dangerous If the dishwasher gets damaged switch it off at the mains and call your dealer or the service department Unauthorised repairs could result in unforeseen dangers for the user for which the manufacturer cannot accept liability Repairs should only be undertaken by an approved service technician Faulty components must o...

Страница 12: ...with electrical connections or components and mechanical parts is highly dangerous and can cause operational faults or electric shock While the appliance is under guarantee repairs should only be undertaken by a service technician authorised by the manufacturer Otherwise the guarantee will be invalidated When installing the product make sure there is space at the top left right and back of the pro...

Страница 13: ... of the dishwasher may differ depending on your model and country CAUTION After unpacking the dishwasher keep packaging materials out of children s reach to ensure their safety Installation kit provided Top bracket 2 Ø4 X 14 screw 10 Protective sticker 1 Plastic cap 2 Ø3 5 X 45 screw 4 Ø3 5 X 16 screw 2 Door bracket 2 Sub foot 3 Custom panel fixer wood panel holders 2 Ø3 5 X 25 screw 2 DW4000RM A5...

Страница 14: ... Tools required not provided Safety glasses Gloves Flashlight Wrench 22 mm for the front foot Torx T15 Pliers Nipper Tape measure Pencil Phillips screwdriver Flat head screwdriver Cutting knife Level Hole saw 80 100 mm DW4000RM A5 _IB_DD81 02709B 05_EN indd 14 2021 04 06 3 51 22 ...

Страница 15: ...e power plug of the dishwasher If the power plug does not fit the outlet have a proper outlet installed by a qualified electrician Water supply The water supply line must support water pressures between 0 04 and 1 MPa Water temperatures must be lower than 60 C A stopcock with a 3 4 male thread must be installed on the water tap To reduce a risk of leaks Make sure water taps are easily accessible T...

Страница 16: ...ns Avoid installing on carpet or soft tile Carpeting and soft tile may cause vibrations and may cause your dishwasher to move slightly while operating WARNING Do not install the dishwasher on a poorly supported structure Ambient temperature Do not install the dishwasher in an area exposed to freezing temperatures The dishwasher always retains some water in the water valve pump and hose If the wate...

Страница 17: ...sides The rear wall must be free of obstructions Installation in a new location If you install the dishwasher in a new location follow these instructions before installing the dishwasher 1 Using a hole saw cut a hole into the side of the cabinet that holds the sink A 2 If the base inside the sink cabinet is raised above the kitchen floor and is higher than the connections on the dishwasher make a ...

Страница 18: ... NOTE Check if the distance between the floor and the bottom of the worktop is more than 850 mm If so insert the sub foot included in the installation kit For details see the next section If the distance is less than 850 mm skip to STEP 3 DW4000RM A5 _IB_DD81 02709B 05_EN indd 18 2021 04 06 3 51 23 ...

Страница 19: ...ater may leak 2 Find the sub foot in the installation kit and then insert the sub foot into the hole on the bottom of the dishwasher as shown in the figure STEP 3 Check the water line The water line pressure must be between 0 04 and 1 0 MPa Make sure that the water temperature does not exceed 60 C Hot water over 60 C may cause the dishwasher to malfunction Make sure that the water supply valve is ...

Страница 20: ...hown 3 Pull the power plug the water hose and the drain hose through the sink hole CAUTION Use caution not to kink or step on the power plug or the hoses Do not remove the brown paper on the back of the dishwasher The paper is used to keep the rear side clean against the wall DW4000RM A5 _IB_DD81 02709B 05_EN indd 20 2021 04 06 3 51 23 ...

Страница 21: ...he top end of the custom panel must be aligned with the top end of the installation template Use a custom panel between 2 kg and 5 kg 2 Mark 6 points guided on the installation template A B A B 3 Remove the installation template and then tighten the custom panel fixers A with 2 screws B Ø3 5 X 25 as shown in the figure D C 4 Tighten the door bracket C with 8 screws D Ø4 X 14 as shown in the figure...

Страница 22: ...downward to fix CAUTION Do not let the custom panel extend more than 30 mm from the top of the dishwasher UP DOW N UP DO WN 30 8 Adjust the spring level while the door is approximately opened at 30 degrees The door should hold its position and should not fall open CAUTION Do not adjust the spring level while the door is completely opened If the custom panel weighs more than 5 kg the door may fall ...

Страница 23: ...e caution when opening the door The door might open or close unexpectedly if the spring level is not adjusted appropriately resulting in physical injury 10 Secure the custom panel to the door by fastening the 4 screws 3 5 X 45 DW4000RM A5 _IB_DD81 02709B 05_EN indd 23 2021 04 06 3 51 24 ...

Страница 24: ...level to check if the dishwasher is level 2 To adjust the front height use a 22 mm wrench To lower the height turn the foot counterclockwise To raise the height turn the foot clockwise 3 To adjust the rear height insert the screwdriver in the bottom centre of the dishwasher To lower the height turn the screwdriver clockwise To raise the height turn the screwdriver counterclockwise 4 When levelling...

Страница 25: ...op front holes of the dishwasher as shown 2 Insert the dishwasher fully into place under the countertop Ø 2 8 3 Tighten the 2 screws Ø4 X 12 to fix the brackets NOTE After fixing the dishwasher to the countertop some screws remain You can simply discard these screws or use them to fix the sides of the dishwasher to the cabinet if you want to 4 Connect the water hose but do not open the water tap u...

Страница 26: ...tric shock 1 Remove the plastic caps 2 Tighten the 2 screws Ø3 5 X 16 to the 2 places marked on the illustration 3 Insert the provided plastic caps to the 2 places where screws are fastened 4 Connect the water hose but do not open the water tap until installation is complete DW4000RM A5 _IB_DD81 02709B 05_EN indd 26 2021 04 06 3 51 25 ...

Страница 27: ...P 9 Final check 1 Remove all foam paper packaging and unnecessary parts from inside the dishwasher 2 Turn the circuit breaker on 3 Open the water supply valve to supply water to the dishwasher 4 Plug in and turn the dishwasher on Then select and run the Quick cycle 5 Check if the dishwasher turns on normally and if there are any water leaks while the dishwasher is operating Make sure to check for ...

Страница 28: ...asher and draw a baseline on the skirting board where it interferes with the door 3 Follow the baseline and cut the skirting board using a saw 4 Attach the cut skirting board to the bottom of the dishwasher Make sure the board does not interfere with the door of the dishwasher DW4000RM A5 _IB_DD81 02709B 05_EN indd 28 2021 04 06 3 51 25 ...

Страница 29: ... prevent accidents when washing dishes Dishwasher at a glance DW5 R406 BB DW5 R404 BB NOTE Asterisk s means variant model and can be varied 0 9 or A Z 04 05 07 08 06 01 02 03 01 Upper rack 02 Lower rack 03 Salt storage 04 Dispenser 05 Door 06 Base 07 Inlet hose 08 Drain hose DW4000RM A5 _IB_DD81 02709B 05_EN indd 29 2021 04 06 3 51 26 ...

Страница 30: ... NOTE Asterisk s means variant model and can be varied 0 9 or A Z 05 06 08 09 07 01 02 04 03 01 Cutlery rack 02 Upper rack 03 Salt storage 04 Lower rack 05 Dispenser 06 Door 07 Base 08 Inlet hose 09 Drain hose DW4000RM A5 _IB_DD81 02709B 05_EN indd 30 2021 04 06 3 51 26 ...

Страница 31: ... safe Do not wash aluminium e g grease filters The dishwasher may damage aluminium or in extreme cases cause a severe chemical reaction Do not wash the following items in the dishwasher Copper brass tin ivory and aluminium items or items with adhesive Non heat resistant plastics Craft items antiques valuable vases and decorative glassware Pottery or glazed ceramic items Wooden cutlery and crockery...

Страница 32: ...djust the height of the upper rack before loading dishes into the rack Adjusting the rack after loading the dishes may damage the dishes Make sure to hold both handles when adjusting or the dishwasher door may not close properly DW5 R407 BB DW5 R406 BB To raise the upper rack pull the upper rack upwards The adjustable handle will latch and the upper rack will raise To lower the upper rack hold bot...

Страница 33: ...n page 34 and then put the lower three wheels on each side of the rack to lock on the guide rail To lower the upper rack remove the upper rack as instructed in Upper rack removal section on page 34 and then put the upper four wheels on each side of the rack to lock on the guide rail DW4000RM A5 _IB_DD81 02709B 05_EN indd 33 2021 04 06 3 51 26 ...

Страница 34: ...he upper rack properly to ensure the dishwasher operates normally DW5 R407 BB DW5 R406 BB Pull the upper rack to the front until it is fully extended and then lift it slightly to remove See the following figures DW5 R405 BB DW5 R404 BB Pull the upper rack towards the front and then remove it by lifting it up slightly and pulling it towards the front See the following figures DW4000RM A5 _IB_DD81 0...

Страница 35: ...blocking the rotation of the upper nozzle Pots serving bowls etc must always be placed top down Deep pots should be slanted to allow water to flow out The lower rack features folding tines to easily load more larger pots and pans DW5 R406 BB DW5 R404 BB DW5 R407 BB DW5 R405 BB NOTE Long items serving cutlery salad servers and big knives should be placed on the shelf so that they do not obstruct th...

Страница 36: ... more delicate and lighter dishware such as glasses coffee and tea cups and saucers as well as plates small bowls and shallow pans as long as they are not too dirty Position the dishes and cookware so that they will not get moved by the spray of water Always place glasses cups bowls upside down DW5 R406 BB DW5 R404 BB DW5 R407 BB DW5 R405 BB DW4000RM A5 _IB_DD81 02709B 05_EN indd 36 2021 04 06 3 5...

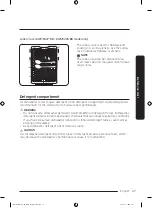
Страница 37: ...ommended for the selected cycle to ensure best performance WARNING Do not consume dishwasher detergent Avoid breathing in detergent fumes Dishwasher detergent contains irritants and caustic chemicals that can induce respiratory conditions If you have consumed dishwasher detergent or inhaled detergent fumes seek medical attention immediately Keep dishwasher detergent out of children s reach CAUTION...

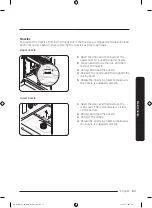
Страница 38: ...dispenser cap by pushing the detergent dispenser catch to the right NOTE The cap remains open at the end of a cycle 2 Add the recommended amount of detergent to the main wash detergent compartment 3 Close the lid by sliding it up DW4000RM A5 _IB_DD81 02709B 05_EN indd 38 2021 04 06 3 51 29 ...

Страница 39: ...ditional detergent will activate during the pre wash process The cover opens automatically to dispense the detergent during the wash Recommended amount of detergent Cycle Amount of detergent Main wash dispenser Onto the door for pre wash AUTO Normal 2 3 oz 20 g 1 3 oz 10 g Intensive Express 1 oz 30 g 1 2 oz 15 g NOTE The numbers inside the dispenser refer to grams DW4000RM A5 _IB_DD81 02709B 05_EN...

Страница 40: ...TION Do not apply any type of detergent to the rinse aid reservoir Do not excessively fill the reservoir Excessive rinse aid may overflow during a cycle Filling the rinse aid 1 Open the rinse aid reservoir cap 2 Fill the rinse aid reservoir with rinse aid NOTE Use the viewing port when filling the rinse aid reservoir CAUTION Do not fill the reservoir above the full level indicator Excess rinse aid...

Страница 41: ...e door 2 Turn the cap counterclockwise to open 3 Fill the salt storage with water only required when using the dishwasher for the first time 4 Apply dishwasher salt CAUTION The maximum capacity is about 1 kg Do not exceed the capacity Exceeding the capacity may affect the dishwasher performance 5 Turn the cap clockwise to close NOTE To clean salt or salt water from dishwasher run the Quick cycle D...

Страница 42: ...responsiveness To prevent the touch enabled controls from losing responsiveness follow these instructions Touch the centre of each button with one finger Do not touch more than one button at a time except as directed Clean the surface of the control panel regularly with a soft damp cloth DW4000RM A5 _IB_DD81 02709B 05_EN indd 42 2021 04 06 3 51 30 ...

Страница 43: ...tton to select the sound setting menu The display shows the current setting Default setting U1 2 Press the AUTO DW5 R407 BB DW5 R406 BB model or Normal DW5 R405 BB DW5 R404 BB models cycle button to change the setting U0 Sound off U1 Sound on 3 Wait 5 seconds to save the setting Auto door open function setting applicable models only You can set the dishwasher to automatically open the door after e...

Страница 44: ...will have effect on the salt consumption in the dishwasher s salt storage 1 Press the Delay Start button to select the water hardness level setting menu The display shows the current setting Default setting H4 2 Press the AUTO DW5 R407 BB DW5 R406 BB model or Normal DW5 R405 BB DW5 R404 BB models cycle button to change the setting You can select from H1 H6 soft hard 3 Wait 5 seconds to save the se...

Страница 45: ...o wash small number of items to save energy 06 Rinse Add Press to select the Rinse Add option You can use it when you want an additional rinse process at the end of the cycle 07 Sanitize Press to increase the water temperature up to 69 C in the final rinse process for high temperature sanitization This option is not available with Delicate and Quick 08 Multi tab Control Lock Press to select the Mu...

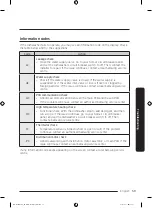
Страница 46: ... current cycle and drain the dishwasher press and hold START for 3 seconds Indicators No Salt indicator Lights up when the salt storage runs out of salt Rinse Refil indicator Lights up if the dishwasher runs out of rinse aid Control Lock indicator Lights up if Control Lock is activated and blinks if any button except for the POWER button is pressed Delay Start indicator Lights up if Delay Start is...

Страница 47: ...d daily cycle 03 ECO This cycle reduces power and water consumption which is appropriate for normally soiled items 04 Intensive Select this cycle for heavily soiled items 05 Delicate Select this cycle for lightly soiled fragile items such as glasses Sanitize option is not available in this cycle 06 Express Normally soiled daily using items with short cycle time Multi tab option is not available in...

Страница 48: ...cycle NOTE If you select Upper rack only DW5 R407 BB DW5 R406 BB make sure the dishes are loaded in the upper rack If you select Lower rack only DW5 R407 BB DW5 R406 BB make sure the dishes are loaded in the lower rack 4 Press START and then close the door The dishwasher starts the cycle after draining for a few seconds NOTE To change the cycle after it has started press and hold START for 3 secon...

Страница 49: ... so that the salt consumption could be set proceed as follows 1 Turn the dishwasher on 2 Press and hold the AUTO DW5 R407 BB DW5 R406 BB model or Normal DW5 R405 BB DW5 R404 BB models cycle button for five seconds within 60 seconds from turning on the dishwasher When you entered the Setting mode the display will show 0 00 3 Press the Delay Start button to select the water hardness level setting me...

Страница 50: ... 20 NOTE 1 dH German degree 0 178 mmol l 1 Clark British degree 0 143 mmol l 1 fH French degree 0 1 mmol l Contact your local water board for information on the hardness of your water supply WATER SOFTENER The hardness of the water varies from place to place If hard water is used in the dishwasher deposits may form on dishes and utensils The appliance is equipped with a special softener that uses ...

Страница 51: ...en close the door NOTE To change the delay time once the dishwasher has started press POWER and restart the dishwasher Control Lock To prevent children from playing with the dishwasher Control Lock locks all button controls except for POWER To activate Control Lock press and hold Multi tab for 3 seconds With Control Lock activated you cannot select a cycle or option or start an operation To deacti...

Страница 52: ...y onto the dishwasher Protect electrical components from water For a stainless steel door panel use a stainless steel cleaner for home appliances and a clean soft cloth Interior Clean the interior of the dishwasher on a regular basis to remove any dirt or food particles Wipe inside the dishwasher and inside the door with a wet dishcloth CAUTION Do not remove the front seal the long rubber seal enc...

Страница 53: ... remove the nut and then remove the nozzle 3 Unclog and clean the nozzle 4 Reinsert the nozzle and then tighten the nut by hand 5 Rotate the nozzle by hand to make sure the nozzle is engaged correctly Lower nozzle 1 Open the door and then pull out the lower rack The lower nozzle is visible on the bottom 2 Unclog and clean the nozzle 3 Reinsert the nozzle 4 Rotate the nozzle by hand to make sure th...

Страница 54: ...er every month 1 Open the door and then remove the lower rack first 2 Turn the filter handle counterclockwise to unlock the Coarse filter 3 Remove the Coarse filter and then the cylindrical micro filter underneath DW4000RM A5 _IB_DD81 02709B 05_EN indd 54 2021 04 06 3 51 32 ...

Страница 55: ...ION Make sure the Coarse filter is closed properly A loose cover can reduce the filtering performance Long term care If you will not use the dishwasher for an extended period of time first drain the unit completely and then disconnect the water hose Shut off the water supply valve and the circuit breaker Water remaining in the hoses or the internal components can damage the dishwasher DW4000RM A5 ...

Страница 56: ...er rack is properly assembled The power cord is not connected Connect the power cord Water is not being supplied Make sure the water supply valve is open The control panel is locked Deactivate the Control Lock The dishwasher has bad odours Water remains from the previous cycle With the dishwasher empty add detergent and then run the Quick cycle This is available only on applicable models Water rem...

Страница 57: ...o they do not interfere with the nozzles and or the detergent dispenser The water is too hard Check the salt refill indicator and refill with dishwasher salt Dishes are not dried well There is no rinse aid in the dispenser or not enough rinse aid was used Add rinse aid Check the rinse aid settings Too many dishes are loaded Overloading may reduce the drying performance Load your dishes as recommen...

Страница 58: ... temperature Indicators do not light up The power cord is not connected Connect the power cord The nozzles do not rotate smoothly The nozzles are clogged with food particles Clean the nozzles A white coating remains on dishes The water is too hard Make sure the salt fill indicator and softener settings are correct according to the water hardness of your area Make sure the salt storage cap is corre...

Страница 59: ...CB communication check Abnormal communication between the main PCB and the sub PCB If the problem continues contact an authorised Samsung service center HC High temperature heating check Functional check With the dishwasher empty add detergent and then run a cycle If the issue continues go to your home s circuit breaker panel and set the dishwasher s circuit breaker switch to off Then contact a Sa...

Страница 60: ...r consumption L 9 5 13 9 9 DW5 R406 BB 9 5 DW5 R407 BB 15 5 Energy consumption kWh 0 85 1 2 0 704 DW5 R406 BB 0 755 DW5 R407 BB 1 33 Cycle time min 150 220 175 Cycle Delicate Express Quick Amount of food remains Light Normal Light Cycle sequence Pre wash Main wash 40 C Rinse Hot rinse 60 C Dry End Pre wash 40 C Main wash 45 C Hot rinse 60 C Dry End Main wash 35 C Rinse 35 C Water consumption L 12 ...

Страница 61: ...ence Pre wash Main wash 40 C Rinse Hot rinse 60 C Dry End Pre wash 50 C Main wash 60 C Hot rinse 60 C Dry End Main wash 35 C Rinse 35 C Water consumption L 13 4 9 1 10 5 Energy consumption kWh 0 78 0 75 0 3 Cycle time min 125 60 20 NOTE The cycle time depends on the options you have added and the pressure and temperature of the supplied water The dishwasher drains the remaining water inside automa...

Страница 62: ...e and the drain hose CAUTION Do not shake or sway the dishwasher while moving it Residual water may drip from the dishwasher Protection against frost If you leave the dishwasher in a place with a risk of frost for an extended time make sure to empty the dishwasher For details see the Transportation relocation section Disposing the dishwasher and helping the environment Your dishwasher is manufactu...

Страница 63: ... Power 220 240 V 50 Hz Water pressure 0 04 1 0 MPa Wash capacity 10 place setting 9 place setting 10 place setting 9 place setting Rated power 1760 2100 W Dimension Width x Depth x Height 450 x 550 x 815 mm Weight Unpacked 38 kg 37 5 kg 33 kg 32 kg DW4000RM A5 _IB_DD81 02709B 05_EN indd 63 2021 04 06 3 51 33 ...

Страница 64: ...sh cycle ECO Additional options None Rinse aid level setting 5 Water hardness level setting H3 Dosage of the standard detergent main wash 18 g For the arrangement of the items refer to the below figures 4 4 5 3 3 8 6 1 2 2 1 Knives 2 Forks 3 Serving spoons 4 Soup spoons 5 Teaspoons 6 Dessert spoons 7 Serving forks 8 Gravy ladles Cutlery rack Upper rack Lower rack DW4000RM A5 _IB_DD81 02709B 05_EN ...

Страница 65: ...ing 5 Water hardness level setting H3 Dosage of the standard detergent main wash 17 g For the arrangement of the items refer below figures Upper rack Lower rack 1 Knives 2 Forks 3 Serving spoons 4 Soup spoons 5 Teaspoons 6 Dessert spoons 7 Serving forks 8 Gravy ladles Cutlery rack 4 4 3 3 4 4 4 4 4 4 4 6 6 6 5 8 5 5 5 6 6 5 6 7 1 2 6 6 6 5 5 5 5 DW4000RM A5 _IB_DD81 02709B 05_EN indd 65 2021 04 06...

Страница 66: ...Memo DW4000RM A5 _IB_DD81 02709B 05_EN indd 66 2021 04 06 3 51 35 ...

Страница 67: ...Memo DW4000RM A5 _IB_DD81 02709B 05_EN indd 67 2021 04 06 3 51 35 ...

Страница 68: ...COMMENTS COUNTRY CALL OR VISIT US ONLINE AT UK 0333 000 0333 www samsung com uk support IRELAND EIRE 0818 717100 www samsung com ie support DD81 02709B 05 DW4000RM A5 _IB_DD81 02709B 05_EN indd 68 2021 04 06 3 51 35 ...

Отзывы: