background image

84 - English

E

diting

2

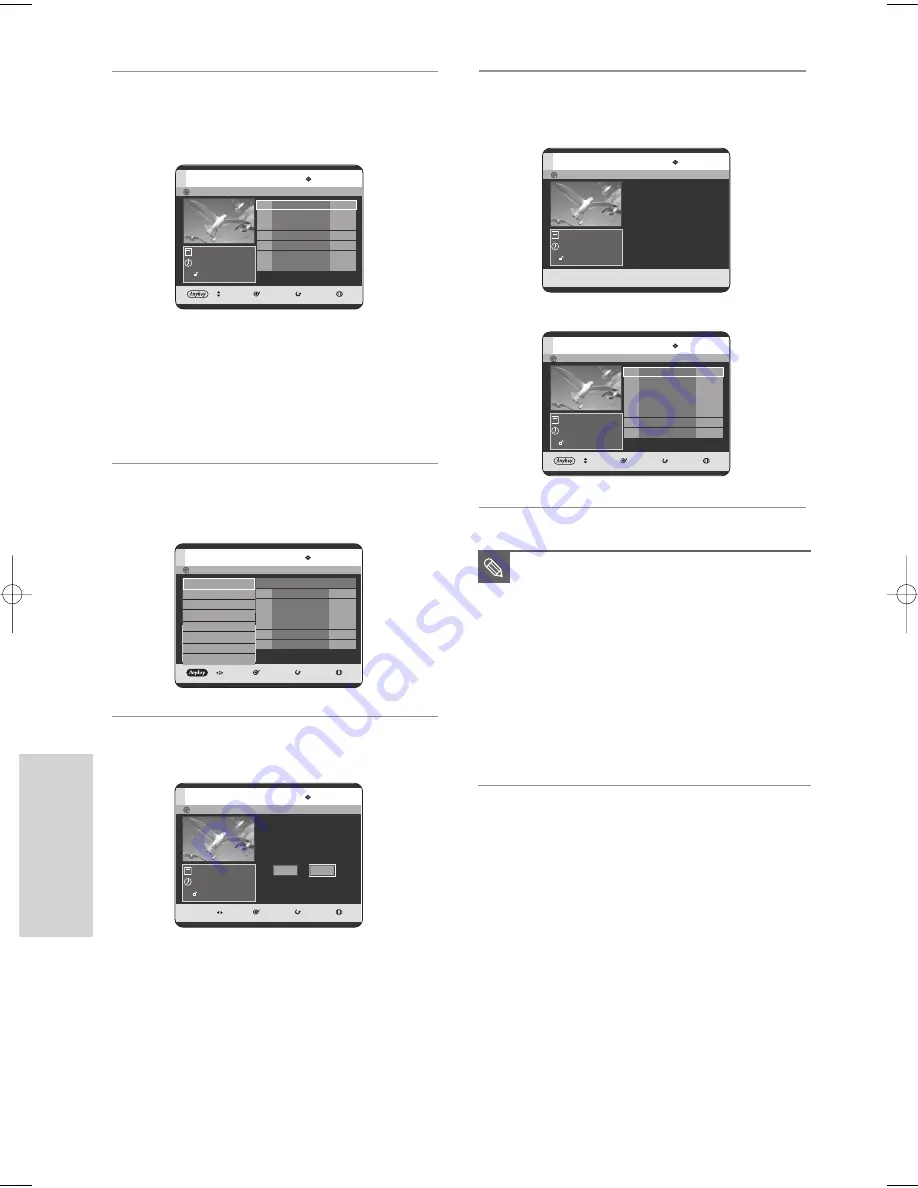
With the unit in Stop mode/Playback mode, press the
TITLE LIST button.
The Title List screen is displayed.

Using the MENU button.

• With the unit in Stop mode/Playback mode, press

the MENU button.

• 

Press the 

…†

buttons to select Title

then press the ENTER or 

button.

3

Press the 

…†

buttons to select a title that you want to

delete in the Title List, then press the ANYKEY button.

4

Press the 

…†

buttons to select Delete, then press the

ENTER or 

button.

• The message may be different depending on the

type of disc that you are using. You will be prompted
with the confirmation message. DVD-RAM(VR
mode), DVD-RW(VR mode):  Since Playlist is
present, the message “Do you want to delete?
(Related playlists may be deleted.)” is displayed.
DVD-RW(Video mode)/-R: Since Playlist is not
present, the message “Do you want to delete?” is
displayed.

5

Press the 

œ √

buttons to select Yes, then press the

ENTER button.

Title List

Deleting...

(Please wait)

JAN/18/2005 12:15 AM CH11

JAN/18/2005 12:15 AM

SP

No.

Title

Length

MOVE

SELECT

RETURN

EXIT

Title List

01

JAN/19/2005 12:15A 00:40:03

02

JAN/20/2005 12:15A 00:20:15

03

JAN/25/2005 12:15A 00:50:16

1/1 Page

JAN/18/2005 12:15 AM CH11

JAN/18/2005 12:15 AM

SP

MOVE

SELECT

RETURN

EXIT

Title List

Do you want to delete?

(Related playlists

may be deleted.)

JAN/18/2005 12:15 AM CH11

JAN/18/2005 12:15 AM

SP

Yes

No

No.

Title

Length

MOVE

SELECT

RETURN

EXIT

Title List

01

JAN/18/2005 12:15A 00:10:21

02

JAN/19/2005 12:15A 00:40:03

03

JAN/20/2005 12:15A 00:20:15

04

JAN/25/2005 12:15A 00:50:16

1/1 Page

JAN/18/2005 12:15 AM CH11

JAN/18/2005 12:15 AM

SP

No.

Title

Length

MOVE

SELECT

RETURN

EXIT

Title List

01

JAN/18/2005 12:15A 00:10:21

02

JAN/19/2005 12:15A 00:40:03

03

JAN/20/2005 12:15A 00:20:15

04

JAN/25/2005 12:15A 00:50:16

1/1 Page

JAN/18/2005 12:15 AM CH11

JAN/18/2005 12:15 AM

SP

Rename

Protection

Delete

Partial Delete

Playlist

Navigation

Select Tray

Disc Manager

DVD-RAM(VR)

DVD-RAM(VR)

DVD-RAM(VR)

DVD-RAM(VR)

DVD-RAM(VR)

■ 

You cannot delete a protected entry. If you
want to delete a protected entry, select
“Off” in the Title Protection menu. (See
page 83)

■ 

When the Cartridge Protection or Disc
Protection has been set to Protected, you
cannot delete titles. (See page 6 and 105)

■ 

Once an entry is deleted from the Title List
it cannot be recovered.

■ 

Once DVD-RW/-R is finalized, it cannot be
deleted.

NOTE

00627D-DVD-TR520_XAA_81-86  2005.7.26  9:38 AM  Page 84

Содержание DVD-TR520

Страница 1: ...Instruction Manual DVD TR520 www samsung com AK68 00627D 01 ...

Страница 2: ...imits for a Class B digital device pursuant to Part 15 of the FCC Rules These limits are designed to provide reasonable protection against harmful interference in a residential installation This equipment generates uses and can radiate radio frequency energy and if not installed and used in accordance with the instructions may cause harmful interference to radio communications However there is no ...

Страница 3: ...service personnel Servicing is required when the apparatus has been damaged in any way such as power supply cord or plug is damaged liquid has been spilled or objects have fallen into the apparatus the apparatus has been exposed to rain or moisture does not operate normally or has been dropped Precaution Handling Cautions Before connecting other components to this TWIN TRAY DVD RECORDER be sure to...

Страница 4: ... a delay in the early playback time all recorded files may not play Some CD R RW discs may not be playable with this unit depending on the device which was used to burn them For contents recorded on CD R RW media from CDs for your personal use playability may vary depending on contents and discs Holding discs Avoid touching the surface of a disc where recording is performed Cartridge This is used ...

Страница 5: ...e unfinalized DVD RW Video mode discs can not play back in the P Tray DVD RAM discs come with or without a cartridge For this product we recommend DVD RAM discs that come with cartridges DVD R Disc Playback and Recording Cartridges can only be used in the R tray of this product Some cartridges are able to eject the disc inside Even if you are able to eject the disc always use the disc with the car...

Страница 6: ...ed below Cartridge Protection allows you to protect discs from disc formatting and program deletion due to unintended operations The cartridge write protect tab should be set to the unprotect position to be able to record copy edit or erase a DVD RAM disc Program Protection See page 83 Locking Protecting a Title Disc Protection See page 104 Disc Protection DVD RAM RW R discs that are incompatible ...

Страница 7: ...necting the Audio cable 22 Method 1 Connecting to your TV 22 Method 2 Connecting to a stereo amplifier with analog input jacks 22 Method 3 Connecting to an AV amplifier with a digital input jack 23 Step 4 Connecting External devices 23 Method 1 Connecting a VCR Set Top Box STB or TWIN TRAY DVD player to the AV 1 IN jacks 23 Method 2 Connecting a Camcorder to the AV 2 IN jacks 24 Method 3 Connectin...

Страница 8: ...Locking Protecting a Title 83 Deleting a Title 83 Deleting a Section of a Title Partial Delete 85 Advanced Editing Playlist 87 Creating a Playlist 87 Playing Entries in the Playlist 88 Renaming a Playlist Entry 89 Editing a Scene for the Playlist 90 Deleting a Playlist Entry from the Playlist 94 Title Copy 95 About the Copy Screen 95 Contents Title Copy Specifications 95 Copying a Title that has b...

Страница 9: ...th EP 6Hr or 8Hr mode yields the most recording time LP SP modes provide less recording time with higher quality recording XP mode gives you the highest quality recording Automated Quality Adjustment for Timer Recording If FR mode is selected the video quality is adjusted automatically so that all video for the scheduled time can be recorded onto the free disc space See page 79 Creating a DVD vide...

Страница 10: ... been finalized Before Reading the User s Manual About the use of this user s manual 1 Be sure to be familiar with Safety Instructions before using this product See pages 2 6 2 If a problem occurs check the Troubleshooting See pages 109 112 Make sure to check the following terms before reading the user manual Icons that will be used in manual Icon Term Definition This involves a function available...

Страница 11: ...ate a new playlist on the same disc and edit it without the change of the original recording You can only use either the VR or Video mode on a DVD RW but not both at the same time You can change the DVD RW format to another format by reinitializing It should be noted that the disc s data will be lost when changing formats NOTE The Edit functions of the Title List and Playlist are available only in...

Страница 12: ...he batteries are drained Check if remote sensor is blocked by obstacles Check if there is any fluorescent lighting nearby Dispose of batteries according to local environmental regulations Do not put them in the household trash Video Audio Cable AC39 00073A RF Cable for TV AC39 42001J Batteries for Remote Control AAA Size AC43 12002H Remote Control AK59 00023P Instruction Manual AK68 00627D Quick G...

Страница 13: ...television brand try each one in turn until you find one that works If you replace the remote control s batteries you must set the brand code again NOTE BRAND BUTTON SELECO 74 SHARP 36 37 38 39 48 SIEMENS 71 SINGER 57 SINUDYNE 57 SONY 35 48 TELEAVA 73 TELEFUNKEN 67 73 75 76 THOMSON 72 73 75 THOMSON ASIA 80 81 TOSHIBA 47 48 49 50 51 52 WEGA 57 YOKO 06 ZENITH 63 BRAND BUTTON AIWA 82 ANAM 10 11 12 13...

Страница 14: ...TTON Select input signal in external input mode Tuner AV1 AV2 or DV 11 P SCAN BUTTON Selects the progressive scan mode 12 REC REC MODE PAUSE CH BUTTONS Select to start recording to set the Recording time and picture quality or to pause a recording Select preset TV channels Same as CH button on the remote control 13 PLAY PAUSE SEARCH SKIP BUTTONS Plays a disc pauses playback or recording goes to th...

Страница 15: ...onnects the output of external equipment using an S Video cable 6 S VIDEO OUT better video quality Connects the input of external equipment using an S Video cable 7 AV 1 VIDEO IN Connects to the video output of external equipment using a video cable 8 AV 1 AUDIO IN Connects to the audio output of external equipment using audio cables 9 ANT IN ANT OUT TO TV Connects antenna cables Fan The fan alway...

Страница 16: ...menu or to view the recorded Playlist 29 ANYKEY Button View and select the applicable features under current status 30 CANCEL Button 31 SUBTITLE Button Press this to switch the DVD s subtitle language 32 TIMER Button Press to directly enter the Timer Recording Mode menu 33 MARKER Button Use this to bookmark or mark a position while playing a disc 34 REPEAT A B Button Allows you to repeat a title c...

Страница 17: ...External devices Step 5 Connecting the Power cord Quick Overview 17 Step 1 Connecting the Antenna Cable 18 Step 2 Connecting the Video cable 20 Step 3 Connecting the Audio cable 22 Step 4 Connecting External devices 23 Step 5 Connecting the Power Cord 24 Note to CATV system installer This reminder is provided to call CATV system installer s attention to Article 820 40 of the National Electrical Co...

Страница 18: ... You must connect Audio Video cables to view Video from the unit i e DVD playback NOTE Step 1 Connecting the Antenna Cable There are several ways to connect your TWIN TRAY DVD RECORDER Select the antenna that best suits you below Method 1 Antenna TWIN TRAY DVD RECORDER TV No Cable box Method 2 Antenna Cable box TWIN TRAY DVD RECORDER TV Cable box with many scrambled channels Method 3 Antenna TWIN ...

Страница 19: ...ile watching another channel Be sure that the cable box is turned on To ANT IN Cable box Wall To ANT INPUT To ANT OUT RF Cable TV Method 3 Antenna TWIN TRAY DVD RECORDER Cable box TV Cable box with a few scrambled channels You can record non scrambled channels by selecting the channel on the cable box You cannot record scrambled channels that require a cable box To ANT IN Wall To ANT INPUT To ANT ...

Страница 20: ...mode This is only available with TVs that support progressive scan Progressive Scan Output 480p Consumers should note that not all high definition television sets are fully compatible with this product and may cause artifacts to be displayed in the picture If you experience 480p progressive scan picture problems it is recommended that the user switch the connection to the standard definition outpu...

Страница 21: ... or AV amplifier See pages 22 23 Method 3 Connecting to Component video input jacks Y PB PR 1 Connect Component video cables not supplied between the COMPONENT OUT Y PB PR jacks on TWIN TRAY DVD RECORDER and COMPONENT IN Y PB PR jacks on your TV 2 Connect audio cables white and red between the AUDIO OUT jacks on the TWIN TRAY DVD RECORDER and AUDIO IN jacks on TV or AV amplifier See pages 22 23 3 ...

Страница 22: ...r with a digital input jack Method 1 Connecting to your TV This connection will use your TV s speakers Method 2 Connecting to a stereo amplifier with analog input jacks If your stereo amplifier only has AUDIO INPUT jacks L and R use the AUDIO OUT jacks Manufactured under license from Dolby Laboratories Dolby and the double D symbol are trademarks of Dolby Laboratories DTS and DTS Digital Out are t...

Страница 23: ...d 1 Connecting a VCR Set Top Box STB or DVD player to the AV 1 IN jacks Method 2 Connecting a Camcorder to the AV 2 IN jacks Method 3 Connecting a Camcorder to the DV IN jack Method 1 Connecting a VCR Set Top Box STB or DVD player to the AV 1 IN jacks Connecting a VCR or external device to AUDIO VIDEO AV 1 IN jacks of the TWIN TRAY DVD RECORDER You can record from connected equipment VCR STB or DV...

Страница 24: ...input source such as a camcorder is inserted into AV 2 IN while viewing TV the input will be switched to AV 2 IN automatically If the input is not selected automatically press the INPUT button to select proper input Method 3 Connecting a Camcorder to the DV IN jack If your camcorder has a DV output jack connect it to the DV input jack of your TWIN TRAY DVD RECORDER Step 5 Connecting the Power Cord...

Страница 25: ...ttings 4 RETURN Button Press this button on the remote control to return to the Previous menu screen displayed or to exit the on screen menu On Screen Menu Navigation 25 OSD Language Setup 26 Auto Clock Set 26 Manual Clock Set 28 Auto Channel Memory 29 Manual Channel Set 30 Auto Power Off Setting 31 CM Skip Time Setting 31 EP Mode Time Setting 32 Setting up the Front Display Options 33 Automatic C...

Страница 26: ...l Auto Clock Set This menu is used to set the current time You need to set the time to use timer recording 1 With the unit in Stop mode No Disc mode press the MENU button 2 Press the buttons to select Setup then press the ENTER or button 3 Press the buttons to select System then press the ENTER or button System menu will be displayed MOVE SELECT RETURN EXIT Title Music Photo Timer Record Setup Tit...

Страница 27: ... settings without turning off the Auto Clock Set function NOTE Clock Data CH Select a channel that carries a time signal using the buttons then press the ENTER button Select Auto to set the clock data channel automatically Time Zone Select the time zone of your area using the buttons then press the ENTER or button Select Automatic to set the time zone automatically Daylight Saving Select Automatic...

Страница 28: ... button When the current time is stored in memory and then the set is powered off the current time will appear in the front panel display Sets the value You can set the value using the number buttons œ Moves to items MOVE SELECT RETURN EXIT Title Music Photo Timer Record Setup Clock Set Auto Clock Set Manual Clock Set MOVE SELECT RETURN EXIT Title Music Photo Timer Record Setup Setup System Langua...

Страница 29: ...em then press the ENTER or button System menu will be displayed Auto Channel Memory MOVE SELECT RETURN EXIT Title Music Photo Timer Record Setup Setup System Language Audio Video Parental Control MOVE SELECT RETURN EXIT Title Music Photo Timer Record Setup System Clock Set Channel Set Auto Power Off Off CM Skip Time 15 Sec EP Mode Time 6 Hour Front Display Auto Dim Chapter Creator Off MOVE SELECT ...

Страница 30: ...Auto Channel Memory Use the Manual Channel Setting to delete unnecessary channels after using the Auto Channel Memory 1 With the unit in Stop mode No Disc mode press the MENU button 2 Press the buttons to select Setup then press the ENTER or button 3 Press the buttons to select System then press the ENTER or button System menu will be displayed 4 Press the buttons to select Channel Set then press ...

Страница 31: ...e buttons to select Setup then press the ENTER or button This feature automatically turns off your TWIN TRAY DVD RECORDER if you do not press any button for the selected time Auto Power Off Setting MOVE SELECT RETURN EXIT Title Music Photo Timer Record Setup Setup System Language Audio Video Parental Control MOVE SELECT RETURN EXIT Title Music Photo Timer Record Setup System Clock Set Channel Set ...

Страница 32: ...up then press the ENTER or button CM Skip can be performed only during normal playback When the time set is more than the remaining time of a current title The next title is played from the beginning When the time set is more than a remaining time of a play list the next scene is played CM Skip does not work in a still picture mode When a set time is less than the remaining time of a scene the las...

Страница 33: ...OVE SELECT RETURN EXIT Title Music Photo Timer Record Setup System Clock Set Channel Set Auto Power Off Off CM Skip Time 15 Sec EP Mode Time 6 Hour Front Display Auto Dim Chapter Creator Off MOVE SELECT RETURN EXIT Title Music Photo Timer Record Setup System Clock Set Channel Set Auto Power Off Off CM Skip Time 15 Sec EP Mode Time 6 Hour Front Display Auto Dim Chapter Creator Off 6 Hour 8 Hour No ...

Страница 34: ... 15 Sec EP Mode Time 6 Hour Front Display Auto Dim Chapter Creator Off Off On DVD RW V DVD RW V 4 Press the buttons to select Front Display then press the ENTER or button 5 Press the buttons to select the desired item then press the ENTER or button Bright Makes the Front Panel Display bright Dim Makes the Front Panel Display dim Auto Dim Makes the Front Panel Display dim automatically when the set...

Страница 35: ... you turn the power off The Automatic chapter creator function may not operate depending on the status of recording Caution Setting up the Language Options If you set the On Screen menu disc menu audio and subtitle language in advance they will come up automatically every time you watch a movie If the selected language is not recorded on the disc the original pre recorded language is selected 1 Wi...

Страница 36: ... disc subtitles Disc Menu For the disc menu contained on the disc On Screen Menu For the on screen menu of your TWIN TRAY DVD RECORDER 5 Press the buttons to select the desired language then press the ENTER or button MOVE SELECT RETURN EXIT Title Music Photo Timer Record Setup Language Audio Original Subtitle Automatic Disc Menu English On Screen menu English Original English Français Deutsch Espa...

Страница 37: ... Digital Output setting Be sure to select the correct Digital Output or you will hear no sound or a loud noise NOTE When DTS soundtrack is played sound is not output from the AV Audio Output It only outputs from the Digital Audio Out NOTE Setting up the Video display Options 1 With the unit in Stop mode No Disc mode press the MENU button 2 Press the buttons to select Setup then press the ENTER or ...

Страница 38: ...l 16 9 ratio screen the DVD supplies even though you have a TV with a 4 3 ratio screen Black bars will appear at the top and bottom of the screen 2 4 3 Pan Scan Select this for conventional size TV when you want to see the central portion of the 16 9 screen Extreme left and right side of movie picture will be cut off 3 16 9 Wide You can view the full 16 9 picture on your widescreen TV Input Level ...

Страница 39: ...ressive input To deactivate press STOP key OK Canceling the Progressive scan 1 With the unit in Stop mode No Disc mode press the P SCAN button on the front of the TWIN TRAY DVD RECORDER The message Press Yes to confirm Interlace scan mode Otherwise press No will appear Press the œ buttons to select Yes and then press the ENTER button 2 The message Please set your TV to Interlace input To deactivat...

Страница 40: ...ip button on the front panel for 5 seconds or more Press the RETURN or œ button to return to the previous menu Press the MENU button to exit the menu NOTE MOVE SELECT RETURN EXIT Title Music Photo Timer Record Setup Setup System Language Audio Video Parental Control 0 9 NUMBER SELECT RETURN EXIT Title Music Photo Timer Record Setup Parental Control Create the password MOVE SELECT RETURN EXIT Title...

Страница 41: ...that contain Level 7 8 will not play A larger number indicates that the program is intended for adult use only See page 40 if you forgot your password NOTE MOVE SELECT RETURN EXIT Title Music Photo Timer Record Setup Parental Control Password On Rating Level Level 1 Kids Change Password MOVE SELECT RETURN EXIT Title Music Photo Timer Record Setup Parental Control Password On Rating Level Level 8 A...

Страница 42: ...nada Korea Japan etc Before Playing 42 Playing a Disc 43 Using the Disc Menu Title Menu 44 Using the Search Skip Functions 45 Slow Motion Play Step Motion Play 46 About ANYKEY 46 Playing the Title List 48 Navigation Menu 49 Using the Markers 52 Using the Bookmarks 54 Selecting the Subtitle Language 56 Selecting the Soundtracks Audio Channels 57 Changing the Camera Angle 58 Repeat Play 58 Zooming I...

Страница 43: ...ten in detail on the box Do not allow the disc to become dirty or scratched finger prints dirt dust scratches or deposits of cigarette smoke on the recording surface may make it impossible to use the disc for recording To protect a DVD RAM disc from damage use a cartridge DVD RAM RW R discs may not be able to play on some DVD players depending on the player disc and the condition of the recording ...

Страница 44: ...al power on When the TWIN TRAY DVD RECORDER is powered on and a disc is in the tray the unit will be activated and wait in stop status Press the PLAY button to start playback If you insert an MP3 Disc your TWIN TRAY DVD RECORDER will display the file list on the screen and start playing If you insert a JPEG Disc folders and files are displayed in the thumbnail picture If you want the unit to play ...

Страница 45: ...will not operate if a selected title does not have Chapters Tracks or Markers NOTE Using the Search Skip Functions Searching through a Chapter or Track 1 During play press the SEARCH buttons on the remote control You can scan the program in reverse To return to normal speed playback press the PLAY button When you press and hold the SEARCH buttons playback is done at the default speed of X4 If you ...

Страница 46: ...ideo 1 10 1 40 00 01 45 Title Chapter Time MOVE CHANGE Slow Motion Play Step Motion Play Slow Motion Play In pause or step mode press the SEARCH buttons on the remote control If you press the SEARCH button Slow 1 8 Slow 1 4 Slow 1 2 If you press the SEARCH button Slow 1 8 Slow 1 4 Slow 1 2 To return to normal speed playback press the PLAY button Press and hold the SEARCH buttons during pause the d...

Страница 47: ...TER or button 3 Press the buttons to select Time 4 Enter the time in the sequence of hours minutes and seconds using the number buttons then press the ENTER button DVD Video 1 10 1 40 00 01 45 Title Chapter Time MOVE CHANGE This may not work for some discs When an audio CD CD DA or an MP3 disc is inserted according to a disc type the information display may not be appear The Time Search function d...

Страница 48: ... playback information screen appears Displays information of Playback Name Title Created Time Length Playing Time Audio and if the disc protection is activated 3 To stop title play press the STOP button To return the title list screen press the TITLE LIST button MOVE SELECT RETURN EXIT Title Music Photo Timer Record Setup Title Press ENTER or Right button for Title List MOVE SELECT RETURN EXIT Tit...

Страница 49: ...12 15A 00 10 21 02 JAN 19 2005 12 15A 00 40 03 03 JAN 20 2005 12 15A 00 20 15 04 JAN 25 2005 12 15A 00 50 16 1 1 page JAN 18 2005 12 15 AM CH11 JAN 18 2005 12 15 AM SP Rename Protection Delete Partlal Delete Playlist Navigation Select Tray Disc Manager MOVE SELECT RETURN EXIT Title List 001 JAN 18 2005 12 15A 00 10 21 002 JAN 19 2005 12 15A 00 40 03 003 JAN 20 2005 12 15A 00 20 15 004 JAN 25 2005 ...

Страница 50: ...r button 4 Press the œ œ buttons to select desired scene then press the ENTER or PLAY button Search Navigation Marker Subtitle Audio Repeat Zoom Select Tray Disc Manager Search Navigation Marker Subtitle Audio Repeat Zoom Select Tray Disc Manager Scene Navigation Time Navigation MOVE SELECT RETURN EXIT Scene Navigation Title List No 1 01 00 00 16 01 00 05 16 1 1 Page Scene Navigation will not oper...

Страница 51: ...ne Navigation Time Navigation Cursor does not move if selected recorded title is shorter than 1 minute The Navigation function may not work with discs recorded on another manufacturer s unit An edited title may not display exact search time NOTE HDD No Title Length MOVE SELECT RETURN EXIT Title List 01 JAN 18 2005 12 15A 00 10 21 02 JAN 19 2005 12 15A 00 40 03 03 JAN 20 2005 12 15A 00 20 15 04 JAN...

Страница 52: ...e number 01 is displayed and the scene is memorized 3 Press the œ buttons to move to the next position 4 Press the ENTER button again when the desired scene appears The number 02 is displayed and the scene is memorized DVD RAM or DVD RW VR Mode discs have the Marker function instead of the Bookmark function The Marker function allows you to mark up to 99 scenes Since the scenes may be displayed as...

Страница 53: ... to the next marker MOVE PLAY CANCEL RETURN Marker 01 02 N 2 MOVE PLAY CANCEL RETURN Marker 01 02 N 2 Search Navigation Marker Subtitle Audio Repeat Zoom Select Tray Disc Manager Clearing a marker Using the MARKER button 1 Press the MARKER button during playback Using the ANYKEY button Press the ANYKEY button during playback Press the buttons to select Marker then press the ENTER or button 2 Press...

Страница 54: ...one and the 8th marker becomes the 7th V mode MOVE SELECT RETURN Bookmark 2 Press the ENTER button when the desired scene appears The number 1 is displayed and the scene is memorized 3 Press the œ buttons to move to the next position 4 Press the ENTER button again when the desired scene appears The number 2 is displayed and the scene is memorized Repeat above to bookmark other positions You can bo...

Страница 55: ...cene Search Bookmark Audio Subtitle Angle Repeat Zoom Select Tray MOVE PLAY CANCEL RETURN Bookmark 1 2 Clearing a bookmark Using the MARKER button 1 Press the MARKER button during playback Using the ANYKEY button Press the ANYKEY button during playback Press the buttons to select Bookmark then press the ENTER or button 2 Press the œ buttons to select a bookmarked scene 3 Press the CANCEL button to...

Страница 56: ... the Subtitle Language Using the ANYKEY button 1 Press the ANYKEY button during playback 2 Press the buttons to select Subtitle then press the ENTER or button 3 Press the buttons to select the desired subtitle language then press the ENTER or button The subtitle display may be different depending on the disc type Some discs allow you to select the language for the disc menu only If the subtitles o...

Страница 57: ...olby Digital 2 0 L R Audio Using the ANYKEY button 1 Press the ANYKEY button during playback 2 Press the buttons to select Audio then press the ENTER or button 3 Press the buttons to select the desired soundtracks or audio channel then press the ENTER or button Soundtracks or Audio channel may be different because they are disc specific Some discs allow you to select the audio language for the dis...

Страница 58: ...gle 2 Angle 3 Angle 4 Angle 5 Angle 6 Search Bookmark Audio Subtitle Angle Repeat Zoom Select Tray Search Bookmark Audio Subtitle Angle Repeat Zoom Select Tray This function is disc dependent and may not work on all DVDs This function does not work when a DVD has not been recorded with a multi camera angle system NOTE Playing Repeatedly Repeat Playback Using the REPEAT button 1 Press the REPEAT bu...

Страница 59: ...eat Zoom Select Tray DVD RAM RW VR mode unfinalized DVD R and unfinalized DVD RW V mode do not repeat a chapter NOTE Repeat A B Using the REPEAT A B button 1 Press the REPEAT A B button during playback 2 Press the ENTER button at the point where you want the repeat play to start A and press it again at the point where you want the repeat play to stop B Repeat playback of the A B section starts Off...

Страница 60: ...ss the ENTER button The screen will be enlarged to twice the normal size The screen size will be enlarged to four times the normal size Zooming In If you set point B before five seconds of playback time has elapsed the prohibition mark will appear You can also return to Normal Playback by pressing the CANCEL button Audio CDs CD DA and MP3 discs do not support the Repeat A B function NOTE DVD VIDEO...

Страница 61: ... then press the ENTER button Audio CD CD DA Screen Elements 1 Current track song Displays the number of the track currently being played 2 Displays the current play index total track number 3 Display available buttons 4 This shows the operating state of a disc and a playback time corresponding to a portion that is currently played 5 Displays the track list song list Search Bookmark Audio Subtitle ...

Страница 62: ...ically 2 Press the buttons to select the track you want to hear and then press the ENTER button MP3 Screen Elements 1 Current track song Displays the name of the track being played 2 Displays the current folder play index and current track size 3 Displays available buttons 4 This shows the operating state of a disc and a playback time corresponding to a portion that is currently played 5 Displays ...

Страница 63: ...aylist New Playlist or Select Tray Repeat CD CD DA MP3 Using the REPEAT button 1 Press the REPEAT button during playback 2 Press the REPEAT button repeatedly to select the repeat mode you want Repeat Track CD CD DA MP3 Repeat Folder MP3 Repeat All CD CD DA MP3 Random CD CD DA MP3 The random option plays a disc s track in random order Normal CD CD DA MP3 Track on a disc are played in the order in w...

Страница 64: ... button 3 Press the buttons to select desired play mode then press the ENTER or button Normal CD CD DA MP3 Track on a disc are played in the order in which they were recorded on the disc Repeat Track CD CD DA MP3 Repeat Folder MP3 Repeat All CD CD DA MP3 Random CD CD DA MP3 The random option plays a disc s track in random order MOVE SELECT RETURN EXIT Music List TRACK 1 TRACK 2 TRACK 3 TRACK 4 TRA...

Страница 65: ...RACK 2 TRACK 3 TRACK 4 TRACK 5 TRACK 6 TRACK 7 1 3 Page CDDA CDDA CDDA CDDA CDDA CDDA CD 01 TRACK 1 02 TRACK 3 03 TRACK 7 1 1 Page CDDA Delete Go To Playlist MOVE SELECT RETURN EXIT Playlist Playlist 1 Playlist 2 1 1 Page PLAYLIST 04 57 CD 00 00 PLAYLIST MOVE SELECT RETURN EXIT Playlist Playlist 1 Playlist 2 1 1 Page PLAYLIST 04 57 CD 00 00 PLAYLIST MOVE Delete EXIT Make Playlist TRACK 1 TRACK 2 T...

Страница 66: ...PLAYLIST Delete Playlist Go To Edit Playlist Go To Music List New Playlist MOVE SELECT RETURN EXIT Playlist Playlist 1 Playlist 2 1 1 Page CD 00 00 PLAYLIST Yes Do you want to delete No MOVE SELECT RETURN EXIT Playlist Playlist 1 Playlist 2 1 1 Page PLAYLIST 01 02 00 00 CD TRACK 2 00 00 PLAYLIST Delete Playlist Go To Edit Playlist Go To Music List New Playlist MOVE SELECT RETURN EXIT Playlist Play...

Страница 67: ...CDDA CDDA CDDA CDDA CDDA CDDA CDDA CD 01 TRACK 1 02 TRACK 3 03 TRACK 7 04 TRACK 4 1 1 Page Go To Music List 1 Press the ANYKEY button during the Playlist playback 2 Press the buttons to select Go To Music List then press the ENTER or button MOVE SELECT RETURN EXIT Playlist 1 1 Page PLAYLIST 01 04 04 30 CD TRACK 1 02 10 Playlist 1 TRACK 1 TRACK 2 TRACK 3 TRACK 4 CDDA CDDA CDDA Go To Music List New ...

Страница 68: ... Bryan Adams mp3 02 10 Play Mode Go To Playlist New Playlist Selet Tray Playing a Picture 1 Insert a JPEG disc or Mixed disc JPEG MP3 into the disc tray 2 Press the buttons to select Photo then press the ENTER or button 3 Press the œ buttons to select a picture To see the next 8 pictures press the SKIP button To see the previous 8 pictures press the SKIP button CD MOVE SELECT RETURN EXIT Title Mus...

Страница 69: ...Page Slow Normal Fast Slide Show Select Tray To stop the Slide Show 1 Press the ANYKEY button 2 Press the buttons to select Slideshow Off then press the ENTER or button Rotate Slideshow Off Go To Photo List Rotate To set up follow steps 1 3 in page 68 4 Press the ENTER button to select you want to see the picture then press the ANYKEY button 5 Press the buttons to select Rotate then press the ENTE...

Страница 70: ... 1 Press the ANYKEY button 2 Press the buttons to select Zoom Off then press the ENTER or button Slideshow Rotate Zoom Go To Photo List Zoom Off Go To Photo List Go To Photo List To set up follow steps 1 3 in page 68 4 Press the ENTER button to select you want to see the picture then press the ANYKEY button 5 Press the buttons to select Go To Photo List then press the ENTER or button Slideshow Rot...

Страница 71: ...d Not recordable Recordable Not recordable Recordable Not recordable Not recordable Not recordable Recordable Not recordable Not recordable Not recordable Recordable finalized not finalized Recordable Recordable DVD RW DVD R DVD RAM DVD RW DVD R Before Recording 71 Recording the current TV program you are watching 73 Recording from external equipment you are watching 74 Copying from a Camcorder 75...

Страница 72: ...ed Playlist Unformatted Disc Do you want to format this disc Yes No Uninitialized Disc Do you want to initialize this disc Yes No Recording Mode Select one of four recording modes by pressing the REC MODE button repeatedly while the unit is in Stop mode for the desired recording time and picture quality In general picture quality improves as the recording time decreases In FR mode the most suitabl...

Страница 73: ...front panel or R button on the remote control Press the OPEN CLOSE button and place a recordable disc on the disc tray Press the OPEN CLOSE button to close the disc tray Wait until LOAD disappears from the front panel display If an unused DVD RAM disc is used you will be prompted to format first Make your selection using the œ buttons then press ENTER button See page 72 If an unused DVD RW disc is...

Страница 74: ...ng will stop automatically if a copy protected image is selected DVD RAM RW discs must be formatted before starting to record Most new discs are sold unformatted Do not use DVD R authoring discs with this TWIN TRAY DVD RECORDER NOTE Record Mode SP 031 39 Recording CH 11 Mono Recording from external equipment you are watching Check that the disc has enough available space for the recording Adjust t...

Страница 75: ...394 DV interface Record Mode SP 031 39 3 Press the REC MODE button repeatedly or press the REC MODE button then press the buttons to select the recording speed quality SP LP EP XP 4 Press the REC button Information concerning the external input mode is displayed on the screen then recording begins Icon is displayed on the front panel To pause recording Press the REC PAUSE button to pause a recordi...

Страница 76: ...iscs the message Updating the information of disc Please wait for a moment is displayed DV The DV device is connected RETURN SELECT MOVE 1 Press the RECORDER button on the front panel or R button on the remote control Press the OPEN CLOSE button and place a recordable disc on the disc tray Press the OPEN CLOSE button to close the disc tray Wait until LOAD disappears from the front panel display 2 ...

Страница 77: ...n During recording press the INFO button once Disc information screen appears Displays Total numbers of Titles and Playlists Recordable Time Available Space Music Photo Press the INFO button twice Current recording information screen appears and displays recording Name Title Created Time and Recording Time information DVD RAM VR Recording Info Name JAN 01 2005 12 00 AM CH 11 Recording Title 4 Crea...

Страница 78: ...you want to make a timer recording from Date Timer Recording allows setting the recording time within one month period Set the recording day day month 01 JAN Every Day 02 JAN MON SAT 03 JAN MON FRI Every SAT 30 JAN 31 JAN Every SUN 4 After selecting the set up value for each mode press the ENTER button to select Save and press the ENTER button again will appear on the front panel It means that a t...

Страница 79: ...of the timer recording The FR mode recording setup is the same as Timer Recording When setting the mode in step 4 set the FR mode Current Time 11 00 AM MOVE SELECT RETURN EXIT Timer Rec List No Source Date Start End Mode Add a list 01 CH 04 01 JAN 11 00 AM 02 00PM SP 02 AV 2 15 JAN 11 10 AM 01 30PM SP 03 CH 04 01 JAN 15 10 AM 02 30PM SP Available Time DVD 29 10 SP DVD RAM VR DVD RAM VR Source Date...

Страница 80: ...t 5 Press the MENU button after finishing the operation The Timer Record List screen will disappear Current Time 11 00 AM MOVE SELECT RETURN EXIT Timer Rec List No Source Date Start End Mode Add a list Available Time DVD 29 10 SP 01 HDD CH 07 01 JAN 11 00 AM 02 00PM SP 02 HDD CH 11 15 JAN 11 10 AM 01 30PM SP 03 HDD AV 2 01 JAN 15 10 AM 02 30PM SP Do you want to delete No 02 No Yes DVD RAM VR Curre...

Страница 81: ... is actually recorded if one title is deleted that title cannot be played again Play List This refers to a unit of playback which is made by selecting a desired scene in the entire Title List When one playlist is played only the scene selected by the user will play and then stop Since only the information necessary for playing a desired scene is included in a playlist even if that playlist is dele...

Страница 82: ...acter at the cursor position Clear Deletes all the character inputs Save Registers the character inputs 6 Press the œ buttons to select Save and then press the ENTER button The changed title name is displayed MOVE SELECT RETURN EXIT Rename JAN 1 8 2005 12 15 AM CH 11 Back Space Space Delete Clear Save MOVE SELECT RETURN EXIT Rename Sports A1 Back Space Space Delete Clear Save No Title Length MOVE ...

Страница 83: ...e a title from the Title List Using the TITLE LIST button 1 Press the RECORDER button on the front panel or R button on the remote control MOVE SELECT RETURN EXIT Title List Title Protection JAN 18 2005 12 15 AM CH11 JAN 18 2005 12 15 AM SP On Off DVD RAM VR No Title Length MOVE SELECT RETURN EXIT Title List 01 JAN 18 2005 12 15A 00 10 21 02 JAN 19 2005 12 15A 00 40 03 03 JAN 20 2005 12 15A 00 20 ...

Страница 84: ... 02 JAN 20 2005 12 15A 00 20 15 03 JAN 25 2005 12 15A 00 50 16 1 1 Page JAN 18 2005 12 15 AM CH11 JAN 18 2005 12 15 AM SP MOVE SELECT RETURN EXIT Title List Do you want to delete Related playlists may be deleted JAN 18 2005 12 15 AM CH11 JAN 18 2005 12 15 AM SP Yes No No Title Length MOVE SELECT RETURN EXIT Title List 01 JAN 18 2005 12 15A 00 10 21 02 JAN 19 2005 12 15A 00 40 03 03 JAN 20 2005 12 ...

Страница 85: ...section of a Title List entry Using the TITLE LIST button 1 Press the RECORDER button on the front panel or R button on the remote control 2 With the unit in Stop mode Playback mode press the TITLE LIST button The Title List screen is displayed Using the MENU button With the unit in Stop mode Playback mode press the MENU button Press the buttons to select Title then press the ENTER or button VR mo...

Страница 86: ...d 00 06 35 Start Delete Return 7 Press the œ buttons to select Delete then press the ENTER button You will be asked Do you want to delete 8 Press the œ buttons to select Yes then press the ENTER button The selected section has been deleted 9 Press the œ buttons to select Return then press the ENTER button to finish the operation The length of the section to be deleted must be at least 5 seconds lo...

Страница 87: ...bar moves to the End item Select the starting point of the section from which you want to create a new scene using the playback related buttons PLAY SEARCH VR mode New Playlist MOVE SELECT RETURN EXIT Make Playlist 00 00 00 Scene No 01 Start 00 00 00 End 00 00 00 Start End Make Return New Playlist MOVE SELECT RETURN EXIT Make Playlist 00 00 10 Scene No 01 Start 00 00 10 End 00 00 00 Start End Make...

Страница 88: ...ist screen is displayed Using the MENU button With the unit in Stop mode press the MENU button Press the buttons to select Title then press the ENTER or button The Title List screen is displayed Press the ANYKEY button Press the buttons to select Playlist then press the ENTER or button Press the buttons to select Go To Playlist then press the ENTER or button 3 Press the buttons to select the playl...

Страница 89: ...ame then press the ENTER or button The Rename screen is displayed 5 Select the desired characters using the œ buttons then press the ENTER button This function is the same as the Rename function in the renaming the title See page 82 The maximum number of characters that can be entered is 31 All 31 characters can be displayed by pressing the INFO button VR mode MOVE SELECT RETURN EXIT Rename 1 8 JA...

Страница 90: ...phin 00 10 21 02 JAN 19 2005 12 15A 00 40 03 03 JAN 20 2005 12 15A 00 20 15 04 JAN 25 2005 12 15A 00 50 16 1 1 Page Dolphin 18 JAN 2005 12 15 AM 6 Scenes DVD RAM VR 3 Press the buttons to select the title you want to edit from the Playlist then press the ANYKEY button The Edit Playlist menu is displayed Rename Delete Edit Playlist Go To Titlelist Disc Manager 4 Press the buttons to select Edit Pla...

Страница 91: ...00 00 30 Start End Change Cancel Title List 1 7 Title List 1 7 DVD RAM VR DVD RAM VR 6 Press the buttons to select Play then press the ENTER or button The selected scene is played To stop scene play press the STOP button To setup follow steps 1 to 4 in page 90 5 Press the œ buttons to select the scene you want to modify then press the ANYKEY button 6 Press the buttons to select Modify then press t...

Страница 92: ... 00 26 02 0 00 07 03 00 06 04 04 0 00 03 05 0 00 26 06 00 01 07 1 1 Page Play Modify Move Add Delete DVD RAM VR DVD RAM VR 7 Press the œ buttons to select the position to which you want to move the selected scene then select the ENTER button The selected scene is moved to the selected position Playlist No 1 MOVE SELECT RETURN EXIT Edit Playlist Cancel 01 00 00 26 02 00 00 07 03 00 00 04 04 00 00 0...

Страница 93: ...0 5 Press the œ buttons to select the scene that will have a new scene inserted before it then press the ANYKEY button 6 Press the buttons to select Add then press the ENTER or button The Add Scene screen is displayed 7 Press the ENTER button at the starting point of the scene The image and starting point time are displayed on the Start window Select the starting or ending point of the section you...

Страница 94: ...e unit in Stop mode press the MENU button Press the buttons to select Title then press the ENTER or button The Title List screen is displayed Press the ANYKEY button Press the buttons to select Playlist then press the ENTER or button Press the buttons to select Go To Playlist then press the ENTER or button 3 Press the buttons to select the title you want to delete from the Playlist then press the ...

Страница 95: ...to delete 5 Press the œ buttons to select Yes then press the ENTER button You automatically returned to the Playlist screen after the delete operation has finished No Title Lengtha MOVE SELECT RETURN EXIT Playlist 01 JAN 19 2005 12 15A 00 40 03 02 JAN 20 2005 12 15A 00 40 03 03 JAN 25 2005 12 15A 00 50 16 1 1 Page JAN 19 2005 12 15 AM CH11 JAN 19 2005 12 15 AM 7 Scenes MOVE SELECT RETURN EXIT Play...

Страница 96: ...0 15 03 JAN 20 2005 12 15A 00 20 15 04 JAN 25 2005 12 15A 00 50 16 1 1 Page JAN 18 2005 12 15 AM CH11 JAN 18 2005 12 15 AM SP DVD RAM VR No Title Length MOVE SELECT RETURN EXIT Title List 01 JAN 18 2005 12 15A 00 10 21 02 JAN 19 2005 12 15A 00 40 03 03 JAN 20 2005 12 15A 00 20 15 004 JAN 25 2005 12 15A 00 50 16 1 1 Page JAN 18 2005 12 15 AM CH11 JAN 18 2005 12 15 AM SP Title Disc Copy Playlist Sce...

Страница 97: ...th Add a list Start Rec Mode DVD Available LP 04 08 47 Total 04 08 47 Do you want to view screen of copying title No Yes DVD DVD RAM VR Do you want to use high speed copy mode No Yes 7 Press the buttons to select Title then press the ENTER or button The Copy screen is displayed If you want to change the record mode when copying see page 98 8 Press the ENTER or button to select Start then press the...

Страница 98: ...TER button HS High Speed Copies in the same record mode the original disc was recorded in XP SP LP EP You cannot copy a disc at a higher quality than it was originally recorded in If the same record mode is selected the title is copied at high speed This unit can not open the P tray and the R tray simultaneously Using the same method you can copy a Playlist High speed copying is not available for ...

Страница 99: ...001 JAN 18 2005 12 15A 00 10 21 002 JAN 19 2005 12 15A 00 40 03 003 JAN 20 2005 12 15A 00 20 15 004 JAN 25 2005 12 15A 00 50 16 1 1 Page JAN 18 2005 12 15 AM CH11 JAN 18 2005 12 15 AM SP DVD RAM VR 6 Press the ANYKEY button 7 Press the buttons to select Copy then press the ENTER or button and select Title The Copy screen is displayed 8 Press the ANYKEY button DVD RAM VR Copy To DVD RAM VR DVD RAM ...

Страница 100: ...is displayed Press the buttons to select the title you want to copy then press the ENTER button Other method Press the buttons to select Add a list then press the ENTER button Press the buttons to select the title you want to copy then press the ENTER button 10Repeat steps 8 9 to copy additional titles 11 Press the ENTER or buttons to select Start then press the ENTER button The added title lists ...

Страница 101: ...Selecting Record Mode of Each Title from the Copy List You can copy multiple titles while setting different record modes for each title To setup follow steps 1 to 7 in page 99 and then continue with step 8 below 8 Press the buttons to select a title to change its record mode in the copy screen 9 Press the ANYKEY button Press the buttons to select Rec Mode then press the ENTER or button 10Press the...

Страница 102: ...rt Rec Mode R Available XP 00 59 43 3 80 GB 00 00 16 0 01 GB P Total DVD RAM VR DVD RAM VR Disc Copy Disc Copy Specifications Protection This TWIN TRAY DVD RECORDER can allow you to protect the contents of your discs as described below Title Protection See page 83 Locking Protecting a Title Disc Protection See page 104 Disc Protection Cartridge protection See page 6 Disc copy will operate only if ...

Страница 103: ... JAN 19 2005 13 15A LP HS 00 15 21 3 JAN 20 2005 15 15A LP HS 00 30 21 No Title Rec Mode Length Add a list Start Rec Mode DVD Available LP 04 00 16 4 48 GB 01 06 03 1 88 GB Total DVD RAM VR All data in Recorder Tray s Disc will be deleted Do you want to continue No Yes 1 DVD If you want to stop copy press CANCEL key DVD The Disc is successfully copied Disc manager functions are only available when...

Страница 104: ...ot Protected Rename Protection Delete All Format 104 English Editing Disc Protection Disc Protection allows you to protect your discs from being formatted erased or deleted due to unintended operations 1 With the unit in Stop mode playback mode press the ANYKEY button 2 Press the buttons to select Disc Manager then press the ENTER or button 3 Press the œ buttons to select Protection then press the...

Страница 105: ...e Select Tray Disc Manager DVD RAM VR MOVE SELECT RETURN EXIT Disc Manager Disc Name Used Space Available Space 00 04 30 02 08 SP Disc Protection Info Disc Cartridge Info Not Protected Not Protected Rename Protection Delete All Format DVD RW You will be prompted with the confirmation message Choose the recording format for DVD RW 4 Press the œ buttons to select Yes then press the ENTER button The ...

Страница 106: ...fo Disc Cartridge Info Not Protected Not Protected Rename Protection Delete All Format DVD RAM VR Finalizing a Disc After you record titles onto a DVD RW DVD R disc with your TWIN TRAY DVD RECORDER the disc needs to be finalized before it can be played back on external devices 1 Press the RECORDER button on the front panel or R button on the remote control With the unit in Stop mode press the ANYK...

Страница 107: ...mpted again with the message Disc will be finalized Do you want to continue 4 Press the œ buttons to select Yes then press the ENTER button The disc is finalized Unfinalizing a Disc V VR mode To add additional titles to a finalized disc you must first unfinalize it 1 Press the RECORDER button on the front panel or R button on the remote control With the unit in Stop mode press the ANYKEY button 2 ...

Страница 108: ...nd deletion are possible Finalize Unfinalize Mark DVD RW VR F DVD RW VR Additional recording Additional recording Operation deletion editing and deletion editing and protection are impossible protection are possible A DVD RW can be finalized or unfinalized in Video mode A DVD RW can be finalized or unfinalized in VR mode NOTE MOVE SELECT RETURN EXIT Disc Manager Disc Name Used Space Available Spac...

Страница 109: ...rvice center Power Recording The TWIN TRAY DVD RECORDER requires some time to initialize and the input will be displayed for approx 10 seconds after it is turned on Checkpoint 1 Check whether the power cord is securely plugged into the power outlet Did you set the TWIN TRAY DVD RECORDER channel settings correctly Check the free space on your DVD RAM DVD RW DVD R discs Is the DVD RAM Cartridge prot...

Страница 110: ...eckpoint 1 icon appears on the screen The disc does not support all selected functions In this case some settings configured in the settings menu may not work properly Checkpoint 1 Play mode settings are different from the settings configured in the Settings menu The aspect ratio is fixed for some DVD discs See page 38 Checkpoint 1 Cannot change the aspect ratio The angle operation is available on...

Страница 111: ...to or any foreign material on your disc Some low quality discs may not play properly If scenes change from dark to bright suddenly the screen may shake vertically temporarily but this is not a fault Checkpoint 1 Checkpoint 2 Checkpoint 3 The disc revolves but no image or bad quality images are displayed Re check the recording time and the end time settings again Recording will be canceled if the p...

Страница 112: ... your TWIN TRAY DVD RECORDER and the remote control Check the batteries Check for the DVD TV selection button Checkpoint 1 Checkpoint 2 Checkpoint 3 The remote control doesn t work A recorded disc is played with only the subtitle and the audio signal which were selected during recording Checkpoint 1 Is it possible to change a subtitle and an audio signal on a recorded disc Other Press the buttons ...

Страница 113: ...0 47 lb 16 9in W x 12 52in D x 3 11in H 41 F to 95 F Keep level when operating Less than 75 operating humidity 1 0 V p p at 75Ω load sync negative S Video input Y 1 0Vp p C 0 286Vp p at 75Ω load Max Audio Input Level 2Vrms IEEE 1394 4p compatible jack Regular TV broadcasting VHF 2 13 UHF 14 69 Cable TV broadcasting 1 125 Analog output jacks 1 2 Optical Coaxial digital audio output Full scale Analo...

Страница 114: ...determination and service procedures SAMSUNG does not warrant uninterrupted or error free operation of the product All replaced parts and products become the property of SAMSUNG and must be returned to SAMSUNG Replacement parts and products assume the remaining original warranty or ninety 90 days whichever is longer This limited warranty covers manufacturing defects in materials and workmanship en...

Страница 115: ... SAMSUNG ELECTRONICS AMERICA INC HEADQUARTERS 105 Challenger Road Rldgefield Park N J 07660 0511 TEL 1 800 SAMSUNG SERVICE DIVISION 400 Valley Road Suite 201 Mount Arlington NJ 07856 1 800 SAMSUNG 1 800 726 7864 www samsung com ...

Отзывы: