background image

24 - English

S

ystem Setup

5

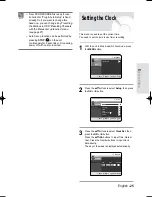
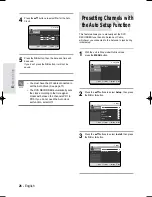
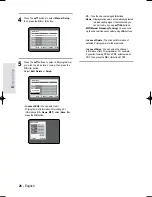
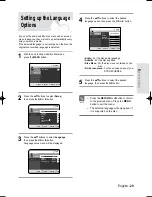
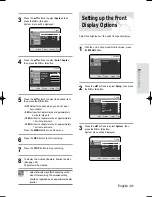
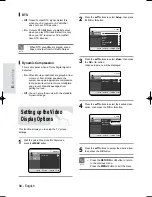
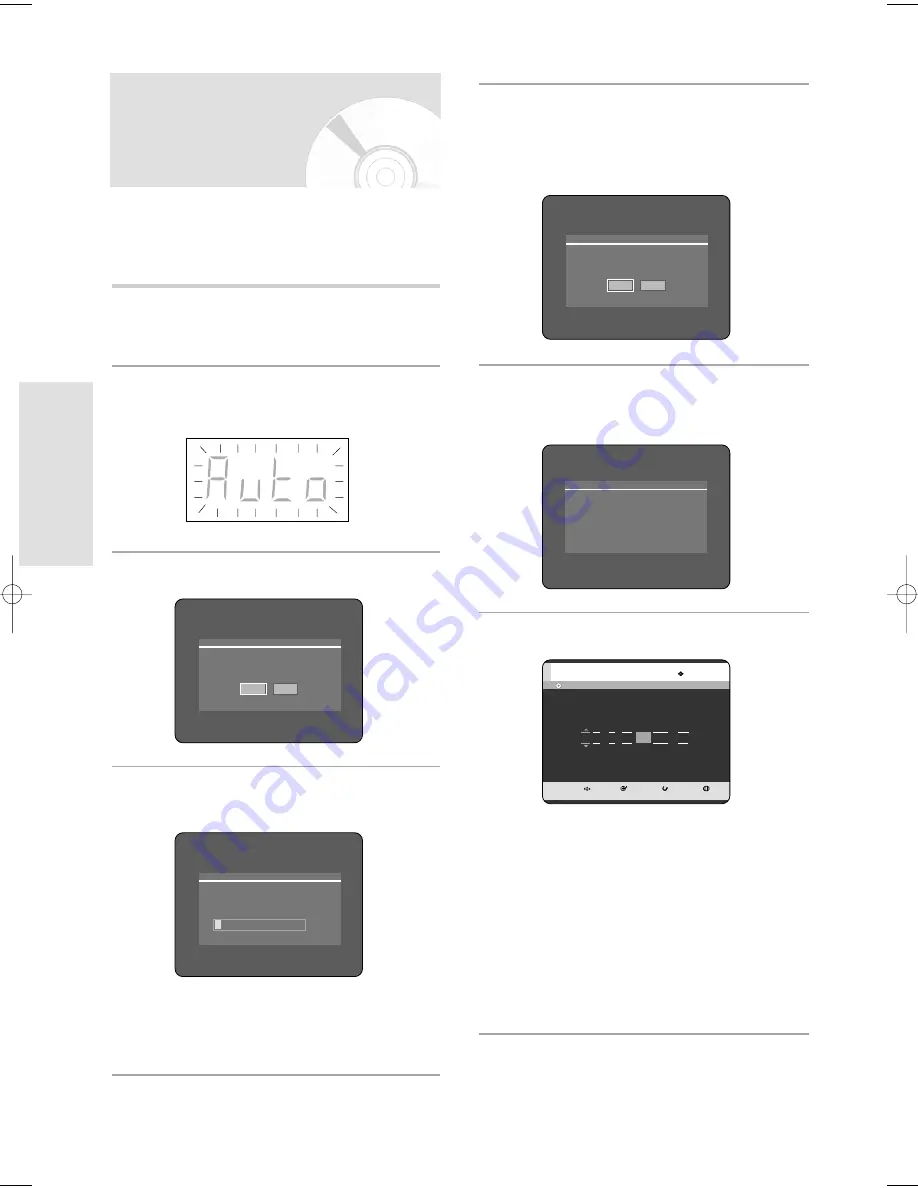
After Auto Channel Scan is completed, Auto Clock
Setting will be started automatically in 10 seconds.
If you want to start Auto Clock Setting immediately,
press OK button. If you do not want to do Auto
Clock Setting, press CANCEL or MENU button.

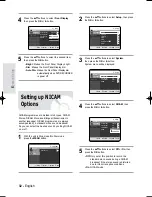
6

Wait until current date and time are displayed
automatically. If you want to exit Auto Clock
Setting, press MENU button.

7

Check the date and time.

• if it is : Correct, press OK button then the date

and time will be saved. If you don't press
the OK button, the date and time will be
saved automatically after 5 seconds.

• if it is : Incorrect, input correct TimeDateYear

using 

…†œ √

buttons or number buttons.

Press OK button then the date and time
will be saved. When you need to change
clock setting, you can set up it manually.
(see page 25)

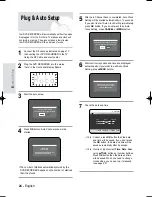
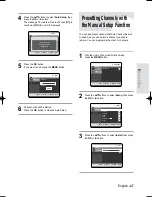
Plug & Auto Setup

Your DVD RECORDER will automatically set itself up when
it is plugged in for the first time. TV stations and clock will
be stored in memory. The process takes a few minutes.
Your DVD RECORDER will then be ready for use.

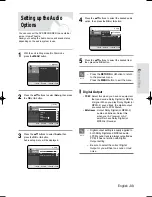
1

Connect the RF cable as indicated on page 17.
(Connecting Your DVD RECORDER to the TV
Using the RF Cable and scart cable.)

2

Plug the DVD RECORDER into the mains.
“Auto” in the front panel display flickers.

3

Start the auto setup.

4

Press OK button. Auto Channel scan will be
started.

• The number of stations automatically stored by the

DVD RECORDER depends on the number of stations
that it has found.

Please wait. Now setting the clock.

If you want to exit clock setting,

press the [MENU] button.

Auto channel scan completed successfully.

Press the [OK] button to auto clock set.

Yes

No

No Disc

MOVE

SELECT

RETURN

EXIT

Clock Set

07 : 49

01 / JAN   SAT

2005

On

Time

Date 

Auto Clock

Auto setup will be started.

Check antenna and TV cable connection.

OK

Cancel

10%     

Channel Scan

Now, Scanning...

03-R119-XEU_23-39_SETUP  8/19/05 12:39 PM  Page 24

Содержание DVD-R119

Страница 1: ...Instruction Manual DVD R119 www samsung com AK68 00870A 00 ...

Страница 2: ...f the fuse is indicated on the pin face of the plug If it requires replacing a fuse approved to BS1362 of the same rating must be used Never use the plug with the fuse cover omitted if the cover is detachable If a replacement fuse cover is required it must be of the same colour as the pin face of the plug Replacement covers are available from your dealer If the fitted plug is not suitable for the ...

Страница 3: ...normally or has been dropped Handling Cautions Before connecting other components to this recorder be sure to turn them all off Do not move the recorder while a disc is being played or the disc may be scratched or broken the recorder s internal parts may be damaged Do not put a flower vase filled with water or any small metal objects on the recorder Be careful not to put your hand into the disc tr...

Страница 4: ...VR Mode and then record in V Mode be sure to execute Format Be careful when executing Format because all the recorded data may be lost A DVD RW blank disc is initialized to VR Mode when first initialized Do not use discs printed with label printers available on the market Do not load warped or cracked discs Disc Storage Be careful not to harm the disc because the data on these discs is highly vuln...

Страница 5: ...y a different maker s recorder but has not been finalised it cannot be played or additionally be recorded by this recorder Many DVD discs are encoded with copy protection Because of this you should only connect your DVD RECORDER directly to your TV not to a VCR Connecting to a VCR results in a distorted picture from copy protected DVD discs This product incorporates copyright protection technology...

Страница 6: ...er with a digital output jack 21 Connecting to AV 3 IN jack 22 Connecting a VCR Set Top Box STB DVD player or Camcorder to the AV3 IN jacks 22 System Setup System Setup On Screen Menu Navigation 23 Plug Auto Setup 24 Setting the Clock 25 Presetting Channels with the Auto Setup Function 26 Presetting Channels with the Manual Setup Function 27 Setting up the Language Options 29 EP Mode Time Setting ...

Страница 7: ...ed Record List 75 Editing Editing Basic Editing Title List 77 Renaming Labeling a Title 77 Locking Protecting a Title 78 Deleting a Title 79 Deleting a Section of a Title Partial Delete 80 Advanced Editing Playlist 82 Creating a Playlist 82 Playing Entries in the Playlist 83 Renaming a Playlist Entry 84 Editing a Scene for the Playlist 85 Deleting a Playlist Entry from the Playlist 89 Copying a Pl...

Страница 8: ...justment for Timer Record List If Auto mode is selected the video quality is adjusted automatically so that all video for the scheduled time can be recorded onto the free disc space See page 74 Creating a DVD video title using DVD RW R disc With the DVD RECORDER you can create your own DVD Video titles on 4 7 GB DVD RW R discs High quality progressive scan Progressive scanning provides high resolu...

Страница 9: ... Reading the User s Manual About the use of this user s manual 1 Be sure to be familiar with Safety Instructions before using this product See pages 2 5 2 If a problem occurs check the Troubleshooting See pages 96 99 2005 Samsung Electronics Co All rights reserved No part or whole of this user s manual may be reproduced or copied without the prior written permission of Samsung Electronics Co Make ...

Страница 10: ...it menu you can operate various edit functions such as delete copy rename lock etc on a recorded title Creating a playlist DVD RW in VR mode With this recorder you can create a new playlist on the same disc and edit it without the change of the original recording You can only use either the VR or Video mode on a DVD RW but not both at the same time You can change the DVD RW format to another forma...

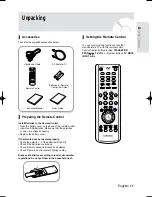
Страница 11: ... the batteries Dry Cell Check if the batteries are drained Check if remote sensor is blocked by obstacles Check if there is any fluorescent lighting nearby Dispose of batteries according to local environmental regulations Do not put them in the household trash Video Audio Cable RF Cable for TV Batteries for Remote Control AAA Size Remote Control Instruction Manual Quick Guide Setting the Remote Co...

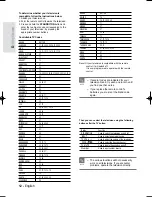
Страница 12: ...r problems operate the television directly NOTE If several codes are indicated for your television brand try each one in turn until you find one that works If you replace the remote control s batteries you must set the brand code again NOTE BRAND BUTTON SAMSUNG 01 02 03 04 05 06 07 08 09 AIWA 82 ANAM 10 11 12 13 14 15 16 17 18 BANG OLUFSEN 57 BLAUPUNKT 71 BRANDT 73 BRIONVEGA 57 CGE 52 CONTINENTAL ...

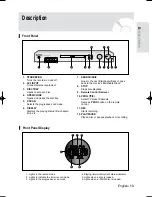
Страница 13: ... title chapter track or goes back to the previous title chapter track 8 STOP Stops disc playback 9 Remote Control Reciever 10 PROG Select TV preset Channels Same as PROG button on the remote control 11 REC Starts recording 12 PLAY PAUSE Plays a disc or pauses playback or recording Description Front Panel Display 1 Lights in the record mode 2 Lights to indicate the timer record mode 3 Lights in the...

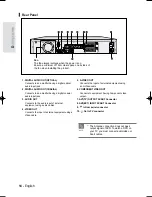
Страница 14: ...nt using a Video cable 5 S VIDEO OUT Connects the input of external equipment using an S Video cable 6 COMPONENT VIDEO OUT Connects to equipment having Component video output 7 AV1 TV OUTPUT SCART Connector 8 AV2 EXT INPUT SCART Connector 9 In from aerial connector 10 Out to TV connector Fan The fan always revolves when the power is on Ensure a minimum of 10cm clear space on all sides of the fan w...

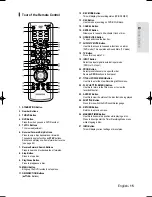
Страница 15: ...o view the recorded files list 23 ANYKEY Button Use this to view the status of the disc that is being played 24 SUBTITLE Button Press this to switch the DVD s subtitle language 25 RETURN Button Returns to a previous menu 26 MARKER TIMER Button Use this to bookmark a position while playing a disc Press to directly enter the Timer Recording Mode menu while stopping a disc 27 INFO Button This will di...

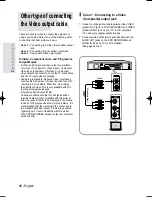
Страница 16: ...e will give you enough information to start using the recorder Connecting the DVD RECORDER Additional Connections Other type of connecting the Video output cable Other type of connecting the Audio output cable Connecting to AV 3 IN jack Quick Overview 16 Connecting the DVD RECORDER 17 Additional Connections 17 Other type of connecting the Video output cable 18 Other type of connecting the Audio ou...

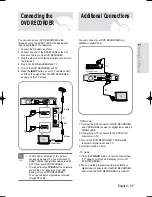
Страница 17: ...ur DVD RECORDER to the television using the SCART cable if the appropriate input is available on the television 1 Connect the RF cable as shown 2 Connect one end of the SCART cable to the AV1 socket on the rear of the DVD RECORDER 3 Plug the other end into the appropriate connector on the television 4 Plug in the DVD RECORDER and TV 5 Turn on the DVD RECORDER and TV 6 Press the INPUT button on you...

Страница 18: ...ponent video output are available only if your TV supports S Video input or Component video input respectively If S Video or Component video output does not work check the TV connections and the TV input selection settings Compared to standard interlaced video progressive scan doubles the amount of video lines fed to your TV resulting in a more stable flicker free clear image than interlaced video...

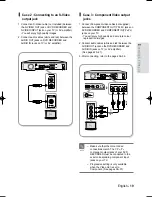
Страница 19: ...p Case 2 Connecting to an S Video output jack 1 Connect an S Video cable not included between the S VIDEO OUT jack on DVD RECORDER and S VIDEO INPUT jack on your TV or AV amplifier You will enjoy high quality images 2 Connect audio cables white and red between the AUDIO OUT jacks on DVD RECORDER and AUDIO IN jacks on TV or AV amplifier COMPONENT Pr Pb Y green blue red green blue red Make sure that...

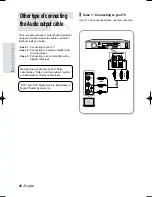
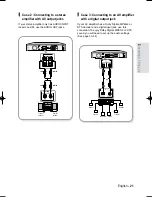
Страница 20: ...th AV output jacks Case 3 Connecting to an AV amplifier with a digital output jack Case 1 Connecting to your TV If your TV has audio input jacks use this connection Manufactured under license from Dolby Laboratories Dolby and the double D symbol are trademarks of Dolby Laboratories DTS and DTS Digital Out are trademarks of Digital Theater Systems Inc Othertypeofconnecting theAudiooutputcable yello...

Страница 21: ...nput jack use this connection To enjoy Dolby Digital MPEG2 or DTS sound you will need to set up the audio settings See page 33 34 Case 2 Connecting to a stereo amplifier with AV output jacks If your stereo amplifier only has AUDIO INPUT jacks L and R use the AUDIO OUT jacks white red white red Front L speaker Front R speaker or Rear L Front L Subwoofer Centre Front R Rear R ...

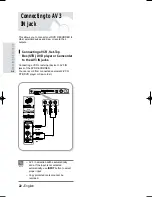
Страница 22: ... jacks Connecting a VCR or external device to AV3 IN jacks of the DVD RECORDER You can record from connected equipment VCR STB DVD player or Camcorder DVD STB VCR yellow white red yellow white red Connecting to AV 3 IN jack AV 3 in selection will be automatically done If the input is not selected automatically use INPUT button to select proper input Copy protected content cannot be recorded NOTE C...

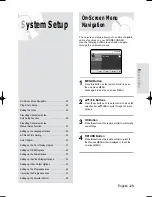
Страница 23: ...ngs 4 RETURN Button Press this button on the remote control to return to the Previous MENU screen displayed or to exit the on screen MENU On Screen Menu Navigation 23 Plug Auto Setup 24 Setting the Clock 25 Presetting Channels with the Auto Setup Function 26 Presetting Channels with the Manual Setup Function 27 Setting up the Language Options 29 EP Mode Time Setting 30 Auto Chapter 30 Setting up t...

Страница 24: ...Plug Auto Setup Your DVD RECORDER will automatically set itself up when it is plugged in for the first time TV stations and clock will be stored in memory The process takes a few minutes Your DVD RECORDER will then be ready for use 1 Connect the RF cable as indicated on page 17 Connecting Your DVD RECORDER to the TV Using the RF Cable and scart cable 2 Plug the DVD RECORDER into the mains Auto in ...

Страница 25: ... ready for use Function for Plug Auto Setup is fixed already So if you want to change this fixed one you can change it by Presetting the Stations in OSD Presetting Channels with the Manual set up function menu see page 27 Auto Set up function can be performed by pressing STOP on the unit continuously for 5 seconds or more during power off with no disc inserted NOTE No Disc MOVE SELECT RETURN EXIT ...

Страница 26: ...OVE SELECT RETURN EXIT Programme Setup Setup System Clock Set Language Audio Video Parental Control Install No Disc MOVE SELECT RETURN EXIT Programme Setup Setup Auto Setup Manual Setup 4 Press the buttons to select On for the Auto Clock 5 Press the OK button then the date and time will be saved If you don t press the OK button it will not be saved You must have the RF cable connected to set the A...

Страница 27: ...c MOVE SELECT RETURN EXIT Programme Setup Setup System Clock Set Language Audio Video Parental Control Install No Disc MOVE SELECT RETURN EXIT Programme Setup Setup Auto Setup Manual Setup 4 Press the buttons to select Auto Setup then press the OK or button The message Your data will be lost Press OK to continue MENU to exit is displayed 5 Press the OK button If you want to exit press the MENU but...

Страница 28: ...ample if you wish to swap PR2 and PR5 select swap at PR2 then press the OK or button at PR5 4 Press the buttons to select Manual Setup then press the OK or button 5 Press the buttons to select a Pr programme you wish to edit delete or swap then press the OK or button Select Edit Delete or Swap In case of Edit You can add or edit Pr programme information After change Pr informations Ch Name MFT sel...

Страница 29: ... English Français Deutsch Español Italiano Nederlands Korean If you set the audio subtitle disc menu and on screen menu in advance they will come up automatically every time you watch a movie If the selected language is not recorded on the disc the original pre recorded language is selected 1 With the unit in Stop mode No Disc mode press the MENU button 2 Press the buttons to select Setup then pre...

Страница 30: ...laylist Disc Manager Programme Setup Disc Navigation Title List Photo Music 1 With the unit in Stop mode No Disc mode press the MENU button 2 Press the buttons to select Setup then press the OK or button 3 Press the buttons to select System then press the OK or button System menu will be displayed EP Mode Time Setting You can select one of four recording modes by pressing the REC MODE button repea...

Страница 31: ... the buttons to select the desired item then press the OK button Off Select this option when you do not want Auto chapter 5 Min Inserts chapter marks at approximately 5 minute intervals 10 Min Inserts chapter marks at approximately 10 minute intervals 15 Min Inserts chapter marks at approximately 15 minute intervals Press the MENU button to exit the menu 6 Press the REC button to start recording 7...

Страница 32: ...gramme Setup Setup EP Mode Time 6 Hours Auto Chapter Off Front Display Bright NICAM On Off On 4 Press the buttons to select Front Display then press the OK or button 5 Press the buttons to select the desired item then press the OK button Bright Makes the Front Panel Display bright Dim Makes the Front Panel Display dim Auto Dim Makes the Front Panel Display dim automatically when DVD RECORDER is po...

Страница 33: ...output setting is equally applied to both Dolby Digital and MPEG 2 audio LPCM sound track is always outputted as PCM It has no relation with Digital Output setting Be sure to select the correct Digital Output or you will hear no sound or loud noise NOTE Setting up the Audio Options You can connect the DVD RECORDER to an external amp or Home Theatre Allow you to setup the Audio device and sound sta...

Страница 34: ...tup System Clock Set Language Audio Video Parental Control Install Dynamic Compression This is only active when a Dolby Digital signal is detected On When Movie soundtracks are played at low volume or from smaller speakers the system can apply appropriate compression to make low level content more intelligible and prevent dramatic passages from getting too loud Off You can enjoy the movie with the...

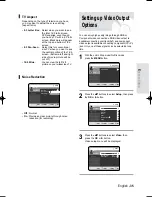
Страница 35: ...arental Control Install No Disc MOVE SELECT RETURN EXIT Programme Setup Setup TV Aspect 4 3 Letter Box Noise Reduction Off Video Output Component TV Aspect Depending on the type of television you have you may want to adjust the screen setting aspect ratio 4 3 Letter Box Select when you want to see the total 16 9 ratio screen DVD supplies even though you have a TV with a 4 3 ratio screen Black bars...

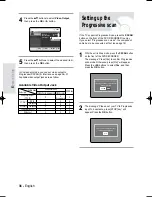
Страница 36: ...nfirm Progressive scan mode Otherwise press No Yes No Please set your TV to Progressive input To deactivate press STOP key OK 4 Press the buttons to select Video Output then press the OK or button 5 Press the buttons to select the desired item then press the OK button In Component mode you can set video output to Progressive P SCAN or Interlace see page 36 37 Available video output jacks are as fo...

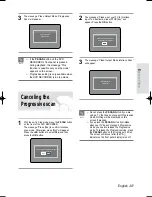
Страница 37: ...sage Please set your TV to Interlace input To deactivate press STOP key will appear Press the OK button 3 The message Video Output Mode Interlace Scan will appear Video Output Mode Interlace Scan Please set your TV to Interlace input To deactivate press STOP key OK 3 The message Video Output Mode Progressive Scan will appear Video Output Mode Progressive Scan Do not press the P SCAN button if you ...

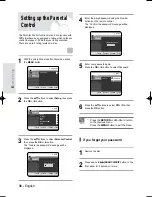
Страница 38: ...lect Off or On then press the OK button If you forgot your password 1 Remove the disc 2 Press and hold SEARCH SKIP button on the front panel for 5 seconds or more MOVE SELECT RETURN EXIT Programme Setup Setup Create the password No Disc MOVE SELECT RETURN EXIT Programme Setup Setup Confirm the password No Disc No Disc MOVE SELECT RETURN EXIT Programme Setup Setup Password Off On Setting up the Par...

Страница 39: ...sword message will be displayed 3 Enter your password again using the Number buttons on the remote control See page 38 if you forgot your password NOTE No Disc MOVE SELECT RETURN EXIT Programme Setup Setup Password On Rating Level Level 1 Kids Change Password No Disc MOVE SELECT RETURN EXIT Programme Setup Setup Enter the password No Disc MOVE SELECT RETURN EXIT Programme Setup Setup Confirm the p...

Страница 40: ...D G CD I Dolby Digital DTS Digital Audio Stereo MP3 PAL broadcast system in U K France Germany etc Before Playing 40 Playing a Disc 41 Using the Disc Menu Title Menu 42 Using the Search Skip Functions 42 Slow Motion Play Step Motion Play 43 About ANYKEY 44 Playing the Title List 45 Navigation Menu 46 Using the Markers 49 Using the Bookmarks 51 Selecting the Subtitle Language 53 Selecting the Audio...

Страница 41: ...s dirt dust scratches or deposits of cigarette smoke on the recording surface may make it impossible to use the disc for recording DVD RW R discs may not be able to play on some DVD players depending on the player disc and the condition of the recording Discs with NTSC programmes recorded on them cannot be recorded using this product NOTE When you stop playing back a disc the DVD RECORDER remember...

Страница 42: ... disc contains more than one title Some discs may not support the title menu function Some type of discs contain a dedicated menu system that allows you to select special functions for title chapter audio track subtitle film preview information on characters etc DVD VIDEO DVD RW R AUDIO CD CD DA Fast X 2 Fast X 4 Fast X 8 Fast X 16 Fast X 32 Fast X 128 X 2 X 4 X 8 No sound is heard during Scan Sea...

Страница 43: ...press the SEARCH buttons on the remote control If you press the SEARCH button Slow 1 8 Slow 1 4 Slow 1 2 If you press the SEARCH button Slow 1 8 Slow 1 4 Slow 1 2 To return to normal speed playback press the PLAY button Press and hold the SEARCH buttons during pause the disc will play slowly at a 1 4 speed If the button is released the pause operation will resume The speed marked in this function ...

Страница 44: ...ed scene by accessing title chapter track time You can also change the subtitle and audio settings and set some features including Marker Angle Zoom Repeat Disc Manager Moving to a scene directly using the ANYKEY If you want to move to a title a chapter or a track to find a desired scene 1 Press the ANYKEY button during playback 2 Press the buttons to select Search then press the OK or button 3 Pr...

Страница 45: ...ton once again Then you can check the information about the title under playback 3 To stop title play press the STOP button To return the title list screen press the TITLE LIST button DVD RW VR No Title Length MOVE SELECT RETURN EXIT Title List 001 18 JAN 2005 12 00A 00 10 21 002 19 JAN 2005 12 15A 00 40 03 003 20 JAN 2005 12 33A 00 20 15 004 25 JAN 2005 12 34A 00 50 16 005 25 JAN 2005 12 37A 00 5...

Страница 46: ...Title Length MOVE SELECT RETURN EXIT Title List 001 18 JAN 2005 12 00A 00 10 21 002 19 JAN 2005 12 15A 00 40 03 003 20 JAN 2005 12 33A 00 20 15 004 25 JAN 2005 12 34A 00 50 16 005 25 JAN 2005 12 37A 00 50 16 1 1 page 01 JAN 2005 12 00 PR1 01 JAN 2005 12 00 XP DVD RW VR MOVE SELECT RETURN EXIT Disc Navigation Playlist Disc Manager Programme Setup Disc Navigation Title List Photo Music DVD RW VR No ...

Страница 47: ... Press the buttons to select Disc Navigation then press the OK or button twice MOVE SELECT RETURN EXIT Scene Navigation DVD RW VR Title List No 001 01 00 00 16 01 00 05 16 1 1 Page Scene Navigation will not operate if a selected title does not have Markers NOTE VR mode Search Navigation Marker Subtitle Audio Repeat Zoom Disc Manager Scene Navigation Time Navigation Search Navigation Marker Subtitl...

Страница 48: ...recorded by this device may not operates Navigation function An edited title may not display exact search time NOTE DVD RW VR No Title Length MOVE SELECT RETURN EXIT Title List 1 1 page 01 JAN 2005 12 00 PR1 01 JAN 2005 12 00 XP Rename Protection Delete Partial Delete Playlist Navigation Disc Manager 001 18 JAN 2005 12 00A 00 10 21 002 19 JAN 2005 12 15A 00 40 03 003 20 JAN 2005 12 33A 00 20 15 00...

Страница 49: ...ain when the desired scene appears The number 02 is displayed and the scene is memorized DVD RW VR Mode discs have the Marker function instead of the Bookmark function The Marker function allows you to mark up to 99 scenes Since the scenes may be displayed as many different pages numbering is necessary If a disc in use is encoded with Disc Protection Markers cannot be set or deleted Only playback ...

Страница 50: ... 2 Press the œ buttons to select a marked scene 3 Press the OK or PLAY button to start playing from the selected scene If you press the SKIP button it moves to the beginning of the marker Pressing the button once again within 3 seconds returns to the beginning of the previous marker If you press the SKIP button it moves to the next marker MOVE PLAY CANCEL RETURN Marker 01 02 N 2 MOVE PLAY CANCEL R...

Страница 51: ...one and the 8th marker becomes the 7th V mode MOVE OK RETURN Bookmark N 0 2 Press the OK button when the desired scene appears The number 1 is displayed and the scene is memorized 3 Press the œ buttons to move to the next position 4 Press the OK button again when the desired scene appears The number 2 is displayed and the scene is memorized Repeat above to bookmark other positions You can bookmark...

Страница 52: ...scene Clearing a bookmark Using the MARKER button 1 Press the MARKER button during playback Using the ANYKEY button Press the ANYKEY button during playback Press the buttons to select Bookmark then press the OK or button 2 Press the œ buttons to select a bookmarked scene 3 Press the CANCEL button to delete the selected bookmark Search Bookmark Subtitle Audio Repeat Angle Zoom Search Bookmark Subti...

Страница 53: ...lect the desired subtitle language Also press the SUBTITLE button repeatedly to select the desired subtitle language To make the screen disappear press the CANCEL or RETURN button Selects one of the subtitle language recorded on the disc VR mode OFF Subtitle Selecting the Subtitle Language The subtitle display may be different depending on the disc type Some discs allow you to select the language ...

Страница 54: ...then press the CANCEL or RETURN button VR mode ENG Dolby Digital 5 1Ch Audio Using the ANYKEY button 1 Press the ANYKEY button during playback 2 Press the buttons to select Audio then press the OK or button 3 Press the buttons to select the desired audio language then press the OK or button Audio languages may be different because they are disc specific Some discs allow you to select the audio lan...

Страница 55: ...ss the OK button Repeat Off Repeat Title Repeat Play Using the ANYKEY button 1 Press the ANYKEY button during playback 2 Press the buttons to select Angle then press the OK or button 3 Press the buttons to select the desired angle then press the OK or button This function is disc dependent and may not work all DVDs This function does not work when a DVD has not been recorded with a multi camera an...

Страница 56: ...ress the buttons to select Repeat A B then press the OK or button 4 Press the OK button at the point where you want the repeat play to start A and press it again at the point where you want the repeat play to stop B Repeat playback of the A B section starts To return to normal playback 5 Press the CANCEL button to return to normal playback Search Bookmark Subtitle Audio Repeat Angle Zoom Repeat Of...

Страница 57: ...ting state of a disc and a playback time corresponding to a portion that is currently played 5 Displays the track list song list MOVE SELECT RETURN EXIT Music List Track 1 Track 2 Track 3 Track 4 Track 5 Track 6 Track 7 1 3 Page CD DA 01 11 03 14 CDDA CDDA CDDA CDDA CDDA CDDA CD Track 1 00 13 1 Press the ANYKEY button during playback 2 Press the buttons to select Zoom then press the OK or button w...

Страница 58: ...yed automatically 2 Press the buttons to select the track you want to hear and then press the OK button MP3 Screen Elements 1 Current track song Displays the name of the track being played 2 Displays the current folder play index and current track size 3 Displays available buttons 4 This shows the operating state of a disc and a playback time corresponding to a portion that is currently played 5 D...

Страница 59: ...XIT Music List Track 1 Track 2 Track 3 Track 4 Track 5 Track 6 Track 7 1 3 Page CD DA 01 11 03 14 CDDA CDDA CDDA CDDA CDDA CDDA CD Track 1 00 20 Buttons on the Remote Control used for MP3 playback 1 Selects a track song 2 OK button Plays the selected track song 3 SKIP button Plays the next track 4 SKIP button Returns to the beginning of the current track when pressed during playback If pressed aga...

Страница 60: ...age CD DA 01 15 04 57 CDDA CDDA CDDA CDDA CDDA CDDA CD Track 1 02 10 Normal Repeat Track Repeat All Random Play Mode Go To Playlist New Playlist New Playlist You can register a maximum 28 tracks in the playlist 1 Press the ANYKEY button during the Music List playback 2 Press the buttons to select New Playlist then press the OK or button 3 Press the buttons to select tracks in order in which you wa...

Страница 61: ...s the OK button The selected tracks are played automatically Play Mode Go To Playlist New Playlist MOVE SELECT RETURN EXIT Playlist Playlist 01 1 1 Page ROOT 00 01 CD 00 00 Playlist MOVE SELECT RETURN EXIT Music List Track 1 Track 2 Track 3 Track 4 Track 5 Track 6 Track 7 1 3 Page CD DA 01 15 04 57 CDDA CDDA CDDA CDDA CDDA CDDA CD TRACK 1 02 10 Play Mode Go To Playlist New Playlist MOVE Delete EXI...

Страница 62: ...ss the œ œ buttons to select Yes then press the OK button The selected Playlist is deleted MOVE SELECT RETURN EXIT Music List Track 1 Track 2 Track 3 Track 4 Track 5 Track 6 Track 7 1 3 Page CD DA 01 15 04 57 CDDA CDDA CDDA CDDA CDDA CDDA CD Track 1 02 10 Play Mode Go To Playlist New Playlist MOVE SELECT RETURN EXIT Playlist Playlist 01 1 1 Page ROOT 00 01 CD 00 00 Playlist MOVE SELECT RETURN EXIT...

Страница 63: ...DA CDDA CDDA CDDA CDDA CDDA CD Track 1 00 12 MOVE SELECT RETURN EXIT Edit Playlist Track 1 Track 2 Track 3 Track 4 Track 5 Track 6 Track 7 1 3 Page CDDA CDDA CDDA CDDA CDDA CDDA CDDA CD 01 Track 2 02 Track 8 03 Track 5 04 Track 3 1 1 Page Delete Go To Playlist If a disc contains only MP3 files or only JPEG files the MP3 or JPEG screen appears after the disc is loaded If a disc contains a mix of MP...

Страница 64: ...Show Rotate Zoom Go To Photo List Rotate 90 Rotate 180 Rotate 270 Slide Show Rotate Zoom Go To Photo List Rotate Rotate Off Go To Photo List Slide Show 4 Press the ANYKEY button then press the OK button 5 Press the buttons to select the slide show speed then press the OK or button The slide show starts To stop the Slide Show 1 Press the ANYKEY button 2 Press the buttons to select Slide Show Off th...

Страница 65: ...n press the OK or button Zoom Off Go To Photo List Slide Show Rotate Zoom Go To Photo List Go To Photo List To setup follow steps 1 to 3 in page 63 4 Press the OK button to select you want to see the picture then press the ANYKEY button 5 Press the buttons to select Go To Photo List then press the OK or button Slide Show Rotate Zoom Go To Photo List MOVE SELECT RETURN EXIT Photo List CD DSC01194 I...

Страница 66: ... recordable Recordable Not recordable Recordable Not recordable Not recordable Not recordable Recordable Not recordable Not recordable Not recordable Recordable finalised not finalised DVD RW DVD R DVD RW DVD R Before Recording 66 Recording the current TV programme you are watching 68 Recording from external equipment you are watching 70 Making an One Touch Recording OTR 71 Making a Timer Recordin...

Страница 67: ...cording time decreases In Auto mode the most suitable record mode is adjusted automatically according to remaining time on the disc and length of the timer recording This function is selected only one mode in XP SP LP and EP modes and you can use this mode for timer recording Unrecordable pictures Video with copy protection cannot be recorded on this DVD RECORDER When the DVD RECORDER receives a c...

Страница 68: ... to other media the ID will be absent or wrong and the data will not be decryptable Media Copy Free Copy Once Copy Never DVD RW Ver 1 1 O DVD RW Ver 1 1 with CPRM VR mode O O V mode O DVD R O Signal type RecordingthecurrentTV programmeyouarewatching Check that the disc has enough available space for the recording Adjust the recording mode 1 Press the OPEN CLOSE button and place a recordable disc o...

Страница 69: ...tus of the disc and progress of recording Press the INFO button and information about the disc will appear Press the INFO button once again Then you can check the information about the title being recorded You can not change the recording mode and the PROG while recording Recording will stop automatically if there is no free space left for recording Up to 99 titles can be recorded onto a disc DVD ...

Страница 70: ... sequence PR Number AV1 AV2 AV3 4 Press the REC MODE button repeatedly or press the REC MODE button then press the buttons to select the recording speed quality SP LP EP XP 5 Press the REC button Information concerning the external input mode is displayed on the screen then recording begins REC is displayed on the front panel To pause recording Press the PLAY PAUSE button to pause a recording in p...

Страница 71: ...the INFO button once again Then you can check the information about the title being recorded To stop recording Press the STOP button The message Do you want to stop recording is displayed Press the œ buttons to select Yes then press the OK button Or press the OK button again The timer counter decreases by the minute from 9 00 to 0 00 then the DVD RECORDER stops recording NOTE DVD RW VR Disc Info D...

Страница 72: ...es to the previous next item 0 9 Sets a value Source The video input source AV1 AV2 or AV3 or the broadcasting channel you want to make a timer recording from Date Timer Recording allows setting the recording time within one month period Set the recording day day month 01 JAN SAT Every day 02 JAN SUN MON SAT 03 JAN MON MON FRI Every SAT 30 JAN SUN 31 JAN MON Every SUN DVD RW VR MOVE SELECT RETURN ...

Страница 73: ...urn the power off to finish the Timer Recording setting will appear on the front panel It means that a timer recording is registered Timer Recording will not work when the power is on PDC PDC Programme Delivery Control function If you set this function on you can control the starting and ending time of recording by special signal included in the broadcasting signal If a TV programme is shortened o...

Страница 74: ...28 XP 01 Title No 01 Available Time 29 10 SP Title Save Source Date Start End Mode PDC AV2 Everyday 12 00 14 00 SP OFF DVD RW VR Current Time 12 00 MOVE SELECT RETURN EXIT Scheduled Record List No Source Date Start End Mode PDC AvailableTime 0 28 XP 01 AV2 Everyday 13 29 15 29 SP OFF 02 AV1 Mon SAT 14 46 20 52 SP OFF 03 PRO7 EveryTHR 14 10 18 10 SP OFF 04 Add Edit Delete Flexible Recording for Tim...

Страница 75: ...he buttons to select Delete then press the OK or button You will be prompted with the delete confirm message such as Do you want to delete No 01 5 Press the œ buttons to select Yes then press the OK button The selected entry will be deleted from the list 6 Press the MENU button after finishing the operation The Scheduled Record List screen will disappear DVD RW VR Current Time 12 00 MOVE SELECT RE...

Страница 76: ...ly recorded if one title is deleted that title cannot be played again Play List This refers to a unit of playback which is made by selecting a desired scene in the entire Title List When one playlist is played only the scene selected by the user will play and then stop Since only the information necessary for playing a desired scene is included in a playlist even if that playlist is deleted the or...

Страница 77: ...lect Disc Navigation then press the OK or button twice 2 Press the buttons to select an entry you want to rename from the Title List then press the ANYKEY button DVD RW VR MOVE SELECT RETURN EXIT Rename Sports A1 Back Space Space Delete Clear Save DVD RW VR No Title Length MOVE SELECT RETURN EXIT Title List 001 18 JAN 2005 12 00A 00 10 21 002 19 JAN 2005 12 15A 00 40 03 003 20 JAN 2005 12 33A 00 2...

Страница 78: ...LECT RETURN EXIT Title List 001 18 JAN 2005 12 00A 00 10 21 002 19 JAN 2005 12 15A 00 40 03 003 20 JAN 2005 12 33A 00 20 15 004 25 JAN 2005 12 34A 00 50 16 005 25 JAN 2005 12 37A 00 50 16 1 1 page 01 JAN 2005 12 00 PR1 01 JAN 2005 12 00 SP DVD RW VR No Title Length MOVE SELECT RETURN EXIT Title List 1 1 page 01 JAN 2005 12 00 PR1 01 JAN 2005 12 00 XP Rename Protection Delete Partial Delete Playlis...

Страница 79: ...the MENU button Press the buttons to select Disc Navigation then press the OK or button twice 2 Press the buttons to select an entry you want to delete in the Title List then press the ANYKEY button DVD RW VR No Title Length Title List Deleting Please wait 01 JAN 2005 12 00 PR1 01 JAN 2005 12 00 SP DVD RW VR No Title Length MOVE SELECT RETURN EXIT Title List 001 19 JAN 2005 12 15A 00 40 03 003 20 ...

Страница 80: ...ice 2 Press the buttons to select an entry you want to edit from the Title List then press the ANYKEY button VR mode DVD RW VR No Title Length MOVE SELECT RETURN EXIT Title List 001 18 JAN 2005 12 00A 00 10 21 002 19 JAN 2005 12 15A 00 40 03 003 20 JAN 2005 12 33A 00 20 15 004 25 JAN 2005 12 34A 00 50 16 005 25 JAN 2005 12 37A 00 50 16 1 1 Page 18 JAN 2005 12 15 AV3 18 JAN 2005 12 15 SP DVD RW VR ...

Страница 81: ...message The range is too short If the end time precedes the starting time you will be prompted with the message End point cannot be marked earlier than start point The section cannot be deleted when it includes a still picture Press the MENU button after the operation has finished The Title List screen will disappear NOTE DVD RW VR MOVE SELECT RETURN EXIT Title List 00 06 35 Title List No 001 Star...

Страница 82: ... at the end point The image and end point time are displayed in the End window The yellow coloured selection bar moves to the Make item VR mode DVD RW VR No Title Length MOVE SELECT RETURN EXIT Title List 001 18 JAN 2005 12 00A 00 10 21 002 19 JAN 2005 12 15A 00 40 03 003 20 JAN 2005 12 33A 00 20 15 004 25 JAN 2005 12 34A 00 50 16 005 25 JAN 2005 12 37A 00 50 16 1 1 page 01 JAN 2005 12 00 PR1 01 J...

Страница 83: ... press the PLAY LIST button The Playlist screen is displayed Using the MENU button Press the MENU button with the disc stopped Press the buttons to select Playlist then press the OK button Press the buttons to select Playlist then press the OK button 2 Press the buttons to select the playlist you want to play then press the OK or PLAY button 3 Press the STOP button to stop playing The screen retur...

Страница 84: ...sing the INFO button 5 Press the œ buttons to select Save then press the OK button The changed title is displayed in the title field of the selected playlist entry VR mode DVD RW VR MOVE SELECT RETURN EXIT Rename 1 8 JAN 2005 12 15 AV3 Back Space Space Delete Clear Save DVD RW VR MOVE SELECT RETURN EXIT Rename Dolphin Back Space Space Delete Clear Save DVD RW VR No Title Length MOVE SELECT RETURN ...

Страница 85: ...ns to select Play then press the OK or button The selected scene is played To stop scene play press the STOP button VR mode Playing a Selected Scene DVD RW VR Playlist No 001 MOVE SELECT RETURN EXIT Edit Playlist Return 01 00 00 26 02 0 00 07 03 00 06 04 04 0 00 03 05 0 00 26 06 00 01 07 1 1 Page DVD RW VR Playlist No 001 MOVE SELECT RETURN EXIT Edit Playlist Return 01 0 00 26 02 0 00 07 03 00 06 ...

Страница 86: ...o select Change then press the OK button The scene you want to modify is changed with the selected section Modifying a Scene Replacing a Scene DVD RW VR MOVE SELECT RETURN EXIT Modify Scene 00 00 20 Scene No 001 Start 00 00 20 End 00 00 00 Start End Change Cancel DVD RW VR MOVE SELECT RETURN EXIT Modify Scene 00 00 30 Scene No 001 Start 00 00 20 End 00 00 30 Start End Change Cancel DVD RW VR MOVE ...

Страница 87: ... 00 00 07 03 00 00 04 04 00 00 03 05 00 00 26 06 00 01 07 1 1 Page Play You cannot move the selected scene to the position of the next scene because the selected scene should be inserted before that position which requires no action Depending on the kind of disc the displayed screen may have a slight difference NOTE DVD RW VR Playlist No 001 MOVE SELECT RETURN EXIT Edit Playlist Return 01 00 01 07...

Страница 88: ...cel then press the OK button 8 Press the œ buttons to select Add then press the OK button The section you want to add is inserted prior to the scene selected in step 4 of Adding a Scene on the previous page DVD RW VR Playlist No 001 MOVE SELECT RETURN EXIT Edit Playlist Return 01 00 00 26 02 00 00 07 03 00 00 04 04 00 00 03 01 00 00 26 02 00 00 07 1 1 Page 02 00 02 17 DVD RW VR MOVE SELECT RETURN ...

Страница 89: ...ist menu is displayed Rename Delete Edit Playlist Copy Go toTitlelist Disc Manager DVD RW VR Playlist No 001 MOVE SELECT RETURN EXIT Edit Playlist Return 01 0 00 26 02 0 00 07 03 00 06 04 04 0 00 03 05 0 00 26 06 00 01 07 1 1 Page Play Modify Move Add Delete DVD RW VR Playlist No 001 MOVE SELECT RETURN EXIT Edit Playlist Return 01 0 00 26 02 0 00 07 03 00 06 04 04 0 00 03 05 0 00 26 06 00 01 07 1 ...

Страница 90: ...buttons to select Playlist then press the OK button 2 Press the buttons to select the title you want to edit from the Playlist then press the ANYKEY button The Edit Playlist menu is displayed Rename Delete Edit Playlist Copy Go toTitlelist Disc Manager 3 Press the buttons to select Copy then press the OK or button Playlist that has been selected will be copied DVD RW VR No Title Length MOVE SELECT...

Страница 91: ...lear Save DVD RW VR MOVE SELECT RETURN EXIT Disc Manager Disc Name Used Space Available Space 00 04 30 02 08 LP Disc Protection Info Current Rec mode OFF Rename Delete All Finalise Format VR Mode Protection Editing the Disc Name Follow these instructions to give a name to a disc 1 With the unit in Stop mode press the ANYKEY button Using the MENU button With the unit in Stop mode Playback mode pres...

Страница 92: ...e buttons to select Disc Manager then press the OK or button 3 Press the œ buttons to select Protection then press the OK button 4 Press the œ buttons to select ON then press the OK button Search Scene Navigation Time Navigation Marker Rec Mode Disc Manager DVD RW VR MOVE SELECT RETURN EXIT Disc Manager Disc Name Used Space Available Space 00 04 30 02 08 LP Disc Protection Info Current Rec mode OF...

Страница 93: ...n Info Current Rec mode OFF Rename Delete All Finalise Format VR Mode Protection DVD RW VR MOVE SELECT RETURN EXIT Disc Manager Disc Name Used Space Available Space Disc 00 04 30 02 08 LP Disc Protection Info OFF Rename Protection Delete All Format No Yes Do you want to delete all title lists 3 Press the œ buttons to select Format then press the OK button You will be prompted with the confirmation...

Страница 94: ... Protection Rename Delete All Finalise Format No Yes Do you want to finalise disc If you select Yes you will be prompted again with the message Disc will be finalised Do you want to continue 4 Press the œ buttons to select Yes then press the OK button The disc is finalised Once a disc is finalised you cannot delete entries from the record list After being finalised the DVD R DVD RW video mode oper...

Страница 95: ... and deletion are possible Finalise Unfinalise Mark DVD RW VR F DVD RW VR Additional recording Additional recording Operation deletion editing and deletion editing and protection are impossible protection are possible A DVD RW can be finalised or unfinalised in Video mode A DVD RW can be finalised or unfinalised in VR mode NOTE DVD RW V F MOVE SELECT RETURN EXIT Disc Manager Disc Name Used Space A...

Страница 96: ...ing a Samsung authorised service centre Power Recording The DVD RECORDER requires some time to initialize and the input will be displayed for approx 10 seconds after it is turned on Checkpoint 1 Check whether the power cord is securely plugged into the power outlet Did you set the DVD RECORDER channel settings correctly Check the free space on your DVD RW R discs Checkpoint 1 Checkpoint 2 Checkpoi...

Страница 97: ...point 1 icon appears on the screen The disc does not support all selected functions In this case some settings configured in the settings menu may not work properly Checkpoint 1 Play mode settings are different from the settings configured in the Settings menu The aspect ratio is fixed for DVD discs See pages 34 35 Checkpoint 1 Cannot change the aspect ratio The angle operation is available only w...

Страница 98: ...s 34 35 Check whether there is damage to or any foreign material on your disc Some low quality discs may not play properly If scenes change from dark to bright suddenly the screen may shake vertically temporarily but this is not a fault Checkpoint 1 Checkpoint 2 Checkpoint 3 Checkpoint 4 The disc revolves but no image or bad quality images are displayed Re check the recording time and the end time...

Страница 99: ...hether the batteries are empty Check for the TV DVD selection button Checkpoint 1 Checkpoint 2 Checkpoint 3 The remote control doesn t work A recorded disc is played with only the subtitle and the audio signal which were selected during recording Checkpoint 1 Is it possible to change a subtitle and an audio signal on a recorded disc Other Press and hold the button on the front panel of the Recorde...

Страница 100: ...50mm D x 59mm H 5 C to 35 C Keep level when operating Less than 75 operating humidity Composite Video 1 0 V p p at 75Ω load sync negative Max Audio Input Level 2Vrms PAL I Video Composite Audio analogue Video Composite RGB Audio analogue Analogue output jacks x 2 Optical Coaxial digital audio output Composite Video Video output jack x 1 S Video output x 1 Y 1 0Vp p C 0 286Vp p at 75Ω load Componen...

Страница 101: ...ed by this warranty 4 This product is not considered to be defective in materials nor workmanship by reason that it requires adaptation in order to conform to national or local technical or safety standards in force in any Country other than the one for which the product was originally designed and manufactured This warranty will not cover and no re imbursement will be made for such adaptation nor...

Страница 102: ... environment or human health from uncontrolled waste disposal please separate this from other types of wastes and recycle it responsibly to promote the sustainable reuse of material resources Household users should contact either the retailer where they purchased this product or their local government office for details of where and how they can take this item for environmentally safe recycling Bu...

Отзывы: