background image

3

P

recautions

2

P

recautions

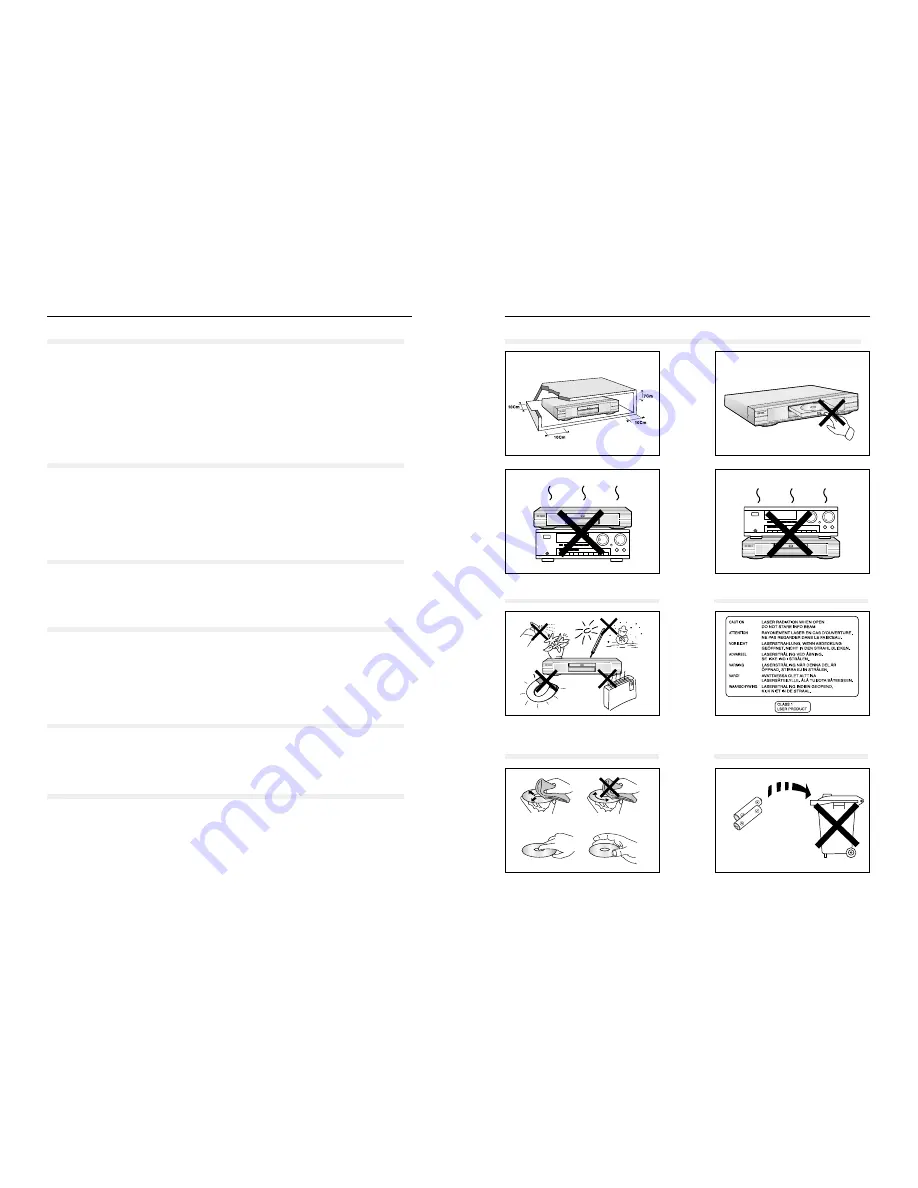
Ensure that the mains supply in your house complies whit that indicated on the identification
sticker located at the back of your player. Install your player horizontally, on a suitable base 
(furniture), with enough space around it for ventilation (7~10cm). Make sure the ventilation 
slots are not covered. Do not stack other heavy devices on top of the player. Do not place 
the player on amplifiers or other equipment, which may become hot. Before moving the player
ensure the disc tray is empty. This player is designed for continuous use. Switching off the DVD
player to the stand-by mode dose not disconnect the electricity supply. In order to separate the
player completely from the mains, it has to be disconnected by unplugging the main plug. 
This is recommended when left unused for a long period of time.

Protect the player from; moisture (ensure no objects filled with liquids e.g. vases, are placed 
on the player), excess heat (e.g. fireplace) or equipment creating strong magnetic or electric 
fields (e.g. speakers). Disconnect the power cable from the mains electricity supply if the player 
malfunctions. Your player is not intended for industrial use but for domestic personal purposes
only. WARNING: If your player or discs have been stored in a cold atmosphere e.g. during trans-
portation in the winter, wait for approximately 2 hours until they have reached room temperature
before use.

Never open the player or any of its components, this can be dangerous to you and may 
damage fragile components. Do not place your eyes close to the opening of the disc tray 
or any other opening to look inside the player.

Always handle your discs with care. Hold a disc by the border or centre hole. Always place 
disc with the label facing upward (especially single sided discs). To clean discs, always use 
a soft damp (water only)  cloth to clean disc. Wipe from the centre to the border. Always put 
disc back into their cases after playing and store in a vertical position. Always place the disc 
properly into the tray using the proper guide area. Never use record cleaning sprays, benzine,
static electricity liquids or any other solvent, to clean disc. 

The battery used in this product contains chemicals that are harmful to the environment. 
Do not dispose of batteries with the general household waste. RECOMMENDATION:
Replacement of the battery should be carried out by a qualified technician.

For safety reasons, be sure to disconnect the AC power cord from the AC outlet.

Do not use solvents for cleaning.

Wipe the cabinet with a soft cloth.

1. Setting up  

1

2

3

4

5

2. Caution 

3. For your safety

4. Disc   

5. Battery   

6. Maintenance of cabinet 

Содержание DVD-N505

Страница 1: ...AH68 00986Q UK UK ...

Страница 2: ...RNING If your player or discs have been stored in a cold atmosphere e g during trans portation in the winter wait for approximately 2 hours until they have reached room temperature before use Never open the player or any of its components this can be dangerous to you and may damage fragile components Do not place your eyes close to the opening of the disc tray or any other opening to look inside t...

Страница 3: ...ant scene can be viewed in slow motion Lock The parental control allows users to set the level necessary to prohibit children from viewing harmful movies containing violence or adult subject matter Various On Screen Menu Functions You can select various languages Audio Subtitle and screen angles while viewing movies Repeat You can repeat a song or movie simply by pressing the REPEAT button MP3 Thi...

Страница 4: ...isplay 31 Digest Play 32 V L M Gaming 33 MP3 play 34 Remote Control Setting 35 Troubleshooting Guide 36 Specifications 37 Warranty 38 Description Front Panel 8 Description Rear Panel 9 Tour of the Remote Control 10 Before You Start 1 Open the battery cover on the back of the remote 2 Insert two AA batteries Make sure that the polarities and are aligned correctly 3 Replace the battery cover Check t...

Страница 5: ...yed here 6 DISC TRAY Press OPEN CLOSE to open and close the disc tray 7 OPEN CLOSE Press to open and close the disc tray 8 SCREEN FIT Allows you to eliminate the black bars of the screen and fill any TV screen completely with the picture 9 STOP Stops disc play 10 JOG DIAL Operates frame by frame play In CD mode performs track search 11 SHUTTLE DIAL Performs fast or slow motion play 12 PLAY PAUSE B...

Страница 6: ...7 SHUTTLE DIAL Performs fast or slow motion play 18 TV POWER Button 19 NUON Button Pressing this button brings up a special NUON menu When a DVD disc has enhanced NUON content you can navigate and view this extra content by going to this menu first 20 3D Button 21 OPEN CLOSE Button 22 CHANNEL Buttons 23 DIGEST Button Zoom In 24 PLAY PAUSE Button Begin Pause disc play 25 SKIP Buttons Use to skip th...

Страница 7: ...nnections commonly used to connect the DVD player with a TV and other components Always turn off the DVD player TV and other components before you con nect or disconnect any cables Refer to user s manual of the components you are connecting for more infor mation on those particular components AUDIO SYSTEM DVD PLAYER Method 1 Method 2 Analog Audio Out Digital Audio Out Method 1 DVD Player 2CH Stere...

Страница 8: ... the disc menu screens Using the Menu NOTE The Menu lets you customise your DVD player by allowing you to select various language preferences set up a parental control even adjust the player to the type of television screen you have Not all Menu selections will work this is dependent on the DVD disc content For example the subtitle menu option will not have any effect on a disc that does not have ...

Страница 9: ...be the original language the disc is recorded in 6 Press the ENTER button English is selected and then the submenu of language menu returns 7 Press the EXIT button twice or the MENU button and the menu screen will disappear Using the Preferred Audio ex Setting up in English ex Setting up in English NOTE PLAYBACK 1 Press the MENU button 2 Press the UP DOWN buttons to select to Movie 3 Press the ENT...

Страница 10: ...utomatically when playing a DVD SCART Output 1 RGB Sends RGB signal from the AV JACK SCART terminal 2 VIDEO Sends COMPOSITE VIDEO signal from the AV JACK SCART terminal 3 S VIDEO Sends S VIDEO signal from the AV JACK SCART terminal 5 Press the EXIT button twice or the MENU button again and the MENU screen will disappear Setting Up the Audio 1 Press the MENU button 2 Use the UP DOWN buttons to sele...

Страница 11: ...id button press Setting Up the Lock NOTE To change your password press the UP DOWN buttons and select Change Password from the LOCK menu Changing password is possible only when the password has been entered The Parental Control function works in conjunction with DVDs that have been assigned a rating which helps you control the types of DVDs that your family watches There are up to 8 rating levels ...

Страница 12: ...or FORWARD SEARCH button on the remote and press again to search at a faster speed 2X 4X 8X 16X 32X on VCD and CD To return to normal speed play press the PLAY PAUSE button Select a desired reproduction speed by turning the shuttle dial left or right 2X 4X 8X 16X 32X 128X for DVD Searching a Chapter Track Skipping Chapter Tracks NOTE When in search mode 4X 8X 16X 32X 64X 128X on a DVD or high spee...

Страница 13: ...ss the REPEAT A B button again or the ENTER button at the end B of the segment you want to review 3 To clear Repeat A B press the REPEAT A B button again The Repeat A B function works on the same title or track If the title or track is completed before marking the end B the end of the title or track becomes B automatically Depending on the disc the Repeat A B and 3D Sound functions may not work 3D...

Страница 14: ... ENTER button and the highlighted subscreen becomes a still screen To return to the P strobe status press the P STROBE button 5 Press the PLAY button again for normal play MediaMacroTM Zoom Pan NOTE Use the DIRECTION UP DOWN LEFT RIGHT button to move the zoom picture For DVDs VCDs This function allows complete control over what part of the picture you want to see You can select any portion of the ...

Страница 15: ...n allowing you to select any angle at the touch of the remote Press the ANGLE button to see if an ANGLE mark is present in the upper right hand corner of the screen 1 When an ANGLE mark is shown press the ANGLE button 2 Use the LEFT RIGHT UP DOWN buttons to select the desired screen angle Then press the ENTER button Using the ANGLE Button m m Example If there are 6 angles available Screen Fit Pres...

Страница 16: ...a desired subtitle quickly and easily with the SUBTITLE button 1 Press the SUBTITLE button 2 Use the UP DOWN buttons to select the desired subtitle language 3 Press the ENTER button 4 Use the UP DOWN buttons to determine whether or not the subtitle will be displayed Initially the subtitling will not appear on screen The audio and subtitle languages are represented by abbreviations 5 Press the EXIT...

Страница 17: ...lable on a standard DVD player When playing a regular DVD movie disc that is not NUON enhanced while the DVD N505 is in NUON mode your player s performance will not be affected No set changes are required Therefore we recommend that the default setting for your player be kept in NUON priority Pressing the NUON button allows you to switch your player s default setting between NUON priority and DVD ...

Страница 18: ...evice are trademarks owned by DesperProducts Inc Manufactured under license from Dolby Laboratories Dolby and the double D symbol are trademarks of Dolby Laboratories Confidential unpublished works 1992 1997 Dolby Laboratories Inc All rights reserves DTS and DTS Digital Out are trademarks of Digital Theatre Systems Inc VM Labs Legal Notices Trademark NUONTM and VLM and Virtual Light MachineTM are ...

Страница 19: ...ons for several minutes to drain the microprocessor inside the remote to reset it Reinstall batteries and try remote again Ensure that the disc is installed with the label side facing up Check the region number of the DVD This player cannot play CD ROMs DVD ROMs CD R etc Insert a DVD a VIDEO CD or a CD The features or action cannot be completed at this time because 1 The DVD s software restricts i...

Страница 20: ...arranty 4 This product is not considered to be defective in materials nor workmanship by reason that it requires adaptation in order to conform to national or local technical or safety standards in force in any Country other than the one for which the product was originally designed and manufactured This warranty will not cover and no re imbursement will be made for such adaptation nor any damage ...

Отзывы: